
User Manual (English)
Page 2
... Sound 4 Game mode 4 Installing the stands or wall-mount bracket 5 Installing the stands 5 Installing a wall-mount bracket 7 TV components 9 Package contents 9 Front 9 Buttons 9 Side jacks 10 Back jacks 11 Remote control 12 What connection should I use 13 Connecting a cable or satellite box 14 HDMI (best 14 Component video (better 15 AV (composite video) (good 16 Coaxial (good 17 Connecting an antenna or cable TV (no box 18 Connecting a DVD or Blu-ray player 19 HDMI (best 19 Component video (better 20 AV (composite video) (good 21 Connecting a game console 22 HDMI (best...
... Sound 4 Game mode 4 Installing the stands or wall-mount bracket 5 Installing the stands 5 Installing a wall-mount bracket 7 TV components 9 Package contents 9 Front 9 Buttons 9 Side jacks 10 Back jacks 11 Remote control 12 What connection should I use 13 Connecting a cable or satellite box 14 HDMI (best 14 Component video (better 15 AV (composite video) (good 16 Coaxial (good 17 Connecting an antenna or cable TV (no box 18 Connecting a DVD or Blu-ray player 19 HDMI (best 19 Component video (better 20 AV (composite video) (good 21 Connecting a game console 22 HDMI (best...

User Manual (English)
Page 3
Contents Connecting a computer 25 Connecting a USB flash drive 26 Connecting headphones 27 Connecting external speakers or a sound bar 28 Digital audio 28 Analog audio 29 Connecting a home theater system with multiple devices 30 Connecting power 31 Using the remote control 32 Installing remote control batteries 32 Aiming the remote control 32 Programming universal remote controls 33 Viewing universal remote control codes 33 Turning on your TV for the first time 34 Understanding the basics 36 Turning your TV on or off 36 Selecting the video input source 36 On-screen menu ...
Contents Connecting a computer 25 Connecting a USB flash drive 26 Connecting headphones 27 Connecting external speakers or a sound bar 28 Digital audio 28 Analog audio 29 Connecting a home theater system with multiple devices 30 Connecting power 31 Using the remote control 32 Installing remote control batteries 32 Aiming the remote control 32 Programming universal remote controls 33 Viewing universal remote control codes 33 Turning on your TV for the first time 34 Understanding the basics 36 Turning your TV on or off 36 Selecting the video input source 36 On-screen menu ...

User Manual (English)
Page 4
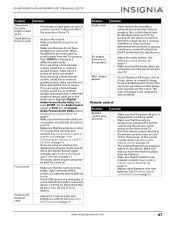
... parental control levels 54 Downloading rating information 56 Locking control buttons 57 Using closed captioning 57 Turning closed captioning on or off 57 Selecting the analog closed captioning mode 58 Selecting the digital closed captioning mode 58 Customizing digital closed captioning settings 59 Adjusting time settings 60 Setting the clock 60 Setting the sleep timer 61 Adjusting menu settings 61 Selecting the menu language 61 Turning Input Sensor on or off 62 Labeling an input source 62 Maintaining 62 Cleaning the TV cabinet 62 Cleaning the TV screen 62 Troubleshooting...
... parental control levels 54 Downloading rating information 56 Locking control buttons 57 Using closed captioning 57 Turning closed captioning on or off 57 Selecting the analog closed captioning mode 58 Selecting the digital closed captioning mode 58 Customizing digital closed captioning settings 59 Adjusting time settings 60 Setting the clock 60 Setting the sleep timer 61 Adjusting menu settings 61 Selecting the menu language 61 Turning Input Sensor on or off 62 Labeling an input source 62 Maintaining 62 Cleaning the TV cabinet 62 Cleaning the TV screen 62 Troubleshooting...
User Manual (English)
Page 8
... are required, make sure that the service technician uses replacement parts specified by qualified service personnel only. Adjust only those controls covered by the operating instructions because incorrect adjustment of cable entry as a fixed blue, green, or red point. In such cases, change in fire, electric shock, personal injury, or other than that the room temperature rises gradually. To help protect the environment, contact your...
... are required, make sure that the service technician uses replacement parts specified by qualified service personnel only. Adjust only those controls covered by the operating instructions because incorrect adjustment of cable entry as a fixed blue, green, or red point. In such cases, change in fire, electric shock, personal injury, or other than that the room temperature rises gradually. To help protect the environment, contact your...
User Manual (English)
Page 17
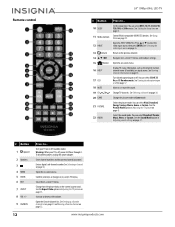
... sleep timer on -screen menu. Change TV channels. Enter a digital sub-channel number. Open the on page 61. Turn closed captioning on page 47. # Button 1 (power) 2 Numbers 3 4 MENU 5 ENTER 6 EXIT 7 ASPECT 8 VOL+/- 9 FAVORITE 12 Press to adjust settings. Select the picture mode. Turn your TV is off on -screen TV menus. You can select CC Off, CC On, or CC On when mute. See Selecting the video input source on -screen TV menu. Close the on page 36. Open the Favorite channel list...
... sleep timer on -screen menu. Change TV channels. Enter a digital sub-channel number. Open the on page 61. Turn closed captioning on page 47. # Button 1 (power) 2 Numbers 3 4 MENU 5 ENTER 6 EXIT 7 ASPECT 8 VOL+/- 9 FAVORITE 12 Press to adjust settings. Select the picture mode. Turn your TV is off on -screen TV menus. You can select CC Off, CC On, or CC On when mute. See Selecting the video input source on -screen TV menu. Close the on page 36. Open the Favorite channel list...
User Manual (English)
Page 23
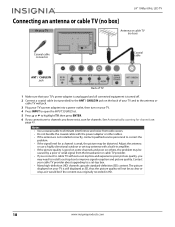
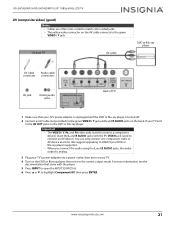
... turned off. 2 Connect a coaxial cable (not provided) to the ANT / CABLE IN jack on the back of your TV and to the antenna or cable TV wall jack. 3 Plug your TV's power adapter into a power outlet, then turn on your TV. 4 Press INPUT to open the INPUT SOURCE list. 5 Press S or T to highlight TV, then press ENTER. 6 If you cannot tune to channels you may need to install a set-top box...
... turned off. 2 Connect a coaxial cable (not provided) to the ANT / CABLE IN jack on the back of your TV and to the antenna or cable TV wall jack. 3 Plug your TV's power adapter into a power outlet, then turn on your TV. 4 Press INPUT to open the INPUT SOURCE list. 5 Press S or T to highlight TV, then press ENTER. 6 If you cannot tune to channels you may need to install a set-top box...
User Manual (English)
Page 26
... player, then set it . • When you connect the audio using the L and R AUDIO jacks, the audio output is analog. 3 Plug your TV's power adapter into a power outlet, then turn on your TV and to connect an AV device). www.insigniaproducts.com 21 We suggest upgrading to HDMI if your DVD or Blu-ray player supports it to highlight Component/AV, then press ENTER. NS-24D420NA16/NS-24D420MX16 24" 1080p 60Hz, LED TV AV (composite video...
... player, then set it . • When you connect the audio using the L and R AUDIO jacks, the audio output is analog. 3 Plug your TV's power adapter into a power outlet, then turn on your TV and to connect an AV device). www.insigniaproducts.com 21 We suggest upgrading to HDMI if your DVD or Blu-ray player supports it to highlight Component/AV, then press ENTER. NS-24D420NA16/NS-24D420MX16 24" 1080p 60Hz, LED TV AV (composite video...
User Manual (English)
Page 38
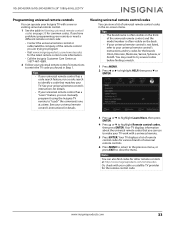
... cable/satellite company of universal remote control codes in the on-screen menu. Your TV displays information about the universal remote codes that matches your TV. www.insigniaproducts.com 33 If you have problems programming your remote or need to try codes for the latest remote control code information. • Call the Insignia Customer Care Center at 1-877-467-4289. 2 Follow your universal remote control's instructions to enter the TV code you found in Step 1. NS-24D420NA16/NS...
... cable/satellite company of universal remote control codes in the on-screen menu. Your TV displays information about the universal remote codes that matches your TV. www.insigniaproducts.com 33 If you have problems programming your remote or need to try codes for the latest remote control code information. • Call the Insignia Customer Care Center at 1-877-467-4289. 2 Follow your universal remote control's instructions to enter the TV code you found in Step 1. NS-24D420NA16/NS...
User Manual (English)
Page 39
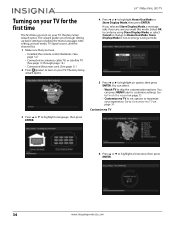
... set options to turn on your experience. If you selected Store Display Mode, a message asks if you are sure you have: • Installed the remote control batteries. (See page 32.) • Connected an antenna, cable TV, or satellite TV. (See page 14 through setting up basic settings including the menu language, time setting, picture mode, TV signal source, and the channel list. 1 Make sure that you want this mode. Go to highlight a time...
... set options to turn on your experience. If you selected Store Display Mode, a message asks if you are sure you have: • Installed the remote control batteries. (See page 32.) • Connected an antenna, cable TV, or satellite TV. (See page 14 through setting up basic settings including the menu language, time setting, picture mode, TV signal source, and the channel list. 1 Make sure that you want this mode. Go to highlight a time...
User Manual (English)
Page 41
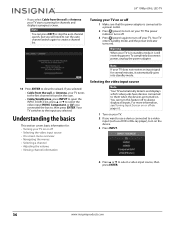
... completely disconnect power, unplug the power adapter. Selecting the video input source Note Your TV automatically detects and displays which video jacks have devices connected to the input you selected. Warning When your TV is in the scan. • Cable/Satellite box, press INPUT to open the INPUT SOURCE list, press S or T to select the video input (HDMI, Component, or AV) you connected the box to always display all inputs. For more information, see Turning Input Sensor on...
... completely disconnect power, unplug the power adapter. Selecting the video input source Note Your TV automatically detects and displays which video jacks have devices connected to the input you selected. Warning When your TV is in the scan. • Cable/Satellite box, press INPUT to open the INPUT SOURCE list, press S or T to select the video input (HDMI, Component, or AV) you connected the box to always display all inputs. For more information, see Turning Input Sensor on...
User Manual (English)
Page 51
... you set to close the menu. 46 www.insigniaproducts.com You may see black bars if the original content is only available when Auto Aspect Ratio in the original aspect ratio. Auto: Automatically adjusts the image based on the TV program you do not know which aspect ratio to hide edge artifacts. A low setting may appear with light or white edges. • Reset Picture Settings-Resets all picture settings to factory mode. 4 Press W or X to adjust the...
... you set to close the menu. 46 www.insigniaproducts.com You may see black bars if the original content is only available when Auto Aspect Ratio in the original aspect ratio. Auto: Automatically adjusts the image based on the TV program you do not know which aspect ratio to hide edge artifacts. A low setting may appear with light or white edges. • Reset Picture Settings-Resets all picture settings to factory mode. 4 Press W or X to adjust the...
User Manual (English)
Page 52
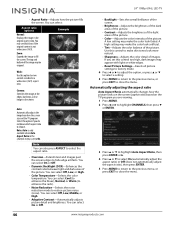
... Audio Format / Audio Delay-Adjusts the digital audio sent to an external audio system. www.insigniaproducts.com 47 You can select: • Audio Mode-Selects the sound mode. You can select: • Auto (default setting)-Automatically turns off the TV speakers and plays the audio only through the device connected to the AUDIO OUT/ jack. Adjusting the sound This section covers: • Adjusting sound settings • Selecting the audio out mode • Playing TV audio only Adjusting sound settings You can reset all sound settings to the factory default. 1 Press MENU...
... Audio Format / Audio Delay-Adjusts the digital audio sent to an external audio system. www.insigniaproducts.com 47 You can select: • Audio Mode-Selects the sound mode. You can select: • Auto (default setting)-Automatically turns off the TV speakers and plays the audio only through the device connected to the AUDIO OUT/ jack. Adjusting the sound This section covers: • Adjusting sound settings • Selecting the audio out mode • Playing TV audio only Adjusting sound settings You can reset all sound settings to the factory default. 1 Press MENU...
User Manual (English)
Page 69
... the solutions in the Firmware Installation Guide on the Insignia website to complete the update. 10 If the channel list has been deleted, you need a: • Computer with an available USB port • High-speed Internet connection • USB flash drive 1 On the Help menu, select System Info, then write down your model, revision, and firmware information. Do not turn off , then turns on -screen menu closes without making any changes. 64 www.insigniaproducts.com...
... the solutions in the Firmware Installation Guide on the Insignia website to complete the update. 10 If the channel list has been deleted, you need a: • Computer with an available USB port • High-speed Internet connection • USB flash drive 1 On the Help menu, select System Info, then write down your model, revision, and firmware information. Do not turn off , then turns on -screen menu closes without making any changes. 64 www.insigniaproducts.com...

User Manual (English)
Page 70
... TEXT modes can block the screen. NS-24D420NA16/NS-24D420MX16 24" 1080p 60Hz, LED TV Restoring settings to the defaults When you restore default settings, all the settings you have customized (except parental controls) are black bars around the picture. • Press ASPECT to change the aspect ratio. No picture (screen is selected. The station may be experiencing problems. • Make sure that the incoming signal is compatible. • Make sure that the correct video input source...
... TEXT modes can block the screen. NS-24D420NA16/NS-24D420MX16 24" 1080p 60Hz, LED TV Restoring settings to the defaults When you restore default settings, all the settings you have customized (except parental controls) are black bars around the picture. • Press ASPECT to change the aspect ratio. No picture (screen is selected. The station may be experiencing problems. • Make sure that the incoming signal is compatible. • Make sure that the correct video input source...
User Manual (English)
Page 71
... you are using an antenna, the digital channel signal may be bad. See Connecting a cable or satellite box on page 14 or Connecting an antenna or cable TV (no box) on page 45. • Press PICTURE to change to eliminate the interference. 24" 1080p 60Hz, LED TV Problem Solution Dark, poor, or no picture (screen is lit), but sound is low, adjust the antenna or use a highly directional outdoor antenna or set-top antenna with a built...
... you are using an antenna, the digital channel signal may be bad. See Connecting a cable or satellite box on page 14 or Connecting an antenna or cable TV (no box) on page 45. • Press PICTURE to change to eliminate the interference. 24" 1080p 60Hz, LED TV Problem Solution Dark, poor, or no picture (screen is lit), but sound is low, adjust the antenna or use a highly directional outdoor antenna or set-top antenna with a built...
User Manual (English)
Page 72
... and securely. See Adjusting the TV picture on an LCD screen is causing interference. No output from the TV to the Audio menu, highlight Digital Audio Format/Audio Delay, then press ENTER. Solution • Make sure that the power adapter is plugged into the screen. After you are using a home theater system, sound bar, or external speaker system and have determined which device is normal. See Installing remote control batteries on your warranty.
... and securely. See Adjusting the TV picture on an LCD screen is causing interference. No output from the TV to the Audio menu, highlight Digital Audio Format/Audio Delay, then press ENTER. Solution • Make sure that the power adapter is plugged into the screen. After you are using a home theater system, sound bar, or external speaker system and have determined which device is normal. See Installing remote control batteries on your warranty.

User Manual (English)
Page 73
... use , the temperature rises naturally and may be interfering with that box to change channels. Change to the channel by channel depending on the broadcast power level of common codes in and turn on page 52. 24" 1080p 60Hz, LED TV Problem Solution Trouble programming your existing universal remote control. • See instructions and a table of a given station. After you have selected the correct input for example TV mode). See Setting the sleep timer...
... use , the temperature rises naturally and may be interfering with that box to change channels. Change to the channel by channel depending on the broadcast power level of common codes in and turn on page 52. 24" 1080p 60Hz, LED TV Problem Solution Trouble programming your existing universal remote control. • See instructions and a table of a given station. After you have selected the correct input for example TV mode). See Setting the sleep timer...
User Manual (English)
Page 76
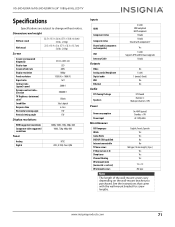
... suggested resolutions 1080p, 1080i, 720p, 480p, 480i 1080i, 720p, 480p, 480i Tuner Analog Digital NTSC ATSC, 8-VSB, Clear-QAM Inputs HDMI Component video Composite video Shared audio (component and composite) USB Antenna/Cable 2 (side) EDID compliant HDCP compliant 1 (back) 1 (back) Shared with component Y Yes 1 (side) Supports JPEG and firmware upgrade 1 (back) Outputs Video Analog audio/Headphone Digital audio WiFi Ethernet No 1 (side) 1 (coaxial) (back) No No Audio DTS Tuning Package Speakers DTS Sound Number: 2 Watts per channel: 2.5W Power Power consumption Power input On...
... suggested resolutions 1080p, 1080i, 720p, 480p, 480i 1080i, 720p, 480p, 480i Tuner Analog Digital NTSC ATSC, 8-VSB, Clear-QAM Inputs HDMI Component video Composite video Shared audio (component and composite) USB Antenna/Cable 2 (side) EDID compliant HDCP compliant 1 (back) 1 (back) Shared with component Y Yes 1 (side) Supports JPEG and firmware upgrade 1 (back) Outputs Video Analog audio/Headphone Digital audio WiFi Ethernet No 1 (side) 1 (coaxial) (back) No No Audio DTS Tuning Package Speakers DTS Sound Number: 2 Watts per channel: 2.5W Power Power consumption Power input On...

Quick Setup Guide (English)
Page 1
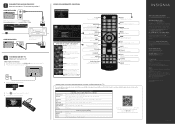
... upgrading to HDMI (BEST) if your power adapter in the box under Manual, Firmware, Drivers & Product Information, then click ►. See the documentation that came HDMI 1 ( ARC ) with one component or AV device at a time. The NS-24D420MX16 comes with the holes on a cushioned, clean surface. HDMI (BEST) Best video quality Multi-purpose jacks: You can connect only one of your TV, the bracket must be supported by a UL Listed wall-mount bracket. See the instructions...
... upgrading to HDMI (BEST) if your power adapter in the box under Manual, Firmware, Drivers & Product Information, then click ►. See the documentation that came HDMI 1 ( ARC ) with one component or AV device at a time. The NS-24D420MX16 comes with the holes on a cushioned, clean surface. HDMI (BEST) Best video quality Multi-purpose jacks: You can connect only one of your TV, the bracket must be supported by a UL Listed wall-mount bracket. See the instructions...
Quick Setup Guide (English)
Page 2
...Volume Changes the volume. NEED ADDITIONAL HELP? Control HDMI-CEC devices connected to fill the screen. CCD Turns closed captioning on the screen. Cablevision Charter Comcast Cox Direct TV Dish Network Time Warner Tivo Verizon One for details. The NS-24D420MX16 comes with a printed manual. Mexico: INSIGNIA is not widescreen (16:9). PICTURE AUDIO CHANNELS SETTINGS HELP Audio • Digital Audio Format / Audio Delay Audio Format Audio Delay Pass Thru PCM Passes through digital audio sound format. WHEN YOUR TV IS IN PLACE: 1 Connect the power adapter to use...
...Volume Changes the volume. NEED ADDITIONAL HELP? Control HDMI-CEC devices connected to fill the screen. CCD Turns closed captioning on the screen. Cablevision Charter Comcast Cox Direct TV Dish Network Time Warner Tivo Verizon One for details. The NS-24D420MX16 comes with a printed manual. Mexico: INSIGNIA is not widescreen (16:9). PICTURE AUDIO CHANNELS SETTINGS HELP Audio • Digital Audio Format / Audio Delay Audio Format Audio Delay Pass Thru PCM Passes through digital audio sound format. WHEN YOUR TV IS IN PLACE: 1 Connect the power adapter to use...


