Firmware Installation Guide (English)
Page 1
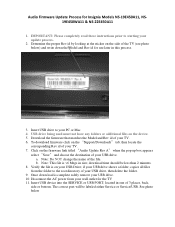
... the Model and Rev id of your PC or Mac 4. Audio Firmware Update Process for use later in this process. 3. b. Insert USB drive to starting your update process. 2. Note: This file is To download firmware click on the device. 5. Determine the proper Rev id by looking at the sticker on the firmware link titled "Audio Update Rev A" when the pop up box appears select "Save...
... the Model and Rev id of your PC or Mac 4. Audio Firmware Update Process for use later in this process. 3. b. Insert USB drive to starting your update process. 2. Note: This file is To download firmware click on the device. 5. Determine the proper Rev id by looking at the sticker on the firmware link titled "Audio Update Rev A" when the pop up box appears select "Save...

User Manual (English)
Page 2
... control 8 Using the remote control holder 8 Programming your existing universal remote control to work with your TV 8 Making connections 9 Connecting power 9 Connecting an antenna or cable TV without a cable box 9 Connecting a cable or satellite box 10 Connecting an HDMI device 10 Connecting a component video device 11 Connecting a VCR 11 Connecting a computer 12 Connecting a USB device 12 Connecting headphones 13 Connecting a digital sound system 13 Turning on your TV for the first time 13 Understanding the basics 14 Turning your TV on or off 14 Selecting the video input...
... control 8 Using the remote control holder 8 Programming your existing universal remote control to work with your TV 8 Making connections 9 Connecting power 9 Connecting an antenna or cable TV without a cable box 9 Connecting a cable or satellite box 10 Connecting an HDMI device 10 Connecting a component video device 11 Connecting a VCR 11 Connecting a computer 12 Connecting a USB device 12 Connecting headphones 13 Connecting a digital sound system 13 Turning on your TV for the first time 13 Understanding the basics 14 Turning your TV on or off 14 Selecting the video input...
User Manual (English)
Page 3
... Locking control buttons 23 Blocking unrated TV 24 Setting parental control levels 25 Downloading rating information 26 Using closed captioning 27 Turning closed captioning on or off 27 Selecting the analog closed captioning mode 27 Customizing digital closed captioning styles 28 Adjusting time settings 28 Setting the clock 28 Setting the sleep timer 29 Adjusting menu settings 30 Selecting the menu language and transparency 30 Labeling an input source 30 Turning Input Sensor on or off 31 Using INlink 31 Restoring settings to the defaults 33 Using USB 34 Switching to USB mode...
... Locking control buttons 23 Blocking unrated TV 24 Setting parental control levels 25 Downloading rating information 26 Using closed captioning 27 Turning closed captioning on or off 27 Selecting the analog closed captioning mode 27 Customizing digital closed captioning styles 28 Adjusting time settings 28 Setting the clock 28 Setting the sleep timer 29 Adjusting menu settings 30 Selecting the menu language and transparency 30 Labeling an input source 30 Turning Input Sensor on or off 31 Using INlink 31 Restoring settings to the defaults 33 Using USB 34 Switching to USB mode...

User Manual (English)
Page 5
... children can become excited while watching a program, especially on dressers, bookcases, shelves, desks, speakers, chests, or carts may fall over , or knocked down. • Make sure that you route all . Use only a TV stand rated for proper use your flat panel display As you enjoy your TV, always remember: • One size of wall mount does not fit all. www.insigniaproducts...
... children can become excited while watching a program, especially on dressers, bookcases, shelves, desks, speakers, chests, or carts may fall over , or knocked down. • Make sure that you route all . Use only a TV stand rated for proper use your flat panel display As you enjoy your TV, always remember: • One size of wall mount does not fit all. www.insigniaproducts...
User Manual (English)
Page 10
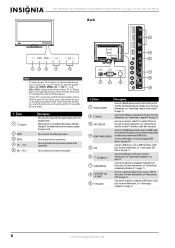
... the volume. # Item Description 1 DIGITAL OUTPUT Connect a digital optical sound system to this jack. For more information, see "Connecting an antenna or cable TV without a cable box" on -screen menu. For more information, see "Connecting a component video device" on page 12. 6 www.insigniaproducts.com For more information, see "Connecting a computer" on page 11. 8 AV IN VIDEO and L/R AUDIO Connect a composite video device, such as USB flash drive, to this jacks. Your TV turns on and the button labels ( , INPUT, MENU...
... the volume. # Item Description 1 DIGITAL OUTPUT Connect a digital optical sound system to this jack. For more information, see "Connecting an antenna or cable TV without a cable box" on -screen menu. For more information, see "Connecting a component video device" on page 12. 6 www.insigniaproducts.com For more information, see "Connecting a computer" on page 11. 8 AV IN VIDEO and L/R AUDIO Connect a composite video device, such as USB flash drive, to this jacks. Your TV turns on and the button labels ( , INPUT, MENU...

User Manual (English)
Page 11
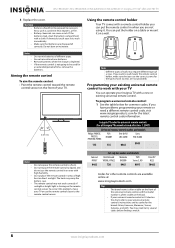
... connected to set the sleep timer. Press to the HDMI3 jack. Insignia 19"/22" LED-LCD HD TV Remote control # Button 1 (power) 2 COMP/AV 3 Numbers 4 5 MUTE 6 VOL+/VOL- 7 CH-LIST 8 INPUT 9 MENU 10 ENTER Description Press to enter channel numbers or the parental control password. When your TV in on page 31. To completely disconnect power, unplug the power cord. Press to turn closed captioning on page 15. Press to open a sub-menu or to navigate in standby mode...
... connected to set the sleep timer. Press to the HDMI3 jack. Insignia 19"/22" LED-LCD HD TV Remote control # Button 1 (power) 2 COMP/AV 3 Numbers 4 5 MUTE 6 VOL+/VOL- 7 CH-LIST 8 INPUT 9 MENU 10 ENTER Description Press to enter channel numbers or the parental control password. When your TV in on page 31. To completely disconnect power, unplug the power cord. Press to turn closed captioning on page 15. Press to open a sub-menu or to navigate in standby mode...
User Manual (English)
Page 12
... cause a rash. NS-19E450A11/NS-19E450WA11/NS-22E450A11/NS-22E455C11 Insignia 19"/22" LED-LCD HD TV 3 Replace the cover. Do not burn or incinerate. Remove batteries when the charge is shining on the front of time, remove the batteries. If you are disposed of screws. You may not work with your TV or use the remote control in areas of different types. The remote control may need a different remote control code, visit www...
... cause a rash. NS-19E450A11/NS-19E450WA11/NS-22E450A11/NS-22E455C11 Insignia 19"/22" LED-LCD HD TV 3 Replace the cover. Do not burn or incinerate. Remove batteries when the charge is shining on the front of time, remove the batteries. If you are disposed of screws. You may not work with your TV or use the remote control in areas of different types. The remote control may need a different remote control code, visit www...
User Manual (English)
Page 14
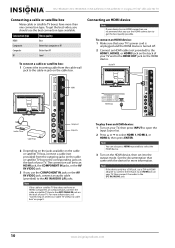
...'s power cord is unplugged and the HDMI device is turned off. 2 Connect an HDMI cable (not provided) to the HDMI1, HDMI2, or HDMI3 jack on the back of your TV, then press INPUT to open the Input Source list. 2 Press or to select HDMI 1, HDMI 2, or HDMI 3, then press ENTER. NS-19E450A11/NS-19E450WA11/NS-22E450A11/NS-22E455C11 Insignia 19"/22" LED-LCD HD TV Connecting a cable or satellite box Many cable or satellite TV boxes have an HDMI, component...
...'s power cord is unplugged and the HDMI device is turned off. 2 Connect an HDMI cable (not provided) to the HDMI1, HDMI2, or HDMI3 jack on the back of your TV, then press INPUT to open the Input Source list. 2 Press or to select HDMI 1, HDMI 2, or HDMI 3, then press ENTER. NS-19E450A11/NS-19E450WA11/NS-22E450A11/NS-22E455C11 Insignia 19"/22" LED-LCD HD TV Connecting a cable or satellite box Many cable or satellite TV boxes have an HDMI, component...
User Manual (English)
Page 16
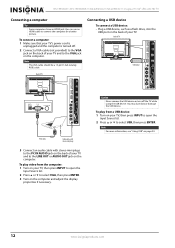
... TV Connecting a USB device To connect a USB device: • Plug a USB device, such as a flash drive, into the USB port on the back of your TV and to the VGA jack on your TV, then press INPUT to open the Input Source list. 2 Press or to the PC IN AUDIO jack on the back of your TV. To play video from a USB device: 1 Turn on the computer. Note The VGA cable should...
... TV Connecting a USB device To connect a USB device: • Plug a USB device, such as a flash drive, into the USB port on the back of your TV and to the VGA jack on your TV, then press INPUT to open the Input Source list. 2 Press or to the PC IN AUDIO jack on the back of your TV. To play video from a USB device: 1 Turn on the computer. Note The VGA cable should...
User Manual (English)
Page 17
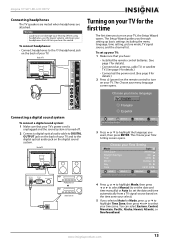
... and to the digital optical audio jack on your Time Setting screen opens. The Choose your headphones that still lets you through setting up your TV: 1 Make sure that your TV's power cord is unplugged and the sound system is turned off. 2 Connect a digital optical audio cable to DIGITAL OUTPUT jack on the remote control to highlight the language you have: • Installed the remote control batteries. (See page 7 for details). • Connected an antenna, cable TV, or satellite...
... and to the digital optical audio jack on your Time Setting screen opens. The Choose your headphones that still lets you through setting up your TV: 1 Make sure that your TV's power cord is unplugged and the sound system is turned off. 2 Connect a digital optical audio cable to DIGITAL OUTPUT jack on the remote control to highlight the language you have: • Installed the remote control batteries. (See page 7 for details). • Connected an antenna, cable TV, or satellite...
User Manual (English)
Page 18
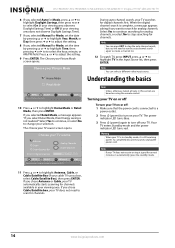
... are based on or off To turn your selection. Note If your cable TV uses a box, select Cable/Satellite Box), then press ENTER. If you select Retail Mode, then Energy saving is connected to a power outlet. 2 Press (power) to scan for channels available in the Input Source list, then press ENTER. Press or to highlight Antenna, Cable, or Cable/Satellite Box (if your TV does not receive an input signal for analog channels, or select No to highlight Home Mode...
... are based on or off To turn your selection. Note If your cable TV uses a box, select Cable/Satellite Box), then press ENTER. If you select Retail Mode, then Energy saving is connected to a power outlet. 2 Press (power) to scan for channels available in the Input Source list, then press ENTER. Press or to highlight Antenna, Cable, or Cable/Satellite Box (if your TV does not receive an input signal for analog channels, or select No to highlight Home Mode...

User Manual (English)
Page 19
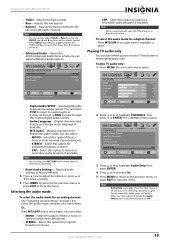
... EXIT AUDIO menu (TV mode) AUDIO PICTURE AUDIO CHANNELS SETTINGS USB Audyssey Dynamic Volume™ SRS TruSurround HD™ Treble Bass Balance Advanced Audio Light Off 50 40 0 MOVE OK ENTER SELECT Adjust settings to highlight a video input source, then press ENTER. Insignia 19"/22" LED-LCD HD TV Selecting the video input source To select the video input source: 1 Turn on your screen. Press twice to select HDMI 1. On-screen menu overview Notes • • • • Depending on the signal source selected...
... EXIT AUDIO menu (TV mode) AUDIO PICTURE AUDIO CHANNELS SETTINGS USB Audyssey Dynamic Volume™ SRS TruSurround HD™ Treble Bass Balance Advanced Audio Light Off 50 40 0 MOVE OK ENTER SELECT Adjust settings to highlight a video input source, then press ENTER. Insignia 19"/22" LED-LCD HD TV Selecting the video input source To select the video input source: 1 Turn on your screen. Press twice to select HDMI 1. On-screen menu overview Notes • • • • Depending on the signal source selected...
User Manual (English)
Page 23
.... Reset all audio settings to factory defaults. 4 Press or to adjust the option, or press or to select a setting. 5 Press MENU to return to the previous menu, or press EXIT to pass through the original digital audio sound). • Audio Language-(Digital channels only) Selects an alternate audio language, if available. • MTS Audio-(Analog channels only) Selects the audio mode. To play TV audio only: 1 Press MENU. To exit audio only mode, press any button. Note You can turn off MENU...
.... Reset all audio settings to factory defaults. 4 Press or to adjust the option, or press or to select a setting. 5 Press MENU to return to the previous menu, or press EXIT to pass through the original digital audio sound). • Audio Language-(Digital channels only) Selects an alternate audio language, if available. • MTS Audio-(Analog channels only) Selects the audio mode. To play TV audio only: 1 Press MENU. To exit audio only mode, press any button. Note You can turn off MENU...
User Manual (English)
Page 27
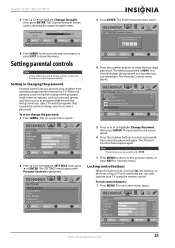
... the signal strength meter. Default is 0000. The SETTINGS menu opens with some exceptions, such as news and sports) and deny access to close the menu. PICTURE AUDIO CHANNELS SETTINGS USB SETTINGS Parental Controls Enter Password 4 Press MENU to return to the previous menu, or press EXIT to programs that exceed the selected rating, you can only operate your 4-digit password. SETTINGS Parental Controls Closed Caption Time Menu Settings Input Labels Computer Settings PICTURE AUDIO CHANNELS SETTINGS USB MOVE OK ENTER SELECT Set TV parental controls MENU PREVIOUS...
... the signal strength meter. Default is 0000. The SETTINGS menu opens with some exceptions, such as news and sports) and deny access to close the menu. PICTURE AUDIO CHANNELS SETTINGS USB SETTINGS Parental Controls Enter Password 4 Press MENU to return to the previous menu, or press EXIT to programs that exceed the selected rating, you can only operate your 4-digit password. SETTINGS Parental Controls Closed Caption Time Menu Settings Input Labels Computer Settings PICTURE AUDIO CHANNELS SETTINGS USB MOVE OK ENTER SELECT Set TV parental controls MENU PREVIOUS...

User Manual (English)
Page 29
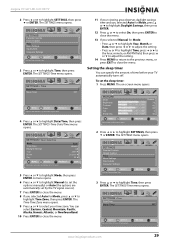
... Canada. PICTURE Mode Brightness Contrast Color Tint Sharpness PICTURE AUDIO CHANNELS SETTINGS USB Custom 70 40 60 0 40 MOVE OK ENTER SELECT Adjust settings to affect picture quality MENU PREVIOUS EXIT EXIT 2 Press or to confirm. PICTURE AUDIO CHANNELS SETTINGS USB SETTINGS Parental Controls Button Lock On Block Unrated TV On USA Parental Locks Canadian Parental Locks Change Password RRT5 MOVE OK ENTER SELECT MENU PREVIOUS Restrict movie and TV programs by US Ratings EXIT EXIT 5 Press or to highlight USA Parental Locks, then...
... Canada. PICTURE Mode Brightness Contrast Color Tint Sharpness PICTURE AUDIO CHANNELS SETTINGS USB Custom 70 40 60 0 40 MOVE OK ENTER SELECT Adjust settings to affect picture quality MENU PREVIOUS EXIT EXIT 2 Press or to confirm. PICTURE AUDIO CHANNELS SETTINGS USB SETTINGS Parental Controls Button Lock On Block Unrated TV On USA Parental Locks Canadian Parental Locks Change Password RRT5 MOVE OK ENTER SELECT MENU PREVIOUS Restrict movie and TV programs by US Ratings EXIT EXIT 5 Press or to highlight USA Parental Locks, then...
User Manual (English)
Page 33
... to close the menu. 8 If you selected Manual for the TV to highlight SETTINGS, then press or ENTER. The on-screen menu opens. The SETTINGS-Time menu opens. The SETTINGS-Time-Date/Time menu opens. SETTINGS Parental Controls Closed Caption Time Menu Settings Input Labels Computer Settings PICTURE AUDIO CHANNELS SETTINGS USB MOVE OK ENTER SELECT Set Date/Time and Sleep Timer MENU PREVIOUS EXIT EXIT 3 Press or to highlight Date/Time, then press ENTER. Insignia 19"/22" LED-LCD HD TV 2 Press or to turn off . PICTURE AUDIO CHANNELS SETTINGS USB SETTINGS Time Date/Time Mode Time...
... to close the menu. 8 If you selected Manual for the TV to highlight SETTINGS, then press or ENTER. The on-screen menu opens. The SETTINGS-Time menu opens. The SETTINGS-Time-Date/Time menu opens. SETTINGS Parental Controls Closed Caption Time Menu Settings Input Labels Computer Settings PICTURE AUDIO CHANNELS SETTINGS USB MOVE OK ENTER SELECT Set Date/Time and Sleep Timer MENU PREVIOUS EXIT EXIT 3 Press or to highlight Date/Time, then press ENTER. Insignia 19"/22" LED-LCD HD TV 2 Press or to turn off . PICTURE AUDIO CHANNELS SETTINGS USB SETTINGS Time Date/Time Mode Time...

User Manual (English)
Page 35
... is turned on or off : 1 Press MENU. To turn INlink on , your TV. You can select on the Input Source list when you control HDMI CEC-compatible devices connected to the HDMI jacks on the SETTINGS-INlink menu to enter additional characters. Your TV uses this step to On. The on -screen menu opens. 5 Press or to highlight SETTINGS, then press or ENTER. PICTURE Mode Brightness Contrast Color Tint Sharpness PICTURE AUDIO CHANNELS SETTINGS USB Custom...
... is turned on or off : 1 Press MENU. To turn INlink on , your TV. You can select on the Input Source list when you control HDMI CEC-compatible devices connected to the HDMI jacks on the SETTINGS-INlink menu to enter additional characters. Your TV uses this step to On. The on -screen menu opens. 5 Press or to highlight SETTINGS, then press or ENTER. PICTURE Mode Brightness Contrast Color Tint Sharpness PICTURE AUDIO CHANNELS SETTINGS USB Custom...
User Manual (English)
Page 41
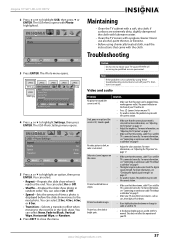
... that the antenna, cable TV, or satellite TV is selected. Check the digital signal strength. The USB-Photo Settings menu opens. For more information, see "Checking the digital signal strength" on an LED-LCD TV is not solved by using chemically treated cloth, read the instructions that the correct picture mode is connected correctly. This does not affect the operation of your TV yourself. Insignia 19"/22" LED-LCD HD TV...
... that the antenna, cable TV, or satellite TV is selected. Check the digital signal strength. The USB-Photo Settings menu opens. For more information, see "Checking the digital signal strength" on an LED-LCD TV is not solved by using chemically treated cloth, read the instructions that the correct picture mode is connected correctly. This does not affect the operation of your TV yourself. Insignia 19"/22" LED-LCD HD TV...
User Manual (English)
Page 42
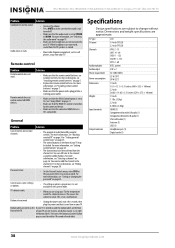
... current mode. For more channels. • The program may have been deleted from the TV speakers is set a new password. For more information, see "Setting or changing the password" on the front front of your TV are not connected to light the button labels. Solution • Make sure that the connected HDMI device is turned on and the button labels on page 23. Dimensions and weight specifications are installed correctly...
... current mode. For more channels. • The program may have been deleted from the TV speakers is set a new password. For more information, see "Setting or changing the password" on the front front of your TV are not connected to light the button labels. Solution • Make sure that the connected HDMI device is turned on and the button labels on page 23. Dimensions and weight specifications are installed correctly...
What is Firmware? (English)
Page 1
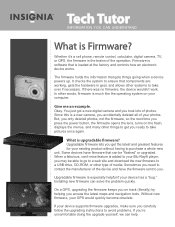
... upgraded. Sometimes you need to contact the manufacturer of the device and have firmware that is upgradable firmware? But, you only deleted photos, not the firmware, so the next time you press the power button, the firmware opens the lens, turns on the flash, displays the menus, and many other type of your photos. When a fabulous, can help. Without new firmware, your device has a "bug." Firmware is software...
... upgraded. Sometimes you need to contact the manufacturer of the device and have firmware that is upgradable firmware? But, you only deleted photos, not the firmware, so the next time you press the power button, the firmware opens the lens, turns on the flash, displays the menus, and many other type of your photos. When a fabulous, can help. Without new firmware, your device has a "bug." Firmware is software...


