
User Manual
Page 4
...on a bed, sofa, rug, or other similar surface. Please read the following safety precautions carefully. Safety Instructions and Precautions 1. CONNECTION TO THE TV • Disconnect the product from the mains before connecting or disconnecting the cable from the mains before cleaning. • Use a light damp cloth... filled with any object, and do not place the product on the apparatus. 4. ATTACHMENTS • Do not use any unsupported attachments as a TV or a VCR. • Do not block the openings with liquid should not be hazardous or cause damage to dust the product. 5. In ...
...on a bed, sofa, rug, or other similar surface. Please read the following safety precautions carefully. Safety Instructions and Precautions 1. CONNECTION TO THE TV • Disconnect the product from the mains before connecting or disconnecting the cable from the mains before cleaning. • Use a light damp cloth... filled with any object, and do not place the product on the apparatus. 4. ATTACHMENTS • Do not use any unsupported attachments as a TV or a VCR. • Do not block the openings with liquid should not be hazardous or cause damage to dust the product. 5. In ...
User Manual
Page 6
... Setting GB23 3.6 Search Channels GB23 3.7 Display GB24 3.8 Result GB24 3.9 Installation Checklist GB25 4. Contents 1. Setup GB15 2.1 Connecting the TV and VCR GB15 2.2 Powering On GB20 3. Channel List GB32 5.1 My TV List GB32 5.2 Favourite List GB34 5.3 Satellite List GB34 5.4 Scramble List GB35 6. TV Guide GB36 6.1 Using TV Guide GB36 6.2 List Guide GB37 6.3 Schedule GB38 6.4 Find GB39 7.
... Setting GB23 3.6 Search Channels GB23 3.7 Display GB24 3.8 Result GB24 3.9 Installation Checklist GB25 4. Contents 1. Setup GB15 2.1 Connecting the TV and VCR GB15 2.2 Powering On GB20 3. Channel List GB32 5.1 My TV List GB32 5.2 Favourite List GB34 5.3 Satellite List GB34 5.4 Scramble List GB35 6. TV Guide GB36 6.1 Using TV Guide GB36 6.2 List Guide GB37 6.3 Schedule GB38 6.4 Find GB39 7.
User Manual
Page 9
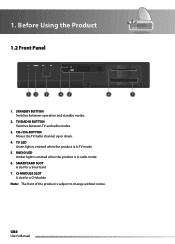
Before Using the Product 1.2 Front Panel 12 3 45 6 7 1. TV LED Green light is emitted when the product is in radio mode. 6. STANDBY BUTTON Switches between TV and radio modes. 3. RADIO LED Amber light is emitted when the product is subject to change without notice. GB8 User's Manual SMARTCARD SLOT A slot for a CI-Module Note: The front of the product is in TV mode. 5. CI-MODULE SLOT A slot for a Smartcard 7. TV/RADIO BUTTON Switches between operation and standby modes. 2. CH-/CH+BUTTON Moves the TV/radio channel up or down. 4. 1.
Before Using the Product 1.2 Front Panel 12 3 45 6 7 1. TV LED Green light is emitted when the product is in radio mode. 6. STANDBY BUTTON Switches between TV and radio modes. 3. RADIO LED Amber light is emitted when the product is subject to change without notice. GB8 User's Manual SMARTCARD SLOT A slot for a CI-Module Note: The front of the product is in TV mode. 5. CI-MODULE SLOT A slot for a Smartcard 7. TV/RADIO BUTTON Switches between operation and standby modes. 2. CH-/CH+BUTTON Moves the TV/radio channel up or down. 4. 1.

User Manual
Page 10
... Smartcard looks similar to a credit card and is inserted into the top slot. Smartcard GB9 User's Manual Before Using the Product 1.3 Conditional Access Although some TV and radio channels are available on the front panel of the product. Hold the Smartcard horizontally with the electronic chip (small square-shaped, gold in... colour) facing upwards. 3. A valid Smartcard entitles you to view and listen to all the channels you choose to subscribe to air, most TV and radio/music channels are free to . 1. 1.
... Smartcard looks similar to a credit card and is inserted into the top slot. Smartcard GB9 User's Manual Before Using the Product 1.3 Conditional Access Although some TV and radio channels are available on the front panel of the product. Hold the Smartcard horizontally with the electronic chip (small square-shaped, gold in... colour) facing upwards. 3. A valid Smartcard entitles you to view and listen to all the channels you choose to subscribe to air, most TV and radio/music channels are free to . 1. 1.
User Manual
Page 12
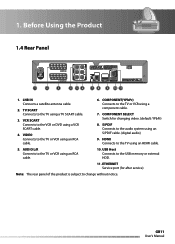
... VCR using an RCA cable. 10. AUDIO L/R Connects to the TV or VCR using a VCR SCART cable. 4. USB Host Connects to change without notice. 1. COMPONENT SELECT Switch for after service) Note: The rear panel of the ... 78 9 10 11 1. HDMI Connects to the VCR or DVD using an RCA cable. 6. VCR SCART Connects to the TV using a component cable. 7. TV SCART Connects to the TV or VCR using an HDMI cable. 5. COMPONENT(YPbPr) Connects to the TV using an S/PDIF cable. (digital audio) 9. S/PDIF Connects to the audio system using...
... VCR using an RCA cable. 10. AUDIO L/R Connects to the TV or VCR using a VCR SCART cable. 4. USB Host Connects to change without notice. 1. COMPONENT SELECT Switch for after service) Note: The rear panel of the ... 78 9 10 11 1. HDMI Connects to the VCR or DVD using an RCA cable. 6. VCR SCART Connects to the TV using a component cable. 7. TV SCART Connects to the TV or VCR using an HDMI cable. 5. COMPONENT(YPbPr) Connects to the TV using an S/PDIF cable. (digital audio) 9. S/PDIF Connects to the audio system using...
User Manual
Page 13
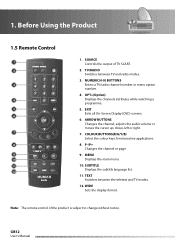
...right. 7. COLOUR BUTTONS(R/G/Y/B) Select the colour keys for interactive applications. 8. Note: The remote control of TV SCART. 2. P-/P+ Changes the channel or page. 9. NUMERIC(0-9) BUTTONS Enters a TV/radio channel number or menu option number. 4. EXIT Exits all On-Screen Display (OSD) screens. .... 11. WIDE Sets the display format. SOURCE Controls the output of the product is subject to change without notice. GB12 User's Manual TEXT Switches between TV and radio modes. 3. 1. Before Using the Product 1.5 Remote Control 1 2 3 4 5 6 7 8 9 10 11 12 1. OPT+(Option) ...
...right. 7. COLOUR BUTTONS(R/G/Y/B) Select the colour keys for interactive applications. 8. Note: The remote control of TV SCART. 2. P-/P+ Changes the channel or page. 9. NUMERIC(0-9) BUTTONS Enters a TV/radio channel number or menu option number. 4. EXIT Exits all On-Screen Display (OSD) screens. .... 11. WIDE Sets the display format. SOURCE Controls the output of the product is subject to change without notice. GB12 User's Manual TEXT Switches between TV and radio modes. 3. 1. Before Using the Product 1.5 Remote Control 1 2 3 4 5 6 7 8 9 10 11 12 1. OPT+(Option) ...

User Manual
Page 16
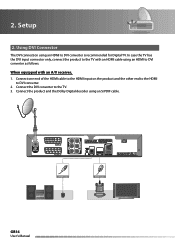
... you have . HDMI Cable HDMI GB15 User's Manual Setup This chapter describes how to connect your local product distributor. 2.1 Connecting the TV and VCR You can select one of the following antenna connections depending on the equipment you encounter any problems setting up your product, please... contact your product to the TV, VCR or other devices. Note: If you have . 1. Using HDMI Cable The HDMI connection is recommended for gaining optimum signal quality....
... you have . HDMI Cable HDMI GB15 User's Manual Setup This chapter describes how to connect your local product distributor. 2.1 Connecting the TV and VCR You can select one of the following antenna connections depending on the equipment you encounter any problems setting up your product, please... contact your product to the TV, VCR or other devices. Note: If you have . 1. Using HDMI Cable The HDMI connection is recommended for gaining optimum signal quality....
User Manual
Page 17
In case the TV has the DVI input connector only, connect the product to the TV with an A/V receiver, 1. Connect the DVI converter to DVI converter. 2. When equipped with an HDMI cable using an HDMI to DVI converter is recommended for Digital TV. Setup 2. GB16 User's Manual HDMI Cable Using DVI Connector The DVI connection using an S/PDIF cable. 2. Connect the product and the Dolby Digital decoder using an HDMI to DVI converter as follows. Connect one end of the HDMI cable to the HDMI input on the product and the other end to the HDMI to the TV. 3.
In case the TV has the DVI input connector only, connect the product to the TV with an A/V receiver, 1. Connect the DVI converter to DVI converter. 2. When equipped with an HDMI cable using an HDMI to DVI converter is recommended for Digital TV. Setup 2. GB16 User's Manual HDMI Cable Using DVI Connector The DVI connection using an S/PDIF cable. 2. Connect the product and the Dolby Digital decoder using an HDMI to DVI converter as follows. Connect one end of the HDMI cable to the HDMI input on the product and the other end to the HDMI to the TV. 3.
User Manual
Page 18
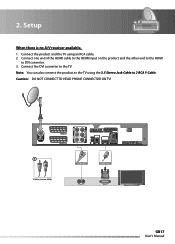
Caution: DO NOT CONNECT TO HEAD PHONE CONNECTOR ON TV! Connect the DVI converter to DVI converter. 3. Y Cable (1stereo, 2RCA) HDMI Cable GB17 User's Manual Connect one end of the HDMI cable to the HDMI input on the product and the other end to the HDMI to the TV. Connect the product and the TV using the 3.5 Stereo Jack Cable to 2 RCA Y Cable. 2. Note: You can also connect the product to the TV using an RCA cable. 2. Setup When there is no A/V receiver available, 1.
Caution: DO NOT CONNECT TO HEAD PHONE CONNECTOR ON TV! Connect the DVI converter to DVI converter. 3. Y Cable (1stereo, 2RCA) HDMI Cable GB17 User's Manual Connect one end of the HDMI cable to the HDMI input on the product and the other end to the HDMI to the TV. Connect the product and the TV using the 3.5 Stereo Jack Cable to 2 RCA Y Cable. 2. Note: You can also connect the product to the TV using an RCA cable. 2. Setup When there is no A/V receiver available, 1.

User Manual
Page 19
Note: The Component Select switch should be on YPbPr when using an S/PDIF cable. You can either: • 1-1 Connect the product and the TV using an RCA cable (Audio L/R). • 1-2 Connect the product and the Dolby Digital decoder using the component cable. 2. Connect the product and the TV using a component cable as follows. RCA Cable Component Cable S/PDIF Cable L AUDIO R COMPONENT IN S/PDIF GB18 User's Manual Setup 3. Using Component Cable The component connection is recommended for Digital TV.
Note: The Component Select switch should be on YPbPr when using an S/PDIF cable. You can either: • 1-1 Connect the product and the TV using an RCA cable (Audio L/R). • 1-2 Connect the product and the Dolby Digital decoder using the component cable. 2. Connect the product and the TV using a component cable as follows. RCA Cable Component Cable S/PDIF Cable L AUDIO R COMPONENT IN S/PDIF GB18 User's Manual Setup 3. Using Component Cable The component connection is recommended for Digital TV.

User Manual
Page 20
Connect the product and the TV using the SCART cable. Note: • Connecting your TV directly to the audio/video output of the product will assure a more vivid picture and enhance your viewing enjoyment. • The Component Select switch should be on RGB when using a SCART cable. 2. SCART Cable VCR SCART SCART Cable TV SCART GB19 User's Manual Setup 4. Connect the product and the VCR using a SCART cable. Using SCART Cable A SCART cable connection is recommended for analogue TV or VCR. 1. 2.
Connect the product and the TV using the SCART cable. Note: • Connecting your TV directly to the audio/video output of the product will assure a more vivid picture and enhance your viewing enjoyment. • The Component Select switch should be on RGB when using a SCART cable. 2. SCART Cable VCR SCART SCART Cable TV SCART GB19 User's Manual Setup 4. Connect the product and the VCR using a SCART cable. Using SCART Cable A SCART cable connection is recommended for analogue TV or VCR. 1. 2.
User Manual
Page 26
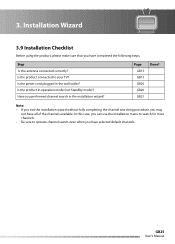
... GB15 GB15 GB20 GB20 GB21 Done? In this case, you can use the installation menu to search for more channels. • Be sure to your TV? Is the power cord plugged in the installation wizard? Have you have completed the following steps. Is the product in operation mode (not Standby mode...
... GB15 GB15 GB20 GB20 GB21 Done? In this case, you can use the installation menu to search for more channels. • Be sure to your TV? Is the power cord plugged in the installation wizard? Have you have completed the following steps. Is the product in operation mode (not Standby mode...
User Manual
Page 27
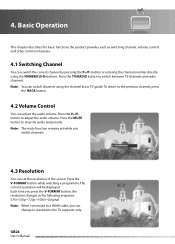
...Original Note: When connected to a HDMI cable, you switch channels. 4.3 Resolution You can set the resolution of the screen. 4. Press the TV/RADIO button to stop the audio temporarily. To return to the previous channel, press the BACK button. 4.2 Volume Control You can change to ...control and other common features. 4.1 Switching Channel You can switch channels using the NUMERIC(0-9) buttons. Press the MUTE button to switch between TV channels and radio channels. Note: The mute function remains set while you can adjust the audio volume. button or entering the channel number...
...Original Note: When connected to a HDMI cable, you switch channels. 4.3 Resolution You can set the resolution of the screen. 4. Press the TV/RADIO button to stop the audio temporarily. To return to the previous channel, press the BACK button. 4.2 Volume Control You can change to ...control and other common features. 4.1 Switching Channel You can switch channels using the NUMERIC(0-9) buttons. Press the MUTE button to switch between TV channels and radio channels. Note: The mute function remains set while you can adjust the audio volume. button or entering the channel number...
User Manual
Page 33
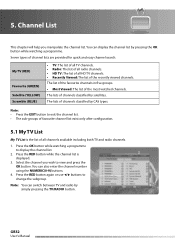
...8226; Radio: The list of all radio channels. • HD TV: The list of all channels available including both TV and radio channels. 1. Note: • Press the EXIT button to display the channel list. 2. You can switch between TV and radio by pressing the OK button while watching a programme. ...to exit the channel list. • The sub-groups of favourite channel list exist only after configuration. 5.1 My TV List My TV List is displayed. 3. The lists of all HD TV channels. • Recently Viewed: The list of the most watched channels. Press the RED button while the channel...
...8226; Radio: The list of all radio channels. • HD TV: The list of all channels available including both TV and radio channels. 1. Note: • Press the EXIT button to display the channel list. 2. You can switch between TV and radio by pressing the OK button while watching a programme. ...to exit the channel list. • The sub-groups of favourite channel list exist only after configuration. 5.1 My TV List My TV List is displayed. 3. The lists of all HD TV channels. • Recently Viewed: The list of the most watched channels. Press the RED button while the channel...

User Manual
Page 37
...'s Manual EPG Table 1. Select the programme you wish to play the programme in the PIG. Press the OK button again to exit the TV guide screen. 6.1 Using TV Guide You can view the programme information of each channel, in time and date order. 1. Select a future programme and press the OK... button. Select Yes and press the OK button. 5. 6. TV Guide The TV Guide displays the programme information of all channels in time and date order. Note: Press the GUIDE or EXIT button to view the programme...
...'s Manual EPG Table 1. Select the programme you wish to play the programme in the PIG. Press the OK button again to exit the TV guide screen. 6.1 Using TV Guide You can view the programme information of each channel, in time and date order. 1. Select a future programme and press the OK... button. Select Yes and press the OK button. 5. 6. TV Guide The TV Guide displays the programme information of all channels in time and date order. Note: Press the GUIDE or EXIT button to view the programme...

User Manual
Page 38
... to the current time, press the BACK button. 6.2 List Guide EPG List displays the programme information for approximately a week. Note: • Press the TV/RADIO button to switch to TV or radio. • Press the i button to view programme information. • You can move to watch or reserve the selected programme. 4. 6. Select.... Press the OK button to EPG list. 3. Select a channel group using the / button. 3. The features are similar as in EPG table. 1 Press the GUIDE button. 2. TV Guide 2.
... to the current time, press the BACK button. 6.2 List Guide EPG List displays the programme information for approximately a week. Note: • Press the TV/RADIO button to switch to TV or radio. • Press the i button to view programme information. • You can move to watch or reserve the selected programme. 4. 6. Select.... Press the OK button to EPG list. 3. Select a channel group using the / button. 3. The features are similar as in EPG table. 1 Press the GUIDE button. 2. TV Guide 2.
User Manual
Page 39
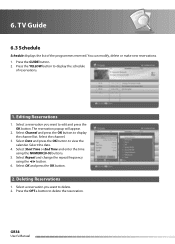
... End Time and enter the time using the / button. 6. Select a reservation you want to edit and press the OK button. Select the channel. 3. Deleting Reservations 1. TV Guide 6.3 Schedule Schedule displays the list of reservations. 1. Editing Reservations 1. GB38 User's Manual 6. Press the YELLOW button to display the channel list. Select a reservation you...
... End Time and enter the time using the / button. 6. Select a reservation you want to edit and press the OK button. Select the channel. 3. Deleting Reservations 1. TV Guide 6.3 Schedule Schedule displays the list of reservations. 1. Editing Reservations 1. GB38 User's Manual 6. Press the YELLOW button to display the channel list. Select a reservation you...
User Manual
Page 40
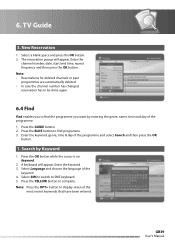
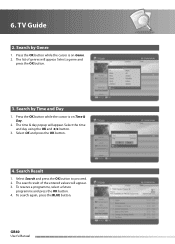
... entering the genre, name, time and day of the keyword. 4. Enter the keyword. 3. A keyboard will appear. Select Language and choose the language of the programme. 1. TV Guide 3. Select a blank space and press the OK button. 2. Press the OK button while the cursor is on Keyword. 2. Enter the channel number, date, start...
... entering the genre, name, time and day of the keyword. 4. Enter the keyword. 3. A keyboard will appear. Select Language and choose the language of the programme. 1. TV Guide 3. Select a blank space and press the OK button. 2. Press the OK button while the cursor is on Keyword. 2. Enter the channel number, date, start...
User Manual
Page 41
... programme and press the OK button. 4. Search by Genre 1. Select Search and press the OK button to proceed. 2. Select a genre and press the OK button. 3. TV Guide 2. Press the OK button while the cursor is on Genre. 2. GB40 User's Manual
... programme and press the OK button. 4. Search by Genre 1. Select Search and press the OK button to proceed. 2. Select a genre and press the OK button. 3. TV Guide 2. Press the OK button while the cursor is on Genre. 2. GB40 User's Manual

User Manual
Page 48
... S-Video and RGB and press the OK button. Select Stereo or Mono using the OK or / button. 3. Dolby Digital Auto Selection You can select the TV SCART output option. 1. GB47 User's Manual VCR SCART You can adjust the sound difference of audio and video. 1. Select Audio Output. 2. Lip-Sync You... or On using the / button. 3. Adjust the sync using the OK or / button. 5. Press the BACK button to all channels when once adjusted. Select TV-SCART and press the OK button. 2. Note: You can select the audio output option. 1. Note: Lip-Sync is on RGB. 2. Select Lip-Sync and ...
... S-Video and RGB and press the OK button. Select Stereo or Mono using the OK or / button. 3. Dolby Digital Auto Selection You can select the TV SCART output option. 1. GB47 User's Manual VCR SCART You can adjust the sound difference of audio and video. 1. Select Audio Output. 2. Lip-Sync You... or On using the / button. 3. Adjust the sync using the OK or / button. 5. Press the BACK button to all channels when once adjusted. Select TV-SCART and press the OK button. 2. Note: You can select the audio output option. 1. Note: Lip-Sync is on RGB. 2. Select Lip-Sync and ...


