
User Manual
Page 2
...Laboratories. Use of KUDELSKI S.A. • Manufactured under license from Dolby Laboratories. GB1 User's Manual Reverse engineering or disassembly is intended for purchasing a HUMAX product. Warranty The warranty does not cover parts which may become defective due to be copied...by Macrovision. This product incorporates copyright protection technology that is a registered trademark of this manual. The information in this user's manual is subject to change without HUMAX's prior consent in this copyright protection technology must be able to be authorized by Macrovision...
...Laboratories. Use of KUDELSKI S.A. • Manufactured under license from Dolby Laboratories. GB1 User's Manual Reverse engineering or disassembly is intended for purchasing a HUMAX product. Warranty The warranty does not cover parts which may become defective due to be copied...by Macrovision. This product incorporates copyright protection technology that is a registered trademark of this manual. The information in this user's manual is subject to change without HUMAX's prior consent in this copyright protection technology must be able to be authorized by Macrovision...
User Manual
Page 3
... the user aware of possible problems and information of any importance to help understand, use and maintain the installation. GB2 User's Manual Notice Warnings, Cautions and Notes Throughout the whole manual, pay special attention to the following marks that presents a risk of electric shock or personal injury. Refer servicing to the environment...
... the user aware of possible problems and information of any importance to help understand, use and maintain the installation. GB2 User's Manual Notice Warnings, Cautions and Notes Throughout the whole manual, pay special attention to the following marks that presents a risk of electric shock or personal injury. Refer servicing to the environment...
User Manual
Page 4
... not stand the product on soft furnishings or carpets. • Do not stack electronic equipments on top of any maintenance or installation procedures. 2. GB3 User's Manual If you start any kind. LIQUID • The product should be earthed to comply with international safety standards. CLEANING • Disconnect the product from the...
... not stand the product on soft furnishings or carpets. • Do not stack electronic equipments on top of any maintenance or installation procedures. 2. GB3 User's Manual If you start any kind. LIQUID • The product should be earthed to comply with international safety standards. CLEANING • Disconnect the product from the...
User Manual
Page 5
... mains plug, as the original part. Warning 1. This will prevent damage to the unit due to the product and reduce its life span. GB4 User's Manual Unauthorized substitution may cause damage to lightning and power-surges. 12.
... mains plug, as the original part. Warning 1. This will prevent damage to the unit due to the product and reduce its life span. GB4 User's Manual Unauthorized substitution may cause damage to lightning and power-surges. 12.
User Manual
Page 6
... Panel GB8 1.3 Conditional Access GB9 1.4 Rear Panel GB11 1.5 Remote Control GB12 1.6 Remote Control Batteries GB14 2. Preferences GB41 7.1 Parental Control GB41 7.2 Language Setting GB43 GB5 User's Manual Basic Operation GB26 4.1 Switching Channel GB26 4.2 Volume Control GB26 4.3 Resolution GB26 4.4 Sleep GB27 4.5 Wide GB27 4.6 Audio GB28 4.7 Subtitle GB28 4.8 Teletext GB29 4.9 Programme Information (i-plate GB29...
... Panel GB8 1.3 Conditional Access GB9 1.4 Rear Panel GB11 1.5 Remote Control GB12 1.6 Remote Control Batteries GB14 2. Preferences GB41 7.1 Parental Control GB41 7.2 Language Setting GB43 GB5 User's Manual Basic Operation GB26 4.1 Switching Channel GB26 4.2 Volume Control GB26 4.3 Resolution GB26 4.4 Sleep GB27 4.5 Wide GB27 4.6 Audio GB28 4.7 Subtitle GB28 4.8 Teletext GB29 4.9 Programme Information (i-plate GB29...
User Manual
Page 7
....2 Multi Custom Code GB75 12.3 Trouble Shooting GB76 12.4 Error Message GB78 12.5 Specification GB80 12.6 Glossary GB82 12.7 Service and Support GB84 GB6 User's Manual System GB71 10.1 Status GB71 10.2 Signal Detection GB71 10.3 Common Interface GB72 11.
....2 Multi Custom Code GB75 12.3 Trouble Shooting GB76 12.4 Error Message GB78 12.5 Specification GB80 12.6 Glossary GB82 12.7 Service and Support GB84 GB6 User's Manual System GB71 10.1 Status GB71 10.2 Signal Detection GB71 10.3 Common Interface GB72 11.
User Manual
Page 8
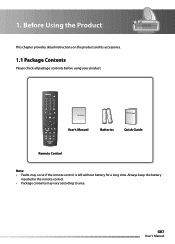
1. Before Using the Product This chapter provides detail instructions on the product and its accessories. 1.1 Package Contents Please check all package contents before using your product. User's Manual Quick Start Guide User's Manual Batteries Quick Guide Remote Control Note: • Faults may vary according to area. Always keep the battery inserted in the remote control. • Package contents may occur if the remote control is left without battery for a long time. GB7 User's Manual
1. Before Using the Product This chapter provides detail instructions on the product and its accessories. 1.1 Package Contents Please check all package contents before using your product. User's Manual Quick Start Guide User's Manual Batteries Quick Guide Remote Control Note: • Faults may vary according to area. Always keep the battery inserted in the remote control. • Package contents may occur if the remote control is left without battery for a long time. GB7 User's Manual
User Manual
Page 9
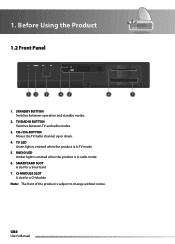
TV/RADIO BUTTON Switches between operation and standby modes. 2. CH-/CH+BUTTON Moves the TV/radio channel up or down. 4. SMARTCARD SLOT A slot for a CI-Module Note: The front of the product is subject to change without notice. STANDBY BUTTON Switches between TV and radio modes. 3. RADIO LED Amber light is emitted when the product is in radio mode. 6. TV LED Green light is emitted when the product is in TV mode. 5. 1. GB8 User's Manual CI-MODULE SLOT A slot for a Smartcard 7. Before Using the Product 1.2 Front Panel 12 3 45 6 7 1.
TV/RADIO BUTTON Switches between operation and standby modes. 2. CH-/CH+BUTTON Moves the TV/radio channel up or down. 4. SMARTCARD SLOT A slot for a CI-Module Note: The front of the product is subject to change without notice. STANDBY BUTTON Switches between TV and radio modes. 3. RADIO LED Amber light is emitted when the product is in radio mode. 6. TV LED Green light is emitted when the product is in TV mode. 5. 1. GB8 User's Manual CI-MODULE SLOT A slot for a Smartcard 7. Before Using the Product 1.2 Front Panel 12 3 45 6 7 1.

User Manual
Page 10
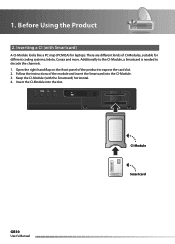
... colour) facing upwards. 3. Before Using the Product 1.3 Conditional Access Although some TV and radio channels are free to expose the card slot. 2. Smartcard GB9 User's Manual 1. Inserting the Smartcard The Smartcard looks similar to . 1. A valid Smartcard entitles you to view and listen to all the channels you choose to subscribe to...
... colour) facing upwards. 3. Before Using the Product 1.3 Conditional Access Although some TV and radio channels are free to expose the card slot. 2. Smartcard GB9 User's Manual 1. Inserting the Smartcard The Smartcard looks similar to . 1. A valid Smartcard entitles you to view and listen to all the channels you choose to subscribe to...
User Manual
Page 11
...-Module into the CI-Module. 3. There are different kinds of the module and insert the Smartcard into the slot. Before Using the Product 2. GB10 User's Manual CI-Module Smartcard Follow the instructions of CI-Modules, suitable for laptops. 1.
...-Module into the CI-Module. 3. There are different kinds of the module and insert the Smartcard into the slot. Before Using the Product 2. GB10 User's Manual CI-Module Smartcard Follow the instructions of CI-Modules, suitable for laptops. 1.
User Manual
Page 12
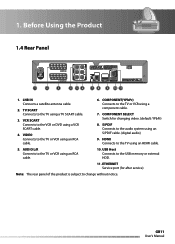
...(YPbPr) Connects to the USB memory or external HDD. 11. USB Host Connects to the TV or VCR using an RCA cable. 10. GB11 User's Manual LNB IN Connects a satellite antenna cable. 2. COMPONENT SELECT Switch for after service) Note: The rear panel of the product is subject to the TV using...
...(YPbPr) Connects to the USB memory or external HDD. 11. USB Host Connects to the TV or VCR using an RCA cable. 10. GB11 User's Manual LNB IN Connects a satellite antenna cable. 2. COMPONENT SELECT Switch for after service) Note: The rear panel of the product is subject to the TV using...

User Manual
Page 13
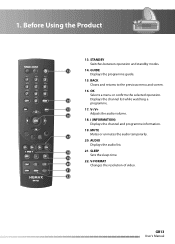
GB12 User's Manual Before Using the Product 1.5 Remote Control 1 2 3 4 5 6 7 8 9 10 11 12 1. NUMERIC(0-9) BUTTONS Enters a TV/radio channel number or menu option number. 4. EXIT Exits all On-Screen ...
GB12 User's Manual Before Using the Product 1.5 Remote Control 1 2 3 4 5 6 7 8 9 10 11 12 1. NUMERIC(0-9) BUTTONS Enters a TV/radio channel number or menu option number. 4. EXIT Exits all On-Screen ...
User Manual
Page 14
... Displays the audio list. 18 21. i (INFORMATION) Displays the channel and programme information. 19. V-FORMAT 20 Changes the resolution of video. 21 22 GB13 User's Manual STANDBY Switches between operation and standby modes. 13 14. Before Using the Product 13. BACK Closes and returns to the previous menu and screen. 16...
... Displays the audio list. 18 21. i (INFORMATION) Displays the channel and programme information. 19. V-FORMAT 20 Changes the resolution of video. 21 22 GB13 User's Manual STANDBY Switches between operation and standby modes. 13 14. Before Using the Product 13. BACK Closes and returns to the previous menu and screen. 16...

User Manual
Page 15
Make sure the plus (+) ends meet the plus markings on the battery case. 3. Insert the new batteries. GB14 User's Manual Slide the cover back into place. Press down the top of the battery cover and slide the cover off. 2. iˆ››Œ™ 1. Before Using the Product 1.6 Remote Control Batteries 1.
Make sure the plus (+) ends meet the plus markings on the battery case. 3. Insert the new batteries. GB14 User's Manual Slide the cover back into place. Press down the top of the battery cover and slide the cover off. 2. iˆ››Œ™ 1. Before Using the Product 1.6 Remote Control Batteries 1.

User Manual
Page 16
2. HDMI Cable HDMI GB15 User's Manual Note: If you encounter any problems setting up your product, please contact your product to the TV, VCR or other devices. The product provides various ...
2. HDMI Cable HDMI GB15 User's Manual Note: If you encounter any problems setting up your product, please contact your product to the TV, VCR or other devices. The product provides various ...
User Manual
Page 17
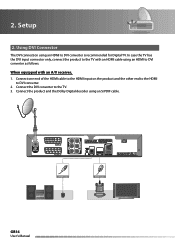
Connect the DVI converter to DVI converter. 2. Connect the product and the Dolby Digital decoder using an HDMI to DVI converter as follows. Setup 2. Connect one end of the HDMI cable to the HDMI input on the product and the other end to the HDMI to the TV. 3. 2. When equipped with an HDMI cable using an HDMI to DVI converter is recommended for Digital TV. GB16 User's Manual HDMI Cable Using DVI Connector The DVI connection using an S/PDIF cable. In case the TV has the DVI input connector only, connect the product to the TV with an A/V receiver, 1.
Connect the DVI converter to DVI converter. 2. Connect the product and the Dolby Digital decoder using an HDMI to DVI converter as follows. Setup 2. Connect one end of the HDMI cable to the HDMI input on the product and the other end to the HDMI to the TV. 3. 2. When equipped with an HDMI cable using an HDMI to DVI converter is recommended for Digital TV. GB16 User's Manual HDMI Cable Using DVI Connector The DVI connection using an S/PDIF cable. In case the TV has the DVI input connector only, connect the product to the TV with an A/V receiver, 1.
User Manual
Page 18
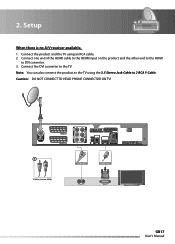
Connect one end of the HDMI cable to the HDMI input on the product and the other end to the HDMI to the TV. Y Cable (1stereo, 2RCA) HDMI Cable GB17 User's Manual Connect the product and the TV using the 3.5 Stereo Jack Cable to the TV using an RCA cable. 2. Connect the DVI converter to DVI converter. 3. Note: You can also connect the product to 2 RCA Y Cable. Caution: DO NOT CONNECT TO HEAD PHONE CONNECTOR ON TV! Setup When there is no A/V receiver available, 1. 2.
Connect one end of the HDMI cable to the HDMI input on the product and the other end to the HDMI to the TV. Y Cable (1stereo, 2RCA) HDMI Cable GB17 User's Manual Connect the product and the TV using the 3.5 Stereo Jack Cable to the TV using an RCA cable. 2. Connect the DVI converter to DVI converter. 3. Note: You can also connect the product to 2 RCA Y Cable. Caution: DO NOT CONNECT TO HEAD PHONE CONNECTOR ON TV! Setup When there is no A/V receiver available, 1. 2.

User Manual
Page 19
Using Component Cable The component connection is recommended for Digital TV. Connect the product and the TV using an S/PDIF cable. You can either: • 1-1 Connect the product and the TV using an RCA cable (Audio L/R). • 1-2 Connect the product and the Dolby Digital decoder using a component cable as follows. Note: The Component Select switch should be on YPbPr when using the component cable. 2. Setup 3. RCA Cable Component Cable S/PDIF Cable L AUDIO R COMPONENT IN S/PDIF GB18 User's Manual
Using Component Cable The component connection is recommended for Digital TV. Connect the product and the TV using an S/PDIF cable. You can either: • 1-1 Connect the product and the TV using an RCA cable (Audio L/R). • 1-2 Connect the product and the Dolby Digital decoder using a component cable as follows. Note: The Component Select switch should be on YPbPr when using the component cable. 2. Setup 3. RCA Cable Component Cable S/PDIF Cable L AUDIO R COMPONENT IN S/PDIF GB18 User's Manual

User Manual
Page 20
Connect the product and the TV using a SCART cable. Using SCART Cable A SCART cable connection is recommended for analogue TV or VCR. 1. Connect the product and the VCR using a SCART cable. 2. SCART Cable VCR SCART SCART Cable TV SCART GB19 User's Manual Note: • Connecting your TV directly to the audio/video output of the product will assure a more vivid picture and enhance your viewing enjoyment. • The Component Select switch should be on RGB when using the SCART cable. 2. Setup 4.
Connect the product and the TV using a SCART cable. Using SCART Cable A SCART cable connection is recommended for analogue TV or VCR. 1. Connect the product and the VCR using a SCART cable. 2. SCART Cable VCR SCART SCART Cable TV SCART GB19 User's Manual Note: • Connecting your TV directly to the audio/video output of the product will assure a more vivid picture and enhance your viewing enjoyment. • The Component Select switch should be on RGB when using the SCART cable. 2. Setup 4.

User Manual
Page 21
2. Power on the power switch located at the front of the product to a wall outlet. 2. GB20 User's Manual Setup 2.2 Powering On 1. Connect the power cord of the product. Turn on by pressing the STANDBY button of the remote control or the STANDBY button at the back left side of the product. 3.
2. Power on the power switch located at the front of the product to a wall outlet. 2. GB20 User's Manual Setup 2.2 Powering On 1. Connect the power cord of the product. Turn on by pressing the STANDBY button of the remote control or the STANDBY button at the back left side of the product. 3.


