Owners Guide
Page 2
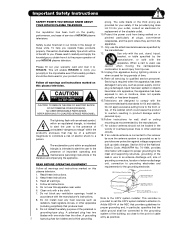
...within an equilateral triangle, is damaged, liquid has been spilled or objects CAUTION have fallen into your HITACHI plasma television. replacement of HITACHI plasma televisions. Use only with the cart, stand, tripod, bracket, or table specified by the manufacturer. 12. This will be discovered in wire to... specified by the manufacturer, or sold with respect to proper grounding for the mast and supporting structure, grounding of benefit to HITACHI. An outdoor antenna should be of the lead-in your warranty card and mail it to rain or moisture, does not ...
...within an equilateral triangle, is damaged, liquid has been spilled or objects CAUTION have fallen into your HITACHI plasma television. replacement of HITACHI plasma televisions. Use only with the cart, stand, tripod, bracket, or table specified by the manufacturer. 12. This will be discovered in wire to... specified by the manufacturer, or sold with respect to proper grounding for the mast and supporting structure, grounding of benefit to HITACHI. An outdoor antenna should be of the lead-in your warranty card and mail it to rain or moisture, does not ...

Owners Guide
Page 4
...180; Wire Clamp (50" models only) REMOTE CONTROL BATTERY INSTALLATION AND REPLACEMENT 1. CAUTION: Do not insert batteries with Hitachi P42H401, P42H401A, P50H401 and P50H401A models. This stand for models H4011, H4011A series are similar as this may cause the batteries to swell or rupture resulting in the battery ...Please visit our For optional accessories, please access our web site at: website for the 55" models is WM07S and for optional www.hitachi.us/tv accessories. Mounting the panel on tab to the wall mount. Insert two new "AA" size batteries for the front glass ...
...180; Wire Clamp (50" models only) REMOTE CONTROL BATTERY INSTALLATION AND REPLACEMENT 1. CAUTION: Do not insert batteries with Hitachi P42H401, P42H401A, P50H401 and P50H401A models. This stand for models H4011, H4011A series are similar as this may cause the batteries to swell or rupture resulting in the battery ...Please visit our For optional accessories, please access our web site at: website for the 55" models is WM07S and for optional www.hitachi.us/tv accessories. Mounting the panel on tab to the wall mount. Insert two new "AA" size batteries for the front glass ...
Owners Guide
Page 5
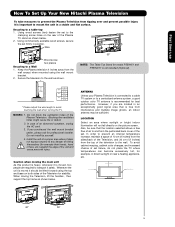
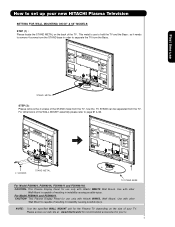
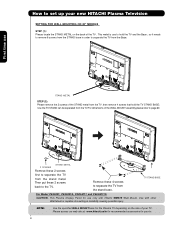
...from the top of the Plasma Television. First time use How To Set Up Your New Hitachi Plasma Television To take measures to prevent the Plasma Television from tipping over and prevent possible ...the rear of an abnormal symptom, unplug the AC cord. 3. A 55" NOTE: The Table Top Stand for example, in a stable and flat surface. Using wood screws (two) fasten the set failure, ...do not place the TV where temperatures can become excessively hot, for model P55H401 and P55H4011 is free from interference and multiple image ghosts, an indoor antenna may be sure that the location...
...from the top of the Plasma Television. First time use How To Set Up Your New Hitachi Plasma Television To take measures to prevent the Plasma Television from tipping over and prevent possible ...the rear of an abnormal symptom, unplug the AC cord. 3. A 55" NOTE: The Table Top Stand for example, in a stable and flat surface. Using wood screws (two) fasten the set failure, ...do not place the TV where temperatures can become excessively hot, for model P55H401 and P55H4011 is free from interference and multiple image ghosts, an indoor antenna may be sure that the location...
Owners Guide
Page 6
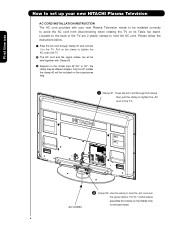
... clamp to tighten the AC cord to the TV. · The AC cord and the signal cables can all be held together with your new HITACHI Plasma Television AC CORD INSTALLATION INSTRUCTION The AC cord provided with Clamp #2. » Depend on the model size 42",50" or 55", the clamp may... up your new Plasma Television needs to be installed correctly to avoid the AC cord from disconnecting when rotating the TV on its Table top stand. Located on the middle hole of the TV are 2 plastic clamps to the TV. For 50 " model please assemble this Clamp on the back of...
... clamp to tighten the AC cord to the TV. · The AC cord and the signal cables can all be held together with your new HITACHI Plasma Television AC CORD INSTALLATION INSTRUCTION The AC cord provided with Clamp #2. » Depend on the model size 42",50" or 55", the clamp may... up your new Plasma Television needs to be installed correctly to avoid the AC cord from disconnecting when rotating the TV on its Table top stand. Located on the middle hole of the TV are 2 plastic clamps to the TV. For 50 " model please assemble this Clamp on the back of...
Owners Guide
Page 7
... injury. so it needs to remove 4 screws from the STAND base in instability causing possible injury. Use with Hitachi WM07S Wall Mount. For dimensions of your TV. This Plasma Display Panel for your tv. 7 For Model P55H401 and P55H4011 CAUTION- First time use How to set up your new... HITACHI Plasma Television SETTING FOR WALL MOUNTING ON 50" & 55" MODELS STEP (1) : Please locate the STAND METAL on the size of the WALL MOUNT assembly please refer to ...
... injury. so it needs to remove 4 screws from the STAND base in instability causing possible injury. Use with Hitachi WM07S Wall Mount. For dimensions of your TV. This Plasma Display Panel for your tv. 7 For Model P55H401 and P55H4011 CAUTION- First time use How to set up your new... HITACHI Plasma Television SETTING FOR WALL MOUNTING ON 50" & 55" MODELS STEP (1) : Please locate the STAND METAL on the size of the WALL MOUNT assembly please refer to ...
Owners Guide
Page 8
... WALL MOUNT base for use only with other Wall Mount is use STAND METAL STEP (2): Please remove the 2 screws of the STAND metal from the stand base. First time use to hold the TV STAND BASE; How to set up your new HITACHI Plasma Television SETTING FOR WALL MOUNTING ON 42" MODELS STEP (1) : ...Please locate the STAND METAL on the size of your tv. 8 Then put these 4 ...
... WALL MOUNT base for use only with other Wall Mount is use STAND METAL STEP (2): Please remove the 2 screws of the STAND metal from the stand base. First time use to hold the TV STAND BASE; How to set up your new HITACHI Plasma Television SETTING FOR WALL MOUNTING ON 42" MODELS STEP (1) : ...Please locate the STAND METAL on the size of your tv. 8 Then put these 4 ...
Owners Guide
Page 12
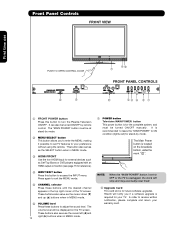
Press again to exit the MENU mode. ቦ CHANNEL selector Press these buttons to adjust the sound level. It is located on the TV screen. Hitachi will stop and may eventually reset itself. ቩ Upgrade Card This card slot is for your TV. In order to receive written notification, please ... of the TV screen. These buttons also serve as Set-Top-Boxes or DVD players equipped with an HDMI output connection (see page 15 for stand-by remote control. The Main Power button is recommended to leave the "MAIN POWER" to ON condition (lights red) for reference). ብ INPUT/EXIT...
Press again to exit the MENU mode. ቦ CHANNEL selector Press these buttons to adjust the sound level. It is located on the TV screen. Hitachi will stop and may eventually reset itself. ቩ Upgrade Card This card slot is for your TV. In order to receive written notification, please ... of the TV screen. These buttons also serve as Set-Top-Boxes or DVD players equipped with an HDMI output connection (see page 15 for stand-by remote control. The Main Power button is recommended to leave the "MAIN POWER" to ON condition (lights red) for reference). ብ INPUT/EXIT...
Owners Guide
Page 13
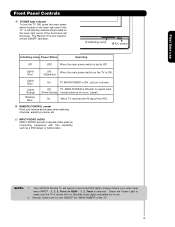
...TV. 13 When the main power switch is set to make sure the TV is selected. Your HITACHI Plasma TV will illuminate. When the main power switch on the TV is ON. (Stand-by indicator lamp located on the lower right side of the front bezel will appear to be ...INPUT-FRONT provide composite Video jacks for remote ON/OFF operation. ቪ Indicating Lamp ቫ R/C sensor Indicating Lamp Power Status Operating Off OFF. A red stand-by ) Lights Blue Lights Orange Blinking Blue On TV MAIN POWER is no sync. First time use . 2. picture is ON with this capability, such ...
...TV. 13 When the main power switch is set to make sure the TV is selected. Your HITACHI Plasma TV will illuminate. When the main power switch on the TV is ON. (Stand-by indicator lamp located on the lower right side of the front bezel will appear to be ...INPUT-FRONT provide composite Video jacks for remote ON/OFF operation. ቪ Indicating Lamp ቫ R/C sensor Indicating Lamp Power Status Operating Off OFF. A red stand-by ) Lights Blue Lights Orange Blinking Blue On TV MAIN POWER is no sync. First time use . 2. picture is ON with this capability, such ...
Owners Guide
Page 59
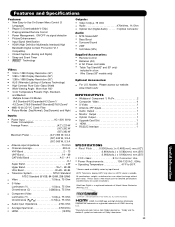
...8226; 1024 x 1080 Display Resolution (42") • 1280 x 1080 Display Resolution (50") • 1280 x 1080 Display Resolution (55") • ALiS (Alternate Lighting of Hitachi Home Electronics (America), Inc. COPYRIGHT c 1999-2007 MONTAVISTA SOFTWARE, INC. VHF-Band 2 ~ 13 UHF-Band 14 ~ 69 CATV Mid Band A-5 ~ A-1 A-I Super Band J-W...Soft Mute (50%) Supplied Accessories: • Remote Control • Batteries (AA) • 6' AC Power cord cable • Table Top Stand(42" and 50" only) included in a box • Wire Clamp (50" models only) Optional Accessories: • For U.S.
...8226; 1024 x 1080 Display Resolution (42") • 1280 x 1080 Display Resolution (50") • 1280 x 1080 Display Resolution (55") • ALiS (Alternate Lighting of Hitachi Home Electronics (America), Inc. COPYRIGHT c 1999-2007 MONTAVISTA SOFTWARE, INC. VHF-Band 2 ~ 13 UHF-Band 14 ~ 69 CATV Mid Band A-5 ~ A-1 A-I Super Band J-W...Soft Mute (50%) Supplied Accessories: • Remote Control • Batteries (AA) • 6' AC Power cord cable • Table Top Stand(42" and 50" only) included in a box • Wire Clamp (50" models only) Optional Accessories: • For U.S.
Owners Guide
Page 60
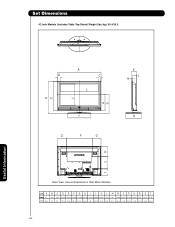
Set Dimensions 42 Inch Models (Includes Table Top Stand) Weight (lbs./kg): 80.4/36.5 Useful Information Rear View, Use as Reference for Wall Mount Bracket Units A B Inches 42 2-3/4 mm 1067.00 70.5 CD E FGH I J K L MNOPQ R ST 2-3/4 30-21/32 28-1/16 21-31/32 17-31/32 15-11/32 36-7/16 20-23/32 4-23/32 3-9/16 1-1/8 15-9/32 8-19/32 24-13/16 8-19/32 9-7/8 12-1/8 6-1/16 70.5 779.15 713.00 558.32 456.15 390.00 926 526.60 119.50 90.80 28.70 388.38 218.50 630.00 218.50 251.00 308.00 154.00 60
Set Dimensions 42 Inch Models (Includes Table Top Stand) Weight (lbs./kg): 80.4/36.5 Useful Information Rear View, Use as Reference for Wall Mount Bracket Units A B Inches 42 2-3/4 mm 1067.00 70.5 CD E FGH I J K L MNOPQ R ST 2-3/4 30-21/32 28-1/16 21-31/32 17-31/32 15-11/32 36-7/16 20-23/32 4-23/32 3-9/16 1-1/8 15-9/32 8-19/32 24-13/16 8-19/32 9-7/8 12-1/8 6-1/16 70.5 779.15 713.00 558.32 456.15 390.00 926 526.60 119.50 90.80 28.70 388.38 218.50 630.00 218.50 251.00 308.00 154.00 60
Owners Guide
Page 61
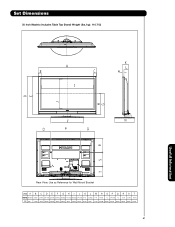
Set Dimensions 50 Inch Models (Includes Table Top Stand) Weight (lbs./kg): 116.7/53 Useful Information Rear View, Use as Reference for Wall Mount Bracket Units A B C D E F G H I J K L M N O P Q R S T Inches 48-13/16 2-9/16 2-9/16 34-11/16 32-5/16 27-17/32 19-29/32 17-17/32 43-23/32 24-13/16 5-1/2 3-25/32 1-1/4 16-5/8 12 24-13/16 12 11-3/4 12-1/8 8-7/16 mm 1240 65.00 65.00 880.85 820.50 699.12 505.85 445.5 1110.00 630.00 127.50 96.00 31.50 422.08 305.00 630.00 305.00 298.00 308.00 214.50 61
Set Dimensions 50 Inch Models (Includes Table Top Stand) Weight (lbs./kg): 116.7/53 Useful Information Rear View, Use as Reference for Wall Mount Bracket Units A B C D E F G H I J K L M N O P Q R S T Inches 48-13/16 2-9/16 2-9/16 34-11/16 32-5/16 27-17/32 19-29/32 17-17/32 43-23/32 24-13/16 5-1/2 3-25/32 1-1/4 16-5/8 12 24-13/16 12 11-3/4 12-1/8 8-7/16 mm 1240 65.00 65.00 880.85 820.50 699.12 505.85 445.5 1110.00 630.00 127.50 96.00 31.50 422.08 305.00 630.00 305.00 298.00 308.00 214.50 61
Owners Guide
Page 62
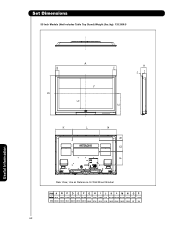
Set Dimensions 55 Inch Models (Not Includes Table Top Stand) Weight (lbs./kg): 133.3/60.5 Useful Information Rear View, Use as Reference for Wall Mount Bracket Units A B C D E F G H I J K L M N O Inches 55-1/2 3-15/32 3-15/32 35-5/8 19-3/16 48-19/32 27-1/4 5-1/32 3-25/32 1-1/4 15-11/32 24-13/16 15-11/32 4-15/16 10-1/8 mm 1410.00 88.00 88.00 904.50 485.50 1234.00 692.00 127.50 96.00 31.50 390.00 630.00 390.00 125.00 257 P 12-1/8 308 62
Set Dimensions 55 Inch Models (Not Includes Table Top Stand) Weight (lbs./kg): 133.3/60.5 Useful Information Rear View, Use as Reference for Wall Mount Bracket Units A B C D E F G H I J K L M N O Inches 55-1/2 3-15/32 3-15/32 35-5/8 19-3/16 48-19/32 27-1/4 5-1/32 3-25/32 1-1/4 15-11/32 24-13/16 15-11/32 4-15/16 10-1/8 mm 1410.00 88.00 88.00 904.50 485.50 1234.00 692.00 127.50 96.00 31.50 390.00 630.00 390.00 125.00 257 P 12-1/8 308 62


