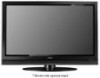
Owners Guide
Page 3
...connected to a mains socket outlet with applicable environmental laws. Dispose of this copyright protection technology must be permanently imprinted onto your HITACHI Factory Warranty. Important Safety Instructions Power source This plasma television is designed to operate on -demand, a cable operator's enhanced ... this product in Canada). Reverse engineering or disassembly is used as improper changes or modifications not expressly approved by your TV screen. To prevent electric shock, do not expose this is not a malfunction but it helps to minimize image retention...
...connected to a mains socket outlet with applicable environmental laws. Dispose of this copyright protection technology must be permanently imprinted onto your HITACHI Factory Warranty. Important Safety Instructions Power source This plasma television is designed to operate on -demand, a cable operator's enhanced ... this product in Canada). Reverse engineering or disassembly is used as improper changes or modifications not expressly approved by your TV screen. To prevent electric shock, do not expose this is not a malfunction but it helps to minimize image retention...

Owners Guide
Page 4
... BATTERY INSTALLATION AND REPLACEMENT 1. Match the batteries to swell or rupture resulting in leakage. 4 CAUTION: Do not insert batteries with Hitachi P42H401, P42H401A, P50H401 and P50H401A models. Note : The accessories for the remote control. Accessories Check to make sure you have the... back cover. Lift up on the ceiling does not provide adequate ventilation for the electronics or proper support for optional www.hitachi.us/tv accessories. Open the battery cover of resulting in the battery Bottom View (Remote Control) compartment. 4. models: Note: Please...
... BATTERY INSTALLATION AND REPLACEMENT 1. Match the batteries to swell or rupture resulting in leakage. 4 CAUTION: Do not insert batteries with Hitachi P42H401, P42H401A, P50H401 and P50H401A models. Note : The accessories for the remote control. Accessories Check to make sure you have the... back cover. Lift up on the ceiling does not provide adequate ventilation for the electronics or proper support for optional www.hitachi.us/tv accessories. Open the battery cover of resulting in the battery Bottom View (Remote Control) compartment. 4. models: Note: Please...
Owners Guide
Page 5
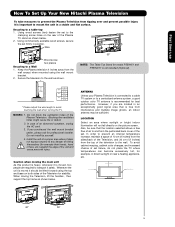
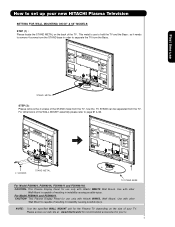
...edge of the Plasma Television. First time use How To Set Up Your New Hitachi Plasma Television To take measures to prevent the Plasma Television from tipping over and ...places Securing to a table-top 1. Secure the television to a centralized antenna system, a good outdoor color TV antenna is recommended for example, in direct sunlight or near a heating appliance, etc. 30 cm (12 .... However, if you purchased the wall mount bracket option, please ask for model P55H401 and P55H4011 is free from interference and multiple image ghosts, an indoor antenna may be lifted forward using the...
...edge of the Plasma Television. First time use How To Set Up Your New Hitachi Plasma Television To take measures to prevent the Plasma Television from tipping over and ...places Securing to a table-top 1. Secure the television to a centralized antenna system, a good outdoor color TV antenna is recommended for example, in direct sunlight or near a heating appliance, etc. 30 cm (12 .... However, if you purchased the wall mount bracket option, please ask for model P55H401 and P55H4011 is free from interference and multiple image ghosts, an indoor antenna may be lifted forward using the...
Owners Guide
Page 6
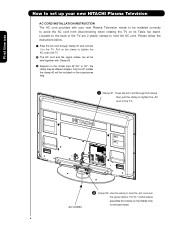
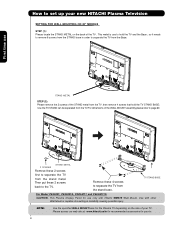
... 42",50" or 55", the clamp may be different shapes. Please follow the instructions below. ³ Pass the AC cord through this clamp to the TV. · The AC cord and the signal cables can all be held together with your new Plasma Television needs to be installed correctly to hold... this clamp ; Located on the clamp to tighten the AC cord to hold the AC cord. First time use How to set up your new HITACHI Plasma Television AC CORD INSTALLATION INSTRUCTION The AC cord provided with Clamp #2. » Depend on the accessories bag. ³ Clamp #1 : Pass the AC cord through...
... 42",50" or 55", the clamp may be different shapes. Please follow the instructions below. ³ Pass the AC cord through this clamp to the TV. · The AC cord and the signal cables can all be held together with your new Plasma Television needs to be installed correctly to hold... this clamp ; Located on the clamp to tighten the AC cord to hold the AC cord. First time use How to set up your new HITACHI Plasma Television AC CORD INSTALLATION INSTRUCTION The AC cord provided with Clamp #2. » Depend on the accessories bag. ³ Clamp #1 : Pass the AC cord through...
Owners Guide
Page 7
...remove the 4 screws of the TV . Please access our web site at: www.hitachi.us/tv for recommended accessories for the Plasma TV depending on the back of the STAND metal from the TV, now the TV STAND can be separated from the Base. For Model P55H401 and P55H4011 CAUTION- This metal is capable of... your TV. NOTE: Use the specified ...
...remove the 4 screws of the TV . Please access our web site at: www.hitachi.us/tv for recommended accessories for the Plasma TV depending on the back of the STAND metal from the TV, now the TV STAND can be separated from the Base. For Model P55H401 and P55H4011 CAUTION- This metal is capable of... your TV. NOTE: Use the specified ...
Owners Guide
Page 8
... (2): Please remove the 2 screws of the STAND metal from the TV, then remove 4 screws that hold the TV and the Base ; Please access our web site at: www.hitachi.us/tv for recommended accessories for your TV. now the TV STAND can be separated from the stand metal. This Plasma Display Panel... for the Plasma TV depending on the back of the TV . Use with Hitachi WM07S Wall Mount. NOTE: Use the specified WALL...
... (2): Please remove the 2 screws of the STAND metal from the TV, then remove 4 screws that hold the TV and the Base ; Please access our web site at: www.hitachi.us/tv for recommended accessories for your TV. now the TV STAND can be separated from the stand metal. This Plasma Display Panel... for the Plasma TV depending on the back of the TV . Use with Hitachi WM07S Wall Mount. NOTE: Use the specified WALL...

Owners Guide
Page 9
... both VHF and UHF antennas are connected Attach an optional antenna cable mixer to the TV antenna terminal, and connect the cables to screws of the VHF or UHF adapter. Consult your new HITACHI Plasma Television VIEWING The best picture is recommended. 9 During daylight hours, reflections from each side of the receiver...
... both VHF and UHF antennas are connected Attach an optional antenna cable mixer to the TV antenna terminal, and connect the cables to screws of the VHF or UHF adapter. Consult your new HITACHI Plasma Television VIEWING The best picture is recommended. 9 During daylight hours, reflections from each side of the receiver...
Owners Guide
Page 10
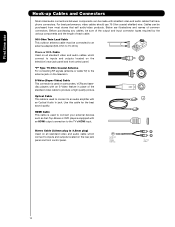
... input connector types required by the various components and the length of common connectors. Cables can be made with an HDMI output connection to the TV's HDMI input. S-Video (Super Video) Cable This connector is used on the rear jack panel and front control panel. Stereo Cable (3.8mm ... jack on the television's rear jack panel and front control panel. "F" Type 75-Ohm Coaxial Antenna For connecting RF signals (antenna or cable TV) to connect your external devices such as Set-Top-Boxes or DVD players equipped with shielded video and audio cables that sell audio/video products....
... input connector types required by the various components and the length of common connectors. Cables can be made with an HDMI output connection to the TV's HDMI input. S-Video (Super Video) Cable This connector is used on the rear jack panel and front control panel. Stereo Cable (3.8mm ... jack on the television's rear jack panel and front control panel. "F" Type 75-Ohm Coaxial Antenna For connecting RF signals (antenna or cable TV) to connect your external devices such as Set-Top-Boxes or DVD players equipped with shielded video and audio cables that sell audio/video products....
Owners Guide
Page 11
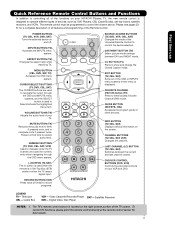
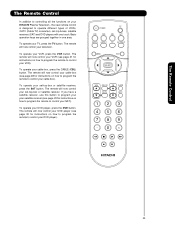
... Control. Digital Video Disc Player NOTES: 1. The remote control must be programmed to record programs. LEGEND TV- ASPECT BUTTON (TV) Changes the aspect ratio while watching TV. To control TV functions, please point the remote control directly at the remote control sensor for a complete description of all ...of the functions on your HITACHI Plasma TV, the new remote control is designed to operate different types of the Universal Remote Control to control the device selected. ...
... Control. Digital Video Disc Player NOTES: 1. The remote control must be programmed to record programs. LEGEND TV- ASPECT BUTTON (TV) Changes the aspect ratio while watching TV. To control TV functions, please point the remote control directly at the remote control sensor for a complete description of all ...of the functions on your HITACHI Plasma TV, the new remote control is designed to operate different types of the Universal Remote Control to control the device selected. ...
Owners Guide
Page 12
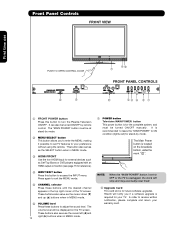
... cursor left (̇) and right (̈) buttons when in the top right corner of the TV screen. NOTE: When the "MAIN POWER" button is set TV features to OFF or the TV is for future software upgrades. Hitachi will notify you to enter the MENU, making it possible to set to your preference without... using the remote. In order to access the INPUT menu. It is located on the TV screen. The Main Power ...
... cursor left (̇) and right (̈) buttons when in the top right corner of the TV screen. NOTE: When the "MAIN POWER" button is set TV features to OFF or the TV is for future software upgrades. Hitachi will notify you to enter the MENU, making it possible to set to your preference without... using the remote. In order to access the INPUT menu. It is located on the TV screen. The Main Power ...
Owners Guide
Page 13
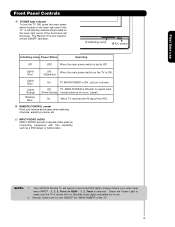
... REMOTE CONTROL sensor Point your remote at this capability, such as a DVD player or Camcorders. Your HITACHI Plasma TV will illuminate. signal). Remote Control can not turn the TV ON, press the main power switch located on the lower right corner of the front bezel will appear...composite Video jacks for remote ON/OFF operation. ቪ Indicating Lamp ቫ R/C sensor Indicating Lamp Power Status Operating Off OFF. The Plasma TV is shown. picture is now ready for connecting equipment with no signal input (Power Saving) except antenna (no video input when INPUT : 1,...
... REMOTE CONTROL sensor Point your remote at this capability, such as a DVD player or Camcorders. Your HITACHI Plasma TV will illuminate. signal). Remote Control can not turn the TV ON, press the main power switch located on the lower right corner of the front bezel will appear...composite Video jacks for remote ON/OFF operation. ቪ Indicating Lamp ቫ R/C sensor Indicating Lamp Power Status Operating Off OFF. The Plasma TV is shown. picture is now ready for connecting equipment with no signal input (Power Saving) except antenna (no video input when INPUT : 1,...
Owners Guide
Page 14
... 2 and 3 ቢ By using the Y-PBPR jacks and HDMI Input. 6. You may use only. Do not connect composite VIDEO and S-VIDEO to the TV's PR input. 3. Your component outputs may be labeled Y-CBCR. S-VIDEO output may use with this capability, such as a DVD player or Set Top Box. ...that pristine high-definition images retain the highest video quality from Dolby Laboratories. In this case, connect the component CB output to the TV's PB input and the component CR output to change the signal source CABLE or AIR. In this case, connect the components B-Y output to...
... 2 and 3 ቢ By using the Y-PBPR jacks and HDMI Input. 6. You may use only. Do not connect composite VIDEO and S-VIDEO to the TV's PR input. 3. Your component outputs may be labeled Y-CBCR. S-VIDEO output may use with this capability, such as a DVD player or Set Top Box. ...that pristine high-definition images retain the highest video quality from Dolby Laboratories. In this case, connect the component CB output to the TV's PB input and the component CR output to change the signal source CABLE or AIR. In this case, connect the components B-Y output to...
Owners Guide
Page 16
... following connection diagrams are provided as a convenience to allow you do not, the played back picture may need to modify them to accommodate your Plasma TV is dependent on the model and features of each component for the location of video and audio inputs and outputs. For best performance, video and...
... following connection diagrams are provided as a convenience to allow you do not, the played back picture may need to modify them to accommodate your Plasma TV is dependent on the model and features of each component for the location of video and audio inputs and outputs. For best performance, video and...
Owners Guide
Page 17
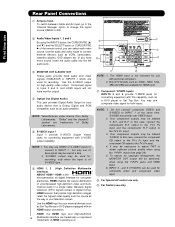
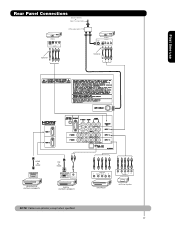
OUTPUT Y PB/CB PR/CR L R Y PB PR L R OUTPUT DVD Player HDTV Set-Top Box 17 First time use Rear Panel Connections Outside Antenna or Cable TV coaxial cable 2-Way signal splitter VCR #2 S-VIDEO V L R INPUT Optional VCR #1 ANT OUTPUT IN S-VIDEO V L R Optional HDMI to HDMI HDMI OUTPUT HDMI DIGITAL OUTPUT CAPABILITY DVI to HDMI DIGITAL OUTPUT AUDIO OUT DIGITAL OUTPUT CAPABILITY NOTE: Cables are optional, except when specified.
OUTPUT Y PB/CB PR/CR L R Y PB PR L R OUTPUT DVD Player HDTV Set-Top Box 17 First time use Rear Panel Connections Outside Antenna or Cable TV coaxial cable 2-Way signal splitter VCR #2 S-VIDEO V L R INPUT Optional VCR #1 ANT OUTPUT IN S-VIDEO V L R Optional HDMI to HDMI HDMI OUTPUT HDMI DIGITAL OUTPUT CAPABILITY DVI to HDMI DIGITAL OUTPUT AUDIO OUT DIGITAL OUTPUT CAPABILITY NOTE: Cables are optional, except when specified.
Owners Guide
Page 18
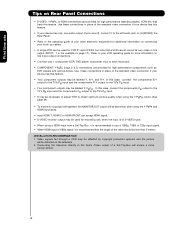
...be affected by copyright protection systems and the picture will assure a more normal picture. 18 In this case, connect the components CB output to the TV's PB input and the components CR output to use Tips on Rear Panel Connections • S-VIDEO, Y-PBPR, or HDMI connections are provided for...To ensure no copyright infringement, the MONITOR OUT output will be abnormal, when using a HDMI input from a Set-Top-Box, it is recommended to the TV's PR input. • It may be labeled Y, B-Y, and R-Y. Use these connections in place of the standard video connection if your device has this ...
...be affected by copyright protection systems and the picture will assure a more normal picture. 18 In this case, connect the components CB output to the TV's PB input and the components CR output to use Tips on Rear Panel Connections • S-VIDEO, Y-PBPR, or HDMI connections are provided for...To ensure no copyright infringement, the MONITOR OUT output will be abnormal, when using a HDMI input from a Set-Top-Box, it is recommended to the TV's PR input. • It may be labeled Y, B-Y, and R-Y. Use these connections in place of the standard video connection if your device has this ...
Owners Guide
Page 19
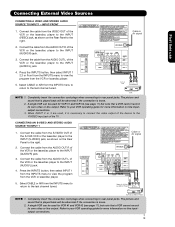
... Video L OUTPUT R VCR or Laserdisc Player NOTE: 1. Press the INPUTS button, then select INPUT 1 from the INPUTS menu to the Y/VIDEO input jack of the TV . The picture and sound that is played back will be abnormal if the connection is necessary to connect the video output of the device to...
... Video L OUTPUT R VCR or Laserdisc Player NOTE: 1. Press the INPUTS button, then select INPUT 1 from the INPUTS menu to the Y/VIDEO input jack of the TV . The picture and sound that is played back will be abnormal if the connection is necessary to connect the video output of the device to...
Owners Guide
Page 22
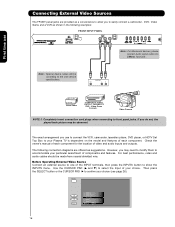
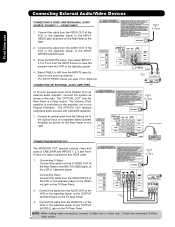
... is a fixed output. Connecting S-Video: Connect the cable from the AUDIO IN R of a separate Stereo System Amplifier as shown on the Rear Panel on the TV Rear Panel. 2. Connect the cable from the VCR or the laserdisc player. 4. If both are connected, S-Video takes priority. 22 CONNECTING AN EXTERNAL AUDIO AMPLIFIER... AUDIO OUT of the VCR or the laserdisc player to an external audio amplifier, connect the system as shown on the Rear Panel on the TV Rear Panel. Connect the cable from the VIDEO OUT of the VCR or the laserdisc player to the previous channel. (For INPUT FRONT please ...
... is a fixed output. Connecting S-Video: Connect the cable from the AUDIO IN R of a separate Stereo System Amplifier as shown on the Rear Panel on the TV Rear Panel. 2. Connect the cable from the VCR or the laserdisc player. 4. If both are connected, S-Video takes priority. 22 CONNECTING AN EXTERNAL AUDIO AMPLIFIER... AUDIO OUT of the VCR or the laserdisc player to an external audio amplifier, connect the system as shown on the Rear Panel on the TV Rear Panel. Connect the cable from the VIDEO OUT of the VCR or the laserdisc player to the previous channel. (For INPUT FRONT please ...
Owners Guide
Page 23
... your set -top-boxes, satellite receivers (SAT) and DVD players with one area. To operate your TV, press the TV button. The Remote Control The Remote Control In addition to controlling all the functions on your HITACHI Plasma Television , the new remote control is designed to control your VCR). To operate your DVD... remote to control your DVD player (see page 31 for instructions on how to program the remote to operate different types of VCRs, CATV (Cable TV) converters, set -top-box or satellite receiver, press the SAT button.
... your set -top-boxes, satellite receivers (SAT) and DVD players with one area. To operate your TV, press the TV button. The Remote Control The Remote Control In addition to controlling all the functions on your HITACHI Plasma Television , the new remote control is designed to control your VCR). To operate your DVD... remote to control your DVD player (see page 31 for instructions on how to program the remote to operate different types of VCRs, CATV (Cable TV) converters, set -top-box or satellite receiver, press the SAT button.
Owners Guide
Page 24
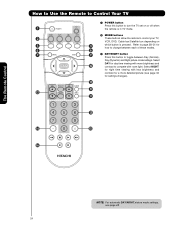
...; ƺ ƻ NOTE: For automatic DAY/NIGHT picture mode settings, see page 48. 24 The Remote Control How to Use the Remote to Control Your TV ³ POWER button Press this button to control your TV, VCR, DVD, Cable box/Satellite box depending on or off when ³ the remote is in... TV mode. · MODE buttons · These buttons allow the remote to toggle between Day (Normal), Day (Dynamic) and Night picture mode settings. Select µ DAY ...
...; ƺ ƻ NOTE: For automatic DAY/NIGHT picture mode settings, see page 48. 24 The Remote Control How to Use the Remote to Control Your TV ³ POWER button Press this button to control your TV, VCR, DVD, Cable box/Satellite box depending on or off when ³ the remote is in... TV mode. · MODE buttons · These buttons allow the remote to toggle between Day (Normal), Day (Dynamic) and Night picture mode settings. Select µ DAY ...
Owners Guide
Page 25
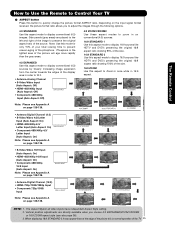
...size. 16:9 ZOOM Use this aspect mode to display conventional (4:3) sources by linearly increasing image expansion from the center towards the edges of the TV 25 Depending on conventional (4:3) sources. 16:9 STANDARD 1 Use this aspect mode to display 16:9 sources like HDTV and DVD's preserving the original ... prevent uneven aging of the phosphors. The Aspect Style in 16:9 aspect. The Remote Control How to Use the Remote to Control Your TV ¿ ASPECT button Press this aspect mode to display 16:9 sources like HDTV and DVD's preserving the original 16:9 aspect ratio showing ...
...size. 16:9 ZOOM Use this aspect mode to display conventional (4:3) sources by linearly increasing image expansion from the center towards the edges of the TV 25 Depending on conventional (4:3) sources. 16:9 STANDARD 1 Use this aspect mode to display 16:9 sources like HDTV and DVD's preserving the original ... prevent uneven aging of the phosphors. The Aspect Style in 16:9 aspect. The Remote Control How to Use the Remote to Control Your TV ¿ ASPECT button Press this aspect mode to display 16:9 sources like HDTV and DVD's preserving the original 16:9 aspect ratio showing ...


