Owners Guide
Page 5
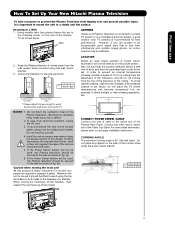
...Hitachi Plasma Television To take measures to prevent the Plasma Television from tipping over and prevent possible injury it safely. Using metallic wire (two places) fasten the set failure, do not place the TV where temperatures can become excessively hot, for example their hands, head or face, etc.) against the edge of the Plasma TV... to the swivel slot of the television to a centralized antenna system, a good outdoor color TV antenna is moved, two people are located in . 50" D 27.5 cm 39 cm 50" 5 NOTES: 1. If you are required to transport it is moved it does not expose...
...Hitachi Plasma Television To take measures to prevent the Plasma Television from tipping over and prevent possible injury it safely. Using metallic wire (two places) fasten the set failure, do not place the TV where temperatures can become excessively hot, for example their hands, head or face, etc.) against the edge of the Plasma TV... to the swivel slot of the television to a centralized antenna system, a good outdoor color TV antenna is moved, two people are located in . 50" D 27.5 cm 39 cm 50" 5 NOTES: 1. If you are required to transport it is moved it does not expose...
Owners Guide
Page 8
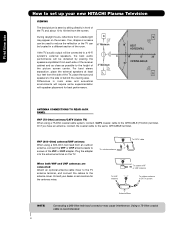
.../ CABLE To outdoor antenna or CATV system Antenna Mixer NOTE: 8 Connecting a 300-Ohm twin lead connector may appear on the TV. Differences in a different section of the room. Using a 75-Ohm coaxial cable is seen by placing the speakers equidistant from outside...the height of the picture screen center. R 4" Minimum If the TV's audio output will be located in room sizes and acoustical environments will require some experimentation with speaker placement for the antenna mixer. Consult your new HITACHI Plasma Television VIEWING The best picture is recommended. For best...
.../ CABLE To outdoor antenna or CATV system Antenna Mixer NOTE: 8 Connecting a 300-Ohm twin lead connector may appear on the TV. Differences in a different section of the room. Using a 75-Ohm coaxial cable is seen by placing the speakers equidistant from outside...the height of the picture screen center. R 4" Minimum If the TV's audio output will be located in room sizes and acoustical environments will require some experimentation with speaker placement for the antenna mixer. Consult your new HITACHI Plasma Television VIEWING The best picture is recommended. For best...
Owners Guide
Page 10
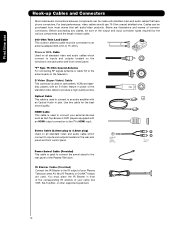
... 75-Ohm coaxial shielded wire. Below are illustrations and names of your Plasma Television when AV Net, IR Passthru or G-LINKTM feature are used. IR Blaster Cable (Provided) Connect the IR Blaster to produce a high quality picture. For best performance, video cables should use Hook-up Cables and Connectors...outputs located on the rear jack panel and front control panel. "F" Type 75-Ohm Coaxial Antenna For connecting RF signals (antenna or cable TV) to 75-Ohm). Cables can be made with an S-Video feature in front of the corresponding IR window of the standard video cable to...
... 75-Ohm coaxial shielded wire. Below are illustrations and names of your Plasma Television when AV Net, IR Passthru or G-LINKTM feature are used. IR Blaster Cable (Provided) Connect the IR Blaster to produce a high quality picture. For best performance, video cables should use Hook-up Cables and Connectors...outputs located on the rear jack panel and front control panel. "F" Type 75-Ohm Coaxial Antenna For connecting RF signals (antenna or cable TV) to 75-Ohm). Cables can be made with an S-Video feature in front of the corresponding IR window of the standard video cable to...

Owners Guide
Page 11
...picture mode settings between the current and last channel viewed. MENU BUTTON (TV,DVD,SAT/CBL,PVR/VCR) Accesses the OSD menu system. CURSOR PAD/SELECT BUTTON (TV, DVD, SAT/CBL,PVR/VCR) The Cursor Pad is displayed. MUTE BUTTON (TV) Reduces the audio level to 50% if pressed once, and to manually enter the TV... audio level. Press it a third time to show and change the Closed Caption mode. PAUSE BUTTON (TV, PVR/VCR, DVD) Press to show and change the Freeze mode of your HITACHI Plasma TV, the new remote control is used for best results. 2. DVD/VCR CONTROL BUTTONS (DVD, PVR/VCR...
...picture mode settings between the current and last channel viewed. MENU BUTTON (TV,DVD,SAT/CBL,PVR/VCR) Accesses the OSD menu system. CURSOR PAD/SELECT BUTTON (TV, DVD, SAT/CBL,PVR/VCR) The Cursor Pad is displayed. MUTE BUTTON (TV) Reduces the audio level to 50% if pressed once, and to manually enter the TV... audio level. Press it a third time to show and change the Closed Caption mode. PAUSE BUTTON (TV, PVR/VCR, DVD) Press to show and change the Freeze mode of your HITACHI Plasma TV, the new remote control is used for best results. 2. DVD/VCR CONTROL BUTTONS (DVD, PVR/VCR...
Owners Guide
Page 12
... order to receive written notification, please complete and return your TV. Hitachi will notify you to enter the MENU, making it possible... input for external devices such as Set-Top-Boxes or DVD players equipped with pictures taken on a Digital Camera, to view them on the TV screen. Press again to ON condition (lights red) for reference). ብ ...INPUT/EXIT button Press this button to turn the Plasma Television ON/OFF. These buttons also serve as the...
... order to receive written notification, please complete and return your TV. Hitachi will notify you to enter the MENU, making it possible... input for external devices such as Set-Top-Boxes or DVD players equipped with pictures taken on a Digital Camera, to view them on the TV screen. Press again to ON condition (lights red) for reference). ብ ...INPUT/EXIT button Press this button to turn the Plasma Television ON/OFF. These buttons also serve as the...

Owners Guide
Page 13
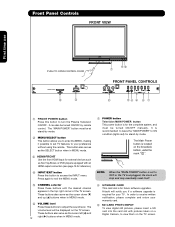
...switch on the lower right side of the TV. 13 signal). Your HITACHI Plasma TV will illuminate. A red stand-by mode (lights red) when not in use Front Panel Controls ቪ POWER light indicator To turn ON/OFF the "MAIN POWER" of the TV. The Plasma TV is now ready for connecting equipment with ... turned OFF (lights orange) if there is no sync. picture is ON ; When the main power switch is set to make sure the TV is selected. Check the Power Light to Off. NOTES: 1. Off TV MAIN POWER is ON. On When TV receives the IR signal from R/C. ቫ REMOTE CONTROL sensor...
...switch on the lower right side of the TV. 13 signal). Your HITACHI Plasma TV will illuminate. A red stand-by mode (lights red) when not in use Front Panel Controls ቪ POWER light indicator To turn ON/OFF the "MAIN POWER" of the TV. The Plasma TV is now ready for connecting equipment with ... turned OFF (lights orange) if there is no sync. picture is ON ; When the main power switch is set to make sure the TV is selected. Check the Power Light to Off. NOTES: 1. Off TV MAIN POWER is ON. On When TV receives the IR signal from R/C. ቫ REMOTE CONTROL sensor...
Owners Guide
Page 14
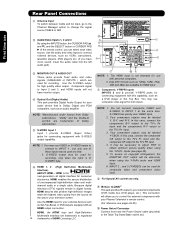
.... ቧ HDMI 1, 2 (High Definition Multimedia Interface) ABOUT HDMI - Do not connect composite VIDEO and S-VIDEO to obtain optimum picture quality when using the Y-PBPR jacks and HDMI Input. 6. To ensure no copyright infringement, the MONITOR OUT output will allow you have...TV's PR input. 4. NOTE: 1. Your component outputs may be abnormal, when using the Y-PBPR inputs (see pages 24-25). ቫ Power Swivel Connector Connect from Dolby Laboratories. HDMI, the HDMI logo and High-Definition Multimedia Interface are used for use composite video signal for your Plasma...
.... ቧ HDMI 1, 2 (High Definition Multimedia Interface) ABOUT HDMI - Do not connect composite VIDEO and S-VIDEO to obtain optimum picture quality when using the Y-PBPR jacks and HDMI Input. 6. To ensure no copyright infringement, the MONITOR OUT output will allow you have...TV's PR input. 4. NOTE: 1. Your component outputs may be abnormal, when using the Y-PBPR inputs (see pages 24-25). ቫ Power Swivel Connector Connect from Dolby Laboratories. HDMI, the HDMI logo and High-Definition Multimedia Interface are used for use composite video signal for your Plasma...

Owners Guide
Page 16
... you to easily connect HDMI or DVI signals from a DVD, Set Top Box , Video Game as a convenience to allow you do not, the played back picture may be according to connect the audio output into the Front Audio Input jacks) : A) Connecting HDMI signal. Completely insert connection cord plugs when connecting to...
... you to easily connect HDMI or DVI signals from a DVD, Set Top Box , Video Game as a convenience to allow you do not, the played back picture may be according to connect the audio output into the Front Audio Input jacks) : A) Connecting HDMI signal. Completely insert connection cord plugs when connecting to...

Owners Guide
Page 17
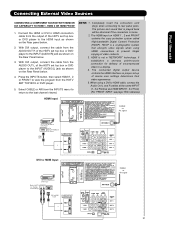
...(̆ and ̄) to the own device specifications. Then press the SELECT button or the CURSOR PAD ̈ to accommodate your Plasma TV is dependent on the model and features of each component for the location of components and features. OUTPUT Video L R Video Game COMPOSITE... VIDEO OUTPUT CAPABILITY DVD , Video Game Console. If you do not, the played back picture may need to modify them to confirm your choice. Connecting External Video Sources The FRONT panel jacks are offered as shown in the...
...(̆ and ̄) to the own device specifications. Then press the SELECT button or the CURSOR PAD ̈ to accommodate your Plasma TV is dependent on the model and features of each component for the location of components and features. OUTPUT Video L R Video Game COMPOSITE... VIDEO OUTPUT CAPABILITY DVD , Video Game Console. If you do not, the played back picture may need to modify them to confirm your choice. Connecting External Video Sources The FRONT panel jacks are offered as shown in the...

Owners Guide
Page 19
...-up cables. • A single VCR can accept HDMI signal. • S-VIDEO monitor output may be necessary to adjust TINT to obtain optimum picture quality when using the Y-PBPR inputs. (See page 45) • To ensure no copyright infringement, the MONITOR OUT output will be abnormal, when... HDMI FRONT can be used for recording only when the input is recommended to the TV's PR input. • Your component outputs may be affected by copyright protection systems and the picture will assure a more normal picture. 19 Video signals fed through a VCR may be less than 5 meters. First ...
...-up cables. • A single VCR can accept HDMI signal. • S-VIDEO monitor output may be necessary to adjust TINT to obtain optimum picture quality when using the Y-PBPR inputs. (See page 45) • To ensure no copyright infringement, the MONITOR OUT output will be abnormal, when... HDMI FRONT can be used for recording only when the input is recommended to the TV's PR input. • Your component outputs may be affected by copyright protection systems and the picture will assure a more normal picture. 19 Video signals fed through a VCR may be less than 5 meters. First ...

Owners Guide
Page 20
Connect the cable from the S-VIDEO OUT of the TV . Completely insert the connection cord plugs when connecting to the Y/VIDEO input jack of the...from the AUDIO OUT L of the VCR or the laserdisc player to the INPUT (AUDIO/L) jack. 4. The picture and sound that is played back will be abnormal if the connection is necessary to connect the video output of the... VCR or the laserdisc player to the right. Connect the cable from the VCR or laserdisc player. 5. The picture and sound that is played back will be abnormal if the connection is loose. 2. Select CABLE or AIR from the...
Connect the cable from the S-VIDEO OUT of the TV . Completely insert the connection cord plugs when connecting to the Y/VIDEO input jack of the...from the AUDIO OUT L of the VCR or the laserdisc player to the INPUT (AUDIO/L) jack. 4. The picture and sound that is played back will be abnormal if the connection is necessary to connect the video output of the... VCR or the laserdisc player to the right. Connect the cable from the VCR or laserdisc player. 5. The picture and sound that is played back will be abnormal if the connection is loose. 2. Select CABLE or AIR from the...
Owners Guide
Page 21
... at the same INPUT (1 , 2 or Front) as shown on the Rear panel below . 3. Select CABLE or AIR from the AUDIO OUT L of video contents. 3. The picture and sound that encrypts video signals when using a DVI to a display. 4. The connected digital output device controls the HDMI interface so proper set top box...
... at the same INPUT (1 , 2 or Front) as shown on the Rear panel below . 3. Select CABLE or AIR from the AUDIO OUT L of video contents. 3. The picture and sound that encrypts video signals when using a DVI to a display. 4. The connected digital output device controls the HDMI interface so proper set top box...

Owners Guide
Page 22
... top box to the INPUT (PR) jack. 4. Connect the cable from the AUDIO OUT R of the Laserdisc/DVD player or HDTV set top box. 7. The picture and sound that is played back will be abnormal if the connection is loose. 2. See page 19 for tips on the Rear panel below. 2. Connect...
... top box to the INPUT (PR) jack. 4. Connect the cable from the AUDIO OUT R of the Laserdisc/DVD player or HDTV set top box. 7. The picture and sound that is played back will be abnormal if the connection is loose. 2. See page 19 for tips on the Rear panel below. 2. Connect...

Owners Guide
Page 27
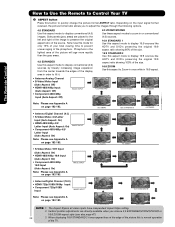
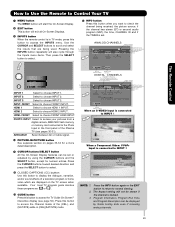
... EXIT button to return the picture to motion. Select NIGHT for night time viewing with room light. The Remote Control How to Use the Remote to Control Your TV ³ POWER button Press this button to turn the TV set on or off when the remote is in TV mode. (See page 26 for... how to set the remote control to TV mode). ³ · MODE Indicator · » Turns on or blinks three times to show remote control mode. ¿ » SOURCE SELECT button 19 Press this button to toggle between Day (Normal), Day (Dynamic) and Night picture mode settings. Select DAY for day time...
... EXIT button to return the picture to motion. Select NIGHT for night time viewing with room light. The Remote Control How to Use the Remote to Control Your TV ³ POWER button Press this button to turn the TV set on or off when the remote is in TV mode. (See page 26 for... how to set the remote control to TV mode). ³ · MODE Indicator · » Turns on or blinks three times to show remote control mode. ¿ » SOURCE SELECT button 19 Press this button to toggle between Day (Normal), Day (Dynamic) and Night picture mode settings. Select DAY for day time...
Owners Guide
Page 28
... 4:3 STANDARD Use this aspect to preserve the original aspect ratio of the size. 16:9 ZOOM Use this aspect mode to quickly change the picture format ASPECT ratio. Vertical position adjustments are placed to the left and right of the phosphors. NOTE: 1. Phosphors in the 18 lighted area... 4:3 EXPANDED/ZOOM1/ZOOM2 or 16:9 ZOOM aspect style (see also page 47). 28 3. The Remote Control How to Use the Remote to Control Your TV ² ASPECT button Press this button to display conventional (4:3) images. IMAGE INPUT • S-Video/Video 16:9 Input (Auto Aspect: On) •...
... 4:3 STANDARD Use this aspect to preserve the original aspect ratio of the size. 16:9 ZOOM Use this aspect mode to quickly change the picture format ASPECT ratio. Vertical position adjustments are placed to the left and right of the phosphors. NOTE: 1. Phosphors in the 18 lighted area... 4:3 EXPANDED/ZOOM1/ZOOM2 or 16:9 ZOOM aspect style (see also page 47). 28 3. The Remote Control How to Use the Remote to Control Your TV ² ASPECT button Press this button to display conventional (4:3) images. IMAGE INPUT • S-Video/Video 16:9 Input (Auto Aspect: On) •...
Owners Guide
Page 29
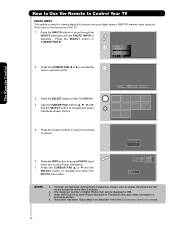
...the channel is connected to INPUT 3 Y-PBPR: 3 480i 3:17PM Input Signal Format Auto NOTE: 1. INPUT- HDMI- PHOTO INPUT Select to access your pictures from a digital camera, MMC/SD Flash memory or memory card connected to the Photo Input in (CBL)(SAT/STB) mode. AIR/CABLE Select between Air...guide denotes these programs as or . Ƹ GUIDE button Press this button to display the dialogue, narration, and/or sound effects of the Plasma TV (see page 52). Pressing the INPUTS button repeatedly will also cycle through the Inputs menu items. Then press the SELECT button to select. &#...
...the channel is connected to INPUT 3 Y-PBPR: 3 480i 3:17PM Input Signal Format Auto NOTE: 1. INPUT- HDMI- PHOTO INPUT Select to access your pictures from a digital camera, MMC/SD Flash memory or memory card connected to the Photo Input in (CBL)(SAT/STB) mode. AIR/CABLE Select between Air...guide denotes these programs as or . Ƹ GUIDE button Press this button to display the dialogue, narration, and/or sound effects of the Plasma TV (see page 52). Pressing the INPUTS button repeatedly will also cycle through the Inputs menu items. Then press the SELECT button to select. &#...
Owners Guide
Page 30
...1 Move SEL Sel. 2. Next SEL Thumbnail [0-9] Jump The Remote Control 5. The maximum number of the TV. 1. Press the CURSOR PAD ̆ or ̄ and the SELECT button to picture. Press the picture number to jump from your digital camera, MMC/SD memory cards using the Photo Input in individual photos... The screen may show Picture Numbers in Thumbnail view, plus other information in the front panel of digital Photos that can be displayed is 999. 3. Press the INPUTS button to access the next or previous photo. 3. How to Use the Remote to Control Your TV PHOTO INPUT This feature ...
...1 Move SEL Sel. 2. Next SEL Thumbnail [0-9] Jump The Remote Control 5. The maximum number of the TV. 1. Press the CURSOR PAD ̆ or ̄ and the SELECT button to picture. Press the picture number to jump from your digital camera, MMC/SD memory cards using the Photo Input in individual photos... The screen may show Picture Numbers in Thumbnail view, plus other information in the front panel of digital Photos that can be displayed is 999. 3. Press the INPUTS button to access the next or previous photo. 3. How to Use the Remote to Control Your TV PHOTO INPUT This feature ...

Owners Guide
Page 31
...2nd to 4th: letters or numbers; 5th to stop on a computer may not be 8 characters (Ex. This TV set . 31 Pictures that were copied, edited or modified on a chosen picture of the digital photos. Press the SELECT button to 8th: numbers. Automatic contrast reduction also applies during SLIDESHOW, then ... (CURSOR PAD ̇). The sub directory then should be displayed on the TV set displays only digital pictures from 5, 10 and 30 seconds. The Remote Control How to Use the Remote to Control Your TV ROTATE Select this menu item to 8th: letters. Supported image types are up...
...2nd to 4th: letters or numbers; 5th to stop on a computer may not be 8 characters (Ex. This TV set . 31 Pictures that were copied, edited or modified on a chosen picture of the digital photos. Press the SELECT button to 8th: numbers. Automatic contrast reduction also applies during SLIDESHOW, then ... (CURSOR PAD ̇). The sub directory then should be displayed on the TV set displays only digital pictures from 5, 10 and 30 seconds. The Remote Control How to Use the Remote to Control Your TV ROTATE Select this menu item to 8th: letters. Supported image types are up...
Owners Guide
Page 33
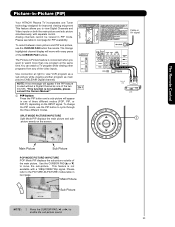
... viewing another program as one of the CURSOR PAD buttons. NOTE: A text message will move the sub-picture. Picture-In-Picture (PIP) Your HITACHI Plasma TV incorporates one Tuner technology designed for PIP availability. The Orange highlighted channel display will appear if the PIP feature is not available with a 1080p/1080i/...
... viewing another program as one of the CURSOR PAD buttons. NOTE: A text message will move the sub-picture. Picture-In-Picture (PIP) Your HITACHI Plasma TV incorporates one Tuner technology designed for PIP availability. The Orange highlighted channel display will appear if the PIP feature is not available with a 1080p/1080i/...

Owners Guide
Page 34
Main Picture Sub Picture SAWP PIP Specifications Table PIP Mode POP Main Digital (Air or Cable) Component Composite S-IN HDMI PIP 16x9 Digital (Air or Cable) Component Composite S-IN ... Yes Yes Yes Yes Yes Yes Yes Yes Yes Yes Yes Yes Yes 34 Select a channel that has a 1080p/1080i/720p signal. The Remote Control Picture-In-Picture (PIP) PIP MODE PICTURE-IN-PICTURE Select CABLE/AIR or INPUT 1~3, Front from the INPUTS menu. To prevent a pattern burn, occasionally move the sub...
Main Picture Sub Picture SAWP PIP Specifications Table PIP Mode POP Main Digital (Air or Cable) Component Composite S-IN HDMI PIP 16x9 Digital (Air or Cable) Component Composite S-IN ... Yes Yes Yes Yes Yes Yes Yes Yes Yes Yes Yes Yes Yes 34 Select a channel that has a 1080p/1080i/720p signal. The Remote Control Picture-In-Picture (PIP) PIP MODE PICTURE-IN-PICTURE Select CABLE/AIR or INPUT 1~3, Front from the INPUTS menu. To prevent a pattern burn, occasionally move the sub...

