Owners Guide
Page 2
....Follow instructions for tilt and stability. plasma television. 1. Do not use Please fill out your product model. Note to the CATV system installer: This reminder is used, use this apparatus near any heat sources such as practical. If an outside antenna is connected to the receiver be discovered in accordance with a dry cloth. 7. built up static charges. Install in your warranty card and mail...
....Follow instructions for tilt and stability. plasma television. 1. Do not use Please fill out your product model. Note to the CATV system installer: This reminder is used, use this apparatus near any heat sources such as practical. If an outside antenna is connected to the receiver be discovered in accordance with a dry cloth. 7. built up static charges. Install in your warranty card and mail...
Owners Guide
Page 3
... viewing of receiving analog basic, digital basic cable television programming by U.S. Reverse engineering or disassembly is prohibited. Certain advanced and interactive digital cable services such as improper changes or modifications not expressly approved by your HITACHI Factory Warranty. Note • There are no user serviceable parts inside the plasma television. • Model and serial numbers are displayed for about 6 minutes. Such "SCREEN DAMAGES" constitute misuse and are left on plasma display panel. The power cord is used as programs...
... viewing of receiving analog basic, digital basic cable television programming by U.S. Reverse engineering or disassembly is prohibited. Certain advanced and interactive digital cable services such as improper changes or modifications not expressly approved by your HITACHI Factory Warranty. Note • There are no user serviceable parts inside the plasma television. • Model and serial numbers are displayed for about 6 minutes. Such "SCREEN DAMAGES" constitute misuse and are left on plasma display panel. The power cord is used as programs...
Owners Guide
Page 4
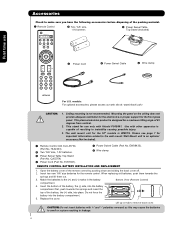
... to swell or rupture resulting in the battery Bottom View (Remote Control) compartment. 4. models: For optional accessories, please access our web site at: www.hitachi.us/tv CAUTION: 1. EW08433). ² Wire clamp REMOTE CONTROL BATTERY INSTALLATION AND REPLACEMENT 1. This plasma television product is an optional accessory (Not Included). ³ Remote Control Unit CLU-4373A (Part No. Use with Hitachi P50S601. CAUTION: Do not insert batteries with '+' and '-' polarities...
... to swell or rupture resulting in the battery Bottom View (Remote Control) compartment. 4. models: For optional accessories, please access our web site at: www.hitachi.us/tv CAUTION: 1. EW08433). ² Wire clamp REMOTE CONTROL BATTERY INSTALLATION AND REPLACEMENT 1. This plasma television product is an optional accessory (Not Included). ³ Remote Control Unit CLU-4373A (Part No. Use with Hitachi P50S601. CAUTION: Do not insert batteries with '+' and '-' polarities...
Owners Guide
Page 5
... the set failure, do not place the TV where temperatures can become excessively hot, for professional installer. C C D 50" 10.8 in. 15.35 in direct sunlight or near a heating appliance, etc. 30 cm (12 inches) 10 cm (4 inches) 10 cm (4 inches) CONNECT POWER SWIVEL CABLE Connect one end of cable to next page installation instruction. Keep the Plasma television 4 inches away from the perforated back cover of the Plasma Rear Panel...
... the set failure, do not place the TV where temperatures can become excessively hot, for professional installer. C C D 50" 10.8 in. 15.35 in direct sunlight or near a heating appliance, etc. 30 cm (12 inches) 10 cm (4 inches) 10 cm (4 inches) CONNECT POWER SWIVEL CABLE Connect one end of cable to next page installation instruction. Keep the Plasma television 4 inches away from the perforated back cover of the Plasma Rear Panel...
Owners Guide
Page 8
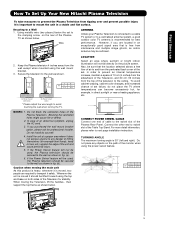
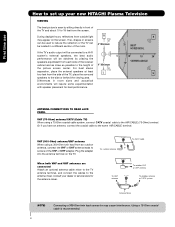
... TV, place the surround speakers to the AIR/CABLE (75-Ohm) terminal. Consult your new HITACHI Plasma Television VIEWING The best picture is recommended. 8 Using a 75-Ohm coaxial cable is seen by placing the speakers equidistant from the screen. First time use How to set up your dealer or service store for best performance. 4" Minimum L S 70 BEST HORIZONTAL 5' 10' 15' 20' VIEWING ANGLE 70 S ANTENNA CONNECTIONS TO REAR JACK PANEL VHF (75-Ohm) antenna/CATV (Cable TV) When using...
... TV, place the surround speakers to the AIR/CABLE (75-Ohm) terminal. Consult your new HITACHI Plasma Television VIEWING The best picture is recommended. 8 Using a 75-Ohm coaxial cable is seen by placing the speakers equidistant from the screen. First time use How to set up your dealer or service store for best performance. 4" Minimum L S 70 BEST HORIZONTAL 5' 10' 15' 20' VIEWING ANGLE 70 S ANTENNA CONNECTIONS TO REAR JACK PANEL VHF (75-Ohm) antenna/CATV (Cable TV) When using...
Owners Guide
Page 10
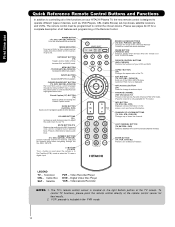
... precode is displayed. INPUTS BUTTON (TV) Accesses the INPUTS menu system. GUIDE BUTTON (SAT/CBL, PVR) Accesses the program guide of your HITACHI Plasma TV, the new remote control is used to Select/Activate highlighted menu items. Closed Caption (CC) BUTTON (TV) Press to show and change to manually enter the TV channel, and used for change the Closed Caption mode. PAUSE BUTTON (PVR/VCR, DVD) Press to enter/access Favorite Channel (FAV CH) mode. (Favorite channel is in DVD, PVR/VCR mode. ANT (Antenna) BUTTON (TV) Press for numeric...
... precode is displayed. INPUTS BUTTON (TV) Accesses the INPUTS menu system. GUIDE BUTTON (SAT/CBL, PVR) Accesses the program guide of your HITACHI Plasma TV, the new remote control is used to Select/Activate highlighted menu items. Closed Caption (CC) BUTTON (TV) Press to show and change to manually enter the TV channel, and used for change the Closed Caption mode. PAUSE BUTTON (PVR/VCR, DVD) Press to enter/access Favorite Channel (FAV CH) mode. (Favorite channel is in DVD, PVR/VCR mode. ANT (Antenna) BUTTON (TV) Press for numeric...
Owners Guide
Page 11
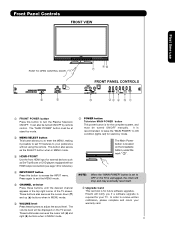
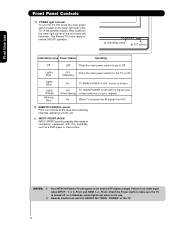
... card slot is required for reference). ብ INPUT/EXIT button Press this button to turn the Plasma Television ON/OFF. In order to receive written notification, please complete and return your preference without using the remote. The "MAIN POWER" button must be at stand-by mode. ባ MENU/SELECT button This button allows you if a software upgrade is for future software upgrades. These buttons also serve as Set-Top-Boxes or DVD players equipped with an HDMI output connection...
... card slot is required for reference). ብ INPUT/EXIT button Press this button to turn the Plasma Television ON/OFF. In order to receive written notification, please complete and return your preference without using the remote. The "MAIN POWER" button must be at stand-by mode. ባ MENU/SELECT button This button allows you if a software upgrade is for future software upgrades. These buttons also serve as Set-Top-Boxes or DVD players equipped with an HDMI output connection...
Owners Guide
Page 12
... power switch is set to make sure the TV is turned off or in Stand-by indicator lamp located on the TV is no sync. picture is ON ; NOTES: 1. Check the Power Light to Off. Off TV MAIN POWER is now ready for connecting equipment with no signal input (Power Saving) except antenna (no video input when INPUT : 1, 2, 3, Front and HDMI 1, 2 , Front. First time use . 2. The Plasma TV is ON with this area when selecting channels, adjusting volume, etc. ቭ INPUT...
... power switch is set to make sure the TV is turned off or in Stand-by indicator lamp located on the TV is no sync. picture is ON ; NOTES: 1. Check the Power Light to Off. Off TV MAIN POWER is now ready for connecting equipment with no signal input (Power Saving) except antenna (no video input when INPUT : 1, 2, 3, Front and HDMI 1, 2 , Front. First time use . 2. The Plasma TV is ON with this area when selecting channels, adjusting volume, etc. ቭ INPUT...
Owners Guide
Page 13
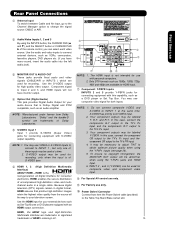
... used at the same time. Your component outputs may use with S-VIDEO output capability. To ensure no copyright infringement, the MONITOR OUT output will not have ቧ ባ mono sound, insert the audio cable into the left audio jack). ቤ MONITOR OUT & AUDIO OUT These jacks provide fixed audio and video signals (CABLE/AIR or INPUTS ) which are trademarks of the remote control, you have monitor output. ብ Optical Out (Digital Audio) This jack provides Digital Audio Output for your television screen...
... used at the same time. Your component outputs may use with S-VIDEO output capability. To ensure no copyright infringement, the MONITOR OUT output will not have ቧ ባ mono sound, insert the audio cable into the left audio jack). ቤ MONITOR OUT & AUDIO OUT These jacks provide fixed audio and video signals (CABLE/AIR or INPUTS ) which are trademarks of the remote control, you have monitor output. ብ Optical Out (Digital Audio) This jack provides Digital Audio Output for your television screen...
Owners Guide
Page 15
... your Plasma TV is dependent on the model and features of the INPUT terminals, then press the INPUTS button to show the INPUTS menu. The following examples: FRONT INPUT PANEL UPGRADE CARD (SERVICE USE ONLY) - Use the CURSOR PAD (̆ and ̄) to select the Input of video and audio inputs and outputs. Note : Special device cables will be according to front panel jacks. Check the owner's manual of each component. Completely insert connection cord plugs when connecting...
... your Plasma TV is dependent on the model and features of the INPUT terminals, then press the INPUTS button to show the INPUTS menu. The following examples: FRONT INPUT PANEL UPGRADE CARD (SERVICE USE ONLY) - Use the CURSOR PAD (̆ and ̄) to select the Input of video and audio inputs and outputs. Note : Special device cables will be according to front panel jacks. Check the owner's manual of each component. Completely insert connection cord plugs when connecting...
Owners Guide
Page 19
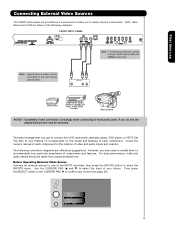
... The connected digital output device controls the HDMI interface so proper set top box or DVD player to prevent illegal copying of the HDTV set top box or DVD player to the last channel viewed. The picture and sound that encrypts video signals when using a DVI to the INPUT (AUDIO/R) jack as shown on the Rear panel below . 3. With DVI output, connect the cable from the HDTV SET TOP BOX or DVD player. 5. CABLE or Air signal HDTV Set-Top-Box or DVD Player DIGITAL OUTPUT Back of HDTV Set-Top-Box or DVD Player HDMI Cable or DVI to HDMI Input HDTV Set-Top-Box or DVD Player...
... The connected digital output device controls the HDMI interface so proper set top box or DVD player to prevent illegal copying of the HDTV set top box or DVD player to the last channel viewed. The picture and sound that encrypts video signals when using a DVI to the INPUT (AUDIO/R) jack as shown on the Rear panel below . 3. With DVI output, connect the cable from the HDTV SET TOP BOX or DVD player. 5. CABLE or Air signal HDTV Set-Top-Box or DVD Player DIGITAL OUTPUT Back of HDTV Set-Top-Box or DVD Player HDMI Cable or DVI to HDMI Input HDTV Set-Top-Box or DVD Player...
Owners Guide
Page 20
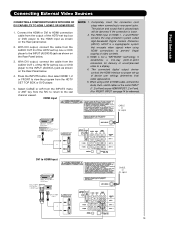
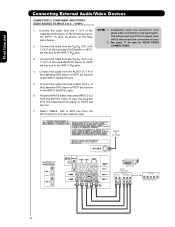
... connection cord plugs when connecting to the INPUT (PR) jack. 4. CABLE or Air signal DVD Player Back of the Laserdisc/DVD player or HDTV set top box to the INPUT (AUDIO/R) jack. Connect the cable from the R/C to return to the INPUT (AUDIO/L) jack. 6. Connect the cable from the PB/CB OUT or BY OUT of the Laserdisc/DVD player or HDTV set top box to the last channel tuned. First time use Connecting External Audio/Video Devices CONNECTING A COMPONENT AND STEREO AUDIO SOURCE TO INPUT 2 or 3 :Y-PBPR. 1. Connect...
... connection cord plugs when connecting to the INPUT (PR) jack. 4. CABLE or Air signal DVD Player Back of the Laserdisc/DVD player or HDTV set top box to the INPUT (AUDIO/R) jack. Connect the cable from the R/C to return to the INPUT (AUDIO/L) jack. 6. Connect the cable from the PB/CB OUT or BY OUT of the Laserdisc/DVD player or HDTV set top box to the last channel tuned. First time use Connecting External Audio/Video Devices CONNECTING A COMPONENT AND STEREO AUDIO SOURCE TO INPUT 2 or 3 :Y-PBPR. 1. Connect...
Owners Guide
Page 25
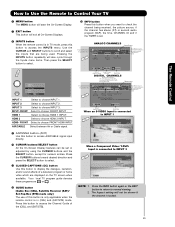
... local TV program guide denotes these programs as or . ¹ GUIDE button [Cable Box (CBL), Satellite Receiver (SAT)/ Set-Top-Box (STB) mode only] The use of this button is only applicable when the remote control is in TV mode, press this button to access the Channel Guide of a television program or home video which are being received, the picture source, if the channel has stereo (ST) or second audio program (SAP), the time, CHANNEL ID and if the TIMER is connected to choose INPUT 1.
... local TV program guide denotes these programs as or . ¹ GUIDE button [Cable Box (CBL), Satellite Receiver (SAT)/ Set-Top-Box (STB) mode only] The use of this button is only applicable when the remote control is in TV mode, press this button to access the Channel Guide of a television program or home video which are being received, the picture source, if the channel has stereo (ST) or second audio program (SAP), the time, CHANNEL ID and if the TIMER is connected to choose INPUT 1.
Owners Guide
Page 26
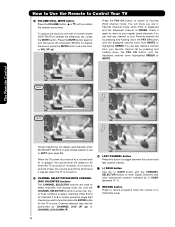
... last channel viewed. 17 (-) DASH button Use the (-) DASH button with the CHANNEL SELECTOR buttons to enter Digital Channels that have subchannel numbers indicated by pressing and holding down the FAV CH button until the displayed channel turns from your regular tuned channels. To restore the sound, press the MUTE button one more time, or VOL UP (̆). When the TV power is GREEN. You will default to record programs when the remote is set...
... last channel viewed. 17 (-) DASH button Use the (-) DASH button with the CHANNEL SELECTOR buttons to enter Digital Channels that have subchannel numbers indicated by pressing and holding down the FAV CH button until the displayed channel turns from your regular tuned channels. To restore the sound, press the MUTE button one more time, or VOL UP (̆). When the TV power is GREEN. You will default to record programs when the remote is set...
Owners Guide
Page 28
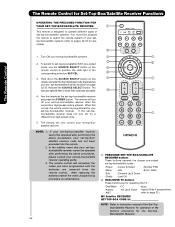
... turn off your set -top-box/satellite codes : -Power -Menu -Exit -Guide -Cursor & Select -Info -Channel Up & Down -Last CH -Number PAD -Enter, Dash ባ EXCLUSIVE TV buttons These buttons are removed from the remote control. After replacing the batteries repeat the entire programming procedure as shown on the ቢ remote control to position the LED light to page 31). The remote will now control your set -top-box/satellite (SAT) pre-coded ባ mode, use the SOURCE SELECT button...
... turn off your set -top-box/satellite codes : -Power -Menu -Exit -Guide -Cursor & Select -Info -Channel Up & Down -Last CH -Number PAD -Enter, Dash ባ EXCLUSIVE TV buttons These buttons are removed from the remote control. After replacing the batteries repeat the entire programming procedure as shown on the ቢ remote control to position the LED light to page 31). The remote will now control your set -top-box/satellite (SAT) pre-coded ባ mode, use the SOURCE SELECT button...

Owners Guide
Page 34
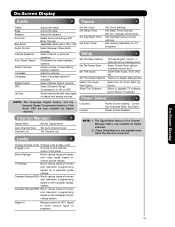
.... The AUTO COLOR function automatically monitors and adjusts the color to quickly exit from a menu. Day Dynamic, Day Normal and Night. Turn On/Off the 3:2 Pulldown detection feature. Adjust color. Press MENU on the remote control to display the different features on the remote control to maintain constant color levels even after a program or channel changes. Video Audio Channel Manager Locks Timers Setup Power Swivel Move SEL Select This part of the On-Screen Display menu. Use the CURSOR PAD (buttons ̆...
.... The AUTO COLOR function automatically monitors and adjusts the color to quickly exit from a menu. Day Dynamic, Day Normal and Night. Turn On/Off the 3:2 Pulldown detection feature. Adjust color. Press MENU on the remote control to display the different features on the remote control to maintain constant color levels even after a program or channel changes. Video Audio Channel Manager Locks Timers Setup Power Swivel Move SEL Select This part of the On-Screen Display menu. Use the CURSOR PAD (buttons ̆...
Owners Guide
Page 35
... for Digital channels. Set Channel List. Movie Ratings Block various types of the Audio OSD are only available for TV programs. Internal Speakers Sources. Change Access Code Change Lock access code. Select Language options if available. Select Optical Output options. Eliminates the noise between stations. Set The Menu Options Set The Screen Saver Set The Inputs Set The Closed Captions Choose English, French, or Spanish text and Background. On-Screen Display On-Screen Display Audio Timers Treble Adjust the treble. Set the Clock Set Clock Settings. Power...
... for Digital channels. Set Channel List. Movie Ratings Block various types of the Audio OSD are only available for TV programs. Internal Speakers Sources. Change Access Code Change Lock access code. Select Language options if available. Select Optical Output options. Eliminates the noise between stations. Set The Menu Options Set The Screen Saver Set The Inputs Set The Closed Captions Choose English, French, or Spanish text and Background. On-Screen Display On-Screen Display Audio Timers Treble Adjust the treble. Set the Clock Set Clock Settings. Power...

Owners Guide
Page 61
... 1 • Antenna (RF)Inputs 1 • Audio Output 1 • Monitor Output 1 • Optical Output 1 • Upgrade Card Slot 1 • HDMI 3 • RS232C Interface 1 SPECIFICATIONS • Pixel Pitch . . . . 0.576(horiz.) x 0.580(vert.) mm. • FCC class B for custom installations. Features and Specifications Features: • New 1080 Full HD Plasma Display Panel • New Easy-to-Use On-Screen Menu Control (3 Language) • Region 5 (Downloadable V-Chip) • Preprogrammed Remote Control • Power Management: ON/OFF via signal detection • Picture...
... 1 • Antenna (RF)Inputs 1 • Audio Output 1 • Monitor Output 1 • Optical Output 1 • Upgrade Card Slot 1 • HDMI 3 • RS232C Interface 1 SPECIFICATIONS • Pixel Pitch . . . . 0.576(horiz.) x 0.580(vert.) mm. • FCC class B for custom installations. Features and Specifications Features: • New 1080 Full HD Plasma Display Panel • New Easy-to-Use On-Screen Menu Control (3 Language) • Region 5 (Downloadable V-Chip) • Preprogrammed Remote Control • Power Management: ON/OFF via signal detection • Picture...
Owners Guide
Page 65
... LICENSE THAT MAY ACCOMPANY SUCH UPGRADE, (A) DO NOT USE ANY HITACHI-PROVIDED FLASH CARD OR OTHER MEDIA, (B) DO NOT PERFORM INSTALL ANY HITACHI-PROVIDED UPGRADE SOFTWARE ON YOUR DTV, AND (C) PROMPTLY RETURN SUCH FLASH CARD OR OTHER MEDIA TO HITACHI. 5. NO FAILURE OF ESSENTIAL PURPOSE. SEVERABILITY. License Agreements 129 By using the DTV or the digital television software installed on the DTV (the "DTV Software") or any copyright infringement or...
... LICENSE THAT MAY ACCOMPANY SUCH UPGRADE, (A) DO NOT USE ANY HITACHI-PROVIDED FLASH CARD OR OTHER MEDIA, (B) DO NOT PERFORM INSTALL ANY HITACHI-PROVIDED UPGRADE SOFTWARE ON YOUR DTV, AND (C) PROMPTLY RETURN SUCH FLASH CARD OR OTHER MEDIA TO HITACHI. 5. NO FAILURE OF ESSENTIAL PURPOSE. SEVERABILITY. License Agreements 129 By using the DTV or the digital television software installed on the DTV (the "DTV Software") or any copyright infringement or...

Owners Guide
Page 76
... Picture Mode 36 Power Swivel 57 C Caution and Safety Tips 2-3 Channel Manager 41-42 Auto Channel Scan 41 Clock 49 Closed Captions Captions 55 Color Temperature 37 Color 36 Color Space 37 Contrast 36 Contrast Mode 37 E Event Timer 51 External Video Source 14-21 R Remote Control Functions 10, 22-33 Programming Codes 32-33 Installing Batteries 4 S Screen Saver 53 Setup 52-56 Sharpness 36 Spanish Section 65-128 Speakers 40 Connecting External Speakers 40 Internal 40 Surround 39 Specifications...
... Picture Mode 36 Power Swivel 57 C Caution and Safety Tips 2-3 Channel Manager 41-42 Auto Channel Scan 41 Clock 49 Closed Captions Captions 55 Color Temperature 37 Color 36 Color Space 37 Contrast 36 Contrast Mode 37 E Event Timer 51 External Video Source 14-21 R Remote Control Functions 10, 22-33 Programming Codes 32-33 Installing Batteries 4 S Screen Saver 53 Setup 52-56 Sharpness 36 Spanish Section 65-128 Speakers 40 Connecting External Speakers 40 Internal 40 Surround 39 Specifications...


