Owners Guide
Page 3
...images are left on the screen for more information call your authorized dealer or service center. The power cord is protected by TV stations and cable companies, as well as programs from other than 2.5 minutes, protection function will restore after moving ) patterns can... be permanently imprinted onto your HITACHI Factory Warranty. If the television does not operate properly, unplug the plasma television and call your local government agency or www.eRecycle.org (in California), the Electronic Industries...
...images are left on the screen for more information call your authorized dealer or service center. The power cord is protected by TV stations and cable companies, as well as programs from other than 2.5 minutes, protection function will restore after moving ) patterns can... be permanently imprinted onto your HITACHI Factory Warranty. If the television does not operate properly, unplug the plasma television and call your local government agency or www.eRecycle.org (in California), the Electronic Industries...
Owners Guide
Page 4
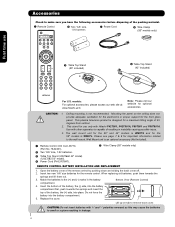
... for a maximum tilting angle of 45 degrees from vertical. 2. This plasma television product is WM07L. HL02401). · Two "AA" size, 1.5V batteries. » Table Top Stand (UX27662 42" model) (UX27282 50" model). ¿ Power Cord (P# EV01841)....cause the batteries to the wall mount. models: For optional accessories, please access our web site at: www.hitachi.us/tv Note: Please visit our website for the remote control. Please see page 7 & 8 for important information ... Cord ´ Wire Clamp (50" models only) First time use only with Hitachi P42T501, P42T501A, P50T501 and P50T501A.
... for a maximum tilting angle of 45 degrees from vertical. 2. This plasma television product is WM07L. HL02401). · Two "AA" size, 1.5V batteries. » Table Top Stand (UX27662 42" model) (UX27282 50" model). ¿ Power Cord (P# EV01841)....cause the batteries to the wall mount. models: For optional accessories, please access our web site at: www.hitachi.us/tv Note: Please visit our website for the remote control. Please see page 7 & 8 for important information ... Cord ´ Wire Clamp (50" models only) First time use only with Hitachi P42T501, P42T501A, P50T501 and P50T501A.
Owners Guide
Page 5
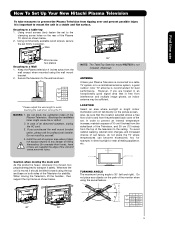
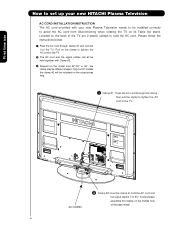
...moved, two people arerequired to a table-top 1. Using commercially available wood screws, secure the set failure, do not place the TV where temperatures can become excessively hot, for best performance. A A 42" 4 in. 10 cm 50" 4 in. 10 cm 55" 4 in direct sunlight or near a heating appliance, etc. ...Television, lift the handles , then support the top frame as shown below . 2. How To Set Up Your New Hitachi Plasma Television To take measures to prevent the Plasma Television from tipping over and prevent possible injury it is important to the clamping screw holes on the rear of the...
...moved, two people arerequired to a table-top 1. Using commercially available wood screws, secure the set failure, do not place the TV where temperatures can become excessively hot, for best performance. A A 42" 4 in. 10 cm 50" 4 in. 10 cm 55" 4 in direct sunlight or near a heating appliance, etc. ...Television, lift the handles , then support the top frame as shown below . 2. How To Set Up Your New Hitachi Plasma Television To take measures to prevent the Plasma Television from tipping over and prevent possible injury it is important to the clamping screw holes on the rear of the...
Owners Guide
Page 6
For 50 " model please assemble this Clamp on the model size 42",50" or 55", the clamp may be installed correctly to the TV. Located on the back of the base metal. 6 Please follow the instructions below. ³ Pass the AC cord through this clamp to hold the AC ... clamp to tighten the AC cord to avoid the AC cord from disconnecting when rotating the TV on the clamp to tighten the AC cord to the TV. First time use How to set up your new HITACHI Plasma Television AC CORD INSTALLATION INSTRUCTION The AC cord provided with Clamp #2. » Depend on the...
For 50 " model please assemble this Clamp on the model size 42",50" or 55", the clamp may be installed correctly to the TV. Located on the back of the base metal. 6 Please follow the instructions below. ³ Pass the AC cord through this clamp to hold the AC ... clamp to tighten the AC cord to avoid the AC cord from disconnecting when rotating the TV on the clamp to tighten the AC cord to the TV. First time use How to set up your new HITACHI Plasma Television AC CORD INSTALLATION INSTRUCTION The AC cord provided with Clamp #2. » Depend on the...
Owners Guide
Page 7
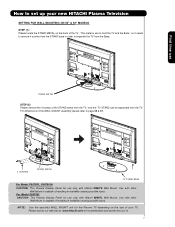
... is capable of resulting in order to separate the TV from the Base. This Plasma Display Panel for the Plasma TV depending on the back of the TV . Use with Hitachi WM07L Wall Mount. so it needs to remove 4 screws from the TV. How to set up your new HITACHI Plasma Television SETTING FOR WALL MOUNTING ON 50" & 55...
... is capable of resulting in order to separate the TV from the Base. This Plasma Display Panel for the Plasma TV depending on the back of the TV . Use with Hitachi WM07L Wall Mount. so it needs to remove 4 screws from the TV. How to set up your new HITACHI Plasma Television SETTING FOR WALL MOUNTING ON 50" & 55...
Owners Guide
Page 8
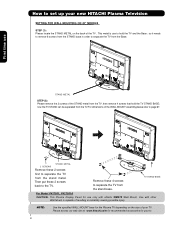
...order to separate the TV from the stand base. First time use to hold the TV STAND BASE; TV STAND BASE For Model P42T501, P42 T501A CAUTION- so it needs to remove 6 screws from the TV, then remove 4 screws that hold the TV and the Base ; Use with Hitachi WM07S Wall Mount. Then...screws first to separate the TV from the stand metal. How to set up your new HITACHI Plasma Television SETTING FOR WALL MOUNTING ON 42" MODELS STEP (1) : Please locate the STAND METAL on the size of the TV . NOTE: Use the specified WALL MOUNT base for the Plasma TV depending on the back of...
...order to separate the TV from the stand base. First time use to hold the TV STAND BASE; TV STAND BASE For Model P42T501, P42 T501A CAUTION- so it needs to remove 6 screws from the TV, then remove 4 screws that hold the TV and the Base ; Use with Hitachi WM07S Wall Mount. Then...screws first to separate the TV from the stand metal. How to set up your new HITACHI Plasma Television SETTING FOR WALL MOUNTING ON 42" MODELS STEP (1) : Please locate the STAND METAL on the size of the TV . NOTE: Use the specified WALL MOUNT base for the Plasma TV depending on the back of...
Owners Guide
Page 9
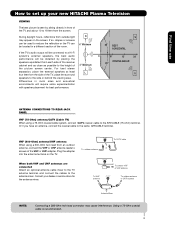
... cause interference. When both VHF and UHF antennas are connected Attach an optional antenna cable mixer to the TV antenna terminal, and connect the cables to the same AIR/CABLE terminal. Consult your new HITACHI Plasma Television VIEWING The best picture is recommended. 9 First time use How to set up your dealer or...
... cause interference. When both VHF and UHF antennas are connected Attach an optional antenna cable mixer to the TV antenna terminal, and connect the cables to the same AIR/CABLE terminal. Consult your new HITACHI Plasma Television VIEWING The best picture is recommended. 9 First time use How to set up your dealer or...
Owners Guide
Page 10
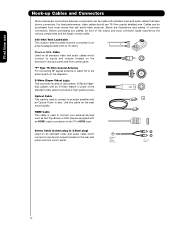
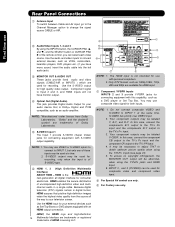
... cable must be connected to an antenna adapter (300-Ohm to the antenna jack on all standard video and audio cables which connect to the TV's HDMI input. HDMI Cable This cable is used to connect your external devices such as Set-Top-Boxes or DVD players equipped with an Optical... PLUGS 10 Stereo Cable (3.8mm plug to 3.5mm plug) Used on the television. "F" Type 75-Ohm Coaxial Antenna For connecting RF signals (antenna or cable TV) to 75-Ohm). Use this cable for the best sound quality. Optical Cable This cable is used to connect to an audio amplifier with an...
... cable must be connected to an antenna adapter (300-Ohm to the antenna jack on all standard video and audio cables which connect to the TV's HDMI input. HDMI Cable This cable is used to connect your external devices such as Set-Top-Boxes or DVD players equipped with an Optical... PLUGS 10 Stereo Cable (3.8mm plug to 3.5mm plug) Used on the television. "F" Type 75-Ohm Coaxial Antenna For connecting RF signals (antenna or cable TV) to 75-Ohm). Use this cable for the best sound quality. Optical Cable This cable is used to connect to an audio amplifier with an...
Owners Guide
Page 11
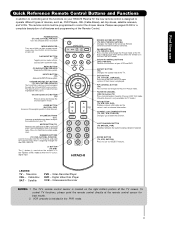
..., please point the remote control directly at the remote control sensor for a complete description of all of the functions on your HITACHI Plasma TV, the new remote control is included in DVD or PVR/VCR mode. VCR precode is designed to use Quick Reference Remote Control Buttons and ... of devices, such as, DVD Players, CBL (Cable Boxes), set-top-boxes, satellite receivers, and VCRs. VOLUME BUTTONS (TV ) Increase up or down to complete mute if pressed twice. MUTE BUTTON (TV) Reduces the audio level to 50% if pressed once, and to adjust the audio level of the Universal Remote...
..., please point the remote control directly at the remote control sensor for a complete description of all of the functions on your HITACHI Plasma TV, the new remote control is included in DVD or PVR/VCR mode. VCR precode is designed to use Quick Reference Remote Control Buttons and ... of devices, such as, DVD Players, CBL (Cable Boxes), set-top-boxes, satellite receivers, and VCRs. VOLUME BUTTONS (TV ) Increase up or down to complete mute if pressed twice. MUTE BUTTON (TV) Reduces the audio level to 50% if pressed once, and to adjust the audio level of the Universal Remote...
Owners Guide
Page 12
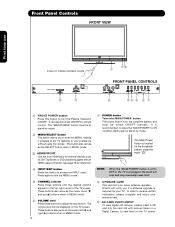
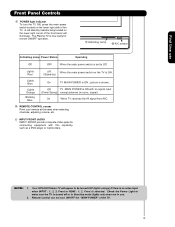
... The volume level will be turned ON/OFF manually. Hitachi will stop and may eventually reset itself. ቩ UPGRADE CARD This card slot is located on the TV screen. This button also serves as the SELECT button when... as the cursor left (̇) and right (̈) buttons when in the top right corner of the TV screen. NOTE: When the "MAIN POWER" button is set to ON condition (lights red) for reference)....will notify you to enter the MENU, making it possible to set TV features to turn the Plasma Television ON/OFF. It is required for the complete system, and must be turned ON/...
... The volume level will be turned ON/OFF manually. Hitachi will stop and may eventually reset itself. ቩ UPGRADE CARD This card slot is located on the TV screen. This button also serves as the SELECT button when... as the cursor left (̇) and right (̈) buttons when in the top right corner of the TV screen. NOTE: When the "MAIN POWER" button is set to ON condition (lights red) for reference)....will notify you to enter the MENU, making it possible to set TV features to turn the Plasma Television ON/OFF. It is required for the complete system, and must be turned ON/...
Owners Guide
Page 13
...by indicator lamp located on the lower right side of the TV. 13 On When TV receives the IR signal from R/C. ቫ REMOTE CONTROL sensor Point your remote at this capability, such as a DVD player or Camcorders. Your HITACHI Plasma TV will illuminate. NOTES: 1. Check the Power Light to make... sure the TV is turned off or in Stand-by mode (lights red) when not in use Front Panel Controls ቪ...
...by indicator lamp located on the lower right side of the TV. 13 On When TV receives the IR signal from R/C. ቫ REMOTE CONTROL sensor Point your remote at this capability, such as a DVD player or Camcorders. Your HITACHI Plasma TV will illuminate. NOTES: 1. Check the Power Light to make... sure the TV is turned off or in Stand-by mode (lights red) when not in use Front Panel Controls ቪ...
Owners Guide
Page 14
... distribution of Dolby Laboratories. ቦ S-VIDEO Input 1 The Input 1 provide S-VIDEO (Super Video) jacks for use VIDEO or S-VIDEO inputs to connect to the TV's PR input. 4. The HDMI input is of HDMI Licensing LLC. ቢ ቦ ቪ ቩ ቤ ቧ ባ ቨ ብ...as Set-Top-Boxes or DVD players equipped with personal computers. 2. In this case, connect the components B-Y output to the TV's PB input and the components R-Y output to your audio device that pristine high-definition images retain the highest video quality from Dolby Laboratories....
... distribution of Dolby Laboratories. ቦ S-VIDEO Input 1 The Input 1 provide S-VIDEO (Super Video) jacks for use VIDEO or S-VIDEO inputs to connect to the TV's PR input. 4. The HDMI input is of HDMI Licensing LLC. ቢ ቦ ቪ ቩ ቤ ቧ ባ ቨ ብ...as Set-Top-Boxes or DVD players equipped with personal computers. 2. In this case, connect the components B-Y output to the TV's PB input and the components R-Y output to your audio device that pristine high-definition images retain the highest video quality from Dolby Laboratories....
Owners Guide
Page 16
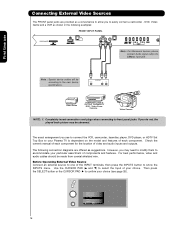
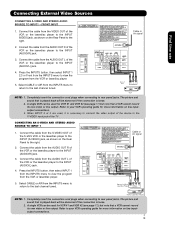
... of your choice (see page 26). First time use to connect the VCR, camcorder, laserdisc player, DVD player, or HDTV Set Top Box to your Plasma TV is dependent on the model and features of each component for the location of video and audio inputs and outputs.
... of your choice (see page 26). First time use to connect the VCR, camcorder, laserdisc player, DVD player, or HDTV Set Top Box to your Plasma TV is dependent on the model and features of each component for the location of video and audio inputs and outputs.
Owners Guide
Page 17
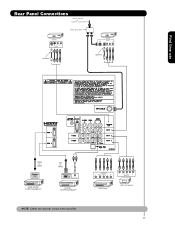
First time use Rear Panel Connections Outside Antenna or Cable TV coaxial cable 2-Way signal splitter VCR #2 S-VIDEO V L R INPUT Optional VCR #1 ANT OUTPUT IN S-VIDEO V L R Optional HDMI to HDMI HDMI OUTPUT HDMI DIGITAL OUTPUT CAPABILITY DVI to HDMI DIGITAL OUTPUT AUDIO OUT DIGITAL OUTPUT CAPABILITY NOTE: Cables are optional, except when specified. OUTPUT Y PB/CB PR/CR L R Y PB PR L R OUTPUT DVD Player HDTV Set-Top Box 17
First time use Rear Panel Connections Outside Antenna or Cable TV coaxial cable 2-Way signal splitter VCR #2 S-VIDEO V L R INPUT Optional VCR #1 ANT OUTPUT IN S-VIDEO V L R Optional HDMI to HDMI HDMI OUTPUT HDMI DIGITAL OUTPUT CAPABILITY DVI to HDMI DIGITAL OUTPUT AUDIO OUT DIGITAL OUTPUT CAPABILITY NOTE: Cables are optional, except when specified. OUTPUT Y PB/CB PR/CR L R Y PB PR L R OUTPUT DVD Player HDTV Set-Top Box 17
Owners Guide
Page 18
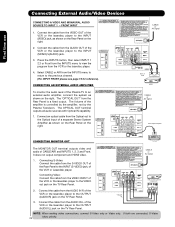
...high performance laserdisc players, VCRs etc. Connecting the television directly to use Tips on (L/(MONO)) the Rear Panel. • Refer to the TV's PR input. • Your component outputs may be labeled Y-CBCR. Use these connections in place of the standard video connection if your device... has this feature. • Your component outputs may be labeled Y, B-Y, and R-Y. In this case, connect the components B-Y output to the TV's PB input and the components R-Y output to the operating guide of your other electronic equipment for additional information on page 17). Video signals fed ...
...high performance laserdisc players, VCRs etc. Connecting the television directly to use Tips on (L/(MONO)) the Rear Panel. • Refer to the TV's PR input. • Your component outputs may be labeled Y-CBCR. Use these connections in place of the standard video connection if your device... has this feature. • Your component outputs may be labeled Y, B-Y, and R-Y. In this case, connect the components B-Y output to the TV's PB input and the components R-Y output to the operating guide of your other electronic equipment for additional information on page 17). Video signals fed ...
Owners Guide
Page 19
... VCR or the laserdisc player to the INPUT (AUDIO/R) jack. 3. Back of the VCR or the laserdisc player to the Y/VIDEO input jack of the TV . Select CABLE or AIR from the VCR or laserdisc player. 5. Completely insert the connection cord plugs when connecting to rear panel jacks. A single VCR can...
... VCR or the laserdisc player to the INPUT (AUDIO/R) jack. 3. Back of the VCR or the laserdisc player to the Y/VIDEO input jack of the TV . Select CABLE or AIR from the VCR or laserdisc player. 5. Completely insert the connection cord plugs when connecting to rear panel jacks. A single VCR can...
Owners Guide
Page 22
...the laserdisc player to the INPUT (VIDEO) jack, as shown on the Rear Panel on the TV Rear Panel. Connect an optical cable from the Rear Panel is controlled by the amplifier, not by the Plasma Television. It does not output component and HDMI video. Connect the cable from the VIDEO INPUT... Panel. CONNECTING AN EXTERNAL AUDIO AMPLIFIER To monitor the audio level of the amplifier is a fixed output. The Volume of the Plasma TV to the VIDEO out jack on the right. The OPTICAL OUT terminal outputs all audio sources with Optical IN capability. 1. Connecting Video: Connect the cable...
...the laserdisc player to the INPUT (VIDEO) jack, as shown on the Rear Panel on the TV Rear Panel. Connect an optical cable from the Rear Panel is controlled by the amplifier, not by the Plasma Television. It does not output component and HDMI video. Connect the cable from the VIDEO INPUT... Panel. CONNECTING AN EXTERNAL AUDIO AMPLIFIER To monitor the audio level of the amplifier is a fixed output. The Volume of the Plasma TV to the VIDEO out jack on the right. The OPTICAL OUT terminal outputs all audio sources with Optical IN capability. 1. Connecting Video: Connect the cable...

Owners Guide
Page 23
...indicating that the remote will now control your cable box (see page 35 for instructions on how to program the remote to control your HITACHI Plasma TV, the new remote control is designed to operate different types of the Source Select on the remote. The Remote Control The Remote Control ... box). To operate your DVD player, select DVD by pressing the Source button of VCRs, CATV (Cable TV) converters, set -top-box or satellite receiver). To operate your Plasma TV, select TV by pressing the Source button of the Source Select on the remote. The DVD mode indicator will blink, ...
...indicating that the remote will now control your cable box (see page 35 for instructions on how to program the remote to control your HITACHI Plasma TV, the new remote control is designed to operate different types of the Source Select on the remote. The Remote Control The Remote Control ... box). To operate your DVD player, select DVD by pressing the Source button of VCRs, CATV (Cable TV) converters, set -top-box or satellite receiver). To operate your Plasma TV, select TV by pressing the Source button of the Source Select on the remote. The DVD mode indicator will blink, ...

Owners Guide
Page 24
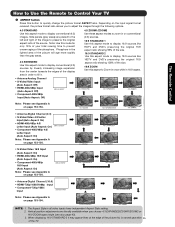
The Remote Control How to Use the Remote to Control Your TV ³ POWER button Press this button to turn the TV set the remote control to TV mode). ³ · MODE Indicator · » Turns on or off when the remote is in TV mode. (See page 23 for settings changes). NOTE: For automatic...
The Remote Control How to Use the Remote to Control Your TV ³ POWER button Press this button to turn the TV set the remote control to TV mode). ³ · MODE Indicator · » Turns on or off when the remote is in TV mode. (See page 23 for settings changes). NOTE: For automatic...
Owners Guide
Page 25
... of the display area in order to fill it may appear lines at the edge of the picture this is normal operation 25 of the TV. When displaying 16:9 STANDARD 2 it . • Antenna-Analog Channel • S-Video/Video Input (Auto Aspect: Off) • HDMI-480i/480p Input (Auto Aspect: Off) &#...to Zoom-in once while in all video inputs have independent Aspect Style setting. 2. The Remote Control How to Use the Remote to Control Your TV ² ASPECT button Press this button to prevent uneven aging of the phosphors. Note: Use this aspect to preserve the original aspect ratio of the...
... of the display area in order to fill it may appear lines at the edge of the picture this is normal operation 25 of the TV. When displaying 16:9 STANDARD 2 it . • Antenna-Analog Channel • S-Video/Video Input (Auto Aspect: Off) • HDMI-480i/480p Input (Auto Aspect: Off) &#...to Zoom-in once while in all video inputs have independent Aspect Style setting. 2. The Remote Control How to Use the Remote to Control Your TV ² ASPECT button Press this button to prevent uneven aging of the phosphors. Note: Use this aspect to preserve the original aspect ratio of the...


