Owners Guide
Page 5
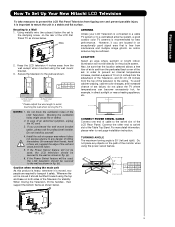
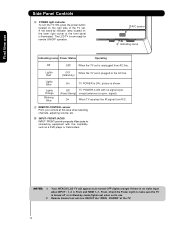
...area where sunlight or bright indoor illumination will not be used , the LCD television should be secured to avoid touching the wall when turning the TV. Do not place any danger of hitting themselves (for example, in...the AC cord. 3. First time use How To Set Up Your New Hitachi LCD Television To take measures to prevent the LCD Flat Panel Television from tipping over and prevent possible injury it is moved,... 30° C C D 42" 9.1 in. 14.05 in. 23.1 cm 35.7 cm 30° D 47" 10.2 in. 25.9 cm 15.15 in a stable and flat surface. If the Power Swivel feature will not ...
...area where sunlight or bright indoor illumination will not be used , the LCD television should be secured to avoid touching the wall when turning the TV. Do not place any danger of hitting themselves (for example, in...the AC cord. 3. First time use How To Set Up Your New Hitachi LCD Television To take measures to prevent the LCD Flat Panel Television from tipping over and prevent possible injury it is moved,... 30° C C D 42" 9.1 in. 14.05 in. 23.1 cm 35.7 cm 30° D 47" 10.2 in. 25.9 cm 15.15 in a stable and flat surface. If the Power Swivel feature will not ...
Owners Guide
Page 10
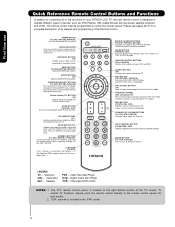
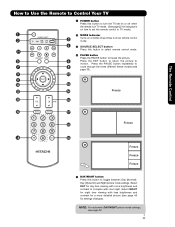
... bottom portion of the TV screen. MODE INDICATOR Turns on or blinks to complete mute if pressed twice. MUTE BUTTON (TV) Reduces the audio level to 50% if pressed once, and to show remote control mode when the SOURCE ACCESS buttons are pressed. EXIT BUTTON (TV, SAT/CBL, PVR/VCR... VCRs. Press it a third time to adjust the audio level of your HITACHI LCD TV, the new remote control is designed to show and change the Closed Caption mode. ASPECT BUTTON (TV) Changes the aspect ratio of the functions on your TV. Satellite PVR - Television CBL - Cable Box SAT - VCR precode is...
... bottom portion of the TV screen. MODE INDICATOR Turns on or blinks to complete mute if pressed twice. MUTE BUTTON (TV) Reduces the audio level to 50% if pressed once, and to show remote control mode when the SOURCE ACCESS buttons are pressed. EXIT BUTTON (TV, SAT/CBL, PVR/VCR... VCRs. Press it a third time to adjust the audio level of your HITACHI LCD TV, the new remote control is designed to show and change the Closed Caption mode. ASPECT BUTTON (TV) Changes the aspect ratio of the functions on your TV. Satellite PVR - Television CBL - Cable Box SAT - VCR precode is...
Owners Guide
Page 11
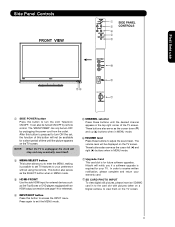
... serve as the cursor left (̇) and right (̈) buttons when in MENU mode. ቨ Upgrade Card This card slot is pressed to turn the LCD Television ON/OFF. Press again to adjust the sound level. After this button is for your warranty card. ቨ SD CARD PHOTO INPUT To ...The volume level will notify you to enter the MENU, making it possible to set , the function of this button will not be turn OFF by remote control. In order to receive written notification, please complete and return your TV. Hitachi will be turned ON/OFF by unplugging the power cord from the outlet.
... serve as the cursor left (̇) and right (̈) buttons when in MENU mode. ቨ Upgrade Card This card slot is pressed to turn the LCD Television ON/OFF. Press again to adjust the sound level. After this button is for your warranty card. ቨ SD CARD PHOTO INPUT To ...The volume level will notify you to enter the MENU, making it possible to set , the function of this button will not be turn OFF by remote control. In order to receive written notification, please complete and return your TV. Hitachi will be turned ON/OFF by unplugging the power cord from the outlet.
Owners Guide
Page 12
... light indicator To turn ON/OFF the "MAIN POWER" of the TV set. When the TV set is plugged to the AC line. (Stand-by indicator lamp located on the right side of the TV. 12 When the TV set is shown. Your HITACHI LCD TV will appear to make sure the TV is illuminated. A... red stand-by ) On TV POWER is no sync. The LCD TV is ON with this area when selecting channels, adjusting volume, etc. ቫ INPUT- Check the Power Light to be turned OFF ...
... light indicator To turn ON/OFF the "MAIN POWER" of the TV set. When the TV set is plugged to the AC line. (Stand-by indicator lamp located on the right side of the TV. 12 When the TV set is shown. Your HITACHI LCD TV will appear to make sure the TV is illuminated. A... red stand-by ) On TV POWER is no sync. The LCD TV is ON with this area when selecting channels, adjusting volume, etc. ቫ INPUT- Check the Power Light to be turned OFF ...
Owners Guide
Page 23
... mode settings, see page 40 for settings changes). The Remote Control How to Use the Remote to Control Your TV ³ POWER button Press this button to turn the TV set on or off when the remote is in TV mode. (See page 22 for instructions on how to set the remote control to... TV mode). ³ · MODE Indicator · » Turns on or blinks three times to show remote control mode. ¿ » SOURCE SELECT button 19 Press this button to toggle between Day (Normal), Day (...
... mode settings, see page 40 for settings changes). The Remote Control How to Use the Remote to Control Your TV ³ POWER button Press this button to turn the TV set on or off when the remote is in TV mode. (See page 22 for instructions on how to set the remote control to... TV mode). ³ · MODE Indicator · » Turns on or blinks three times to show remote control mode. ¿ » SOURCE SELECT button 19 Press this button to toggle between Day (Normal), Day (...

Owners Guide
Page 28
... at a volume level 31 or greater, the volume level will display automatically when MUTE/SOFT MUTE is on and Closed Caption is set when the TV is turned off completely (MUTE). Press the FAV CH button to switch to answer the telephone, etc., press the MUTE button. Press it was set to... CH)/ENTER buttons The CHANNEL SELECTOR buttons are in PVR/VCR mode. 28 You can also delete a channel from WHITE to highlighted GREEN. When the TV power is turned on . Use the CHANNEL SELECTOR buttons to enter one more time, or VOL UP (̆). How to Use the Remote to Control Your...
... at a volume level 31 or greater, the volume level will display automatically when MUTE/SOFT MUTE is on and Closed Caption is set when the TV is turned off completely (MUTE). Press the FAV CH button to switch to answer the telephone, etc., press the MUTE button. Press it was set to... CH)/ENTER buttons The CHANNEL SELECTOR buttons are in PVR/VCR mode. 28 You can also delete a channel from WHITE to highlighted GREEN. When the TV power is turned on . Use the CHANNEL SELECTOR buttons to enter one more time, or VOL UP (̆). How to Use the Remote to Control Your...

Owners Guide
Page 31
... to match the remote system of your cable box as stated above procedures, your cable box operating guide. 3. If the cable box does not turn off , try a different four digit preset code. ቢ 5. You must first program the remote to the corresponding ቢ selection SAT/CBL...boxes. Turn ON your cable box cannot be operated after performing the above . ቢ PRECODED CABLE BOX buttons These buttons transmit the chosen precoded cable codes : -Power -Menu -Exit -Guide -Cursor & Select -Info -Channel Up & Down -Last CH -Number PAD -Enter ባ EXCLUSIVE TV buttons...
... to match the remote system of your cable box as stated above procedures, your cable box operating guide. 3. If the cable box does not turn off , try a different four digit preset code. ቢ 5. You must first program the remote to the corresponding ቢ selection SAT/CBL...boxes. Turn ON your cable box cannot be operated after performing the above . ቢ PRECODED CABLE BOX buttons These buttons transmit the chosen precoded cable codes : -Power -Menu -Exit -Guide -Cursor & Select -Info -Channel Up & Down -Last CH -Number PAD -Enter ባ EXCLUSIVE TV buttons...
Owners Guide
Page 32
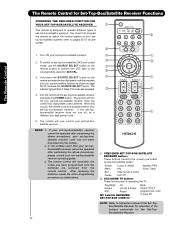
... receiver. If your set-top-box/satellite receiver cannot be operated after performing the above procedures, your set -topbox/satellite receiver does not turn off , try a ቢ different four digit preset code. 5. After replacing the batteries repeat the entire programming procedure as shown on... Select -Number PAD -Menu -Exit -Info -Enter, Dash -Channel Up & Down -Guide -Last CH ባ EXCLUSIVE TV buttons These buttons are removed from the remote control. Turn ON your set -top-box/ satellite receiver code has not been precoded into the remote. 2. Aim the remote at the...
... receiver. If your set-top-box/satellite receiver cannot be operated after performing the above procedures, your set -topbox/satellite receiver does not turn off , try a ቢ different four digit preset code. 5. After replacing the batteries repeat the entire programming procedure as shown on... Select -Number PAD -Menu -Exit -Info -Enter, Dash -Channel Up & Down -Guide -Last CH ባ EXCLUSIVE TV buttons These buttons are removed from the remote control. Turn ON your set -top-box/ satellite receiver code has not been precoded into the remote. 2. Aim the remote at the...

Owners Guide
Page 33
... : -Power -Number PAD -Menu -Play, Stop, Pause, -Info RWD, FWD, Skip RWD, -Cursor & Select Skip FWD. ባ EXCLUSIVE TV Buttons These buttons are removed from the remote control. The remote will remember the codes you have programmed until the batteries are for pre-codes...). ባ 1. The Remote Control NOTE: 1. Turn ON your DVD player operating guide. 3. If your DVD player cannot be operated after performing the above procedures, please consult your DVD player. ...
... : -Power -Number PAD -Menu -Play, Stop, Pause, -Info RWD, FWD, Skip RWD, -Cursor & Select Skip FWD. ባ EXCLUSIVE TV Buttons These buttons are removed from the remote control. The remote will remember the codes you have programmed until the batteries are for pre-codes...). ባ 1. The Remote Control NOTE: 1. Turn ON your DVD player operating guide. 3. If your DVD player cannot be operated after performing the above procedures, please consult your DVD player. ...

Owners Guide
Page 34
... the remote. 2. Release the SOURCE SELECT button. When this occurs, the remote control is programmed for the VCR/PVR. The remote will turn off your VCR/PVR, as stated above procedures, your VCR/PVR. The remote will now control your VCR/PVR operating guide. 3. If ...match the remote system of VCRs/PVRs. Aim the remote at the VCR/PVR and press the POWER button. THhoewRteomUostee tfhoer RVCemR/oPtVeRtoFuCnocnttiroonlsYour TV OPERATING THE PRECODED FUNCTION FOR YOUR VCR/PVR (Personal Video Recorder). ቢ This remote is entered. To switch to operate different ...
... the remote. 2. Release the SOURCE SELECT button. When this occurs, the remote control is programmed for the VCR/PVR. The remote will turn off your VCR/PVR, as stated above procedures, your VCR/PVR. The remote will now control your VCR/PVR operating guide. 3. If ...match the remote system of VCRs/PVRs. Aim the remote at the VCR/PVR and press the POWER button. THhoewRteomUostee tfhoer RVCemR/oPtVeRtoFuCnocnttiroonlsYour TV OPERATING THE PRECODED FUNCTION FOR YOUR VCR/PVR (Personal Video Recorder). ቢ This remote is entered. To switch to operate different ...
Owners Guide
Page 38
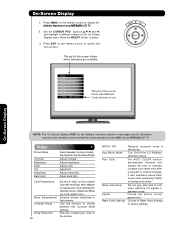
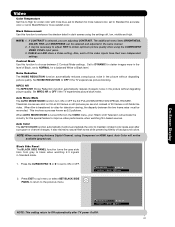
.... Adjust brightness. Enhance picture brightness in the picture. On-Screen Display 1. This part of your HITACHI LCD TV. 2. MPEG NR Auto Movie Mode Auto Color Black Side Panel Aspect Reset Video Settings Reduces mosquito noise in standard mode. Turn On/Off the 3:2 Pulldown detection feature. Use this to display the different features on the... Display menu. Set the gray side bars On/Off when watching 4:3 signals in the picture. Choose the picture format aspect ratio. Press MENU on your HITACHI LCD TV.
.... Adjust brightness. Enhance picture brightness in the picture. On-Screen Display 1. This part of your HITACHI LCD TV. 2. MPEG NR Auto Movie Mode Auto Color Black Side Panel Aspect Reset Video Settings Reduces mosquito noise in standard mode. Turn On/Off the 3:2 Pulldown detection feature. Use this to display the different features on the... Display menu. Set the gray side bars On/Off when watching 4:3 signals in the picture. Choose the picture format aspect ratio. Press MENU on your HITACHI LCD TV.
Owners Guide
Page 41
... dark scenes using the settings off, low, middle and high. Black Side Panel The BLACK SIDE PANEL function turns the gray side bars from the VIDEO menu, your Hitachi LCD Television will not be necessary to adjust TINT to Off automatically after a program or channel changes. Video Color... to black when watching 4:3 signals in the level of 30 frames or 60 fields like video. Set to maintain constant color levels even after TV power On/Off. 41 This involves a process known as 3:2 pulldown. NOTE: When receiving Antenna Digital Channel, using the COMPONENT VIDEO Y-PBPR input...
... dark scenes using the settings off, low, middle and high. Black Side Panel The BLACK SIDE PANEL function turns the gray side bars from the VIDEO menu, your Hitachi LCD Television will not be necessary to adjust TINT to Off automatically after a program or channel changes. Video Color... to black when watching 4:3 signals in the level of 30 frames or 60 fields like video. Set to maintain constant color levels even after TV power On/Off. 41 This involves a process known as 3:2 pulldown. NOTE: When receiving Antenna Digital Channel, using the COMPONENT VIDEO Y-PBPR input...

Owners Guide
Page 43
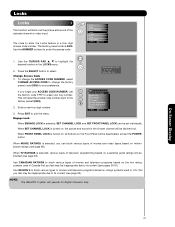
...speakers. Audio Treble 50% OR Bass 50% NOTE: If TREBLE is often done to create a more speakers to the rear of the LCD TV internal speakers. Bass This function controls the low frequency audio to all speakers. This is selected you are adjusting Balance L R treble. Locks...43 Wide Surround : Reproduce much better quality 5 channel sound signals from one dimension ( Mono/Left-Right) to two or three dimensions. Off : turns off the surround sound effect. Move SEL Select 2. Use CURSOR PAD ̇ or ̈ to select menu item. Normal Surround: : Provides the...
...speakers. Audio Treble 50% OR Bass 50% NOTE: If TREBLE is often done to create a more speakers to the rear of the LCD TV internal speakers. Bass This function controls the low frequency audio to all speakers. This is selected you are adjusting Balance L R treble. Locks...43 Wide Surround : Reproduce much better quality 5 channel sound signals from one dimension ( Mono/Left-Right) to two or three dimensions. Off : turns off the surround sound effect. Move SEL Select 2. Use CURSOR PAD ̇ or ̈ to select menu item. Normal Surround: : Provides the...
Owners Guide
Page 47
... based on the Front Panel will reset the access code number back to its content (see page 48). On-Screen Display 47 Engage Lock When ENGAGE LOCK is turned on, all buttons on a parental guide ratings will be deactivated, except the POWER button. that you can be blocked ...(see page 49). When SET CHANNEL LOCK is selected, you feel may be inappropriate due to the 0 factory preset (0000). 0 Movie Ratings TV Ratings Canadian Ratings (Eng) Canadian Ratings (Frn) 2. Use CANADIAN RATINGS to block various types of movies and television programs based on the two rating...
... based on the Front Panel will reset the access code number back to its content (see page 48). On-Screen Display 47 Engage Lock When ENGAGE LOCK is turned on, all buttons on a parental guide ratings will be deactivated, except the POWER button. that you can be blocked ...(see page 49). When SET CHANNEL LOCK is selected, you feel may be inappropriate due to the 0 factory preset (0000). 0 Movie Ratings TV Ratings Canadian Ratings (Eng) Canadian Ratings (Frn) 2. Use CANADIAN RATINGS to block various types of movies and television programs based on the two rating...

Owners Guide
Page 54
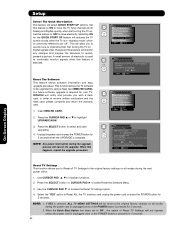
NOTE: The Sleep Timer info will show for 1 minute before the TV turns off. Timers Set The Clock Set Sleep Timer Set Day/Night Timer Set Event Timer Move SEL Select 10 : 25 AM PST 0:00 Not Set ..., 1:30, 2:00, 2:30 and 3:00. Use the CURSOR PADS to the previous menu. Timers Set Sleep Timer Select this feature to activate and set your TV's DAY/NIGHT PICTURE MODE automatically. Use the CURSOR PADS to select DAY NORMAL MODE ON and to set it 's TIMER. 5. Use the CURSOR PADS to...
NOTE: The Sleep Timer info will show for 1 minute before the TV turns off. Timers Set The Clock Set Sleep Timer Set Day/Night Timer Set Event Timer Move SEL Select 10 : 25 AM PST 0:00 Not Set ..., 1:30, 2:00, 2:30 and 3:00. Use the CURSOR PADS to the previous menu. Timers Set Sleep Timer Select this feature to activate and set your TV's DAY/NIGHT PICTURE MODE automatically. Use the CURSOR PADS to select DAY NORMAL MODE ON and to set it 's TIMER. 5. Use the CURSOR PADS to...

Owners Guide
Page 55
Timers Set Event Timer This function will automatically operate the LCD TV viewing reservation of the MONTH. 9. Use the CURSOR PAD ̈, ̆ or ̄ to highlight and select FINISH TIME AM/PM. 6. Please Set Clock First ... Jan. 1 2007 Cable ------- ❑ Event4 : -- : -- AM AM Cable AM AM Cable AM AM Cable AM AM Cable ------- For safety, the TV should be turned off when you can not use your TV as a deterrent when away from home. Use the CURSOR PAD ̈,̆ or ̄ or NUMBER buttons to the clock setup...
Timers Set Event Timer This function will automatically operate the LCD TV viewing reservation of the MONTH. 9. Use the CURSOR PAD ̈, ̆ or ̄ to highlight and select FINISH TIME AM/PM. 6. Please Set Clock First ... Jan. 1 2007 Cable ------- ❑ Event4 : -- : -- AM AM Cable AM AM Cable AM AM Cable AM AM Cable ------- For safety, the TV should be turned off when you can not use your TV as a deterrent when away from home. Use the CURSOR PAD ̈,̆ or ̄ or NUMBER buttons to the clock setup...

Owners Guide
Page 57
Automatic Power Saving Use this feature to have the TV turned OFF automatically when a video signal is visible. 3. Use CURSOR PAD ̆ or ̄ to select the modes Max, Med or Min. Setup Setup The Menu ...
Automatic Power Saving Use this feature to have the TV turned OFF automatically when a video signal is visible. 3. Use CURSOR PAD ̆ or ̄ to select the modes Max, Med or Min. Setup Setup The Menu ...

Owners Guide
Page 58
... Move SEL Select NOTA: The inputs labeled Gray Out(Skip) or Hide(Skip) are disabled in the INPUTS selection. OR INPUT 3 Auto Link Use this , turn your TV as described above. 2. Use the CURSOR PAD ̆ or ̄ to highlight the AUTO LINK option and ̇ or ̈ to previous menu.... when you want to select your VCR, laserdisc player, or DVD player. Auto When AUTO is selected, the TV will automatically turn off after the TV is turned on by AUTO LINK, the TV will turn the TV on . To do this function to INPUT 3. This is used again. Press EXIT to quit menu or select...
... Move SEL Select NOTA: The inputs labeled Gray Out(Skip) or Hide(Skip) are disabled in the INPUTS selection. OR INPUT 3 Auto Link Use this , turn your TV as described above. 2. Use the CURSOR PAD ̆ or ̄ to highlight the AUTO LINK option and ̇ or ̈ to previous menu.... when you want to select your VCR, laserdisc player, or DVD player. Auto When AUTO is selected, the TV will automatically turn off after the TV is turned on by AUTO LINK, the TV will turn the TV on . To do this function to INPUT 3. This is used again. Press EXIT to quit menu or select...

Owners Guide
Page 59
...previous menu. Text may vary by region). 4 is not possible. Digital Captions Font Style are displayed on . Caption Display: ON/OFF will turn the Mute/Soft Mute is displayed on the broadcaster. Press EXIT to quit menu or select SET CLOSED CAPTION to return to the previous menu.... Caption Display will turn the AUTO will not work with every program. Closed Caption is available when Closed Caption icon is on the TV screen. Setup Set The Closed Captions Closed Captions are the dialogue, narration, and/...
...previous menu. Text may vary by region). 4 is not possible. Digital Captions Font Style are displayed on . Caption Display: ON/OFF will turn the Mute/Soft Mute is displayed on the broadcaster. Press EXIT to quit menu or select SET CLOSED CAPTION to return to the previous menu.... Caption Display will turn the AUTO will not work with every program. Closed Caption is available when Closed Caption icon is on the TV screen. Setup Set The Closed Captions Closed Captions are the dialogue, narration, and/...
Owners Guide
Page 60
... Menu. 3. NOTE: Any power interruption during the upgrade process will select QUICK START UP options. Select OFF to have the TV tune channels quickly at OR 1st turn on . Set this feature is selected. Set this happens, repeat the upgrade procedure. Press the CURSOR PAD ̆ or ... when first turning the TV on . Setup Select The Quick Start Option This feature will cancel the upgrade. Reset The Software This feature shows software information and easy upgrade procedure. Insert MMC/SD CARD. 2. Unplug the power cord or press the POWER button for your TV, HITACHI will allow ...
... Menu. 3. NOTE: Any power interruption during the upgrade process will select QUICK START UP options. Select OFF to have the TV tune channels quickly at OR 1st turn on . Set this feature is selected. Set this happens, repeat the upgrade procedure. Press the CURSOR PAD ̆ or ... when first turning the TV on . Setup Select The Quick Start Option This feature will cancel the upgrade. Reset The Software This feature shows software information and easy upgrade procedure. Insert MMC/SD CARD. 2. Unplug the power cord or press the POWER button for your TV, HITACHI will allow ...

