

User Guide
Page 8
.... Refer to page 13.) MUTE button This button turns the sound on and off. VIDEO RGB LASER STANDBY/ON POSITION RESET MENU FREEZE MAGNIFY VOLUME OFF Projector unit Remote control Remote control Batteries User's Guide (this document) CP-X960W CP-X960E ( ) Po1w10eVra-CUoSrd vid3e-oC/Aonubdduioctcoarble... 17 21 for details. Refer to turn the power on and off , the projector enters standby status. When turned off . ZOOM MUTE MENU FOCUS INPUT STANDBY/ON LAMP POWER TEMP RESET LAMP indicator This indicator lights or blinks when the lamp is missing, please contact ...
.... Refer to page 13.) MUTE button This button turns the sound on and off. VIDEO RGB LASER STANDBY/ON POSITION RESET MENU FREEZE MAGNIFY VOLUME OFF Projector unit Remote control Remote control Batteries User's Guide (this document) CP-X960W CP-X960E ( ) Po1w10eVra-CUoSrd vid3e-oC/Aonubdduioctcoarble... 17 21 for details. Refer to turn the power on and off , the projector enters standby status. When turned off . ZOOM MUTE MENU FOCUS INPUT STANDBY/ON LAMP POWER TEMP RESET LAMP indicator This indicator lights or blinks when the lamp is missing, please contact ...
User Guide
Page 10
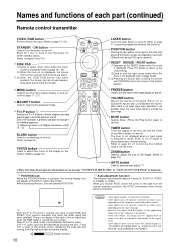
Refer to both RGB and VIDEO. When you can operate POSITION. *3 Auto adjustment function The projector automatically adjusts 4 items (V. Names and functions of each part (continued) Remote control transmitter VIDEO, RGB button Press to switch the input. (Refer to page ... computer connected and the signal. • Auto adjust may be slightly dark in some cases due to page 13.) VIDEO RGB LASER STANDBY/ON POSITION RESET MENU FREEZE MAGNIFY VOLUME OFF P in P function, signals are active. *1 (3) After the POSITION button has been pressed, the screen can be moved upward, ...
Refer to both RGB and VIDEO. When you can operate POSITION. *3 Auto adjustment function The projector automatically adjusts 4 items (V. Names and functions of each part (continued) Remote control transmitter VIDEO, RGB button Press to switch the input. (Refer to page ... computer connected and the signal. • Auto adjust may be slightly dark in some cases due to page 13.) VIDEO RGB LASER STANDBY/ON POSITION RESET MENU FREEZE MAGNIFY VOLUME OFF P in P function, signals are active. *1 (3) After the POSITION button has been pressed, the screen can be moved upward, ...

User Guide
Page 13
... screen. Basic operations To project 5 74 2 1 3 2 5 VIDEO RGB LASER STANDBY/ON POSITION RESET MENU FREEZE MAGNIFY VOLUME OFF P in P MUTE BLANK AUTO TIMER FOCUS ZOOM 7 4 1 Turn on the main power switch of the projector [ I N P U T bu t t o n o f t h e Example on-screen display projector or the VIDEO/RGB button of the remote control to select the signal...
... screen. Basic operations To project 5 74 2 1 3 2 5 VIDEO RGB LASER STANDBY/ON POSITION RESET MENU FREEZE MAGNIFY VOLUME OFF P in P MUTE BLANK AUTO TIMER FOCUS ZOOM 7 4 1 Turn on the main power switch of the projector [ I N P U T bu t t o n o f t h e Example on-screen display projector or the VIDEO/RGB button of the remote control to select the signal...

User Guide
Page 14
...main power switch while the lamp is a system configured with this will shorten the service life of the projector [ : OFF]. 3 Attach the lens cap. Plug & Play This projector is pressed. Caution The fan will not be entered if the time which the STANDBY/ON button is ... including a computer and display, and an operating system. Basic operations (continued) Turning off the power 1 1 VIDEO RGB LASER STANDBY/ON POSITION 2 3 RESET MENU FREEZE MAGNIFY VOLUME OFF P in P MUTE BLANK AUTO TIMER 1 Press the STANDBY/ON button for approximately 1 sec. • The Power indicator will...
...main power switch while the lamp is a system configured with this will shorten the service life of the projector [ : OFF]. 3 Attach the lens cap. Plug & Play This projector is pressed. Caution The fan will not be entered if the time which the STANDBY/ON button is ... including a computer and display, and an operating system. Basic operations (continued) Turning off the power 1 1 VIDEO RGB LASER STANDBY/ON POSITION 2 3 RESET MENU FREEZE MAGNIFY VOLUME OFF P in P MUTE BLANK AUTO TIMER 1 Press the STANDBY/ON button for approximately 1 sec. • The Power indicator will...

User Guide
Page 15
... a still image signal is input when the FREEZE function is on, make sure not to forget to page 10) VIDEO RGB LASER STANDBY/ON POSITION 1 RESET MENU FREEZE MAGNIFY VOLUME OFF P in P MUTE BLANK AUTO TIMER 1 Press the FREEZE button. • The image being displayed will freeze. • The [ ] mark appears...
... a still image signal is input when the FREEZE function is on, make sure not to forget to page 10) VIDEO RGB LASER STANDBY/ON POSITION 1 RESET MENU FREEZE MAGNIFY VOLUME OFF P in P MUTE BLANK AUTO TIMER 1 Press the FREEZE button. • The image being displayed will freeze. • The [ ] mark appears...

User Guide
Page 16
...; When this button is pressed, the image will be displayed even larger. 3 Press the MAGNIFY - Returning to page 10) 5 1,2 3 VIDEO RGB LASER STANDBY/ON POSITION 4 RESET MENU FREEZE MAGNIFY VOLUME OFF P in accordance with the button pressed. Caution 16 • When there is no video signal input, Magnify is not effective...
...; When this button is pressed, the image will be displayed even larger. 3 Press the MAGNIFY - Returning to page 10) 5 1,2 3 VIDEO RGB LASER STANDBY/ON POSITION 4 RESET MENU FREEZE MAGNIFY VOLUME OFF P in accordance with the button pressed. Caution 16 • When there is no video signal input, Magnify is not effective...

User Guide
Page 17
...be adjusted. • The selected menu item will be displayed in orange. 3 Adjust the selected menu item with the MENU ( ) buttons of the projector or the DISK PAD button of the remote control. • The selected menu item will be displayed in P MUTE BLANK AUTO TIMER FOCUS ZOOM 3.... (refer to page 18 - 21 for details.) 2 Press the MENU ( ) buttons of the projector or the DISK PAD button of the remote control to select the menu item to the initial settings. • Press the RESET button. 17 Adjustments and functions 1, 2, 3 VIDEO RGB LASER STANDBY/ON POSITION 2, 3 MENU...
...be adjusted. • The selected menu item will be displayed in orange. 3 Adjust the selected menu item with the MENU ( ) buttons of the projector or the DISK PAD button of the remote control. • The selected menu item will be displayed in P MUTE BLANK AUTO TIMER FOCUS ZOOM 3.... (refer to page 18 - 21 for details.) 2 Press the MENU ( ) buttons of the projector or the DISK PAD button of the remote control to select the menu item to the initial settings. • Press the RESET button. 17 Adjustments and functions 1, 2, 3 VIDEO RGB LASER STANDBY/ON POSITION 2, 3 MENU...
User Guide
Page 8
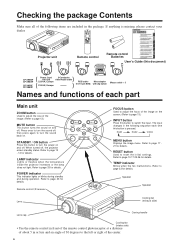
...this button to turn the sound back on. ZOOM MUTE MENU FOCUS INPUT STANDBY/ON LAMP POWER TEMP RESET LAMP indicator Lights or flashes when the temperature inside the projector increases or the lamp does not light. Speaker Speaker Cooling fan (exhaust side) Lens cap Carring handle.... (Refer to page 13.) MUTE button This button turns the sound on and off. VIDEO RGB LASER STANDBY/ON POSITION RESET MENU FREEZE MAGNIFY VOLUME OFF Projector unit Remote control Remote control Batteries User's Guide (this document) CP-X958W CP-X960W CP-X958E CP-X960E ( ) Po1w10eVra...
...this button to turn the sound back on. ZOOM MUTE MENU FOCUS INPUT STANDBY/ON LAMP POWER TEMP RESET LAMP indicator Lights or flashes when the temperature inside the projector increases or the lamp does not light. Speaker Speaker Cooling fan (exhaust side) Lens cap Carring handle.... (Refer to page 13.) MUTE button This button turns the sound on and off. VIDEO RGB LASER STANDBY/ON POSITION RESET MENU FREEZE MAGNIFY VOLUME OFF Projector unit Remote control Remote control Batteries User's Guide (this document) CP-X958W CP-X960W CP-X958E CP-X960E ( ) Po1w10eVra...

User Guide
Page 10
...Play button again to page 15.) VOLUME button Adjusts the volume of the sound. When you can operate POSITION. *3 Auto adjustment function The projector automatically adjusts 4 items (V. There is no signal and when the RGB signal is pressed, the moving DISK PAD left and right during freezing...during blanking or during the display. Refer to page 21 concerning the method used . (Refer to page 13.) VIDEO RGB LASER STANDBY/ON POSITION RESET MENU FREEZE MAGNIFY VOLUME OFF P in the RGB signal) on and off . POSIT, H. POSIT, H. Names and functions of each part (...
...Play button again to page 15.) VOLUME button Adjusts the volume of the sound. When you can operate POSITION. *3 Auto adjustment function The projector automatically adjusts 4 items (V. There is no signal and when the RGB signal is pressed, the moving DISK PAD left and right during freezing...during blanking or during the display. Refer to page 21 concerning the method used . (Refer to page 13.) VIDEO RGB LASER STANDBY/ON POSITION RESET MENU FREEZE MAGNIFY VOLUME OFF P in the RGB signal) on and off . POSIT, H. POSIT, H. Names and functions of each part (...

User Guide
Page 11
...on the screen during automatic adjustment. • The screen may be slightly dark in some cases, depending on any wet object. Hold down the RESET button and press the input switch (INPUT) button. cover. 3Close the battery cover. Also, do not mix new and old batteries. When ...can not execute when the initial display is "NO INPUT IS DETECTED" or "SYNC IS OUT OF RANGE" during automatic adjustment but this projector. Never look directly into the remote control. 1Remove the battery 2Loading the batteries. Such actions could result in personal injury or pollution of the...
...on the screen during automatic adjustment. • The screen may be slightly dark in some cases, depending on any wet object. Hold down the RESET button and press the input switch (INPUT) button. cover. 3Close the battery cover. Also, do not mix new and old batteries. When ...can not execute when the initial display is "NO INPUT IS DETECTED" or "SYNC IS OUT OF RANGE" during automatic adjustment but this projector. Never look directly into the remote control. 1Remove the battery 2Loading the batteries. Such actions could result in personal injury or pollution of the...

User Guide
Page 13
... connection of other equipment. 7 P r e s s e i t h e r t h e I N P U T bu t t o n o f t h e Example on-screen display projector or the VIDEO/RGB button of the remote control to select the signal to be displayed in P MUTE BLANK AUTO TIMER FOCUS ZOOM 7 4 1 Turn on ... RGB 1 projected on the screen. Basic operations To project 5 74 2 1 3 2 5 VIDEO RGB LASER STANDBY/ON POSITION RESET MENU FREEZE MAGNIFY VOLUME OFF P in the lower right part of the projector [ I: ON]. • The Power indicator lights orange. 2 Press the STANDBY / ON button. • The Power indicator ...
... connection of other equipment. 7 P r e s s e i t h e r t h e I N P U T bu t t o n o f t h e Example on-screen display projector or the VIDEO/RGB button of the remote control to select the signal to be displayed in P MUTE BLANK AUTO TIMER FOCUS ZOOM 7 4 1 Turn on ... RGB 1 projected on the screen. Basic operations To project 5 74 2 1 3 2 5 VIDEO RGB LASER STANDBY/ON POSITION RESET MENU FREEZE MAGNIFY VOLUME OFF P in the lower right part of the projector [ I: ON]. • The Power indicator lights orange. 2 Press the STANDBY / ON button. • The Power indicator ...

User Guide
Page 14
...) compatible. (Plug & play is turned off, the lamp will not be selected as a plug-and-play monitor. Plug & Play This projector is pressed. The DDC function will continue running Windows95/98, select the display type from Screen Priority. Basic operations (continued) Turning off the power... 1 1 VIDEO RGB LASER STANDBY/ON POSITION 2 3 RESET MENU FREEZE MAGNIFY VOLUME OFF P in P MUTE BLANK AUTO TIMER 1 Press the STANDBY/ON button for approximately 1 sec. • The Power...
...) compatible. (Plug & play is turned off, the lamp will not be selected as a plug-and-play monitor. Plug & Play This projector is pressed. The DDC function will continue running Windows95/98, select the display type from Screen Priority. Basic operations (continued) Turning off the power... 1 1 VIDEO RGB LASER STANDBY/ON POSITION 2 3 RESET MENU FREEZE MAGNIFY VOLUME OFF P in P MUTE BLANK AUTO TIMER 1 Press the STANDBY/ON button for approximately 1 sec. • The Power...

User Guide
Page 15
... right corner of the screen when the Freeze function is on , make sure not to forget to page 10) VIDEO RGB LASER STANDBY/ON POSITION 1 RESET MENU FREEZE MAGNIFY VOLUME OFF P in P", "AUTO", "BLANK", "VOLUME ","MENU", "MUTE" and "POSITION". 15 Basic operations (continued) Freeze function This function is used to freeze...
... right corner of the screen when the Freeze function is on , make sure not to forget to page 10) VIDEO RGB LASER STANDBY/ON POSITION 1 RESET MENU FREEZE MAGNIFY VOLUME OFF P in P", "AUTO", "BLANK", "VOLUME ","MENU", "MUTE" and "POSITION". 15 Basic operations (continued) Freeze function This function is used to freeze...

User Guide
Page 16
... + button. • When this button is pressed, the image will be displayed magnified approximately 2x. Returning to page 10) 5 1,2 3 VIDEO RGB LASER STANDBY/ON POSITION 4 RESET MENU FREEZE MAGNIFY VOLUME OFF P in accordance with the button pressed.
... + button. • When this button is pressed, the image will be displayed magnified approximately 2x. Returning to page 10) 5 1,2 3 VIDEO RGB LASER STANDBY/ON POSITION 4 RESET MENU FREEZE MAGNIFY VOLUME OFF P in accordance with the button pressed.

User Guide
Page 17
Adjustments and functions 1, 2, 3 VIDEO RGB LASER STANDBY/ON POSITION 2, 3 MENU 1, 3 1 RESET MENU FREEZE MAGNIFY VOLUME OFF P in P MUTE BLANK AUTO TIMER FOCUS ZOOM 3 1 Press the MENU ( ) buttons of the projector or the MENU button of the remote control. • The Menu screen will appear. (refer to page 18...8226; The selected menu item will be displayed in orange. 3 Adjust the selected menu item with the MENU ( ) buttons of the projector or the DISK PAD button of the remote control. • The selected menu item will be returned to be displayed in orange. ...
Adjustments and functions 1, 2, 3 VIDEO RGB LASER STANDBY/ON POSITION 2, 3 MENU 1, 3 1 RESET MENU FREEZE MAGNIFY VOLUME OFF P in P MUTE BLANK AUTO TIMER FOCUS ZOOM 3 1 Press the MENU ( ) buttons of the projector or the MENU button of the remote control. • The Menu screen will appear. (refer to page 18...8226; The selected menu item will be displayed in orange. 3 Adjust the selected menu item with the MENU ( ) buttons of the projector or the DISK PAD button of the remote control. • The selected menu item will be returned to be displayed in orange. ...


