

User Manual
Page 7
...connect it with a metal tool and the like, you use liquid crystal projector at the desired angle. 3. Angle Adjustment Use the foot adjusters on critical parts (i.e.LCD panel, Lens Assy etc.). INSTALLATION Installation of the Projector and Screen Refer to the drawing and table below are for determining of damage... lens up position, the lens down position and the side up position, this unit with ventilation holes blocked. • Do not install LCD projector in the table below for full size (1024 x 768 dots). Lift up and become the cause of the screen size and projection distance...
...connect it with a metal tool and the like, you use liquid crystal projector at the desired angle. 3. Angle Adjustment Use the foot adjusters on critical parts (i.e.LCD panel, Lens Assy etc.). INSTALLATION Installation of the Projector and Screen Refer to the drawing and table below are for determining of damage... lens up position, the lens down position and the side up position, this unit with ventilation holes blocked. • Do not install LCD projector in the table below for full size (1024 x 768 dots). Lift up and become the cause of the screen size and projection distance...
User Manual
Page 9
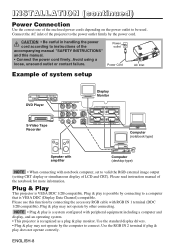
...by the power cord. Please use this manual. • Connect the power cord firmly. NOTE • Plug & play monitor. Plug & Play This projector is recognized as a plug & play is a system configured with RGB IN 1 terminal (DDC 1/2B compatible). Use the standard display drivers. •... Plug & play is possible by other connecting. Connect the AC inlet of LCD and CRT). Plug & play may not operate by connecting to connect. ENGLISH-8 Avoid using a loose, unsound outlet or contact failure. Plug ...
...by the power cord. Please use this manual. • Connect the power cord firmly. NOTE • Plug & play monitor. Plug & Play This projector is recognized as a plug & play is a system configured with RGB IN 1 terminal (DDC 1/2B compatible). Use the standard display drivers. •... Plug & play is possible by other connecting. Connect the AC inlet of LCD and CRT). Plug & play may not operate by connecting to connect. ENGLISH-8 Avoid using a loose, unsound outlet or contact failure. Plug ...
User Manual
Page 10
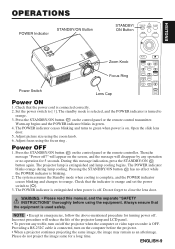
... RESET FREEZE MAGNIFY MUTE OFF VOLUME Power ON 1. NOTE • Except in green. 4. Always ensure that the power cord is off the projector when the computer or video tape recorder is blinking. 2. Providing a RS-232C cable is complete, and the POWER indicator ceases blinking and changes...controller. Adjust focus using the zoom knob. 6. will appear on the screen, and the message will reduce the life of the projector lamp and LCD panel. • To prevent any operation or no effect while the POWER indicator is OFF. The POWER indicator blinks orange during ...
... RESET FREEZE MAGNIFY MUTE OFF VOLUME Power ON 1. NOTE • Except in green. 4. Always ensure that the power cord is off the projector when the computer or video tape recorder is blinking. 2. Providing a RS-232C cable is complete, and the POWER indicator ceases blinking and changes...controller. Adjust focus using the zoom knob. 6. will appear on the screen, and the message will reduce the life of the projector lamp and LCD panel. • To prevent any operation or no effect while the POWER indicator is OFF. The POWER indicator blinks orange during ...


