
User Manual
Page 1
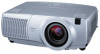
... other trademarks are trademarks of the Video Electronics Standard Association. • Windows is a registered trademark of Microsoft Corporation. • Internet Explorer is subject to ensure correct usage through understanding. After reading, store them in this projector. Safety Guide" and these manuals to change without express written authority. TEMP LAMP STANDBY/ON LENS SHIFT BNG COMPONENT S-VIDEO VIDEO MENU INTER RESET FOCUS ZOOM RGB M1-D INPUT KEYSTONE SEARCH Projector CP-X1200/CP-X1250 User's Manual -
... other trademarks are trademarks of the Video Electronics Standard Association. • Windows is a registered trademark of Microsoft Corporation. • Internet Explorer is subject to ensure correct usage through understanding. After reading, store them in this projector. Safety Guide" and these manuals to change without express written authority. TEMP LAMP STANDBY/ON LENS SHIFT BNG COMPONENT S-VIDEO VIDEO MENU INTER RESET FOCUS ZOOM RGB M1-D INPUT KEYSTONE SEARCH Projector CP-X1200/CP-X1250 User's Manual -
User Manual
Page 3
...;ʜ20 Displaying The Child Window ʜ21 Selecting An Audio Input ʜʜʜ21 Multifunctional Settings ʜʜʜʜ22 Using The Menu Functions ʜʜ22 MAIN Menu 23 PICTURE-1 Menu 24 PICTURE-2 Menu 26 INPUT Menu 27 AUTO Menu 29 SCREEN Menu 31 OPTION Menu 33 NETWORK Menu 35 Network Setting Up 36 Lamp 37 Replacing The Lamp ʜʜʜʜʜ38 Air Filter 39 Caring For The Air Filterʜʜʜ...
...;ʜ20 Displaying The Child Window ʜ21 Selecting An Audio Input ʜʜʜ21 Multifunctional Settings ʜʜʜʜ22 Using The Menu Functions ʜʜ22 MAIN Menu 23 PICTURE-1 Menu 24 PICTURE-2 Menu 26 INPUT Menu 27 AUTO Menu 29 SCREEN Menu 31 OPTION Menu 33 NETWORK Menu 35 Network Setting Up 36 Lamp 37 Replacing The Lamp ʜʜʜʜʜ38 Air Filter 39 Caring For The Air Filterʜʜʜ...

User Manual
Page 6
... environment according to instructions of the "User's Manual - Safety Guide" and this manual. • The power outlet should be close to determine the screen size and projection distance. Max. m:n=1:1 ...Setting Up Arrangement WARNING • Before installation, make sure that the projector is turned off and the power code is disconnected. • Do not set up and move the projector, while it is hot. • Install the projector in the table are calculated for a full size screen. (±10%) Reference for the 16:9 aspect ratio Screen Lens center b m n a Side View Screen Size...
... environment according to instructions of the "User's Manual - Safety Guide" and this manual. • The power outlet should be close to determine the screen size and projection distance. Max. m:n=1:1 ...Setting Up Arrangement WARNING • Before installation, make sure that the projector is turned off and the power code is disconnected. • Do not set up and move the projector, while it is hot. • Install the projector in the table are calculated for a full size screen. (±10%) Reference for the 16:9 aspect ratio Screen Lens center b m n a Side View Screen Size...

User Manual
Page 8
... (display data channel) compatible. • Please take some time and may not be compatible with this projector. • For some RGB input modes, the optional Mac adapter is necessary. • When the image resolution is compatible with core set the laptop to CRT display or to the RGB port (DDC 1/2B compatible). In this function by connecting this projector to computers that you may not be used...
... (display data channel) compatible. • Please take some time and may not be compatible with this projector. • For some RGB input modes, the optional Mac adapter is necessary. • When the image resolution is compatible with core set the laptop to CRT display or to the RGB port (DDC 1/2B compatible). In this function by connecting this projector to computers that you may not be used...
User Manual
Page 13
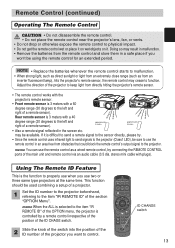
... used combining a setup of the projector to keep light from an inverter fluorescent lamp), hits the projector's remote sensor, the remote control may cease to use two or three same type projectors at the same time. may result in the screen etc. BLANK ASPECT LASER PREVIOUS NEXT ENTER ESC MENU POSITION RESET AUTO MAGNFY PinP VOLUME ON FREEZE MUTE OFF KEYSTONE SEARCH 1 2 3 ID CHANGE ID CHANGE switch 13 LASER INDICATOR STANDBY/ON VIDEO RGB +++ LENS SHIFT FOCUS ZOOM...
... used combining a setup of the projector to keep light from an inverter fluorescent lamp), hits the projector's remote sensor, the remote control may cease to use two or three same type projectors at the same time. may result in the screen etc. BLANK ASPECT LASER PREVIOUS NEXT ENTER ESC MENU POSITION RESET AUTO MAGNFY PinP VOLUME ON FREEZE MUTE OFF KEYSTONE SEARCH 1 2 3 ID CHANGE ID CHANGE switch 13 LASER INDICATOR STANDBY/ON VIDEO RGB +++ LENS SHIFT FOCUS ZOOM...

User Manual
Page 14
... CHANGE (Front) Mouse left button Mouse move pointer Keyboard Arrow keys / / / Mouse right button Keyboard ESC key (Rear) 14 memo The USB control can use the remote control as a mouse and a keyboard of the projector to a PC. • Do not unplug the connector cables while the computer is operating. LASER INDICATOR STANDBY/ON VIDEO RGB ++ LENS SHIFT FOCUS -- + ZOOM - Using the USB control feature, you will be enabled. Connect the M1-D port...
... CHANGE (Front) Mouse left button Mouse move pointer Keyboard Arrow keys / / / Mouse right button Keyboard ESC key (Rear) 14 memo The USB control can use the remote control as a mouse and a keyboard of the projector to a PC. • Do not unplug the connector cables while the computer is operating. LASER INDICATOR STANDBY/ON VIDEO RGB ++ LENS SHIFT FOCUS -- + ZOOM - Using the USB control feature, you will be enabled. Connect the M1-D port...

User Manual
Page 15
...STANDBY/ON indicator will appear on , the indicator will begin blinking green. The message "Power off in right order. LENS SHIFT COMPONENTBNG S-VIDEO RGB M1-D INPUT INTER KEYSTONE SEARCH RESET VIDEO STANDBY/ON MENU TEMP LAMP FOCUS ZOOM AUDIO IN1 REMOTE CONTROL CONTROL NETWORK AUDIO IN2 RGB RGB OUT R/CR/PR G/Y B/CB/PB H V AUDIO OUT CR/PR Ca/Pa Y BNC R-AUDIO IN-L VIDEO S-VIDEO LASER INDICATOR STANDBY/ON VIDEO RGB STANDBY/ON +++ LENS SHIFT FOCUS ZOOM --- will light to [ | ] (ON). STANDBY/ON STANDBY/ON button / indicator 2 Set the power switch to solid orange...
...STANDBY/ON indicator will appear on , the indicator will begin blinking green. The message "Power off in right order. LENS SHIFT COMPONENTBNG S-VIDEO RGB M1-D INPUT INTER KEYSTONE SEARCH RESET VIDEO STANDBY/ON MENU TEMP LAMP FOCUS ZOOM AUDIO IN1 REMOTE CONTROL CONTROL NETWORK AUDIO IN2 RGB RGB OUT R/CR/PR G/Y B/CB/PB H V AUDIO OUT CR/PR Ca/Pa Y BNC R-AUDIO IN-L VIDEO S-VIDEO LASER INDICATOR STANDBY/ON VIDEO RGB STANDBY/ON +++ LENS SHIFT FOCUS ZOOM --- will light to [ | ] (ON). STANDBY/ON STANDBY/ON button / indicator 2 Set the power switch to solid orange...

User Manual
Page 22
LASER INDICATOR STANDBY/ON VIDEO RGB ++ LENS SHIFT FOCUS -- + ZOOM - Turning off the built-in speaker 1) Press the MENU button. MENU MAIN PICTURE-1 PICTURE-2 INPUT AUTO SCREEN OPTION NETWORK : SELECT VOLUME SPEAKER IR REMOTE IR REMOTE ID LAMP TIME FILTER TIME SERVICE RESET 16 TURN ON ALL 1234 h 4321 h MENU MAIN PICTURE-1 PICTURE-2 INPUT AUTO SCREEN OPTION NETWORK : SELECT VOLUME SPEAKER IR REMOTE IR REMOTE ID LAMP TIME FILTER TIME SERVICE RESET 16 TURN ON ALL 1234 h 4321 h 3 Use the cursor buttons / to select an item, then press the (or the ENTER) button to operate the...
LASER INDICATOR STANDBY/ON VIDEO RGB ++ LENS SHIFT FOCUS -- + ZOOM - Turning off the built-in speaker 1) Press the MENU button. MENU MAIN PICTURE-1 PICTURE-2 INPUT AUTO SCREEN OPTION NETWORK : SELECT VOLUME SPEAKER IR REMOTE IR REMOTE ID LAMP TIME FILTER TIME SERVICE RESET 16 TURN ON ALL 1234 h 4321 h MENU MAIN PICTURE-1 PICTURE-2 INPUT AUTO SCREEN OPTION NETWORK : SELECT VOLUME SPEAKER IR REMOTE IR REMOTE ID LAMP TIME FILTER TIME SERVICE RESET 16 TURN ON ALL 1234 h 4321 h 3 Use the cursor buttons / to select an item, then press the (or the ENTER) button to operate the...

User Manual
Page 24
... video signal. MENU MAIN PICTURE-1 PICTURE-2 INPUT AUTO SCREEN OPTION NETWORK : SELECT GAMMA COLOR BAL R COLOR BAL G COLOR BAL B SHARPNESS COLOR TINT MY MEMORY NORMAL +0 +0 +0 +0 +0 +0 LOAD1 Item Description Select a gamma mode using the / buttons, and press the NORMAL CINEMA GAMMA COLOR TEMP 2.2 HIGH (or the ENTER) button to the following page.) 24 GAMMA GAMMA Adjust the gamma data using the / buttons. : Up Down COLOR TEMP Select a color temperature using the / buttons. : HIGH MIDDLE LOW USER R Adjust the red color level for the USER mode of the COLOR TEMP using...
... video signal. MENU MAIN PICTURE-1 PICTURE-2 INPUT AUTO SCREEN OPTION NETWORK : SELECT GAMMA COLOR BAL R COLOR BAL G COLOR BAL B SHARPNESS COLOR TINT MY MEMORY NORMAL +0 +0 +0 +0 +0 +0 LOAD1 Item Description Select a gamma mode using the / buttons, and press the NORMAL CINEMA GAMMA COLOR TEMP 2.2 HIGH (or the ENTER) button to the following page.) 24 GAMMA GAMMA Adjust the gamma data using the / buttons. : Up Down COLOR TEMP Select a color temperature using the / buttons. : HIGH MIDDLE LOW USER R Adjust the red color level for the USER mode of the COLOR TEMP using...

User Manual
Page 27
... function. VIDEO Select a signal type mode using the / buttons. : AUTO RGB SMPTE240 REC709 REC601 Selecting the AUTO automatically selects the optimum mode. MENU MAIN PICTURE-1 PICTURE-2 INPUT AUTO SCREEN OPTION NETWORK : SELECT COLOR SPACE AUTO COMPONENT COMPONENT VIDEO AUTO 3D-YCS TURN OFF VIDEO NR LOW P. INPUT VIDEO P. INP. In such a case, select the SMPTE240 or the REC709 for a SCART RGB signal input. COMPONENT Select a function of this INPUT menu is reduced according to the section "Connecting Your...
... function. VIDEO Select a signal type mode using the / buttons. : AUTO RGB SMPTE240 REC709 REC601 Selecting the AUTO automatically selects the optimum mode. MENU MAIN PICTURE-1 PICTURE-2 INPUT AUTO SCREEN OPTION NETWORK : SELECT COLOR SPACE AUTO COMPONENT COMPONENT VIDEO AUTO 3D-YCS TURN OFF VIDEO NR LOW P. INPUT VIDEO P. INP. In such a case, select the SMPTE240 or the REC709 for a SCART RGB signal input. COMPONENT Select a function of this INPUT menu is reduced according to the section "Connecting Your...

User Manual
Page 28
... is turned on, using the / buttons. : VIDEO S-VIDEO memo About the child window, please refer to reset the INPUT menu items. : EXECUTE CANCEL The items of the MAIN menu is used at a S-VIDEO signal. Note that was used or the item "ASPECT" of the INPUT menu are collectively returned to display just when the projector is performs only at the last time. Select a signal input port to the initial setting. POSIT. Multifunctional Settings (continued) INPUT Menu...
... is turned on, using the / buttons. : VIDEO S-VIDEO memo About the child window, please refer to reset the INPUT menu items. : EXECUTE CANCEL The items of the MAIN menu is used at a S-VIDEO signal. Note that was used or the item "ASPECT" of the INPUT menu are collectively returned to display just when the projector is performs only at the last time. Select a signal input port to the initial setting. POSIT. Multifunctional Settings (continued) INPUT Menu...

User Manual
Page 29
... the suitable mode to 99, the projector lamp will be performed. If the picture becomes unstable (ex. When the time is selected, you can be automatically adjusted. Perform each operation in accordance with a proper signal (without pressing the STANDBY/ON button. Please refer to the item "VIDEO" of the INPUT menu. MENU MAIN PICTURE-1 PICTURE-2 INPUT AUTO SCREEN OPTION NETWORK : SELECT ADJUST POWER OFF POWER ON SEARCH RESET 0 min TURN ON TURN ON Item ADJUST POWER OFF POWER ON...
... the suitable mode to 99, the projector lamp will be performed. If the picture becomes unstable (ex. When the time is selected, you can be automatically adjusted. Perform each operation in accordance with a proper signal (without pressing the STANDBY/ON button. Please refer to the item "VIDEO" of the INPUT menu. MENU MAIN PICTURE-1 PICTURE-2 INPUT AUTO SCREEN OPTION NETWORK : SELECT ADJUST POWER OFF POWER ON SEARCH RESET 0 min TURN ON TURN ON Item ADJUST POWER OFF POWER ON...

User Manual
Page 31
... using the / buttons. : MyScreen ORIGINAL BLUE WHITE BLACK The BLANK screen is the screen, which is displayed by detecting no signal or an unsuitable signal. memo To avoid remaining as an afterimage, the MyScreen and the ORIGINAL screens will change to the item "MyScreen" in this table. MENU MAIN PICTURE-1 PICTURE-2 INPUT AUTO SCREEN OPTION NETWORK : SELECT BLANK BLACK START UP ORIGINAL MyScreen MyScreen SIZE x1 MyScreen LOCK TURN OFF MENU POSITION MESSAGE TURN ON RESET...
... using the / buttons. : MyScreen ORIGINAL BLUE WHITE BLACK The BLANK screen is the screen, which is displayed by detecting no signal or an unsuitable signal. memo To avoid remaining as an afterimage, the MyScreen and the ORIGINAL screens will change to the item "MyScreen" in this table. MENU MAIN PICTURE-1 PICTURE-2 INPUT AUTO SCREEN OPTION NETWORK : SELECT BLANK BLACK START UP ORIGINAL MyScreen MyScreen SIZE x1 MyScreen LOCK TURN OFF MENU POSITION MESSAGE TURN ON RESET...
User Manual
Page 33
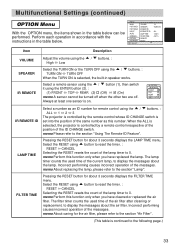
... timer. : RESET CANCEL Selecting the RESET resets the count of the messages. Multifunctional Settings (continued) OPTION Menu With the OPTION menu, the items shown in the table below can be turned off when the other two are off. MENU MAIN PICTURE-1 PICTURE-2 INPUT AUTO SCREEN OPTION NETWORK : SELECT VOLUME SPEAKER IR REMOTE IR REMOTE ID LAMP TIME FILTER TIME SERVICE RESET 16 TURN ON ALL 1234 h 4321 h Item VOLUME SPEAKER IR REMOTE Description Adjust the volume using the / buttons. : High...
... timer. : RESET CANCEL Selecting the RESET resets the count of the messages. Multifunctional Settings (continued) OPTION Menu With the OPTION menu, the items shown in the table below can be turned off when the other two are off. MENU MAIN PICTURE-1 PICTURE-2 INPUT AUTO SCREEN OPTION NETWORK : SELECT VOLUME SPEAKER IR REMOTE IR REMOTE ID LAMP TIME FILTER TIME SERVICE RESET 16 TURN ON ALL 1234 h 4321 h Item VOLUME SPEAKER IR REMOTE Description Adjust the volume using the / buttons. : High...

User Manual
Page 38
.... TEMP LAMP MENU RESET FOCUS ZOOM 5 Insert the new lamp, and tighten the 3 screws firmly to touch the inside of "THE POWER WILL TURN OFF AFTER 0hr." Tell the dealer your dealer to fix it in the Figure. memo Incorrectly resetting of the lamp timer (resetting without replacement, or neglect of a lamp cover lock as possible. 1 Turn off the projector, and unplug the power cord. FOCUS ZOOM TEMP LAMP RESET MENU KEYSTONE SEARCH M1-D INPUT RGB INTER VIDEO STANDBY/ON BNG COMPONENT S-VIDEO LENS SHIFT Lamp cover PC...
.... TEMP LAMP MENU RESET FOCUS ZOOM 5 Insert the new lamp, and tighten the 3 screws firmly to touch the inside of "THE POWER WILL TURN OFF AFTER 0hr." Tell the dealer your dealer to fix it in the Figure. memo Incorrectly resetting of the lamp timer (resetting without replacement, or neglect of a lamp cover lock as possible. 1 Turn off the projector, and unplug the power cord. FOCUS ZOOM TEMP LAMP RESET MENU KEYSTONE SEARCH M1-D INPUT RGB INTER VIDEO STANDBY/ON BNG COMPONENT S-VIDEO LENS SHIFT Lamp cover PC...

User Manual
Page 39
... lamp bulb to cool for at least 45 minutes for 3 seconds. (4) Choose the "RESET" using the / button, then press and hold the RESET button for the lamp to clean. Tell the dealer your dealer to TEMP LAMP STANDBY/ON pulling out it . 4 Insert the cleaned air filter or a new air filter, and replace the filter cover. LENS SHIFT BNG COMPONENT S-VIDEO VIDEO MENU INTER RESET FOCUS ZOOM RGB M1-D INPUT KEYSTONE SEARCH open the menu. (2) Choose the "OPTION" on the projector power, and reset the filter timer...
... lamp bulb to cool for at least 45 minutes for 3 seconds. (4) Choose the "RESET" using the / button, then press and hold the RESET button for the lamp to clean. Tell the dealer your dealer to TEMP LAMP STANDBY/ON pulling out it . 4 Insert the cleaned air filter or a new air filter, and replace the filter cover. LENS SHIFT BNG COMPONENT S-VIDEO VIDEO MENU INTER RESET FOCUS ZOOM RGB M1-D INPUT KEYSTONE SEARCH open the menu. (2) Choose the "OPTION" on the projector power, and reset the filter timer...

User Manual
Page 41
... "Lamp". CHANGE THE LAMP AFTER REPLACING LAMP, RESET THE LAMP TIMER. Please immediately turn the power off . a lamp may be displayed. After you have change within ** hours is recommended. After you have changed the lamp, please be sure to reset the lamp timer. (This table is displayed after long hours of this projector. 41 Troubleshooting Related Messages When the unit's power is on, messages such as described below may thus fail to light even prior to reset the lamp timer...
... "Lamp". CHANGE THE LAMP AFTER REPLACING LAMP, RESET THE LAMP TIMER. Please immediately turn the power off . a lamp may be displayed. After you have change within ** hours is recommended. After you have changed the lamp, please be sure to reset the lamp timer. (This table is displayed after long hours of this projector. 41 Troubleshooting Related Messages When the unit's power is on, messages such as described below may thus fail to light even prior to reset the lamp timer...

User Manual
Page 43
... instructions within the table. Blinking Turned Turned The projector is cooling down . In such a case, press the "˓" (OFF) side of the lamp and lamp cover, and then turn the power on again. STANDBY/ON LAMP TEMP indicator indicator indicator Description Lighting in Orange Turned off Please wait. Blinking in a standby state. in Orange off off Turned The projector is in Red (discretionary) (discretionary) The projector is cooling down . Please turn the power on state. off off Turned The projector...
... instructions within the table. Blinking Turned Turned The projector is cooling down . In such a case, press the "˓" (OFF) side of the lamp and lamp cover, and then turn the power on again. STANDBY/ON LAMP TEMP indicator indicator indicator Description Lighting in Orange Turned off Please wait. Blinking in a standby state. in Orange off off Turned The projector is in Red (discretionary) (discretionary) The projector is cooling down . Please turn the power on state. off off Turned The projector...

User Manual
Page 45
... defect Reference pages The electrical power cord is a unique characteristic of the lamp and lamp cover, and then turn the power off, and allow the unit to cool down at least 45 minutes. Correctly connect the connection cables. 8, 9 Signal source does not correctly work. Before requesting repair, please check in . NOTE • Although bright spots or dark spots may appear on the screen, this is not plugged in...
... defect Reference pages The electrical power cord is a unique characteristic of the lamp and lamp cover, and then turn the power off, and allow the unit to cool down at least 45 minutes. Correctly connect the connection cables. 8, 9 Signal source does not correctly work. Before requesting repair, please check in . NOTE • Although bright spots or dark spots may appear on the screen, this is not plugged in...
User Manual
Page 47
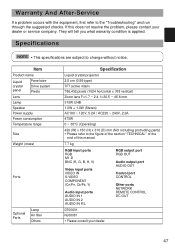
.... 47 Specifications NOTE • This specifications are subject to the "Troubleshooting" and run through the suggested checks. Warranty And After-Service If a problem occurs with the equipment, first refer to change without notice. If this manual. 7.7 kg RGB input ports RGB M1-D BNC (R, G, B, H, V) Video input ports VIDEO IN S-VIDEO COMPONENT (CR/PR, CB/PB, Y) Audio input ports AUDIO IN 1 AUDIO IN 2 AUDIO IN R/L RGB output port RGB OUT Audio output port AUDIO OUT Control port CONTROL Other ports NETWORK REMOTE CONTROL DC...
.... 47 Specifications NOTE • This specifications are subject to the "Troubleshooting" and run through the suggested checks. Warranty And After-Service If a problem occurs with the equipment, first refer to change without notice. If this manual. 7.7 kg RGB input ports RGB M1-D BNC (R, G, B, H, V) Video input ports VIDEO IN S-VIDEO COMPONENT (CR/PR, CB/PB, Y) Audio input ports AUDIO IN 1 AUDIO IN 2 AUDIO IN R/L RGB output port RGB OUT Audio output port AUDIO OUT Control port CONTROL Other ports NETWORK REMOTE CONTROL DC...


