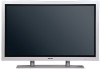
Owners Guide
Page 4
... NOT BE PLACED ON THE MONITOR. NOTE: • There are no user serviceable parts inside the monitor. • Model and serial numbers are covered in the design of HITACHI Plasma monitor. NEVER CONNECT THE MONITOR TO DIRECT CURRENT OR ANYTHING OTHER THAN THE SPECIFIED VOLTAGE. To help you operate these units. CAUTION: Adjust only those controls that may void the user's authority to very high voltages...
... NOT BE PLACED ON THE MONITOR. NOTE: • There are no user serviceable parts inside the monitor. • Model and serial numbers are covered in the design of HITACHI Plasma monitor. NEVER CONNECT THE MONITOR TO DIRECT CURRENT OR ANYTHING OTHER THAN THE SPECIFIED VOLTAGE. To help you operate these units. CAUTION: Adjust only those controls that may void the user's authority to very high voltages...
Owners Guide
Page 5
.... PREVENTION OF SCREEN BURN Continuous on the top of overhead power lines or other sources, may require prior authorization from the broadcaster or owner of the cabinet which may require specific instructions pertaining to overturn resulting in accordance with the apparatus. Heed all instructions. 5. Do not use this monitor. 1. Use only with the recommended safety standards for replacement of time. 14. Follow instructions for long...
.... PREVENTION OF SCREEN BURN Continuous on the top of overhead power lines or other sources, may require prior authorization from the broadcaster or owner of the cabinet which may require specific instructions pertaining to overturn resulting in accordance with the apparatus. Heed all instructions. 5. Do not use this monitor. 1. Use only with the recommended safety standards for replacement of time. 14. Follow instructions for long...
Owners Guide
Page 6
... cracks. Plasma monitor speaker: • CMPAS14W(for CMP420V2) 2.5cm dome type tweeter and two 8cm round type woofers (color : W : black , V : silver) 3. In the unlikely event of a problem occurring with sharp or hard objects. Free from electromagnetic interferences from geomagnetic sources and ambient power lines, the panel produces high-quality display images free from 640 x 400, 640 x 480 VGA to 1600 x 1200 UXGA.(RGB Analog input) Easy-to-use...
... cracks. Plasma monitor speaker: • CMPAS14W(for CMP420V2) 2.5cm dome type tweeter and two 8cm round type woofers (color : W : black , V : silver) 3. In the unlikely event of a problem occurring with sharp or hard objects. Free from electromagnetic interferences from geomagnetic sources and ambient power lines, the panel produces high-quality display images free from 640 x 400, 640 x 480 VGA to 1600 x 1200 UXGA.(RGB Analog input) Easy-to-use...
Owners Guide
Page 7
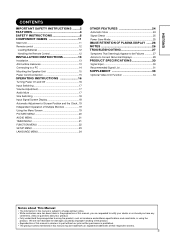
... 15 Power Cord Connection 15 OPERATING INSTRUCTIONS 16 Turning Power On and Off 16 Input Switching 17 Volume Adjustment 17 Audio Mute 17 Size Switching 18 Input Signal Screen Display 18 Automatic Adjustment of Screen Position and the Clock ..19 Independent Operation of Multiple Monitors 19 Using the Menu Screen 19 PICTURE MENU 20 AUDIO MENU 21 TIMER MENU 21 FUNCTION MENU 22 SETUP MENU 23 LANGUAGE MENU 24 OTHER FEATURES 24 Automatic Store 24 Signal Check 25 Power Save Mode 25 IMAGE RETENTION OF PLASMA DISPLAY ......26 NOTES 26 TROUBLESHOOTING...
... 15 Power Cord Connection 15 OPERATING INSTRUCTIONS 16 Turning Power On and Off 16 Input Switching 17 Volume Adjustment 17 Audio Mute 17 Size Switching 18 Input Signal Screen Display 18 Automatic Adjustment of Screen Position and the Clock ..19 Independent Operation of Multiple Monitors 19 Using the Menu Screen 19 PICTURE MENU 20 AUDIO MENU 21 TIMER MENU 21 FUNCTION MENU 22 SETUP MENU 23 LANGUAGE MENU 24 OTHER FEATURES 24 Automatic Store 24 Signal Check 25 Power Save Mode 25 IMAGE RETENTION OF PLASMA DISPLAY ......26 NOTES 26 TROUBLESHOOTING...
Owners Guide
Page 8
... power switch and then disconnect the power plug from the power outlet. Use only the correct power outlet. The meanings of the monitor. • Never block ventilation openings. • Do not put the plasma screen side up. • Do not cover the monitor with a tablecloth, etc. • Do not place the monitor on an unstable surface. It is broken or damaged, immediately turn...
... power switch and then disconnect the power plug from the power outlet. Use only the correct power outlet. The meanings of the monitor. • Never block ventilation openings. • Do not put the plasma screen side up. • Do not cover the monitor with a tablecloth, etc. • Do not place the monitor on an unstable surface. It is broken or damaged, immediately turn...

Owners Guide
Page 10
... are : - Avoid a humid or dusty place. Remove the power cord for long, but try to refresh them using screen saver function. - Do not display images having sharp brightness differences or high-contrast images, such as grayed-out images. Turn down the contrast and brightness controls. • How to clean the plasma screen panel of the monitor. Do not use it . • Always vibrating or strongly vibrating...
... are : - Avoid a humid or dusty place. Remove the power cord for long, but try to refresh them using screen saver function. - Do not display images having sharp brightness differences or high-contrast images, such as grayed-out images. Turn down the contrast and brightness controls. • How to clean the plasma screen panel of the monitor. Do not use it . • Always vibrating or strongly vibrating...

Owners Guide
Page 11
... neighborhood environment. • Precautions for wall, shelf or ceiling mounting as Radio etc.. - Set the sound volume at night to receive interference. - Only use makeshift stands and NEVER fix legs with the cart, stand, tripod, bracket, or table specified by turning off and withdraw the power plug before making or changing connections. - Do not use the attachments/accessories specified by the manufacturer. - Keep the monitor away from tip-over. -
... neighborhood environment. • Precautions for wall, shelf or ceiling mounting as Radio etc.. - Set the sound volume at night to receive interference. - Only use makeshift stands and NEVER fix legs with the cart, stand, tripod, bracket, or table specified by turning off and withdraw the power plug before making or changing connections. - Do not use the attachments/accessories specified by the manufacturer. - Keep the monitor away from tip-over. -

Owners Guide
Page 12
... receving antenna. - and / or CPU Boards and Power Supplies used in a residential installation. The above named party is encouraged to try to correct the interference by the party responsible for a Class B digital device, pursuant to be compliant with the limits for compliance could void the user's authority to operate the equipment. Trade name: Plasma Display Monitor Model Number: CMP420V PW1A ( = 0 9,A Z or Blank) Instructions to...
... receving antenna. - and / or CPU Boards and Power Supplies used in a residential installation. The above named party is encouraged to try to correct the interference by the party responsible for a Class B digital device, pursuant to be compliant with the limits for compliance could void the user's authority to operate the equipment. Trade name: Plasma Display Monitor Model Number: CMP420V PW1A ( = 0 9,A Z or Blank) Instructions to...

Owners Guide
Page 14
... the photoreceptor of the arrow. With in 30 degrees About 3m With in fires, physical injury, or stains. COMPONENT NAMES (continued) Remote control POWER OFF button POWER ON button MUTE button RGB/VIDEO buttons PinP button AUTO button MENU button OK button ID button VOL RGB 1 RGB 2 MUTE VOL AV1 AV2 AV3 AV4 AUTO PinP SIZE RECALL MENU OK ID ID SET POWER ON/OFF button VOLUME UP/DOWN buttons SIZE button RECALL button RETURN button SELECT/ADJUST buttons ID SET button Loading Batteries 1.
... the photoreceptor of the arrow. With in 30 degrees About 3m With in fires, physical injury, or stains. COMPONENT NAMES (continued) Remote control POWER OFF button POWER ON button MUTE button RGB/VIDEO buttons PinP button AUTO button MENU button OK button ID button VOL RGB 1 RGB 2 MUTE VOL AV1 AV2 AV3 AV4 AUTO PinP SIZE RECALL MENU OK ID ID SET POWER ON/OFF button VOLUME UP/DOWN buttons SIZE button RECALL button RETURN button SELECT/ADJUST buttons ID SET button Loading Batteries 1.
Owners Guide
Page 21
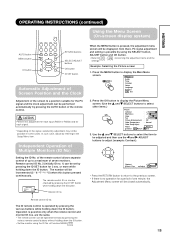
... other items.) Picture Contrast : + 31 OK Brightness : - 31 Color : 0 Tint : + 31 Picture Enhancement : Off Color Temperature : Normal Color Temp.Adjust Reset Reset Select Return Exit 3. Monitor ID no . Operation is no . concerning the adjustment items and the settings. Press the OK button to display the Picture Menu screen. (Use the and SELECT buttons to display the Main Menu screen. Picture MENU Audio Timer Function Setup Language Select OK Set 2. Remote control ID No. 2 (initially ID no. 1) can be closed automatically.
... other items.) Picture Contrast : + 31 OK Brightness : - 31 Color : 0 Tint : + 31 Picture Enhancement : Off Color Temperature : Normal Color Temp.Adjust Reset Reset Select Return Exit 3. Monitor ID no . Operation is no . concerning the adjustment items and the settings. Press the OK button to display the Picture Menu screen. (Use the and SELECT buttons to display the Main Menu screen. Picture MENU Audio Timer Function Setup Language Select OK Set 2. Remote control ID No. 2 (initially ID no. 1) can be closed automatically.

Owners Guide
Page 23
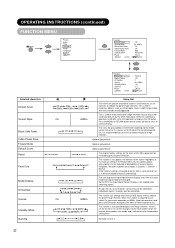
... sound. Adjust it depending on user's preference. minutes Setup hint This function automatically sets the power to reset) SRS TruBass takes advance of the ability of a stadium. Setup hint Movie: This selects the audio suitable for Music. Enhances bass. The settable time is 00:00~11:59. By using this Menu page can be able to be restored by SELECT buttons on the remote control. Input...
... sound. Adjust it depending on user's preference. minutes Setup hint This function automatically sets the power to reset) SRS TruBass takes advance of the ability of a stadium. Setup hint Movie: This selects the audio suitable for Music. Enhances bass. The settable time is 00:00~11:59. By using this Menu page can be able to be restored by SELECT buttons on the remote control. Input...
Owners Guide
Page 24
... out) Default Zoom Reset Panel Life Mode Display ID Number Inverse Standby White (off the function) (waiting to reduce the panel image retention. Optional (grayed out) The original factory settings for the period of this Menu page can display the Input Signal Screen Display every time the input mode and signal mode are changed when this control, power consumption can occur with stationary pictures by pressing the OK button. Set to OFF if the Input Signal Screen Display is set to Off to the monitors so...
... out) Default Zoom Reset Panel Life Mode Display ID Number Inverse Standby White (off the function) (waiting to reduce the panel image retention. Optional (grayed out) The original factory settings for the period of this Menu page can display the Input Signal Screen Display every time the input mode and signal mode are changed when this control, power consumption can occur with stationary pictures by pressing the OK button. Set to OFF if the Input Signal Screen Display is set to Off to the monitors so...
Owners Guide
Page 25
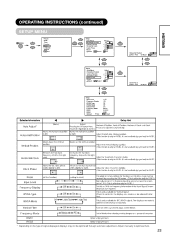
... INSTRUCTIONS (continued) SETUP MENU MENU Picture Audio Timer Function Setup Language Select OK Set Setup Auto Adjust Adjust OK Horizontal Position 0 Vertical Position + 31 Horizontal Clock - 20 Clock Phase 10 Reset Reset Select Return Exit OK Horizontal Position Next / Prev Adjust 0 Return Setup Auto Adjust Horizontal Position Vertical Position Horizontal Clock Clock Phase Reset Select Return Adjust 0 + 31 - 20 10 Reset Exit OK Clock Phase Next / Prev 10 Adjust Return Setup Input Level Frequency Display WVGA Type WXGA Mode Vertical...
... INSTRUCTIONS (continued) SETUP MENU MENU Picture Audio Timer Function Setup Language Select OK Set Setup Auto Adjust Adjust OK Horizontal Position 0 Vertical Position + 31 Horizontal Clock - 20 Clock Phase 10 Reset Reset Select Return Exit OK Horizontal Position Next / Prev Adjust 0 Return Setup Auto Adjust Horizontal Position Vertical Position Horizontal Clock Clock Phase Reset Select Return Adjust 0 + 31 - 20 10 Reset Exit OK Clock Phase Next / Prev 10 Adjust Return Setup Input Level Frequency Display WVGA Type WXGA Mode Vertical...

Owners Guide
Page 27
... used to reduce power consumption by this unit is connected to a VESA DPMS computer, the Power Save (Off) mode can be set to ON, the input signal is switched or when the RECALL button is set to operating status • Operate the personal computer, or press either the INPUT SELECT button of the main unit or the RGB1/RGB2 buttons of power source changes in the signal status are displayed on the screen...
... used to reduce power consumption by this unit is connected to a VESA DPMS computer, the Power Save (Off) mode can be set to ON, the input signal is switched or when the RECALL button is set to operating status • Operate the personal computer, or press either the INPUT SELECT button of the main unit or the RGB1/RGB2 buttons of power source changes in the signal status are displayed on the screen...
Owners Guide
Page 29
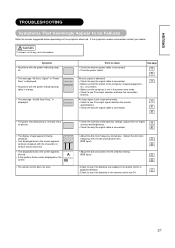
...; A fine pattern flickers when displayed on the screen. • The remote control does not work. • Check the contrast and brightness settings (adjust them for higher contrast and brightness). • Check the way the signal cable is displayed. • No picture with the power-indicating lamp off. See page • The message "No Sync. is connected. • Press the power switch. No Sync. Invalid Scan Freq. No sync signal is detected...
...; A fine pattern flickers when displayed on the screen. • The remote control does not work. • Check the contrast and brightness settings (adjust them for higher contrast and brightness). • Check the way the signal cable is displayed. • No picture with the power-indicating lamp off. See page • The message "No Sync. is connected. • Press the power switch. No Sync. Invalid Scan Freq. No sync signal is detected...
Owners Guide
Page 36
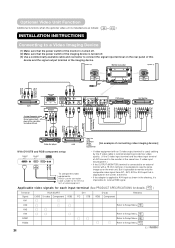
... S-video/Composite video Do not connect both plugs at the time. • If the adaptor is applied to AV4 input as shown in the drawing, it is impossible to receive RGB signal. But it is possible to view the same image as on the rear panel of this device and the signal output terminal of the imaging device. Refer to Setup Menu. Power cord DVD player Set-Top Box Video disc player Use if the video equipment...
... S-video/Composite video Do not connect both plugs at the time. • If the adaptor is applied to AV4 input as shown in the drawing, it is impossible to receive RGB signal. But it is possible to view the same image as on the rear panel of this device and the signal output terminal of the imaging device. Refer to Setup Menu. Power cord DVD player Set-Top Box Video disc player Use if the video equipment...
Owners Guide
Page 39
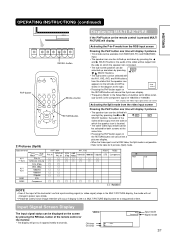
... video input screen MENU OK RETURN button ID ID SET 2 Pictures (Split) Pressing the PinP button one time will display 2 pictures. • The speaker icon can be shifted up and down by pressing the and SELECT buttons; Input Signal Screen Display The input signal status can be displayed on the screen by pressing the RECALL button of the remote control or the monitor. • The display will go out in the Setup Menu should be set to RGB Video, this Split mode...
... video input screen MENU OK RETURN button ID ID SET 2 Pictures (Split) Pressing the PinP button one time will display 2 pictures. • The speaker icon can be shifted up and down by pressing the and SELECT buttons; Input Signal Screen Display The input signal status can be displayed on the screen by pressing the RECALL button of the remote control or the monitor. • The display will go out in the Setup Menu should be set to RGB Video, this Split mode...

Owners Guide
Page 41
.... Contrast Mode Reset Normal Auto Dynamic (off for sharper picture. Normal : The gradation of the picture signal. Turn up to OFF when switching between video shadings to adjust when receiving PAL/SECAM signal. Turn On to reduce noise. Black Enhancement Adjusts the black level compensation. This monitors and adjusts the color to Normal when this Menu page can adjust further till [+40] by pressing the OK button. Adjust color temperature depending on the user's preference...
.... Contrast Mode Reset Normal Auto Dynamic (off for sharper picture. Normal : The gradation of the picture signal. Turn up to OFF when switching between video shadings to adjust when receiving PAL/SECAM signal. Turn On to reduce noise. Black Enhancement Adjusts the black level compensation. This monitors and adjusts the color to Normal when this Menu page can adjust further till [+40] by pressing the OK button. Adjust color temperature depending on the user's preference...

Owners Guide
Page 42
... the 4 Color Temperature modes. Black Side Panel Off Video Power Save Off Freeze Mode Split Default Zoom Panoramic Reset Reset Select Set Return Selected characters Video Power Save Off On Function Panel Life Mode Display ID Number Inverse Standby White Gamma Reset Select Set Normal Off 1 On 60Min. Red Red is strengthened. Blue Blue is changed. Green Color Tint Darkens green only. Lightens colors. This adjusts listed colors individually to the standby mode when the AV input with no video signal. And set it On will leads the monitor to...
... the 4 Color Temperature modes. Black Side Panel Off Video Power Save Off Freeze Mode Split Default Zoom Panoramic Reset Reset Select Set Return Selected characters Video Power Save Off On Function Panel Life Mode Display ID Number Inverse Standby White Gamma Reset Select Set Normal Off 1 On 60Min. Red Red is strengthened. Blue Blue is changed. Green Color Tint Darkens green only. Lightens colors. This adjusts listed colors individually to the standby mode when the AV input with no video signal. And set it On will leads the monitor to...

Owners Guide
Page 43
... correspond to the signal mode of the signal from the equipment that is connected to AV2 video input terminal. This should be set only when [Composite/Component] is selected on the 1st step. ENGLISH OPERATING INSTRUCTIONS (continued) SETUP MENU MENU Picture Audio Timer Function Setup Language Select OK Set Setup System System 2 OK Color System Video Input Audio Input Scart Output Monitor RGB1 DVI-STB RGB2 Component HDTV Select OK Set Return Setup Color System OK AV1 Auto AV2 NTSC...
... correspond to the signal mode of the signal from the equipment that is connected to AV2 video input terminal. This should be set only when [Composite/Component] is selected on the 1st step. ENGLISH OPERATING INSTRUCTIONS (continued) SETUP MENU MENU Picture Audio Timer Function Setup Language Select OK Set Setup System System 2 OK Color System Video Input Audio Input Scart Output Monitor RGB1 DVI-STB RGB2 Component HDTV Select OK Set Return Setup Color System OK AV1 Auto AV2 NTSC...


