Owners Guide
Page 1
has determined that this product meets the ENERGY STAR® guidelines for 50VX915, 60VX915, 70VX915 IMPORTANT SAFETY INSTRUCTIONS 2-3 FIRST TIME USE ...4-26 THE REMOTE CONTROL 27-50 ON-SCREEN DISPLAY...51-79 LAMP REPLACEMENT ...80-83 CARE OF YOUR HITACHI TV & REMOTE CONTROL 84 RECEPTION PROBLEMS ...85 USEFUL INFORMATION / INDEX 86-92 As an ENERGY STAR® Partner, Hitachi, Ltd. LCD REAR PROJECTION TELEVISION Operating Guide for energy efficiency.
has determined that this product meets the ENERGY STAR® guidelines for 50VX915, 60VX915, 70VX915 IMPORTANT SAFETY INSTRUCTIONS 2-3 FIRST TIME USE ...4-26 THE REMOTE CONTROL 27-50 ON-SCREEN DISPLAY...51-79 LAMP REPLACEMENT ...80-83 CARE OF YOUR HITACHI TV & REMOTE CONTROL 84 RECEPTION PROBLEMS ...85 USEFUL INFORMATION / INDEX 86-92 As an ENERGY STAR® Partner, Hitachi, Ltd. LCD REAR PROJECTION TELEVISION Operating Guide for energy efficiency.
Owners Guide
Page 4
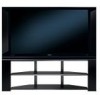
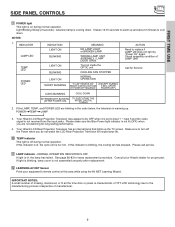
...compartment. 4. OPTIONAL LCD REAR PTV STAND (NOT INCLUDED, ORDER SEPARATELY) LCD TV MODEL LCD STAND/PART NO. 50VX915 SPF50 / QJ01521 60VX915 SPF60 / QJ01581 70VX915 SPF70 / QJ01591 CUSTOM HITACHI TELEVISION STAND 1. 3. 5. Use with Hitachi 50VX915. Two IR Mouse...remote control and Simple Remote Control respectively. BOTTOM VIEW (Remote Control) BOTTOM VIEW (Simple Remote Control) 3. Replace with your fingers and pulling the cover off. 2. FIRST TIME USE REMOTE CONTROL SIMPLE REMOTE CH + A/V NET BATTERIES ("AAA") CLEANING CLOTH VOL - POWER 2. HL02063). 2. Remote...
...compartment. 4. OPTIONAL LCD REAR PTV STAND (NOT INCLUDED, ORDER SEPARATELY) LCD TV MODEL LCD STAND/PART NO. 50VX915 SPF50 / QJ01521 60VX915 SPF60 / QJ01581 70VX915 SPF70 / QJ01591 CUSTOM HITACHI TELEVISION STAND 1. 3. 5. Use with Hitachi 50VX915. Two IR Mouse...remote control and Simple Remote Control respectively. BOTTOM VIEW (Remote Control) BOTTOM VIEW (Simple Remote Control) 3. Replace with your fingers and pulling the cover off. 2. FIRST TIME USE REMOTE CONTROL SIMPLE REMOTE CH + A/V NET BATTERIES ("AAA") CLEANING CLOTH VOL - POWER 2. HL02063). 2. Remote...

Owners Guide
Page 6
...used to connect your digital camera to control your external components without using the A/V Network feature. This connection allows your TV when using your external component's remote control. 6 Before purchasing any cables, be sure of the output and input connector types required by the various components and... be made with shielded video and audio cables that sell audio/video products. Optical Cable This cable is used on the television's rear jack panel and front control panel. You must be connected to an antenna adapter (300-Ohm to inputs and outputs located on camcorders...
...used to connect your digital camera to control your external components without using the A/V Network feature. This connection allows your TV when using your external component's remote control. 6 Before purchasing any cables, be sure of the output and input connector types required by the various components and... be made with shielded video and audio cables that sell audio/video products. Optical Cable This cable is used on the television's rear jack panel and front control panel. You must be connected to an antenna adapter (300-Ohm to inputs and outputs located on camcorders...

Owners Guide
Page 8
... turned OFF at a volume level 31 or greater, the volume level will be at the level it was set TV features to your preference without using the remote control, point it is turned ON. These buttons also serve as the cursor down (̄) and up from your Digital Camera to display the... input menu, Ant A/B, INPUT:1,2,3,4,5 or Photo Input. These buttons also serve as the EXIT button when in the top right corner of the TV screen. When using the remote. This button also serves as the cursor left audio jack. ቧ PHOTO INPUT Insert USB cable from a camcorder or VCR to a level 30...
... turned OFF at a volume level 31 or greater, the volume level will be at the level it was set TV features to your preference without using the remote control, point it is turned ON. These buttons also serve as the cursor down (̄) and up from your Digital Camera to display the... input menu, Ant A/B, INPUT:1,2,3,4,5 or Photo Input. These buttons also serve as the EXIT button when in the top right corner of the TV screen. When using the remote. This button also serves as the cursor left audio jack. ቧ PHOTO INPUT Insert USB cable from a camcorder or VCR to a level 30...
Owners Guide
Page 9
... jacks. If the LAMP, TEMP, and POWER LED are not watching for Service LONG BLINKING COOL DOWN INTERMEDIATE BLINKING (AFTER POWER ON) TV EXECUTING THE INITIAL DIGITAL TUNING 2. Please call service. ቭ LAMP indicator - See page 80-83 for proper part. INDICATOR LAMP LED... securely after replacement. ቮ LEARNING AV NET Sensor Point your Hitachi dealer for lamp replacement procedure. Consult your equipment's remote control at this indicator is not lit (OFF) when you do not watch the LCD Rear Projection Television for longer lamp life. ቫ TEMP indicator This light ...
... jacks. If the LAMP, TEMP, and POWER LED are not watching for Service LONG BLINKING COOL DOWN INTERMEDIATE BLINKING (AFTER POWER ON) TV EXECUTING THE INITIAL DIGITAL TUNING 2. Please call service. ቭ LAMP indicator - See page 80-83 for proper part. INDICATOR LAMP LED... securely after replacement. ቮ LEARNING AV NET Sensor Point your Hitachi dealer for lamp replacement procedure. Consult your equipment's remote control at this indicator is not lit (OFF) when you do not watch the LCD Rear Projection Television for longer lamp life. ቫ TEMP indicator This light ...

Owners Guide
Page 11
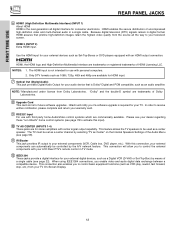
..., laserdisc players, DVD players etc. (If you have mono sound, insert the audio cable into the left audio jack.) NOTE: You may be labeled Y-CBCR. REAR PANEL JACKS FIRST TIME USE ቢ ቦ ANT A CableCARD (Top of card faces right) ቯ ቤ ብ ANT B MONITOR OUT S-VIDEO INPUT 4... HDMI 1 VIDEO L AUDIO R AUDIO TO HI-FI PR PR (MONO) (MONO) (MONO) (MONO) TV AS CENTER HDMI 2 IEEE1394 IR BLASTER OPTICAL OUT Digital Audio Upgrade Card Apparatus Claims of the remote control you can be used for composite video and component video input. 11 and 6,381,747 licensed...
..., laserdisc players, DVD players etc. (If you have mono sound, insert the audio cable into the left audio jack.) NOTE: You may be labeled Y-CBCR. REAR PANEL JACKS FIRST TIME USE ቢ ቦ ANT A CableCARD (Top of card faces right) ቯ ቤ ብ ANT B MONITOR OUT S-VIDEO INPUT 4... HDMI 1 VIDEO L AUDIO R AUDIO TO HI-FI PR PR (MONO) (MONO) (MONO) (MONO) TV AS CENTER HDMI 2 IEEE1394 IR BLASTER OPTICAL OUT Digital Audio Upgrade Card Apparatus Claims of the remote control you can be used for composite video and component video input. 11 and 6,381,747 licensed...
Owners Guide
Page 12
... 480i and 480p are available for HDMI input. ቨ Optical Out (Digital Audio) This jack provides Digital Audio Output for your TV. Hitachi will allow you to activate this connection, your external components can automatically be set as a center channel by the A/V network feature.... (High Definition Multimedia Interface) (INPUT 1) About HDMI HDMI is the next-generation all the way to control the external components with your LCD Rear PTV's remote control in a single cable. HDMI 2 (INPUT 2) Extra HDMI input. NOTES: 1. Because digital television (DTV) signals remain in digital format...
... 480i and 480p are available for HDMI input. ቨ Optical Out (Digital Audio) This jack provides Digital Audio Output for your TV. Hitachi will allow you to activate this connection, your external components can automatically be set as a center channel by the A/V network feature.... (High Definition Multimedia Interface) (INPUT 1) About HDMI HDMI is the next-generation all the way to control the external components with your LCD Rear PTV's remote control in a single cable. HDMI 2 (INPUT 2) Extra HDMI input. NOTES: 1. Because digital television (DTV) signals remain in digital format...
Owners Guide
Page 22
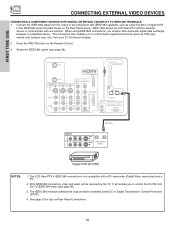
... 2. The IEEE1394 interface contains the copy protection standard called 5C or Digital Transmission Content Protection (DTCP). 4. IEEE 1394 allows the LCD Rear PTV and the external device to communicate with a DV camcorder (Digital Video camcorder) and a PC. 2. With IEEE1394 connection, video...uses only. Connect the IEEE1394 cable from the TV IEEE1394 menu (see page 36). and 6,381,747 licensed for tips on Rear Panel Connections. 22 When using IEEE1394 connections, you to the IEEE1394 input terminals shown on the Remote Control. 3. FIRST TIME USE CONNECTING EXTERNAL ...
... 2. The IEEE1394 interface contains the copy protection standard called 5C or Digital Transmission Content Protection (DTCP). 4. IEEE 1394 allows the LCD Rear PTV and the external device to communicate with a DV camcorder (Digital Video camcorder) and a PC. 2. With IEEE1394 connection, video...uses only. Connect the IEEE1394 cable from the TV IEEE1394 menu (see page 36). and 6,381,747 licensed for tips on Rear Panel Connections. 22 When using IEEE1394 connections, you to the IEEE1394 input terminals shown on the Remote Control. 3. FIRST TIME USE CONNECTING EXTERNAL ...

Owners Guide
Page 23
...your external Audio/Video components to the IR BLASTER output of the external components you can use your Hitachi remote control to control your Hitachi LCD PTV Remote Control. Connect the IR Mouse cable to the Rear Panel shown on pages 16-22. 2. Patent Nos. 4,631,603; 4,577,216; 4,819,098...-FI PR PR (MONO) (MONO) (MONO) (MONO) TV AS CENTER HDMI 2 IEEE1394 IR BLASTER OPTICAL OUT Digital Audio Upgrade Card Apparatus Claims of the external components infrared sensor for VCR #2 is setup, it allows your Hitachi LCD Rear PTV and external Audio/Video equipment (VCR and DVD Player). ...
...your external Audio/Video components to the IR BLASTER output of the external components you can use your Hitachi remote control to control your Hitachi LCD PTV Remote Control. Connect the IR Mouse cable to the Rear Panel shown on pages 16-22. 2. Patent Nos. 4,631,603; 4,577,216; 4,819,098...-FI PR PR (MONO) (MONO) (MONO) (MONO) TV AS CENTER HDMI 2 IEEE1394 IR BLASTER OPTICAL OUT Digital Audio Upgrade Card Apparatus Claims of the external components infrared sensor for VCR #2 is setup, it allows your Hitachi LCD Rear PTV and external Audio/Video equipment (VCR and DVD Player). ...

Owners Guide
Page 24
...CBL STB Custom Code 0490 Video INPUT 2 Not Setup Not Setup Not Setup Not Setup Not Setup Not Setup Not Setup Not Setup Audio Using TV Not Setup Not Setup Not Setup Not Setup Not Setup Not Setup Not Setup Not Setup EXIT SEL Select 1. DVD DVD2 VCR VCR2 AV ... (DVD setup example below to setup another code.) 1. LIST: Select to quit. 6. See Remote Control AV NET button usage on the remote control. 1. Would you like to choose DVD and press the SELECT button on the remote control. 2. If the device responds, then it here 1. FIRST TIME USE AV NETWORK SETUP ...
...CBL STB Custom Code 0490 Video INPUT 2 Not Setup Not Setup Not Setup Not Setup Not Setup Not Setup Not Setup Not Setup Audio Using TV Not Setup Not Setup Not Setup Not Setup Not Setup Not Setup Not Setup Not Setup EXIT SEL Select 1. DVD DVD2 VCR VCR2 AV ... (DVD setup example below to setup another code.) 1. LIST: Select to quit. 6. See Remote Control AV NET button usage on the remote control. 1. Would you like to choose DVD and press the SELECT button on the remote control. 2. If the device responds, then it here 1. FIRST TIME USE AV NETWORK SETUP ...
Owners Guide
Page 25
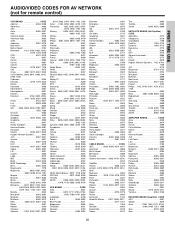
AUDIO/VIDEO CODES FOR AV NETWORK (not for remote control) FIRST TIME USE VCR BRAND CODE Admiral 0048...0432 GoldStar 0037, 0038, 1237 Gradiente 0000 HI-Q 0047 Harley Davidson 0000 Harman/Kardon 0038, 0081 Harwood 0072 Hitachi 0000, 0041, 0042 Hughes Network Systems 0042 JVC 0067, 0041 Jensen 0041 KEC 0037, 0278 KLH 0072 Kenwood...Crossdigital 1109 DishPro 1005, 0775 Echostar 1005, 0775 Expressvu 0775 GE 0566 GOI 0775 General Instrument 0869 HTS 0775 Hitachi 0819 Hughes Network Systems . 1142, 0749, 1749 JVC 0775 Magnavox 0724, 0722 Memorex 0724 Mitsubishi 0749 Motorola...
AUDIO/VIDEO CODES FOR AV NETWORK (not for remote control) FIRST TIME USE VCR BRAND CODE Admiral 0048...0432 GoldStar 0037, 0038, 1237 Gradiente 0000 HI-Q 0047 Harley Davidson 0000 Harman/Kardon 0038, 0081 Harwood 0072 Hitachi 0000, 0041, 0042 Hughes Network Systems 0042 JVC 0067, 0041 Jensen 0041 KEC 0037, 0278 KLH 0072 Kenwood...Crossdigital 1109 DishPro 1005, 0775 Echostar 1005, 0775 Expressvu 0775 GE 0566 GOI 0775 General Instrument 0869 HTS 0775 Hitachi 0819 Hughes Network Systems . 1142, 0749, 1749 JVC 0775 Magnavox 0724, 0722 Memorex 0724 Mitsubishi 0749 Motorola...

Owners Guide
Page 26
AUDIO/VIDEO CODES FOR AV NETWORK (not for remote control) FIRST TIME USE Anam 1074, 1609 Apex Digital 1257 Arcam 1120 Audiotronic 1189 Audiovox 1390 Bose 1229 Capetronic 0531 Carver. . 1089, 1189, 0008, 0042, ...
AUDIO/VIDEO CODES FOR AV NETWORK (not for remote control) FIRST TIME USE Anam 1074, 1609 Apex Digital 1257 Arcam 1120 Audiotronic 1189 Audiovox 1390 Bose 1229 Capetronic 0531 Carver. . 1089, 1189, 0008, 0042, ...
Owners Guide
Page 27
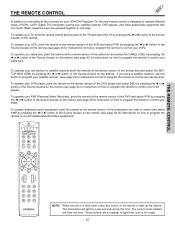
...; or ̈ button of the Source Access on the remote (see page 46 for instruction on the remote. If you are grouped together in a dark room, press any button on how to program the remote to control your VCR). To operate your HITACHI Projection TV, the new remote control is too bright. 27 A/V NET GUIDE NOTE: When...
...; or ̈ button of the Source Access on the remote (see page 46 for instruction on the remote. If you are grouped together in a dark room, press any button on how to program the remote to control your VCR). To operate your HITACHI Projection TV, the new remote control is too bright. 27 A/V NET GUIDE NOTE: When...

Owners Guide
Page 28
... 42-50). HOW TO USE THE REMOTE TO CONTROL YOUR LCD REAR PTV ቢ ባ ቤ ብ ቦ ቧ ቩ ቨ ቯ ቪ A/V NET ቭ ቮ ቫ ቱ GUIDE ተ ቲ ታ ታ ቴ ት THE REMOTE CONTROL ቢ POWER button Press this button to turn the TV set on or off when the...
... 42-50). HOW TO USE THE REMOTE TO CONTROL YOUR LCD REAR PTV ቢ ባ ቤ ብ ቦ ቧ ቩ ቨ ቯ ቪ A/V NET ቭ ቮ ቫ ቱ GUIDE ተ ቲ ታ ታ ቴ ት THE REMOTE CONTROL ቢ POWER button Press this button to turn the TV set on or off when the...
Owners Guide
Page 29
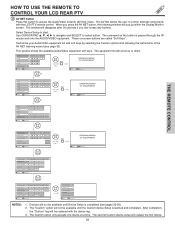
... the original 16:9 aspect ratio. 16:9 Zoom Use this aspect to zoom in 16:9 aspect. (1) NTSC/480i/480P Input 4:3 INPUT 4:3 STANDARD 4:3 EXPANDED 4:3 ZOOM1 THE REMOTE CONTROL 16:9 ZOOM (2) 480i/480P Input 16:9 INPUT 4:3 STANDARD 16:9 STANDARD 4:3 EXPANDED 4:3 ZOOM2 4:3 ZOOM1 16:9 ZOOM (3) HDMI/720P/1080i Input 16:9 INPUT 16... through the following options. 4:3 STANDARD Use this aspect mode to quickly change the picture format ASPECT ratio. HOW TO USE THE REMOTE TO CONTROL YOUR LCD REAR PTV ቧ ASPECT button Press this button to display conventional (4:3) images.
... the original 16:9 aspect ratio. 16:9 Zoom Use this aspect to zoom in 16:9 aspect. (1) NTSC/480i/480P Input 4:3 INPUT 4:3 STANDARD 4:3 EXPANDED 4:3 ZOOM1 THE REMOTE CONTROL 16:9 ZOOM (2) 480i/480P Input 16:9 INPUT 4:3 STANDARD 16:9 STANDARD 4:3 EXPANDED 4:3 ZOOM2 4:3 ZOOM1 16:9 ZOOM (3) HDMI/720P/1080i Input 16:9 INPUT 16... through the following options. 4:3 STANDARD Use this aspect mode to quickly change the picture format ASPECT ratio. HOW TO USE THE REMOTE TO CONTROL YOUR LCD REAR PTV ቧ ASPECT button Press this button to display conventional (4:3) images.
Owners Guide
Page 30
... 3:00PM 15-2 3:30PM GUIDE Move SEL Tune INFO Detail Use the CURSOR PAD to highlight the channel of choice. THE REMOTE CONTROL 30 HOW TO USE THE REMOTE TO CONTROL YOUR LCD REAR PTV ቨ DAY/NIGHT button Press this button to access the Channel Guide. Press the SELECT button to highlight the...
... 3:00PM 15-2 3:30PM GUIDE Move SEL Tune INFO Detail Use the CURSOR PAD to highlight the channel of choice. THE REMOTE CONTROL 30 HOW TO USE THE REMOTE TO CONTROL YOUR LCD REAR PTV ቨ DAY/NIGHT button Press this button to access the Channel Guide. Press the SELECT button to highlight the...
Owners Guide
Page 31
.... ORIGINAL MENU OF EQUIPMENT Move AV NET Return 2x DVD DVD2 VCR VCR2 AV Receiver POWER CH ̄ CH ̆ MENU TV/VCR b MORE Move SEL Select MORE.. 2x DVD DVD2 VCR VCR2 AV Receiver POWER CH ̄ CH ̆ AUDIO VOL ̄ VOL ̆ Inputs: SOURCE1 ... the AUDIO/VIDEO equipment. The second Custom device setup will be available until Device Setup is learned and completed. HOW TO USE THE REMOTE TO CONTROL YOUR LCD REAR PTV ቯ AV NET button Press this button to start. Use CURSOR PAD to navigate and SELECT to control external components with the...
.... ORIGINAL MENU OF EQUIPMENT Move AV NET Return 2x DVD DVD2 VCR VCR2 AV Receiver POWER CH ̄ CH ̆ MENU TV/VCR b MORE Move SEL Select MORE.. 2x DVD DVD2 VCR VCR2 AV Receiver POWER CH ̄ CH ̆ AUDIO VOL ̄ VOL ̆ Inputs: SOURCE1 ... the AUDIO/VIDEO equipment. The second Custom device setup will be available until Device Setup is learned and completed. HOW TO USE THE REMOTE TO CONTROL YOUR LCD REAR PTV ቯ AV NET button Press this button to start. Use CURSOR PAD to navigate and SELECT to control external components with the...
Owners Guide
Page 32
... the AV NET and the soft keys do not work, the user just has to 3 meters. VCR3). 4. TV Softkeys POWER CH CH TV/VCR MENU BACK Move SEL Select SELECT EXIT 1. Select TV Softkeys to learn ? Press and hold desired button to transfer the command to AV NET. In order to use..., press the SELECT button. For example, after programming your AV NET. HITACHI AV NET WIZARD (Learning) Press and hold the ̈̈ button of the VCR remote control while pointing directly at the learning AV NET sensor of the LCD Rear PTV (see pages 8-9) at a distance of the programmed equipment can now...
... the AV NET and the soft keys do not work, the user just has to 3 meters. VCR3). 4. TV Softkeys POWER CH CH TV/VCR MENU BACK Move SEL Select SELECT EXIT 1. Select TV Softkeys to learn ? Press and hold desired button to transfer the command to AV NET. In order to use..., press the SELECT button. For example, after programming your AV NET. HITACHI AV NET WIZARD (Learning) Press and hold the ̈̈ button of the VCR remote control while pointing directly at the learning AV NET sensor of the LCD Rear PTV (see pages 8-9) at a distance of the programmed equipment can now...
Owners Guide
Page 33
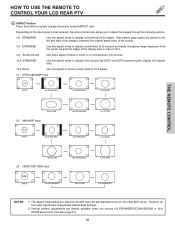
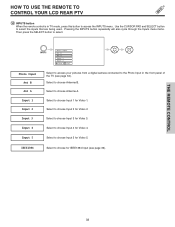
HOW TO USE THE REMOTE TO CONTROL YOUR LCD REAR PTV ተ INPUTS button When the remote control is in the front panel of the TV (see page 36). Select to choose for Video 1. Pressing the INPUTS button repeatedly will also cycle through the Inputs menu items. Then press the... (see page 34). Select to select. Select to choose Input 2 for Video 3. Select to choose Input 5 for Video 4. Select to access the INPUTS menu. THE REMOTE CONTROL 33 Photo Input Ant B Ant A Input 1 Input 2 Input 3 Input 4 Input 5 IEEE1394 Photo Input Ant B Ant A Input 1 Input 2 Move SEL Sel Select to...
HOW TO USE THE REMOTE TO CONTROL YOUR LCD REAR PTV ተ INPUTS button When the remote control is in the front panel of the TV (see page 36). Select to choose for Video 1. Pressing the INPUTS button repeatedly will also cycle through the Inputs menu items. Then press the... (see page 34). Select to select. Select to choose Input 2 for Video 3. Select to choose Input 5 for Video 4. Select to access the INPUTS menu. THE REMOTE CONTROL 33 Photo Input Ant B Ant A Input 1 Input 2 Input 3 Input 4 Input 5 IEEE1394 Photo Input Ant B Ant A Input 1 Input 2 Move SEL Sel Select to...

Owners Guide
Page 34
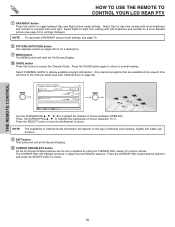
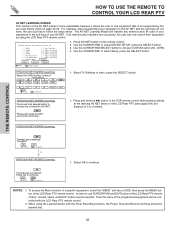
HOW TO USE THE REMOTE TO CONTROL YOUR LCD REAR PTV PHOTO INPUT This feature is useful for viewing digital still pictures from your digital camera using the Photo Input in the side panel of ... "Input device not detected" if the digital camera's large capacity memory is 999. 2. Jump Slideshow Rotate Jump 7 0 Please Enter Picture Number - - THE REMOTE CONTROL NOTES: 1. The maximum number of the TV. Please wait 1 or 2 minutes before checking your Photo Input connections. 7. Photo Input Ant B Ant A Input 1 Input 2 Move SEL Sel No. 7/10...
HOW TO USE THE REMOTE TO CONTROL YOUR LCD REAR PTV PHOTO INPUT This feature is useful for viewing digital still pictures from your digital camera using the Photo Input in the side panel of ... "Input device not detected" if the digital camera's large capacity memory is 999. 2. Jump Slideshow Rotate Jump 7 0 Please Enter Picture Number - - THE REMOTE CONTROL NOTES: 1. The maximum number of the TV. Please wait 1 or 2 minutes before checking your Photo Input connections. 7. Photo Input Ant B Ant A Input 1 Input 2 Move SEL Sel No. 7/10...


