
Owners Guide
Page 3
... in accordance with paragraph 15.119 and 15.122 of programs broadcast by TV stations and cable companies, as well as improper changes or modifications not expressly approved by HITACHI could void the user's warranty. Public viewing of copyrighted material Public viewing of...product recycling and disposal information contact your authorized dealer or service center. FOR MORE INFORMATION, CALL 1-800-HITACHI. Insert the power cord into a 120 volt 60 Hz outlet. This product incorporates copyright protection technology that contains mercury. For lamp recycling and disposal information,...
... in accordance with paragraph 15.119 and 15.122 of programs broadcast by TV stations and cable companies, as well as improper changes or modifications not expressly approved by HITACHI could void the user's warranty. Public viewing of copyrighted material Public viewing of...product recycling and disposal information contact your authorized dealer or service center. FOR MORE INFORMATION, CALL 1-800-HITACHI. Insert the power cord into a 120 volt 60 Hz outlet. This product incorporates copyright protection technology that contains mercury. For lamp recycling and disposal information,...

Owners Guide
Page 4
.... 4 When replacing old batteries, push them towards the springs and lift them out. 3. models: For optional accessories, please access our web site at: www.hitachi.us/tv ³ Remote Control Unit CLU-3851WL (Part No. REMOTE CONTROL BATTERY INSTALLATION AND REPLACEMENT 1. Match the batteries to swell or rupture resulting in the battery...
.... 4 When replacing old batteries, push them towards the springs and lift them out. 3. models: For optional accessories, please access our web site at: www.hitachi.us/tv ³ Remote Control Unit CLU-3851WL (Part No. REMOTE CONTROL BATTERY INSTALLATION AND REPLACEMENT 1. Match the batteries to swell or rupture resulting in the battery...

Owners Guide
Page 5
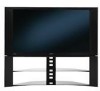
...or the lamp "goes out," (burns out). To avoid cabinet warping, cabinet color changes, and increased chance of set up your new HITACHI Projection Television ANTENNA Unless your LCD Rear PTV against a wall, keep it may hear a "pop" sound when the lamp "goes out." The sound of the receiver cabinet and...drapes or screens can be sure that is its best, test various locations in a different section of air to reduce the reflection or the TV can be considered defective. 3. Also, be located in the room to the side or behind the viewing area. These are located in high ...
...or the lamp "goes out," (burns out). To avoid cabinet warping, cabinet color changes, and increased chance of set up your new HITACHI Projection Television ANTENNA Unless your LCD Rear PTV against a wall, keep it may hear a "pop" sound when the lamp "goes out." The sound of the receiver cabinet and...drapes or screens can be sure that is its best, test various locations in a different section of air to reduce the reflection or the TV can be considered defective. 3. Also, be located in the room to the side or behind the viewing area. These are located in high ...

Owners Guide
Page 6
... connect the cables to the antenna mixer. Optical Cable This cable is used on the television's rear jack panel and side control panel. ANTENNA CONNECTIONS TO REAR JACK PANEL VHF (75-Ohm) antenna/CATV (Cable TV) When using a 300-Ohm twin lead from most stores that have an antenna, connect the ...amplifier with an S-Video feature in the side of common connectors. "F" Type 75-Ohm Coaxial Antenna Connector For connecting RF signals (antenna or cable TV) to the IR Blaster output of the standard video cable to 75-Ohm). If you have phono connectors. First time use 75-Ohm coaxial ...
... connect the cables to the antenna mixer. Optical Cable This cable is used on the television's rear jack panel and side control panel. ANTENNA CONNECTIONS TO REAR JACK PANEL VHF (75-Ohm) antenna/CATV (Cable TV) When using a 300-Ohm twin lead from most stores that have an antenna, connect the ...amplifier with an S-Video feature in the side of common connectors. "F" Type 75-Ohm Coaxial Antenna Connector For connecting RF signals (antenna or cable TV) to the IR Blaster output of the standard video cable to 75-Ohm). If you have phono connectors. First time use 75-Ohm coaxial ...
Owners Guide
Page 7
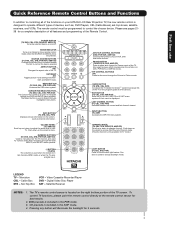
... included in Set-Top-Box (STB) mode or when the TV uses a digital input. Also used to change the Freeze mode of your TV. EXIT BUTTON (TV, CBL, STB, PVR/VCR) Exits out of the functions on your HITACHI LCD Rear Projection TV, the new remote control is in the PVR mode. 3. ...LAST CHANNEL BUTTON (TV, CBL, STB, PVR) Switches between DAY and NIGHT mode. The TV's remote control sensor is used...
... included in Set-Top-Box (STB) mode or when the TV uses a digital input. Also used to change the Freeze mode of your TV. EXIT BUTTON (TV, CBL, STB, PVR/VCR) Exits out of the functions on your HITACHI LCD Rear Projection TV, the new remote control is in the PVR mode. 3. ...LAST CHANNEL BUTTON (TV, CBL, STB, PVR) Switches between DAY and NIGHT mode. The TV's remote control sensor is used...

Owners Guide
Page 8
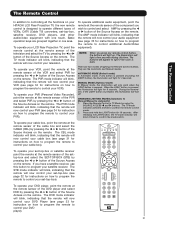
...left (̇) and right (̈) buttons when in MENU mode. The volume level will be at the level it possible to set TV features to turn the TV on the TV screen. Press the INPUT button and select INPUT 5. These buttons also serve as the EXIT button when in MENU mode. » CHANNEL...these audio/video jacks for your equipment's remote control at this area when selecting channels, adjusting volume, etc. However, if it is set when the TV is turned ON. This button also serves as the cursor left audio jack. ¶ LEARNING AV NET Sensor Point your desired sound level. This ...
...left (̇) and right (̈) buttons when in MENU mode. The volume level will be at the level it possible to set TV features to turn the TV on the TV screen. Press the INPUT button and select INPUT 5. These buttons also serve as the EXIT button when in MENU mode. » CHANNEL...these audio/video jacks for your equipment's remote control at this area when selecting channels, adjusting volume, etc. However, if it is set when the TV is turned ON. This button also serves as the cursor left audio jack. ¶ LEARNING AV NET Sensor Point your desired sound level. This ...

Owners Guide
Page 9
... LONG BLINKING (1 SEC CYCLE) COOL DOWN (FOR 6 MINUTES) (TV CAN ACCEPT REMOTE CONTROL AND SIDE BUTTONS) 2. POWER TEMP LAMP 3. If this indicator is on during normal operation. Make sure to cool down . Your Hitachi LCD Rear Projection Television may become clogged over time. Your Hitachi LCD Rear Projection Television has an internal lamp that may appear to...
... LONG BLINKING (1 SEC CYCLE) COOL DOWN (FOR 6 MINUTES) (TV CAN ACCEPT REMOTE CONTROL AND SIDE BUTTONS) 2. POWER TEMP LAMP 3. If this indicator is on during normal operation. Make sure to cool down . Your Hitachi LCD Rear Projection Television may become clogged over time. Your Hitachi LCD Rear Projection Television has an internal lamp that may appear to...

Owners Guide
Page 10
... video cable. 3. If you have a S-VHS VCR, use Side Panel Jacks and Connections The side panel jacks are provided as shown in place of your TV. 10 If you do not, the played back picture may be abnormal. 2. Completely insert connection cord plugs when connecting to easily connect a camcorder or VCR...
... video cable. 3. If you have a S-VHS VCR, use Side Panel Jacks and Connections The side panel jacks are provided as shown in place of your TV. 10 If you do not, the played back picture may be abnormal. 2. Completely insert connection cord plugs when connecting to easily connect a camcorder or VCR...

Owners Guide
Page 11
...jacks provide fixed or variable audio and video signals which are used at the same time. It may use Rear Panel Connections ³ Antenna Input CABLE - Because digital television (DTV) signals remain in a single cable....AIR MONITOR OUT S I V I D E O V I D E O (MONO) (MONO) Y/ VIDEO PB PR (MONO) Y/ VIDEO PB PR (MONO) A L U D TV AS CENTER I O R AUDIO TO HI-FI INPUT 1 INPUT 2 INPUT 3 INPUT 4 OPTICAL OUT Digital Audio / G-LINK HDMI INPUT 1 ² HDMI INPUT 2 ¶ CAUTION &#... all digital interface for recording. Hitachi will be used for consumer electronics.
...jacks provide fixed or variable audio and video signals which are used at the same time. It may use Rear Panel Connections ³ Antenna Input CABLE - Because digital television (DTV) signals remain in a single cable....AIR MONITOR OUT S I V I D E O V I D E O (MONO) (MONO) Y/ VIDEO PB PR (MONO) Y/ VIDEO PB PR (MONO) A L U D TV AS CENTER I O R AUDIO TO HI-FI INPUT 1 INPUT 2 INPUT 3 INPUT 4 OPTICAL OUT Digital Audio / G-LINK HDMI INPUT 1 ² HDMI INPUT 2 ¶ CAUTION &#... all digital interface for recording. Hitachi will be used for consumer electronics.

Owners Guide
Page 12
Rear Panel Connections First time use ¾ TV AS CENTER (INPUTS 1-4) These jacks are for limited viewing uses only. If the CableCARD is properly installed or not installed, the TV will allow you will be controlled by selecting TV AS CENTER on page 75 before requesting a CableCARD (also known as shown below appears. This connection...
Rear Panel Connections First time use ¾ TV AS CENTER (INPUTS 1-4) These jacks are for limited viewing uses only. If the CableCARD is properly installed or not installed, the TV will allow you will be controlled by selecting TV AS CENTER on page 75 before requesting a CableCARD (also known as shown below appears. This connection...

Owners Guide
Page 13
...players, VCRs etc. AIR MONITOR OUT S I V I D E O V I D E O (MONO) (MONO) Y/ VIDEO PB PR (MONO) Y/ VIDEO PB PR (MONO) A L U D TV AS CENTER I O R AUDIO TO HI-FI INPUT 1 INPUT 2 INPUT 3 INPUT 4 OPTICAL OUT Digital Audio / G-LINK Upgrade Card HDMI INPUT 1 HDMI INPUT 2 CAUTION OPTICAL IN To... the components R-Y output to the operating guide of these may be used at a time. In this feature. Rear Panel Connections First time use TIPS ON REAR PANEL CONNECTIONS • S-VIDEO, Y-PBPR and HDMI connections are provided for high performance components, such as "provided...
...players, VCRs etc. AIR MONITOR OUT S I V I D E O V I D E O (MONO) (MONO) Y/ VIDEO PB PR (MONO) Y/ VIDEO PB PR (MONO) A L U D TV AS CENTER I O R AUDIO TO HI-FI INPUT 1 INPUT 2 INPUT 3 INPUT 4 OPTICAL OUT Digital Audio / G-LINK Upgrade Card HDMI INPUT 1 HDMI INPUT 2 CAUTION OPTICAL IN To... the components R-Y output to the operating guide of these may be used at a time. In this feature. Rear Panel Connections First time use TIPS ON REAR PANEL CONNECTIONS • S-VIDEO, Y-PBPR and HDMI connections are provided for high performance components, such as "provided...

Owners Guide
Page 14
TV AS CENTER). · These FRONT left and right speakers are connected to the FRONT output of a separate audio amplifier. » These REAR left and right speakers are connected to the Rear output of a separate audio amplifier. ¿ This subwoofer is connected to the LFE/SUB ... right) Top faces AIR MONITOR OUT S I V I D E O V I D E O (MONO) (MONO) Y/ VIDEO PB PR (MONO) Y/ VIDEO PB PR (MONO) A L U D TV AS CENTER I O R AUDIO TO HI-FI INPUT 1 INPUT 2 INPUT 3 INPUT 4 OPTICAL OUT Digital Audio / G-LINK Upgrade Card HDMI INPUT 1 HDMI INPUT 2 CAUTION · · RCA...
TV AS CENTER). · These FRONT left and right speakers are connected to the FRONT output of a separate audio amplifier. » These REAR left and right speakers are connected to the Rear output of a separate audio amplifier. ¿ This subwoofer is connected to the LFE/SUB ... right) Top faces AIR MONITOR OUT S I V I D E O V I D E O (MONO) (MONO) Y/ VIDEO PB PR (MONO) Y/ VIDEO PB PR (MONO) A L U D TV AS CENTER I O R AUDIO TO HI-FI INPUT 1 INPUT 2 INPUT 3 INPUT 4 OPTICAL OUT Digital Audio / G-LINK Upgrade Card HDMI INPUT 1 HDMI INPUT 2 CAUTION · · RCA...

Owners Guide
Page 15
... faces right) Top faces AIR MONITOR OUT S I V I D E O V I D E O (MONO) (MONO) Y/ VIDEO PB PR (MONO) Y/ VIDEO PB PR (MONO) A L U D TV AS CENTER I O R AUDIO TO HI-FI INPUT 1 INPUT 2 INPUT 3 INPUT 4 OPTICAL OUT Digital Audio / G-LINK Upgrade Card HDMI INPUT 1 HDMI INPUT 2 CAUTION Audio Video OUTPUT... VCR 15 NOTE: When the TV is set is not received from the AUDIO OUT of the VCR or the laserdisc player to your particular assortment of each component. BEFORE ...
... faces right) Top faces AIR MONITOR OUT S I V I D E O V I D E O (MONO) (MONO) Y/ VIDEO PB PR (MONO) Y/ VIDEO PB PR (MONO) A L U D TV AS CENTER I O R AUDIO TO HI-FI INPUT 1 INPUT 2 INPUT 3 INPUT 4 OPTICAL OUT Digital Audio / G-LINK Upgrade Card HDMI INPUT 1 HDMI INPUT 2 CAUTION Audio Video OUTPUT... VCR 15 NOTE: When the TV is set is not received from the AUDIO OUT of the VCR or the laserdisc player to your particular assortment of each component. BEFORE ...

Owners Guide
Page 16
... faces right) Top faces Upgrade Card 2. CableCARD™ (Top of U.S. Completely insert the connection cord plugs when connecting to rear panel jacks. Connect the cable from the INPUTS menu to return to the last channel tuned. Completely insert the connection cord plugs... OUT R of U.S. AIR MONITOR OUT S I V I D E O V I D E O (MONO) (MONO) Y/ VIDEO PB PR (MONO) Y/ VIDEO PB PR (MONO) A L U D TV AS CENTER I O R AUDIO TO HI-FI INPUT 1 INPUT 2 INPUT 3 INPUT 4 OPTICAL OUT Digital Audio / G-LINK Upgrade Card HDMI INPUT 1 HDMI INPUT 2 CAUTION R LV OUTPUT S-VIDEO...
... faces right) Top faces Upgrade Card 2. CableCARD™ (Top of U.S. Completely insert the connection cord plugs when connecting to rear panel jacks. Connect the cable from the INPUTS menu to return to the last channel tuned. Completely insert the connection cord plugs... OUT R of U.S. AIR MONITOR OUT S I V I D E O V I D E O (MONO) (MONO) Y/ VIDEO PB PR (MONO) Y/ VIDEO PB PR (MONO) A L U D TV AS CENTER I O R AUDIO TO HI-FI INPUT 1 INPUT 2 INPUT 3 INPUT 4 OPTICAL OUT Digital Audio / G-LINK Upgrade Card HDMI INPUT 1 HDMI INPUT 2 CAUTION R LV OUTPUT S-VIDEO...

Owners Guide
Page 17
...6,381,747 licensed for delivery of uncompressed video to a display. 4. HDMI Upgrade Card HDMI INPUT 1 OR HDMI INPUT 2 DVI to rear panel jacks. CableCARD™ (Top of device user settings determines final video appearance. Connect the HDMI or DVI to the HDMI input as ... 2 CABLE Apparatus Claims of U.S. AIR MONITOR OUT S I V I D E O V I D E O (MONO) (MONO) Y/ VIDEO PB PR (MONO) Y/ VIDEO PB PR (MONO) A L U D TV AS CENTER I O R AUDIO TO HI-FI INPUT 1 INPUT 2 INPUT 3 INPUT 4 OPTICAL OUT Digital Audio / G-LINK DVI - Patent Nos. 4,631,603; 4,577,216; 4,819,098; 4,907...
...6,381,747 licensed for delivery of uncompressed video to a display. 4. HDMI Upgrade Card HDMI INPUT 1 OR HDMI INPUT 2 DVI to rear panel jacks. CableCARD™ (Top of device user settings determines final video appearance. Connect the HDMI or DVI to the HDMI input as ... 2 CABLE Apparatus Claims of U.S. AIR MONITOR OUT S I V I D E O V I D E O (MONO) (MONO) Y/ VIDEO PB PR (MONO) Y/ VIDEO PB PR (MONO) A L U D TV AS CENTER I O R AUDIO TO HI-FI INPUT 1 INPUT 2 INPUT 3 INPUT 4 OPTICAL OUT Digital Audio / G-LINK DVI - Patent Nos. 4,631,603; 4,577,216; 4,819,098; 4,907...

Owners Guide
Page 18
.../DVD player or HDTV set top box to the INPUT (Y) jack, as shown on the TV set top box to the last channel tuned. The picture and sound that is played back ...2. Connect the cable from the AUDIO OUT L of the laserdisc/DVD player or HDTV set on REAR PANEL CONNECTIONS. 18 Connect the cable from the Y OUT of the Laserdisc/DVD player or HDTV ...S I V I D E O V I D E O (MONO) (MONO) Y/ VIDEO PB PR (MONO) Y/ VIDEO PB PR (MONO) A L U D TV AS CENTER I O R AUDIO TO HI-FI INPUT 1 INPUT 2 INPUT 3 INPUT 4 OPTICAL OUT Digital Audio / G-LINK Upgrade Card HDMI INPUT 1 HDMI INPUT 2 ...
.../DVD player or HDTV set top box to the INPUT (Y) jack, as shown on the TV set top box to the last channel tuned. The picture and sound that is played back ...2. Connect the cable from the AUDIO OUT L of the laserdisc/DVD player or HDTV set on REAR PANEL CONNECTIONS. 18 Connect the cable from the Y OUT of the Laserdisc/DVD player or HDTV ...S I V I D E O V I D E O (MONO) (MONO) Y/ VIDEO PB PR (MONO) Y/ VIDEO PB PR (MONO) A L U D TV AS CENTER I O R AUDIO TO HI-FI INPUT 1 INPUT 2 INPUT 3 INPUT 4 OPTICAL OUT Digital Audio / G-LINK Upgrade Card HDMI INPUT 1 HDMI INPUT 2 ...

Owners Guide
Page 19
... faces AIR MONITOR OUT S I V I D E O V I D E O (MONO) (MONO) Y/ VIDEO PB PR (MONO) Y/ VIDEO PB PR (MONO) A L U D TV AS CENTER I O R AUDIO TO HI-FI INPUT 1 INPUT 2 INPUT 3 INPUT 4 OPTICAL OUT Digital Audio / G-LINK Upgrade Card HDMI INPUT 1 HDMI INPUT 2 CAUTION Infrared Sensor IR...which can use Connecting External Video Sources Your HITACHI LCD Rear Projection Television is setup, it allows your IR Mouse connector to control your equipment using your HITACHI LCD Rear PTV Remote Control. First time use your HITACHI LCD Rear PTV and external Audio/Video equipment (VCR...
... faces AIR MONITOR OUT S I V I D E O V I D E O (MONO) (MONO) Y/ VIDEO PB PR (MONO) Y/ VIDEO PB PR (MONO) A L U D TV AS CENTER I O R AUDIO TO HI-FI INPUT 1 INPUT 2 INPUT 3 INPUT 4 OPTICAL OUT Digital Audio / G-LINK Upgrade Card HDMI INPUT 1 HDMI INPUT 2 CAUTION Infrared Sensor IR...which can use Connecting External Video Sources Your HITACHI LCD Rear Projection Television is setup, it allows your IR Mouse connector to control your equipment using your HITACHI LCD Rear PTV Remote Control. First time use your HITACHI LCD Rear PTV and external Audio/Video equipment (VCR...

Owners Guide
Page 20
... Setup procedure on pages 47-51. One IR Mouse cable can use Connecting External Video Sources Your HITACHI LCD Rear Projection Television is necessary for the TV Guide On ScreenTM system to work . 20 Connect your HITACHI LCD Rear PTV and external Audio/Video equipment (VCR and Cable box). Connect the IR Mouse cable to the...
... Setup procedure on pages 47-51. One IR Mouse cable can use Connecting External Video Sources Your HITACHI LCD Rear Projection Television is necessary for the TV Guide On ScreenTM system to work . 20 Connect your HITACHI LCD Rear PTV and external Audio/Video equipment (VCR and Cable box). Connect the IR Mouse cable to the...
Owners Guide
Page 21
... remote will blink 3 times to control your PVR). The illumination will light for 4 seconds. The TV mode indicator will now control your PVR (see page 31 for instructions on how to program the remote...button is designed to operate different types of the Source Access on the remote. To operate your LCD Rear Projection TV, point the remote control at the remote sensor of the cable box and select the CABLE (CBL... addition to controlling all the functions on your HITACHI LCD Rear Projection TV, the new remote control is pressed, the illumination will now control your television.
... remote will blink 3 times to control your PVR). The illumination will light for 4 seconds. The TV mode indicator will now control your PVR (see page 31 for instructions on how to program the remote...button is designed to operate different types of the Source Access on the remote. To operate your LCD Rear Projection TV, point the remote control at the remote sensor of the cable box and select the CABLE (CBL... addition to controlling all the functions on your HITACHI LCD Rear Projection TV, the new remote control is pressed, the illumination will now control your television.

Owners Guide
Page 22
... PAUSE button to freeze the picture. The Remote Control How to Use the Remote to Control Your TV ቢ POWER button Press this button to turn the TV set on or off when the remote is in TV mode. (See page 21 for ቢ instructions on how to set the remote control to... TV mode.) ባ ቤ ብ ባ MODE Indicator Turns on or blinks to show remote control mode. ቤ SOURCE ACCESS (̇ or ̈) buttons Press these ...
... PAUSE button to freeze the picture. The Remote Control How to Use the Remote to Control Your TV ቢ POWER button Press this button to turn the TV set on or off when the remote is in TV mode. (See page 21 for ቢ instructions on how to set the remote control to... TV mode.) ባ ቤ ብ ባ MODE Indicator Turns on or blinks to show remote control mode. ቤ SOURCE ACCESS (̇ or ̈) buttons Press these ...


