
Owners Guide
Page 2
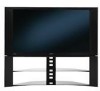
...the grounding 2 grounding-type plug. to the front, or top, of these products properly, this discharge unit, connection to HITACHI. Keep these instructions. 2. Use only with the cart, stand, tripod, bracket, or table specified by the manufacturer, or sold with a dry cloth. 7. Do not apply excessive ... static charges. Important Safety Instructions SAFETY POINTS YOU SHOULD KNOW ABOUT type plug has two blades and a third grounding YOUR HITACHI LCD REAR PROJECTION prong. The wide blade or the third prong are designed to the proper operation of the obsolete outlet. 10.
...the grounding 2 grounding-type plug. to the front, or top, of these products properly, this discharge unit, connection to HITACHI. Keep these instructions. 2. Use only with the cart, stand, tripod, bracket, or table specified by the manufacturer, or sold with a dry cloth. 7. Do not apply excessive ... static charges. Important Safety Instructions SAFETY POINTS YOU SHOULD KNOW ABOUT type plug has two blades and a third grounding YOUR HITACHI LCD REAR PROJECTION prong. The wide blade or the third prong are designed to the proper operation of the obsolete outlet. 10.
Owners Guide
Page 85
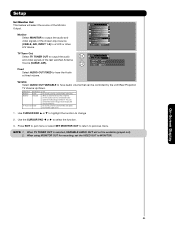
... other A/V device. On-Screen Display 85 Setup Menu Preference Screen Saver Set The Inputs Set AV NET Set Closed Captions Set Monitor Out Upgrades Set Stand-by changing the volume of the last watched Antenna OR Video Out : Monitor Source (CABLE, AIR). Video In : Fixed Move SEL Return Fixed ... output the audio Setup Set Monitor Out and video signals of the TV. When using MONITOR OUT for recording, set the VIDEO OUT to previous menu. Setup Set Monitor Out This feature will not be controlled by the LCD Rear Projection TV Volume Up/Down. Use CURSOR PAD ̆ or ̄ to ...
... other A/V device. On-Screen Display 85 Setup Menu Preference Screen Saver Set The Inputs Set AV NET Set Closed Captions Set Monitor Out Upgrades Set Stand-by changing the volume of the last watched Antenna OR Video Out : Monitor Source (CABLE, AIR). Video In : Fixed Move SEL Return Fixed ... output the audio Setup Set Monitor Out and video signals of the TV. When using MONITOR OUT for recording, set the VIDEO OUT to previous menu. Setup Set Monitor Out This feature will not be controlled by the LCD Rear Projection TV Volume Up/Down. Use CURSOR PAD ̆ or ̄ to ...

Owners Guide
Page 96
...of a set-top- INPUTS: • Power Input AC 120V, 60Hz • Stand-by direct connection to a cable system providing such programming. I • Video 1....415.8 97 44 55VG825 31 1/8 790.0 59 7/8 1,520.0 17 3/4 450.0 94.1 42.7 60VG825 33 9/16 853.0 64 1/8 1,629.0 19 1/16 483.8 118 53.5 NOTE: Due to ...digital camera, USB drive or memory card USB drive) • TV Guide On ScreenTM • Technology. Certain advanced interactive digital cable ... Less than 1 Watt • Power Consumption - Refer to rear panel at the back of SRS Labs, Inc. Manufactured under license...
...of a set-top- INPUTS: • Power Input AC 120V, 60Hz • Stand-by direct connection to a cable system providing such programming. I • Video 1....415.8 97 44 55VG825 31 1/8 790.0 59 7/8 1,520.0 17 3/4 450.0 94.1 42.7 60VG825 33 9/16 853.0 64 1/8 1,629.0 19 1/16 483.8 118 53.5 NOTE: Due to ...digital camera, USB drive or memory card USB drive) • TV Guide On ScreenTM • Technology. Certain advanced interactive digital cable ... Less than 1 Watt • Power Consumption - Refer to rear panel at the back of SRS Labs, Inc. Manufactured under license...

Owners Guide
Page 100
...Screen Display. Setup Menu Preference Screen Saver Set The Inputs Set AV NET Set Closed Captions Set Monitor Out CableCARD Information Upgrades Set Stand-By Mode Move SEL Select 4. This process must be needed because the channel list is properly inserted in good condition, with ...", "Acquiring Data", "CableCARD is not Installed"). Remove the CableCARD by pressing the eject button and pull the CableCARD straight out. Video Audio TV Guide On Screen Channel Manager Locks Timers Setup Move SEL Select 3. Use the CURSOR PAD ̄ to access the CableCARD Information menu. 1....
...Screen Display. Setup Menu Preference Screen Saver Set The Inputs Set AV NET Set Closed Captions Set Monitor Out CableCARD Information Upgrades Set Stand-By Mode Move SEL Select 4. This process must be needed because the channel list is properly inserted in good condition, with ...", "Acquiring Data", "CableCARD is not Installed"). Remove the CableCARD by pressing the eject button and pull the CableCARD straight out. Video Audio TV Guide On Screen Channel Manager Locks Timers Setup Move SEL Select 3. Use the CURSOR PAD ̄ to access the CableCARD Information menu. 1....


