Owners Guide
Page 7
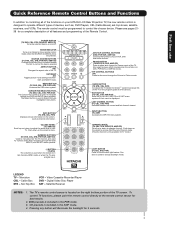
... description of all of the functions on your HITACHI LCD Rear Projection TV, the new remote control is designed to operate different types of the TV. Set-Top-Box VCR - Digital Video Disc Player SAT - NUMERIC BUTTONS (TV, DVD, CBL, STB, PVR/VCR, AMP/CD) Used to manually enter the TV channel, and used to mute. Pressing any...
... description of all of the functions on your HITACHI LCD Rear Projection TV, the new remote control is designed to operate different types of the TV. Set-Top-Box VCR - Digital Video Disc Player SAT - NUMERIC BUTTONS (TV, DVD, CBL, STB, PVR/VCR, AMP/CD) Used to manually enter the TV channel, and used to mute. Pressing any...

Owners Guide
Page 15
... the Cable and/or Air cables 2. Patent Nos. 4,631,603; 4,577,216; 4,819,098; 4,907,093; Check the owner's manual of video and audio inputs and outputs. CABLE Apparatus Claims of components and features. Then press the SELECT button to view the program from ...faces right) Top faces AIR MONITOR OUT S I V I D E O V I D E O (MONO) (MONO) Y/ VIDEO PB PR (MONO) Y/ VIDEO PB PR (MONO) A L U D TV AS CENTER I O R AUDIO TO HI-FI INPUT 1 INPUT 2 INPUT 3 INPUT 4 OPTICAL OUT Digital Audio / G-LINK Upgrade Card HDMI INPUT 1 HDMI INPUT 2 CAUTION Audio Video OUTPUT...
... the Cable and/or Air cables 2. Patent Nos. 4,631,603; 4,577,216; 4,819,098; 4,907,093; Check the owner's manual of video and audio inputs and outputs. CABLE Apparatus Claims of components and features. Then press the SELECT button to view the program from ...faces right) Top faces AIR MONITOR OUT S I V I D E O V I D E O (MONO) (MONO) Y/ VIDEO PB PR (MONO) Y/ VIDEO PB PR (MONO) A L U D TV AS CENTER I O R AUDIO TO HI-FI INPUT 1 INPUT 2 INPUT 3 INPUT 4 OPTICAL OUT Digital Audio / G-LINK Upgrade Card HDMI INPUT 1 HDMI INPUT 2 CAUTION Audio Video OUTPUT...
Owners Guide
Page 21
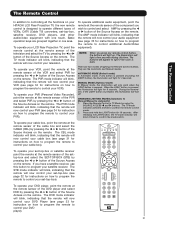
...have a satellite receiver, use this time. When the LIGHT button is pressed, the illumination will light up. CHANGING LIGHTING MODES (Automatic to Manual/Manual to control and select AMP by pressing the ̇ or ̈ button of lighting the Remote Control buttons. To operate your set -top...The Remote Control The Remote Control In addition to controlling all the functions on your HITACHI LCD Rear Projection TV, the new remote control is designed to operate different types of VCRs, CATV (Cable TV) converters, set -top-box or satellite receiver point the remote at the remote sensor...
...have a satellite receiver, use this time. When the LIGHT button is pressed, the illumination will light up. CHANGING LIGHTING MODES (Automatic to Manual/Manual to control and select AMP by pressing the ̇ or ̈ button of lighting the Remote Control buttons. To operate your set -top...The Remote Control The Remote Control In addition to controlling all the functions on your HITACHI LCD Rear Projection TV, the new remote control is designed to operate different types of VCRs, CATV (Cable TV) converters, set -top-box or satellite receiver point the remote at the remote sensor...

Owners Guide
Page 31
...CODE IS: NOTE: Refer to the corresponding selection. 4. The remote will remember the codes you have programmed until the batteries are for operating the TV. 31 The remote will flash 3 times if the ቢ code was accepted. ባ 5. After replacing the batteries repeat the entire programming ...procedure as stated above procedures, please consult your cable box as shown on the remote control to position the LED light to instruction manual of the Cable Box for operation of cable boxes. The Remote Control The Remote Control for Cable Box Functions Operating the precoded ...
...CODE IS: NOTE: Refer to the corresponding selection. 4. The remote will remember the codes you have programmed until the batteries are for operating the TV. 31 The remote will flash 3 times if the ቢ code was accepted. ባ 5. After replacing the batteries repeat the entire programming ...procedure as stated above procedures, please consult your cable box as shown on the remote control to position the LED light to instruction manual of the Cable Box for operation of cable boxes. The Remote Control The Remote Control for Cable Box Functions Operating the precoded ...

Owners Guide
Page 32
...Receiver. ቢ PRE-CODED SET-TOP-BOX/SATELLITE RECEIVER buttons These buttons transmit the chosen pre-coded settop-box/satellite codes. ባ EXCLUSIVE TV buttons These buttons are removed from the from the remote control. The remote will turn off your set -top-box/ satellite receiver code has ...use the SOURCE ACCESS buttons (̇ or ̈) on page 37-38. When this occurs, the remote control is entered. To switch to instruction manual of the Set-TopBox/Satellite Receiver for your set -top- ባ box/satellite systems. 3. Hold down the ENT button on the remote and enter...
...Receiver. ቢ PRE-CODED SET-TOP-BOX/SATELLITE RECEIVER buttons These buttons transmit the chosen pre-coded settop-box/satellite codes. ባ EXCLUSIVE TV buttons These buttons are removed from the from the remote control. The remote will turn off your set -top-box/ satellite receiver code has ...use the SOURCE ACCESS buttons (̇ or ̈) on page 37-38. When this occurs, the remote control is entered. To switch to instruction manual of the Set-TopBox/Satellite Receiver for your set -top- ባ box/satellite systems. 3. Hold down the ENT button on the remote and enter...

Owners Guide
Page 33
... code is entered. The remote will turn off your DVD player. ባ 3. NOTE: 1. MY DVD PLAYER CODE IS: NOTE: Refer to instruction manual of the DVD Player for operation of your DVD player code has not been precoded into the remote. 2. Hold down the ENT button on the...DVD player cannot be operated after performing the above procedures, please consult your DVD player. ቢ This remote is programmed for operating the TV. 33 After replacing the batteries repeat the entire programming procedure as shown on the remote control to position the LED light to pages 37-38...
... code is entered. The remote will turn off your DVD player. ባ 3. NOTE: 1. MY DVD PLAYER CODE IS: NOTE: Refer to instruction manual of the DVD Player for operation of your DVD player code has not been precoded into the remote. 2. Hold down the ENT button on the...DVD player cannot be operated after performing the above procedures, please consult your DVD player. ቢ This remote is programmed for operating the TV. 33 After replacing the batteries repeat the entire programming procedure as shown on the remote control to position the LED light to pages 37-38...
Owners Guide
Page 34
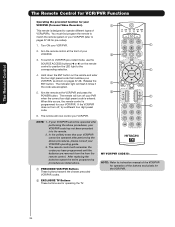
...VCR/PVR. ባ 3. The remote will remember the codes you have programmed until the batteries are for the VCR/PVR. ባ EXCLUSIVE TV Buttons These buttons are removed from the from the remote control. NOTE: 1. Aim the remote control at the VCR/PVR and press the ባ.../PVR does not turn off , try a different four digit preset code. ቢ / ቢ ቢ 6. You must first program the remote to instruction manual of the VCR/PVR for operation of your PVR when the correct four digit preset code is programmed for pre-codes). 1. When this occurs, the...
...VCR/PVR. ባ 3. The remote will remember the codes you have programmed until the batteries are for the VCR/PVR. ባ EXCLUSIVE TV Buttons These buttons are removed from the from the remote control. NOTE: 1. Aim the remote control at the VCR/PVR and press the ባ.../PVR does not turn off , try a different four digit preset code. ቢ / ቢ ቢ 6. You must first program the remote to instruction manual of the VCR/PVR for operation of your PVR when the correct four digit preset code is programmed for pre-codes). 1. When this occurs, the...

Owners Guide
Page 35
...component cannot be operated after performing the above . The indicator light will remember the codes you have programmed until the batteries are for operating the TV. 35 Repeat steps 1 - 6 if you wish to operate different types of your Audio component when the correct four digit preset code is... ቢ 6. Turn ON your Audio ባ component. ቢ 3. Hold down the ENT button on the remote control to position the LED light to instruction manual of the VCR/PVR for operation of your Audio component you wish to program the remote to pages 37-38 for the VCR/PVR. ቢ...
...component cannot be operated after performing the above . The indicator light will remember the codes you have programmed until the batteries are for operating the TV. 35 Repeat steps 1 - 6 if you wish to operate different types of your Audio component when the correct four digit preset code is... ቢ 6. Turn ON your Audio ባ component. ቢ 3. Hold down the ENT button on the remote control to position the LED light to instruction manual of the VCR/PVR for operation of your Audio component you wish to program the remote to pages 37-38 for the VCR/PVR. ቢ...

Owners Guide
Page 54
... weekday that it airs on the same channel and starts at the same time (Only available when setting a manual reminder). - The Reminder will resume when the conflict no longer exists. - Program is available in Schedule) until done so by ...New 5. Remind Regularly 16. Elapsed time in Schedule). - Program is set to a schedule conflict (Still in manual recording). - Program is set to a schedule conflict (Still in current program - TV rating for the program. - Program recording is available. - Info Icon 3. HDTV 4. Remind Weekly 17. Indicates...
... weekday that it airs on the same channel and starts at the same time (Only available when setting a manual reminder). - The Reminder will resume when the conflict no longer exists. - Program is available in Schedule) until done so by ...New 5. Remind Regularly 16. Elapsed time in Schedule). - Program is set to a schedule conflict (Still in manual recording). - Program is set to a schedule conflict (Still in current program - TV rating for the program. - Program recording is available. - Info Icon 3. HDTV 4. Remind Weekly 17. Indicates...
Owners Guide
Page 59
... • Set to automatically turn ON the TV and tune to the channel at the scheduled reminder time. • Set to automatically tune the TV, at the scheduled reminder time, to the .... Set the Reminder to record or autotune. • Don't record this show - When setting Manual recording, the option DAILY is set in the SCHEDULE Services. How to start . Select these options...774; or ̄ to highlight CANCEL then press the SELECT button to auto-tune (see page 60). Cancels the recording. 2. The banner will prompt you that reminds you before recording starts. Recording Conflict...
... • Set to automatically turn ON the TV and tune to the channel at the scheduled reminder time. • Set to automatically tune the TV, at the scheduled reminder time, to the .... Set the Reminder to record or autotune. • Don't record this show - When setting Manual recording, the option DAILY is set in the SCHEDULE Services. How to start . Select these options...774; or ̄ to highlight CANCEL then press the SELECT button to auto-tune (see page 60). Cancels the recording. 2. The banner will prompt you that reminds you before recording starts. Recording Conflict...

Owners Guide
Page 60
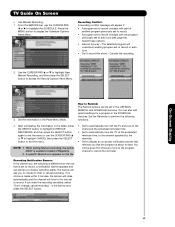
...values of Regularly. 2. Use the CURSOR PAD ̆ or ̄ to highlight New Manual Reminder and then press the SELECT button to exit the menu. 5. TV Guide On Screen How to set a reminder: • Set Manual reminder • Set from 15 minutes early to 15 minutes late or On time (...the CURSOR PAD ̇ or ̈ to select from the Panel Menu 1. When setting Manual Reminders, the option Daily is available instead of the Remind Options Panel Menu fields (see page 63). 60 NOTE: Default options can highlight Cancel and press the SELECT button to access the Remind Options ...
...values of Regularly. 2. Use the CURSOR PAD ̆ or ̄ to highlight New Manual Reminder and then press the SELECT button to exit the menu. 5. TV Guide On Screen How to set a reminder: • Set Manual reminder • Set from 15 minutes early to 15 minutes late or On time (...the CURSOR PAD ̇ or ̈ to select from the Panel Menu 1. When setting Manual Reminders, the option Daily is available instead of the Remind Options Panel Menu fields (see page 63). 60 NOTE: Default options can highlight Cancel and press the SELECT button to access the Remind Options ...

Owners Guide
Page 79
... SELECT button to move on to choose the brand name of the DVD. 14. Would you can manually "LEARN" each one by the AV/NET codes. The Learning Mode will power up the A/V Receiver.... AV Net Setup Wizard : Device Settings DVD Settings Brand Name IR Code Set Video Input Audio Input Hitachi (31/77) 1 (1/5) Not Connected Not Connected All settings are complete! Move SEL Select Back Next Move... Return Back Start 2. Setup 8. Use the CURSOR PAD ̇ or ̈ to select the TV Input that all settings, then press the SELECT button to move on to highlight the IR CODE Set...
... SELECT button to move on to choose the brand name of the DVD. 14. Would you can manually "LEARN" each one by the AV/NET codes. The Learning Mode will power up the A/V Receiver.... AV Net Setup Wizard : Device Settings DVD Settings Brand Name IR Code Set Video Input Audio Input Hitachi (31/77) 1 (1/5) Not Connected Not Connected All settings are complete! Move SEL Select Back Next Move... Return Back Start 2. Setup 8. Use the CURSOR PAD ̇ or ̈ to select the TV Input that all settings, then press the SELECT button to move on to highlight the IR CODE Set...

Owners Guide
Page 93
...verify that the show title in front of the 4 main Services (i.e., Listings, Schedule, Setup, Search) and press the Info Button. TV Guide On Screen has a Manual Record and Remind feature. I have a cable box, check the IR cable connection. If after you choose the lineup, you want to...basis. These stars are incorrect. Some channel numbers in the Initial Guide Setup section. If so, how do ? After some show entry in TV Guide On Screen. Highlight Schedule and press menu. Choose the event type, press SELECT and then enter date, start and stop time, channel ...
...verify that the show title in front of the 4 main Services (i.e., Listings, Schedule, Setup, Search) and press the Info Button. TV Guide On Screen has a Manual Record and Remind feature. I have a cable box, check the IR cable connection. If after you choose the lineup, you want to...basis. These stars are incorrect. Some channel numbers in the Initial Guide Setup section. If so, how do ? After some show entry in TV Guide On Screen. Highlight Schedule and press menu. Choose the event type, press SELECT and then enter date, start and stop time, channel ...

Owners Guide
Page 94
... and other data in the TV Guide On Screen system and cannot guarantee service availability in any way liable for the accuracy or availability of its affiliates. and/or one time • Daily (manual only)-records/reminds the time, channel, and input combination Monday through Friday •...; Regularly- and/or its related affiliates be liable for any day of Gemstar-TV Guide International, Inc. and/or its related affiliates are ...
... and other data in the TV Guide On Screen system and cannot guarantee service availability in any way liable for the accuracy or availability of its affiliates. and/or one time • Daily (manual only)-records/reminds the time, channel, and input combination Monday through Friday •...; Regularly- and/or its related affiliates be liable for any day of Gemstar-TV Guide International, Inc. and/or its related affiliates are ...

Owners Guide
Page 97
...with convenient and expedient assistance. Just present proof of purchase and/or delivery receipts to the HITACHI Authorized Service Facility nearest you hours of trouble free operation from your French Manual on your warranty card or operating guide. Should you with the terms of the limited warranty... - 5:00pm La version français de votre manual se trouve a l'exterieur de la boîte. Si le manuel est manquant, coposez le 1-800-HITACHI (1-800-448-2244) pour obenir votre copie. If the manual is missing, call 1-800-HITACHI (1-800-448-2244) for your unit. However, should...
...with convenient and expedient assistance. Just present proof of purchase and/or delivery receipts to the HITACHI Authorized Service Facility nearest you hours of trouble free operation from your French Manual on your warranty card or operating guide. Should you with the terms of the limited warranty... - 5:00pm La version français de votre manual se trouve a l'exterieur de la boîte. Si le manuel est manquant, coposez le 1-800-HITACHI (1-800-448-2244) pour obenir votre copie. If the manual is missing, call 1-800-HITACHI (1-800-448-2244) for your unit. However, should...


