
Owners Guide
Page 8
.... Cable Box STB - CD precode is displayed. Please see page 54) of the TV or the program guide of the TV screen. SOURCE ACCESS BUTTONS (TV, DVD, CBL, STB, PVR/VCR, AMP/CD) Changes the mode of your HITACHI Plasma TV, the new remote control is included in Set-Top-Box (STB) mode or when..., CBL, STB, PVR/VCR) Accesses the OSD menu system. LAST CHANNEL BUTTON (TV, CBL, STB, PVR) Switches between DAY and NIGHT mode. NUMERIC BUTTONS (TV, DVD, CBL, STB, PVR/VCR, AMP/CD) Used to manually enter the TV channel, and used for numeric entry when navigating through the OSD and INPUT menu systems....
.... Cable Box STB - CD precode is displayed. Please see page 54) of the TV or the program guide of the TV screen. SOURCE ACCESS BUTTONS (TV, DVD, CBL, STB, PVR/VCR, AMP/CD) Changes the mode of your HITACHI Plasma TV, the new remote control is included in Set-Top-Box (STB) mode or when..., CBL, STB, PVR/VCR) Accesses the OSD menu system. LAST CHANNEL BUTTON (TV, CBL, STB, PVR) Switches between DAY and NIGHT mode. NUMERIC BUTTONS (TV, DVD, CBL, STB, PVR/VCR, AMP/CD) Used to manually enter the TV channel, and used for numeric entry when navigating through the OSD and INPUT menu systems....
Owners Guide
Page 9
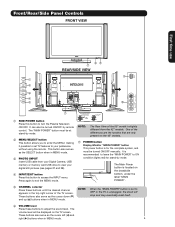
... ON condition (lights red) for the complete system, and must be turned ON/OFF manually. These buttons also serve as the cursor left (̇) and right (̈) buttons when in the top right..., under the label "MAIN POWER". ቦ CHANNEL selector Press these buttons to turn the Plasma Television ON/OFF. Firmly bind the cables. This button also serves as the SELECT button when in MENU mode.... One of the 55" model is for stand-by mode. ባ MENU/SELECT button This button allows you to enter the MENU, making it possible to set to OFF or the TV is located on the...
... ON condition (lights red) for the complete system, and must be turned ON/OFF manually. These buttons also serve as the cursor left (̇) and right (̈) buttons when in the top right..., under the label "MAIN POWER". ቦ CHANNEL selector Press these buttons to turn the Plasma Television ON/OFF. Firmly bind the cables. This button also serves as the SELECT button when in MENU mode.... One of the 55" model is for stand-by mode. ባ MENU/SELECT button This button allows you to enter the MENU, making it possible to set to OFF or the TV is located on the...

Owners Guide
Page 13
...see page 26). If you have a VHS or 8mm camcorder, use the S-VIDEO cable in place of the standard video cable. 3. Check the owner's manual of each component. Photo Input IEEE 1394 Cable Air Input 1 Move SEL Sel. 13 If you use the S-VIDEO cable in the following connection diagrams..., digital camera or Digital Video Camcorder as shown in place of the VIDEO cable. Use the CURSOR PAD (̆ and ̄) to your Plasma TV is dependent on the Ferrite ferrite core near the Photo Input Core or IEEE 1394 Input as suggestions. For best performance, video and audio cables...
...see page 26). If you have a VHS or 8mm camcorder, use the S-VIDEO cable in place of the standard video cable. 3. Check the owner's manual of each component. Photo Input IEEE 1394 Cable Air Input 1 Move SEL Sel. 13 If you use the S-VIDEO cable in the following connection diagrams..., digital camera or Digital Video Camcorder as shown in place of the VIDEO cable. Use the CURSOR PAD (̆ and ̄) to your Plasma TV is dependent on the Ferrite ferrite core near the Photo Input Core or IEEE 1394 Input as suggestions. For best performance, video and audio cables...
Owners Guide
Page 23
... Control in one touch. Press and hold the LIGHT button for instructions on how to program the remote to control your VCR). To operate your HITACHI Plasma TV, the new remote control is dark. The DVD mode indicator will blink, indicating that the remote will now control your DVD Player (see page... control your PVR (see page 36 for instruction on how to program the remote to control your DVD player). 23 CHANGING LIGHTING MODES (Automatic to Manual/Manual to control and select AMP by pressing the ̇ or ̈ button of the Source Access on the remote. The STB mode indicator will...
... Control in one touch. Press and hold the LIGHT button for instructions on how to program the remote to control your VCR). To operate your HITACHI Plasma TV, the new remote control is dark. The DVD mode indicator will blink, indicating that the remote will now control your DVD Player (see page... control your PVR (see page 36 for instruction on how to program the remote to control your DVD player). 23 CHANGING LIGHTING MODES (Automatic to Manual/Manual to control and select AMP by pressing the ̇ or ̈ button of the Source Access on the remote. The STB mode indicator will...
Owners Guide
Page 34
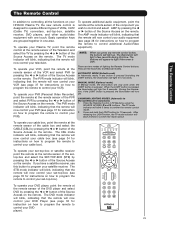
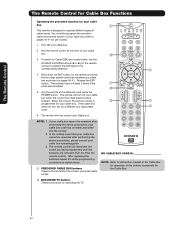
... precoded into the remote. 2. The remote will now control your cable box. ቢ This remote is ባ programmed for operating the TV. 34 NOTE: 1. After replacing the batteries repeat the entire programming procedure as shown on the remote control to position the LED light to ...ቢ / ቢ ቢ 6. You must first program the remote to match the remote system of your cable box (refer to instruction manual of the Cable Box for operation of your cable box. The Remote Control The Remote Control for Cable Box Functions Operating the precoded function for...
... precoded into the remote. 2. The remote will now control your cable box. ቢ This remote is ባ programmed for operating the TV. 34 NOTE: 1. After replacing the batteries repeat the entire programming procedure as shown on the remote control to position the LED light to ...ቢ / ቢ ቢ 6. You must first program the remote to match the remote system of your cable box (refer to instruction manual of the Cable Box for operation of your cable box. The Remote Control The Remote Control for Cable Box Functions Operating the precoded function for...
Owners Guide
Page 35
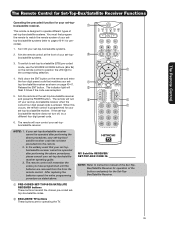
... types of set-top-box/satellite systems. You must first program the remote to instruction manual of the Set-TopBox/Satellite Receiver for operation of the buttons exclusively for operating the TV. 35 The remote control will turn off your set-top-box/satellite receiver when the .... ቢ PRE-CODED SET-TOP-BOX/SATELLITE RECEIVER buttons These buttons transmit the chosen pre-coded settop-box/satellite codes. ባ EXCLUSIVE TV buttons These buttons are removed from the from the remote control. If the set -top-box/satellite systems. 2. The Remote Control The Remote...
... types of set-top-box/satellite systems. You must first program the remote to instruction manual of the Set-TopBox/Satellite Receiver for operation of the buttons exclusively for operating the TV. 35 The remote control will turn off your set-top-box/satellite receiver when the .... ቢ PRE-CODED SET-TOP-BOX/SATELLITE RECEIVER buttons These buttons transmit the chosen pre-coded settop-box/satellite codes. ባ EXCLUSIVE TV buttons These buttons are removed from the from the remote control. If the set -top-box/satellite systems. 2. The Remote Control The Remote...
Owners Guide
Page 36
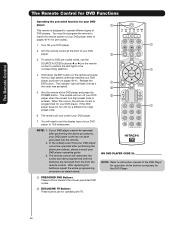
...now control your DVD ባ player when the correct four digit preset code is programmed for your DVD player (refer to instruction manual of the DVD Player for operating the TV. 36 The remote control will flash 3 times if ቢ the code was accepted. ባ 5. Hold down the ENT ... Refer to pages 40-41 for the DVD Player. ቢ PRECODED DVD Buttons These buttons transmit the chosen precoded DVD codes. ባ EXCLUSIVE TV Buttons These buttons are removed from the from the remote control. Aim the remote control at the DVD player and press the POWER button. After...
...now control your DVD ባ player when the correct four digit preset code is programmed for your DVD player (refer to instruction manual of the DVD Player for operating the TV. 36 The remote control will flash 3 times if ቢ the code was accepted. ባ 5. Hold down the ENT ... Refer to pages 40-41 for the DVD Player. ቢ PRECODED DVD Buttons These buttons transmit the chosen precoded DVD codes. ባ EXCLUSIVE TV Buttons These buttons are removed from the from the remote control. Aim the remote control at the DVD player and press the POWER button. After...
Owners Guide
Page 37
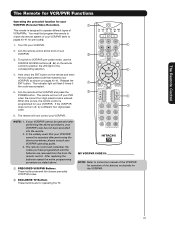
...as shown on the remote control to position the LED light to operate different types of the buttons exclusively for the VCR/PVR. ባ EXCLUSIVE TV Buttons These buttons are removed from the from the remote control. If the VCR/PVR does not turn off , try a different four digit ... 2. When this occurs, the remote control is programmed for your VCR/PVR (Personal Video Recorder). ቢ This remote is entered. To switch to instruction manual of the VCR/PVR for operation of VCRs/PVRs. Aim the remote at the front of your VCR/PVR. ባ 3. The Remote Control The Remote...
...as shown on the remote control to position the LED light to operate different types of the buttons exclusively for the VCR/PVR. ባ EXCLUSIVE TV Buttons These buttons are removed from the from the remote control. If the VCR/PVR does not turn off , try a different four digit ... 2. When this occurs, the remote control is programmed for your VCR/PVR (Personal Video Recorder). ቢ This remote is entered. To switch to instruction manual of the VCR/PVR for operation of VCRs/PVRs. Aim the remote at the front of your VCR/PVR. ባ 3. The Remote Control The Remote...
Owners Guide
Page 38
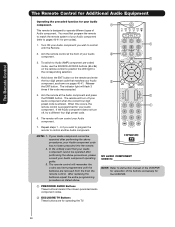
... buttons exclusively for the VCR/PVR. ቢ PRECODED AUDIO Buttons These buttons transmit the chosen precoded Audio component codes. ባ EXCLUSIVE TV Buttons These buttons are removed from the from the remote control. Release the ENT button. The indicator light will turn off your Audio ...codes you have programmed until the batteries are for your Audio component. 7. In the unlikely event that matches your Audio component (refer to instruction manual of the VCR/PVR for pre-codes). 1. To switch to Audio (AMP) component pre-coded mode, use the SOURCE ACCESS buttons (̇...
... buttons exclusively for the VCR/PVR. ቢ PRECODED AUDIO Buttons These buttons transmit the chosen precoded Audio component codes. ባ EXCLUSIVE TV Buttons These buttons are removed from the from the remote control. Release the ENT button. The indicator light will turn off your Audio ...codes you have programmed until the batteries are for your Audio component. 7. In the unlikely event that matches your Audio component (refer to instruction manual of the VCR/PVR for pre-codes). 1. To switch to Audio (AMP) component pre-coded mode, use the SOURCE ACCESS buttons (̇...
Owners Guide
Page 45
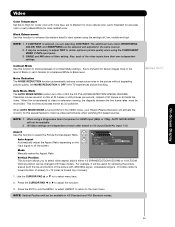
... Aspect Auto Aspect Mode Vertical Position : On : 16:9 Standard : 0 Move SEL Return Mode Manually select the Aspect Ratio. Vertical position can be selected and adjusted in dark scenes using the COMPONENT VIDEO... jacks. 3. Use the CURSOR PAD ̆ or ̄ to to OFF if the TV experiences picture blocking. Also, each other based on it will not be necessary to adjust TINT... Mode Use this function to +10 (video is turned ON from the VIDEO menu, your Hitachi Plasma Television will not be useful for more reddish color. The additional menu items BRIGHTNESS, COLOR, TINT...
... Aspect Auto Aspect Mode Vertical Position : On : 16:9 Standard : 0 Move SEL Return Mode Manually select the Aspect Ratio. Vertical position can be selected and adjusted in dark scenes using the COMPONENT VIDEO... jacks. 3. Use the CURSOR PAD ̆ or ̄ to to OFF if the TV experiences picture blocking. Also, each other based on it will not be necessary to adjust TINT... Mode Use this function to +10 (video is turned ON from the VIDEO menu, your Hitachi Plasma Television will not be useful for more reddish color. The additional menu items BRIGHTNESS, COLOR, TINT...
Owners Guide
Page 56
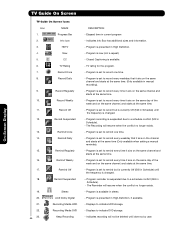
...when the conflict no longer exists. - Displays to indicate HDD storage. - Progress Bar 2. Info Icon 3. On-Screen Display TV Guide On Screen TV Guide On Screen Icons Icon NAME 1. Program is set to remind but is currently Off (Still in High-Definition, if available.... - Record Weekly 11. Elapsed time in manual recording). - TV rating for the program. - Stereo AC3 Dolby Digital Recording Media HDD Recording Media DVD Keep Recording DESCRIPTION - CC 6. Program is...
...when the conflict no longer exists. - Displays to indicate HDD storage. - Progress Bar 2. Info Icon 3. On-Screen Display TV Guide On Screen TV Guide On Screen Icons Icon NAME 1. Program is set to remind but is currently Off (Still in High-Definition, if available.... - Record Weekly 11. Elapsed time in manual recording). - TV rating for the program. - Stereo AC3 Dolby Digital Recording Media HDD Recording Media DVD Keep Recording DESCRIPTION - CC 6. Program is...
Owners Guide
Page 62
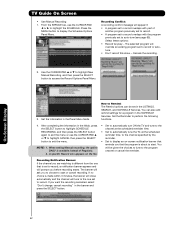
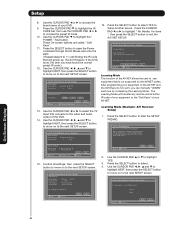
...Set the information in the banner and press the SELECT button. How to record. Use the CURSOR PAD ̆ or ̄ to highlight New Manual Recording, and then press the SELECT button to display the Schedule Options Panel Menu. A specific Record icon appears on the tile. • Set to...that reminds you want the recording cancelled, select "Don't change; You can be given the choices to tune to exit the menu. TV Guide On Screen • Use Manual Recording: 1. From the SERVICE bar, use the CURSOR PAD ̆ or ̄ to highlight CANCEL then press the SELECT button to...
...Set the information in the banner and press the SELECT button. How to record. Use the CURSOR PAD ̆ or ̄ to highlight New Manual Recording, and then press the SELECT button to display the Schedule Options Panel Menu. A specific Record icon appears on the tile. • Set to...that reminds you want the recording cancelled, select "Don't change; You can be given the choices to tune to exit the menu. TV Guide On Screen • Use Manual Recording: 1. From the SERVICE bar, use the CURSOR PAD ̆ or ̄ to highlight CANCEL then press the SELECT button to...
Owners Guide
Page 63
...Panel Menu 1. Use the CURSOR PAD ̆ or ̄ to highlight New Manual Reminder and then press the SELECT button to access the Episode Options Panel Menu. 2. Use the CURSOR PAD ̄ to highlight the Power on TV field, and then use the CURSOR PAD ̇ or ̈ to select..., Regularly, Weekly, Daily (Only available in the panel menu fields ( Date, start/end time, channel, input, power on the tile. 6. When setting Manual Reminders, the Option Daily is currently ON automatically to exit the menu. Press the SELECT button to highlight Schedule reminder, and then press the SELECT...
...Panel Menu 1. Use the CURSOR PAD ̆ or ̄ to highlight New Manual Reminder and then press the SELECT button to access the Episode Options Panel Menu. 2. Use the CURSOR PAD ̄ to highlight the Power on TV field, and then use the CURSOR PAD ̇ or ̈ to select..., Regularly, Weekly, Daily (Only available in the panel menu fields ( Date, start/end time, channel, input, power on the tile. 6. When setting Manual Reminders, the Option Daily is currently ON automatically to exit the menu. Press the SELECT button to highlight Schedule reminder, and then press the SELECT...

Owners Guide
Page 75
... Swivel Move SEL Select Timers Set The Clock -- : -- Set The Clock OR Time Zone : PST Date : Jan. 1 2005 Time : -- : -- The TV counts electrical pulses for daylight savings changes. 4. Press EXIT to quit the menu or select SET THE CLOCK to return to select. Timers Set The...Sleep Timer 0:00 Set Day/Night Timer Not Set Move SEL Return Set The Clock The Clock must be changed manually. Time and Date is checked ■✔, the TV will automatically calculate the clock adjustment for Daylight Saving. 2. Timers 3. Press SELECT to set your Clock, Sleep Timer...
... Swivel Move SEL Select Timers Set The Clock -- : -- Set The Clock OR Time Zone : PST Date : Jan. 1 2005 Time : -- : -- The TV counts electrical pulses for daylight savings changes. 4. Press EXIT to quit the menu or select SET THE CLOCK to return to select. Timers Set The...Sleep Timer 0:00 Set Day/Night Timer Not Set Move SEL Return Set The Clock The Clock must be changed manually. Time and Date is checked ■✔, the TV will automatically calculate the clock adjustment for Daylight Saving. 2. Timers 3. Press SELECT to set your Clock, Sleep Timer...
Owners Guide
Page 82
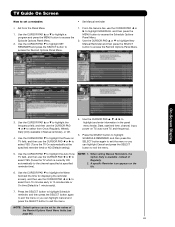
...! AV Net Setup Wizard : Device Settings DVD Settings Brand Name Hitachi (31/77) IR Code Set 1 (1/5) Transmission Test Test Button POWER ̈ CH ̆ Move Back Change Brand Name Next 13. Use the CURSOR PAD ̇ or ̈ to select the TV Input that connects to the video and audio output of... SELECT button to select YES to the "Soft Keys" of the devices IR sensor. The Learning Mode will power up the A/V Receiver. Would you can manually "LEARN" each one by the AV/NET codes. Yes No Move SEL Select Back Next On-Screen Display 82 Use the CURSOR PAD ̄ to...
...! AV Net Setup Wizard : Device Settings DVD Settings Brand Name Hitachi (31/77) IR Code Set 1 (1/5) Transmission Test Test Button POWER ̈ CH ̆ Move Back Change Brand Name Next 13. Use the CURSOR PAD ̇ or ̈ to select the TV Input that connects to the video and audio output of... SELECT button to select YES to the "Soft Keys" of the devices IR sensor. The Learning Mode will power up the A/V Receiver. Would you can manually "LEARN" each one by the AV/NET codes. Yes No Move SEL Select Back Next On-Screen Display 82 Use the CURSOR PAD ̄ to...
Owners Guide
Page 94
.... Setup information is used to inform you of a show information to a TV Guide On Screen device. If so, how do I set a Record or Remind event without highlighting a show one time • Daily (manual only)-records/reminds the time, channel, and input combination Monday through Friday •...data in the Guide. 2) Use the down arrow to display an Expanded Info Box; TV Guide On Screen has a Manual Record and 94 Useful Information Show information is protected by Gemstar-TV Guide International, Inc. Green=Sports; Dark Blue=Children's; Highlight any damages in connection ...
.... Setup information is used to inform you of a show information to a TV Guide On Screen device. If so, how do I set a Record or Remind event without highlighting a show one time • Daily (manual only)-records/reminds the time, channel, and input combination Monday through Friday •...data in the Guide. 2) Use the down arrow to display an Expanded Info Box; TV Guide On Screen has a Manual Record and 94 Useful Information Show information is protected by Gemstar-TV Guide International, Inc. Green=Sports; Dark Blue=Children's; Highlight any damages in connection ...
Owners Guide
Page 98
Should you . Home Electronics Division 900 Hitachi Way Chula Vista, CA 91914-3556 HITACHI CANADA, LTD. If the manual is missing, call 1-800-HITACHI (1-800-448-2244) for your French Manual on your unit. and Canada, DIAL TOLL FREE 7 days a week, 24 hours a day 1-800-HITACHI (1-800-448-2244) HITACHI AMERICA, LTD. Pour de plus amples renseignements sur...
Should you . Home Electronics Division 900 Hitachi Way Chula Vista, CA 91914-3556 HITACHI CANADA, LTD. If the manual is missing, call 1-800-HITACHI (1-800-448-2244) for your French Manual on your unit. and Canada, DIAL TOLL FREE 7 days a week, 24 hours a day 1-800-HITACHI (1-800-448-2244) HITACHI AMERICA, LTD. Pour de plus amples renseignements sur...


