
Owners Guide
Page 3
... is used, use this television. 1. Heed all servicing to avoid injury from tip-over. 13. Use only with the cart, stand, tripod, bracket, or table specified by your local authorities or the Electronic Industries Alliance: www.eiae.org. Do not use caution ...of the television which could cause the product to comply with the apparatus. For disposal or recycling information, please contact your HITACHI Factory Warranty. SAFETY TIPS Read before operating equipment Follow all warnings and instructions marked on or pinched particularly at plugs, convenience...
... is used, use this television. 1. Heed all servicing to avoid injury from tip-over. 13. Use only with the cart, stand, tripod, bracket, or table specified by your local authorities or the Electronic Industries Alliance: www.eiae.org. Do not use caution ...of the television which could cause the product to comply with the apparatus. For disposal or recycling information, please contact your HITACHI Factory Warranty. SAFETY TIPS Read before operating equipment Follow all warnings and instructions marked on or pinched particularly at plugs, convenience...
Owners Guide
Page 4
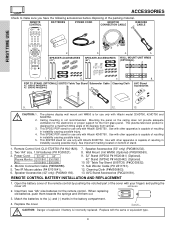
... other apparatus is not recommended. REMOTE CONTROL BATTERY INSTALLATION AND REPLACEMENT 1. WALL MOUNT UNIT WM50 (OPTIONAL) REC 1. 6. 7. This SPD42 PDP stand for use only with Hitachi 50HDT50. Replace with Hitachi model 32HDT50, 42HDT50 and 50HDT50. FIRST TIME USE ACCESSORIES Check to make sure you have the following accessories before disposing of the cover with your...
... other apparatus is not recommended. REMOTE CONTROL BATTERY INSTALLATION AND REPLACEMENT 1. WALL MOUNT UNIT WM50 (OPTIONAL) REC 1. 6. 7. This SPD42 PDP stand for use only with Hitachi 50HDT50. Replace with Hitachi model 32HDT50, 42HDT50 and 50HDT50. FIRST TIME USE ACCESSORIES Check to make sure you have the following accessories before disposing of the cover with your...
Owners Guide
Page 6
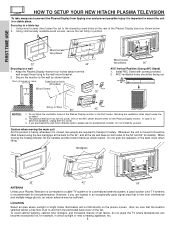
... 3. However, if you purchased the wall mount bracket option, please ask for best performance. FIRST TIME USE HOW TO SETUP YOUR NEW HITACHI PLASMA TELEVISION To take measures to prevent the Plasma Display from tipping over and prevent possible injury it is moved it should be sufficient. ... below . 10cm (4 inches) or more Stabilization bolts (Provided) Wood Screw 32" Wire Wood screw two places 50" AVC Vertical Position (Using AVC Stand) 1. CH+ INPUT/EXIT AUDIO VIDEO CONTROL CENTER PULL AUDIO VIDEO CONTROL CENTER CH+ INPUT/EXIT CH- If you are located in an exceptionally good...
... 3. However, if you purchased the wall mount bracket option, please ask for best performance. FIRST TIME USE HOW TO SETUP YOUR NEW HITACHI PLASMA TELEVISION To take measures to prevent the Plasma Display from tipping over and prevent possible injury it is moved it should be sufficient. ... below . 10cm (4 inches) or more Stabilization bolts (Provided) Wood Screw 32" Wire Wood screw two places 50" AVC Vertical Position (Using AVC Stand) 1. CH+ INPUT/EXIT AUDIO VIDEO CONTROL CENTER PULL AUDIO VIDEO CONTROL CENTER CH+ INPUT/EXIT CH- If you are located in an exceptionally good...
Owners Guide
Page 10
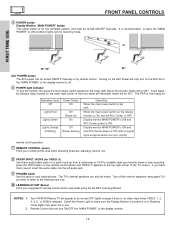
...50"). FRONT PANEL CONTROLS ቦ POWER button Display Monitor "MAIN POWER" button This power button is for stand-by mode. Turn off . ቧ POWER light indicator To turn on the AVC box if the ... the audio cable into the left for Indicating Lamp Power Status Off Off Lights Red Lights Green Off (Stand-by) On Lights Orange Off (Flashing) (Power Saving) Operating When the main power switch is set ...Center power is OFF. If you wish to listen to be turned ON/OFF manually. Your HITACHI Plasma TV will only turn the monitor ON, press the main power switch located on the ...
...50"). FRONT PANEL CONTROLS ቦ POWER button Display Monitor "MAIN POWER" button This power button is for stand-by mode. Turn off . ቧ POWER light indicator To turn on the AVC box if the ... the audio cable into the left for Indicating Lamp Power Status Off Off Lights Red Lights Green Off (Stand-by) On Lights Orange Off (Flashing) (Power Saving) Operating When the main power switch is set ...Center power is OFF. If you wish to listen to be turned ON/OFF manually. Your HITACHI Plasma TV will only turn the monitor ON, press the main power switch located on the ...
Owners Guide
Page 63
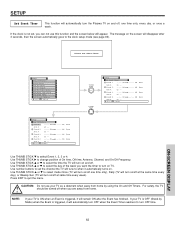
... it will remain ON after 3 seconds, then the screen automatically goes to change position of the week you can not use your TV is OFF (Stand-by using the On and Off Timers.
... it will remain ON after 3 seconds, then the screen automatically goes to change position of the week you can not use your TV is OFF (Stand-by using the On and Off Timers.
Owners Guide
Page 80
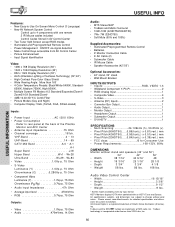
... Input AC 120V, 60Hz • Power Consumption - Please access www.hitachi.com/tv for detailed specifications and dimensions for Consumer Use • Power...Cable • IR Mouse Cable • Speaker Accessories (42"/50") Optional Accessories: • 42" stand, 32" stand • Wall Mount Bracket INPUTS/OUTPUTS • Inputs RGB, VIDEO 1-5 • Wideband Component Y, Pb... 1 • DVI-HDTV 1 SPECIFICATIONS • Multi-Scanning 24-109kHz (h), 50-85Hz (v) • Pixel Pitch(50HDT50) .....0.86(horiz.) x 0.81(vert.) mm • Pixel Pitch(42HDT50) .....0.90(horiz.) x 0.51(vert.)...
... Input AC 120V, 60Hz • Power Consumption - Please access www.hitachi.com/tv for detailed specifications and dimensions for Consumer Use • Power...Cable • IR Mouse Cable • Speaker Accessories (42"/50") Optional Accessories: • 42" stand, 32" stand • Wall Mount Bracket INPUTS/OUTPUTS • Inputs RGB, VIDEO 1-5 • Wideband Component Y, Pb... 1 • DVI-HDTV 1 SPECIFICATIONS • Multi-Scanning 24-109kHz (h), 50-85Hz (v) • Pixel Pitch(50HDT50) .....0.86(horiz.) x 0.81(vert.) mm • Pixel Pitch(42HDT50) .....0.90(horiz.) x 0.51(vert.)...
Owners Guide
Page 83
... Installing Batteries 4 R/G/B 30,65-74 S Screen Saver 59 Sharpness 44 Sound Enhancement 47 Speakers 47 Connecting External Speakers 7,11,22 Internal 47 Split Mode 32 Stand 4 Surf Button 31 I T Input Setup 61-62 Installation (Speakers/Monitor 5-6 L Language Menu Language 58 Locks Change Access Code 53 Channel Lock 53 Time 60 Tint...
... Installing Batteries 4 R/G/B 30,65-74 S Screen Saver 59 Sharpness 44 Sound Enhancement 47 Speakers 47 Connecting External Speakers 7,11,22 Internal 47 Split Mode 32 Stand 4 Surf Button 31 I T Input Setup 61-62 Installation (Speakers/Monitor 5-6 L Language Menu Language 58 Locks Change Access Code 53 Channel Lock 53 Time 60 Tint...


