
Owners Guide
Page 1
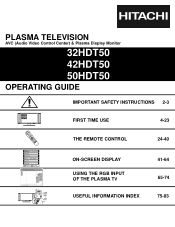
... Setup Move SEL Sel IMPORTANT SAFETY INSTRUCTIONS 2-3 FIRST TIME USE 4-23 THE REMOTE CONTROL 24-40 ON-SCREEN DISPLAY USING THE RGB INPUT OF THE PLASMA TV 41-64 65-74 USEFUL INFORMATION INDEX 75-83 Manager Locks Setup Move SEL Sel STB POWER TV CBL VCR SOURCE WIZARDTAPE CD 2 AMP... 5 VOL MUTE SVCS VCR PLUS+ VID 2 VID 1 PIP FREEZE VID 3 PIP CH PIP ACCESS VIDEO SWAP PIP MODE REC CLU-5723TSI Video Audio Aspect Chan. PLASMA TELEVISION AVC (Audio Video Control Center) & Plasma Display Monitor 32HDT50 42HDT50 50HDT50 OPERATING GUIDE Video Audio Ch.
... Setup Move SEL Sel IMPORTANT SAFETY INSTRUCTIONS 2-3 FIRST TIME USE 4-23 THE REMOTE CONTROL 24-40 ON-SCREEN DISPLAY USING THE RGB INPUT OF THE PLASMA TV 41-64 65-74 USEFUL INFORMATION INDEX 75-83 Manager Locks Setup Move SEL Sel STB POWER TV CBL VCR SOURCE WIZARDTAPE CD 2 AMP... 5 VOL MUTE SVCS VCR PLUS+ VID 2 VID 1 PIP FREEZE VID 3 PIP CH PIP ACCESS VIDEO SWAP PIP MODE REC CLU-5723TSI Video Audio Aspect Chan. PLASMA TELEVISION AVC (Audio Video Control Center) & Plasma Display Monitor 32HDT50 42HDT50 50HDT50 OPERATING GUIDE Video Audio Ch.
Owners Guide
Page 2
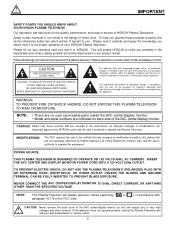
...), in the instructions, as this section illustrates safety tips which will enable HITACHI to operate the equipment. Plasma television consists of HITACHI Plasma Televisions. If the television does not operate properly, unplug the Plasma Television and call your warranty card and mail it to the presence of...THE AVC CENTER AND DISPLAY MONITOR POWER CORD INTO A 120 VOLT 60Hz OUTLET. IMPORTANT SAFETY POINTS YOU SHOULD KNOW ABOUT YOUR HITACHI PLASMA TELEVISION Our reputation has been built on back side of the AVC center/display monitor. REFER SERVICING TO QUALIFIED SERVICE PERSONNEL....
...), in the instructions, as this section illustrates safety tips which will enable HITACHI to operate the equipment. Plasma television consists of HITACHI Plasma Televisions. If the television does not operate properly, unplug the Plasma Television and call your warranty card and mail it to the presence of...THE AVC CENTER AND DISPLAY MONITOR POWER CORD INTO A 120 VOLT 60Hz OUTLET. IMPORTANT SAFETY POINTS YOU SHOULD KNOW ABOUT YOUR HITACHI PLASMA TELEVISION Our reputation has been built on back side of the AVC center/display monitor. REFER SERVICING TO QUALIFIED SERVICE PERSONNEL....
Owners Guide
Page 4
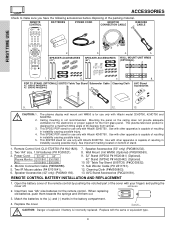
...located on tab to remove back cover. Monitor Connection Cable (P#EW07883). 5. Speaker Accessories (42" only) (P#GM01193). 7. Power Cord: 32"/42" 50" Plasma Monitor EV01841 EV01861 AVC EV01841 EV01841 4. AVC Stand Accessories (P#QJ01081). When replacing old batteries, push them towards the springs and lift them out. 3. Sub...cover of the remote control by pushing the notched part of stand. 1. This 50STD3 stand for use only with Hitachi model 32HDT50, 42HDT50 and 50HDT50. Lift up on bottom of the cover with Hitachi 50HDT50. SPEAKER ACCESSORIES (50") 4. 5.
...located on tab to remove back cover. Monitor Connection Cable (P#EW07883). 5. Speaker Accessories (42" only) (P#GM01193). 7. Power Cord: 32"/42" 50" Plasma Monitor EV01841 EV01861 AVC EV01841 EV01841 4. AVC Stand Accessories (P#QJ01081). When replacing old batteries, push them towards the springs and lift them out. 3. Sub...cover of the remote control by pushing the notched part of stand. 1. This 50STD3 stand for use only with Hitachi model 32HDT50, 42HDT50 and 50HDT50. Lift up on bottom of the cover with Hitachi 50HDT50. SPEAKER ACCESSORIES (50") 4. 5.
Owners Guide
Page 5
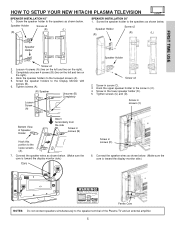
...wires as shown below . (Make sure the core is toward the display monitor side.) Core Screw in screws (C) Bottom View of the Plasma TV and an external amplifier. 5 Screw in screws (D) 6. Screw the speaker holder to the speakers as shown below . Hook the ...the display monitor side.) Ferrite Core NOTES: Do not connect speakers simultaneously to the loose screws (A). 7. FIRST TIME USE HOW TO SETUP YOUR NEW HITACHI PLASMA TELEVISION SPEAKER INSTALLATION 42" 1. Screw in (C). 4. Speaker Holder Screw x2 (R) (L) (R) Speaker Holder Speaker Holder Screw x2 2. Screw in screws...
...wires as shown below . (Make sure the core is toward the display monitor side.) Core Screw in screws (C) Bottom View of the Plasma TV and an external amplifier. 5 Screw in screws (D) 6. Screw the speaker holder to the speakers as shown below . Hook the ...the display monitor side.) Ferrite Core NOTES: Do not connect speakers simultaneously to the loose screws (A). 7. FIRST TIME USE HOW TO SETUP YOUR NEW HITACHI PLASMA TELEVISION SPEAKER INSTALLATION 42" 1. Screw in (C). 4. Speaker Holder Screw x2 (R) (L) (R) Speaker Holder Speaker Holder Screw x2 2. Screw in screws...
Owners Guide
Page 6
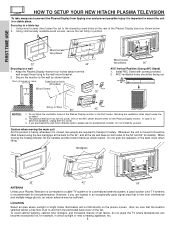
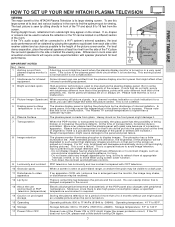
.... Handgrips 3322" " 4422"" 50" ANTENNA Unless your Plasma Television is connected to a cable TV system or to a wall 1. FIRST TIME USE HOW TO SETUP YOUR NEW HITACHI PLASMA TELEVISION To take measures to prevent the Plasma Display from tipping over and prevent possible injury it is ...important to the wall mount bracket. 2. POWER STANDBY (RED) ON (GREEN) VOL- Keep the Plasma Display monitor four inches away from...
.... Handgrips 3322" " 4422"" 50" ANTENNA Unless your Plasma Television is connected to a cable TV system or to a wall 1. FIRST TIME USE HOW TO SETUP YOUR NEW HITACHI PLASMA TELEVISION To take measures to prevent the Plasma Display from tipping over and prevent possible injury it is ...important to the wall mount bracket. 2. POWER STANDBY (RED) ON (GREEN) VOL- Keep the Plasma Display monitor four inches away from...
Owners Guide
Page 7
.... If so, drapes or screens can be used to reduce the reflection or the TV can be located in a different section of the HITACHI Plasma Television is its best, test various locations in some time lag betweeen the picture and the sound. BEST VERTICAL VIEWING 20 ANGLE 3' 0'... apparatus. Tips to -2484ft). Operating temperature: 41˚F to 95˚F. 16 Storage Storage Altitude: 300 to 1114hPa (15510ft to the plasma panel drive circuit when it . 7 Transportation When the PDP monitor is transported horizontally, the glass panel has the possibility of transportation, horizontal ...
.... If so, drapes or screens can be used to reduce the reflection or the TV can be located in a different section of the HITACHI Plasma Television is its best, test various locations in some time lag betweeen the picture and the sound. BEST VERTICAL VIEWING 20 ANGLE 3' 0'... apparatus. Tips to -2484ft). Operating temperature: 41˚F to 95˚F. 16 Storage Storage Altitude: 300 to 1114hPa (15510ft to the plasma panel drive circuit when it . 7 Transportation When the PDP monitor is transported horizontally, the glass panel has the possibility of transportation, horizontal ...

Owners Guide
Page 8
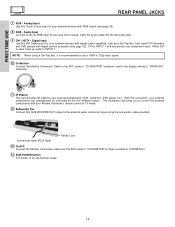
... components can be purchased from most stores that have a second antenna or cable TV system, connect the coaxial cable to display the signal on the Plasma Television. Subwoofer Cable (Provided) This cable is used to connect an external audio component input to control your TV to the subwoofer output of the...
... components can be purchased from most stores that have a second antenna or cable TV system, connect the coaxial cable to display the signal on the Plasma Television. Subwoofer Cable (Provided) This cable is used to connect an external audio component input to control your TV to the subwoofer output of the...
Owners Guide
Page 10
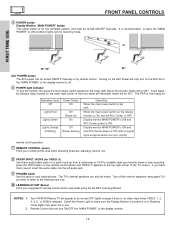
... in use. NOTES: 1. 2. Turn off or in Stand-by mode (lights red) when not in the top right corner of the display monitor. 10 Your HITACHI Plasma TV will appear to be heard. Turning on the AVC Power will illuminate (lower left for 50"). A red standby indicator lamp located on the lower...
... in use. NOTES: 1. 2. Turn off or in Stand-by mode (lights red) when not in the top right corner of the display monitor. 10 Your HITACHI Plasma TV will appear to be heard. Turning on the AVC Power will illuminate (lower left for 50"). A red standby indicator lamp located on the lower...
Owners Guide
Page 12
... MONITOR" connector, and to the display monitor's "FROM AVC" connector. ቭ IR Blaster This jack provides IR output to control the external components with your Plasma Television's remote control in TV mode. ቮ Subwoofer Out Connect this connection, your external devices with digital content protection (see page 22). ቩ RGB - Audio...
... MONITOR" connector, and to the display monitor's "FROM AVC" connector. ቭ IR Blaster This jack provides IR output to control the external components with your Plasma Television's remote control in TV mode. ቮ Subwoofer Out Connect this connection, your external devices with digital content protection (see page 22). ቩ RGB - Audio...
Owners Guide
Page 13
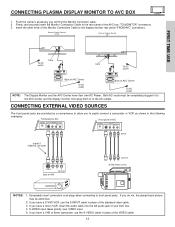
... Display Monitor 32/42" Back of SRS Labs, Inc. If you have their own AC Power. FIRST TIME USE CONNECTING PLASMA DISPLAY MONITOR TO AVC BOX 1. To AC outlet Please use HITACHI specified cable. TO MONITOR Back of AVC Center AC IN TruBass SRS and symbol are trademarks of Display Monitor 50..." NOTE: To AC outlet Core Core To AC outlet Please use HITACHI specified cable. If you do not, the played back picture may be completely plugged in to the AVC Center and the display monitor, then plug...
... Display Monitor 32/42" Back of SRS Labs, Inc. If you have their own AC Power. FIRST TIME USE CONNECTING PLASMA DISPLAY MONITOR TO AVC BOX 1. To AC outlet Please use HITACHI specified cable. TO MONITOR Back of AVC Center AC IN TruBass SRS and symbol are trademarks of Display Monitor 50..." NOTE: To AC outlet Core Core To AC outlet Please use HITACHI specified cable. If you do not, the played back picture may be completely plugged in to the AVC Center and the display monitor, then plug...
Owners Guide
Page 14
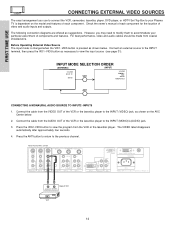
...the VCR or the laserdisc player. Press the VID2~VID5 button to the previous channel. Back of components and features. However, you use HITACHI specified cable. The VIDEO label disappears automatically after approximately four seconds. 4. Press the ANT button to return to view the program from ... AUDIO OUT VIDEO OUT VCR 14 FIRST TIME USE CONNECTING EXTERNAL VIDEO SOURCES The exact arrangement you may need to modify them to accommodate your Plasma TV is pressed as suggestions. TO MONITOR INPUT 1 R R AUDIO OUT RGB AC IN TruBass SRS and symbol are offered as shown below...
...the VCR or the laserdisc player. Press the VID2~VID5 button to the previous channel. Back of components and features. However, you use HITACHI specified cable. The VIDEO label disappears automatically after approximately four seconds. 4. Press the ANT button to return to view the program from ... AUDIO OUT VIDEO OUT VCR 14 FIRST TIME USE CONNECTING EXTERNAL VIDEO SOURCES The exact arrangement you may need to modify them to accommodate your Plasma TV is pressed as suggestions. TO MONITOR INPUT 1 R R AUDIO OUT RGB AC IN TruBass SRS and symbol are offered as shown below...
Owners Guide
Page 18
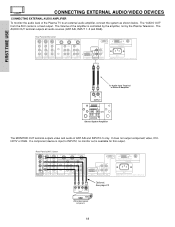
...MONO) PB L/(MONO) R AUDIO INPUT 3 IR BLASTER PR R AUDIO INPUT 2 PR R AUDIO INPUT 1 ANALOG INPUT L AUDIO DVI-HDTV L/(MONO) AUDIO Please use HITACHI specified cable. Rear Panel of AVC Center ANT B TO CONVERTER ANT A S-VIDEO S-VIDEO VIDEO VIDEO L L/(MONO) R AUDIO MONITOR OUT R AUDIO INPUT 4 S-VIDEO ...PR R AUDIO INPUT 1 ANALOG INPUT L AUDIO DVI-HDTV L/(MONO) AUDIO Please use HITACHI specified cable. The "AUDIO OUT" from the AVC center is controlled by the amplifier, not by the Plasma Television. TO MONITOR INPUT 1 R R AUDIO OUT RGB AC IN TruBass SRS and ...
...MONO) PB L/(MONO) R AUDIO INPUT 3 IR BLASTER PR R AUDIO INPUT 2 PR R AUDIO INPUT 1 ANALOG INPUT L AUDIO DVI-HDTV L/(MONO) AUDIO Please use HITACHI specified cable. Rear Panel of AVC Center ANT B TO CONVERTER ANT A S-VIDEO S-VIDEO VIDEO VIDEO L L/(MONO) R AUDIO MONITOR OUT R AUDIO INPUT 4 S-VIDEO ...PR R AUDIO INPUT 1 ANALOG INPUT L AUDIO DVI-HDTV L/(MONO) AUDIO Please use HITACHI specified cable. The "AUDIO OUT" from the AVC center is controlled by the amplifier, not by the Plasma Television. TO MONITOR INPUT 1 R R AUDIO OUT RGB AC IN TruBass SRS and ...
Owners Guide
Page 19
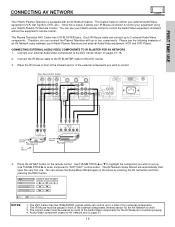
...front of the external components you wish to set up to the IR BLASTER output of an AV Network setup between your Hitachi remote control to control. The Plasma Television AVC Center has 2 IR BLASTER jacks. Audio/Video component codes for AV network are trademarks of the Audio/Video ...components for the AV Network to work. 3. You can use your Hitachi Plasma Television and external Audio/Video equipment (VCR and DVD Player). The IR Mouse must be placed in front of the infrared sensor of the ...
...front of the external components you wish to set up to the IR BLASTER output of an AV Network setup between your Hitachi remote control to control. The Plasma Television AVC Center has 2 IR BLASTER jacks. Audio/Video component codes for AV network are trademarks of the Audio/Video ...components for the AV Network to work. 3. You can use your Hitachi Plasma Television and external Audio/Video equipment (VCR and DVD Player). The IR Mouse must be placed in front of the infrared sensor of the ...
Owners Guide
Page 24
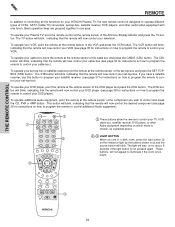
... 2 VID 1 PIP FREEZE VID 3 PIP CH PIP ACCESS VIDEO SWAP PIP MODE REC CLU-5723TSI REMOTE In addition to controlling all the functions on your HITACHI Plasma TV, the new remote control is too bright. 24 To operate your set-top-box or satellite receiver point the remote at the remote sensor... to control your VCR, point the remote at the remote sensor of the VCR and press the VCR button. These buttons will now control your Plasma TV, point the remote control at the remote sensor of VCRs, CATV (Cable TV) converters, set -top-box. To operate your set -top-box, satellite...
... 2 VID 1 PIP FREEZE VID 3 PIP CH PIP ACCESS VIDEO SWAP PIP MODE REC CLU-5723TSI REMOTE In addition to controlling all the functions on your HITACHI Plasma TV, the new remote control is too bright. 24 To operate your set-top-box or satellite receiver point the remote at the remote sensor... to control your VCR, point the remote at the remote sensor of the VCR and press the VCR button. These buttons will now control your Plasma TV, point the remote control at the remote sensor of VCRs, CATV (Cable TV) converters, set -top-box. To operate your set -top-box, satellite...
Owners Guide
Page 25
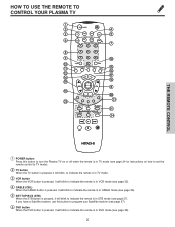
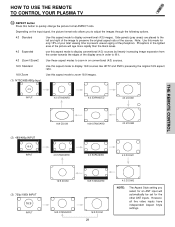
If you have a Satellite receiver, use this button to turn the Plasma TV on or off when the remote is in TV mode (see page 24 for instructions on how to set the remote control to TV ... button is pressed, it will blink to indicate the remote is in DVD mode (see page 37). HOW TO USE THE REMOTE TO CONTROL YOUR PLASMA TV ት POWER TV DVD VCR CBL SOURCE WIZARD CD PVR STB AMP 1 2 3 4 5 6 7 8 9 SLEEP 0 INFO ANT TV/RGB A/V NET ASPECT VIDEO MENU EXIT VOL SELECT...
If you have a Satellite receiver, use this button to turn the Plasma TV on or off when the remote is in TV mode (see page 24 for instructions on how to set the remote control to TV ... button is pressed, it will blink to indicate the remote is in DVD mode (see page 37). HOW TO USE THE REMOTE TO CONTROL YOUR PLASMA TV ት POWER TV DVD VCR CBL SOURCE WIZARD CD PVR STB AMP 1 2 3 4 5 6 7 8 9 SLEEP 0 INFO ANT TV/RGB A/V NET ASPECT VIDEO MENU EXIT VOL SELECT...
Owners Guide
Page 26
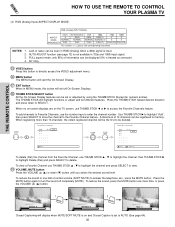
... indicate the remote is in the lower center of this button will add 15 minutes to this timer, up (̆) or down (̄). NOTE: The Plasma TV may also be performed by pressing CH up to select channels. Enter "0" first for the TV to tune. If the SLEEP button is pressed... PLUS+ VID 1 VID 2 PIP FREEZE VID 3 PIP CH PIP ACCESS VIDEO SWAP PIP MODE REC CLU-5723TSI HOW TO USE THE REMOTE TO CONTROL YOUR PLASMA TV ቨ CD, PVR, AMP buttons When pressed, each time the button is pressed. 3:32 PM Ant A 15 Stereo G ANT 3:32 PM Ant B 22 Stereo...
... indicate the remote is in the lower center of this button will add 15 minutes to this timer, up (̆) or down (̄). NOTE: The Plasma TV may also be performed by pressing CH up to select channels. Enter "0" first for the TV to tune. If the SLEEP button is pressed... PLUS+ VID 1 VID 2 PIP FREEZE VID 3 PIP CH PIP ACCESS VIDEO SWAP PIP MODE REC CLU-5723TSI HOW TO USE THE REMOTE TO CONTROL YOUR PLASMA TV ቨ CD, PVR, AMP buttons When pressed, each time the button is pressed. 3:32 PM Ant A 15 Stereo G ANT 3:32 PM Ant B 22 Stereo...
Owners Guide
Page 27
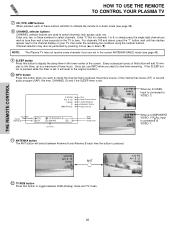
... INFO Device Setting CH ̆ 3 6 9 MENU INFO GUIDE THUMB STICK Cable Box Set Top Box Custom SETUP Move INFO Device Setting THUMB STICK HITACHI AV NET WIZARD (Learning) Use this button to manually learn or modify your Audio/Video equipment list and soft keys by selecting the "Custom" icon... SELECT MORE.. BACK Learn Move SEL Start Wizard Modify NOTE: After selecting the "MENU" soft key, press the MENU button of the Plasma TV remote control to select button. DVD VCR PV Recorder AV Receiver POWER MENU MORE Move INFO Device Setting THUMB STICK THUMB STICK SELECT ...
... INFO Device Setting CH ̆ 3 6 9 MENU INFO GUIDE THUMB STICK Cable Box Set Top Box Custom SETUP Move INFO Device Setting THUMB STICK HITACHI AV NET WIZARD (Learning) Use this button to manually learn or modify your Audio/Video equipment list and soft keys by selecting the "Custom" icon... SELECT MORE.. BACK Learn Move SEL Start Wizard Modify NOTE: After selecting the "MENU" soft key, press the MENU button of the Plasma TV remote control to select button. DVD VCR PV Recorder AV Receiver POWER MENU MORE Move INFO Device Setting THUMB STICK THUMB STICK SELECT ...
Owners Guide
Page 28
...BACK Move Learn Modify SEL Start Wizard THUMB STICK Learn SELECT HITACHI AV NET WIZARD (Learning) A device is not supported by using the Plasma TV remote control. BACK Move OK SEL Select THUMB STICK OK SELECT HITACHI AV NET WIZARD (Learning) Select another DVD2 softkey to be ...added for soft key learning. HITACHI AV NET WIZARD (Learning) Use this wizard to AV ...
...BACK Move Learn Modify SEL Start Wizard THUMB STICK Learn SELECT HITACHI AV NET WIZARD (Learning) A device is not supported by using the Plasma TV remote control. BACK Move OK SEL Select THUMB STICK OK SELECT HITACHI AV NET WIZARD (Learning) Select another DVD2 softkey to be ...added for soft key learning. HITACHI AV NET WIZARD (Learning) Use this wizard to AV ...
Owners Guide
Page 29
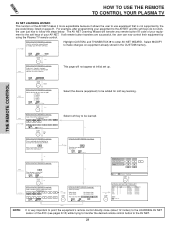
THE REMOTE CONTROL MODE EXIT MUTE VCR PLUS+ SVCS VID 2 VID 1 HOW TO USE THE REMOTE TO CONTROL YOUR PLASMA TV VOL TV POWER SLEEP ANT TV/RGB MENU DVD 1 VCR CDSOURCE WIZARDCBL TAPE STB 4 7 2 5 AMP 3 8 6 0 9 A/V NET ASPECT INFO SELECT CH PIP PIP MODE PIP ...
THE REMOTE CONTROL MODE EXIT MUTE VCR PLUS+ SVCS VID 2 VID 1 HOW TO USE THE REMOTE TO CONTROL YOUR PLASMA TV VOL TV POWER SLEEP ANT TV/RGB MENU DVD 1 VCR CDSOURCE WIZARDCBL TAPE STB 4 7 2 5 AMP 3 8 6 0 9 A/V NET ASPECT INFO SELECT CH PIP PIP MODE PIP ...
Owners Guide
Page 30
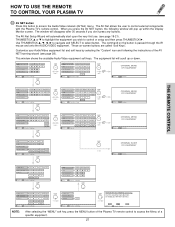
... PLUS+ VID 1 VID 2 PIP FREEZE VID 3 PIP CH PIP ACCESS VIDEO SWAP PIP MODE REC CLU-5723TSI HOW TO USE THE REMOTE TO CONTROL YOUR PLASMA TV (4) RGB (Analog Input) ASPECT DISPLAY MODE. RGB (Analog) INPUT SIGNAL Others SVGA/XGA(4) VGA 480p ASPECT X REAL REAL REAL(1) MODE NORMAL NORMAL NORMAL NORMAL...
... PLUS+ VID 1 VID 2 PIP FREEZE VID 3 PIP CH PIP ACCESS VIDEO SWAP PIP MODE REC CLU-5723TSI HOW TO USE THE REMOTE TO CONTROL YOUR PLASMA TV (4) RGB (Analog Input) ASPECT DISPLAY MODE. RGB (Analog) INPUT SIGNAL Others SVGA/XGA(4) VGA 480p ASPECT X REAL REAL REAL(1) MODE NORMAL NORMAL NORMAL NORMAL...


