Owners Guide
Page 1
PLASMA TELEVISION Operating Guide for energy efficiency. has determined that this product meets the Energy Star ® guidelines for 50HDA39 IMPORTANT SAFETY INSTRUCTIONS 2-3 FIRST TIME USE ...4-16 THE REMOTE CONTROL ...17-21 SETTING UP YOUR TV ...22-43 USEFUL INFORMATION ...44-46 As an Energy Star ® Partner, Hitachi, Ltd.
PLASMA TELEVISION Operating Guide for energy efficiency. has determined that this product meets the Energy Star ® guidelines for 50HDA39 IMPORTANT SAFETY INSTRUCTIONS 2-3 FIRST TIME USE ...4-16 THE REMOTE CONTROL ...17-21 SETTING UP YOUR TV ...22-43 USEFUL INFORMATION ...44-46 As an Energy Star ® Partner, Hitachi, Ltd.
Owners Guide
Page 3
...the broadcaster or owner of the television. A CableCARD provided by TV stations and cable companies, as well as vases, should not ... cleaners. Prevention of certain U.S. FOR MORE INFORMATION, CALL 1-800-HITACHI. How to clean the cabinet of receiving analog basic, digital basic...AC current. Use of a set-top box. If the television does not operate properly, unplug the plasma television and call your cable operator... is intended for home and other limited consumer uses only unless otherwise authorized by direct connection to 50...
...the broadcaster or owner of the television. A CableCARD provided by TV stations and cable companies, as well as vases, should not ... cleaners. Prevention of certain U.S. FOR MORE INFORMATION, CALL 1-800-HITACHI. How to clean the cabinet of receiving analog basic, digital basic...AC current. Use of a set-top box. If the television does not operate properly, unplug the plasma television and call your cable operator... is intended for home and other limited consumer uses only unless otherwise authorized by direct connection to 50...
Owners Guide
Page 5
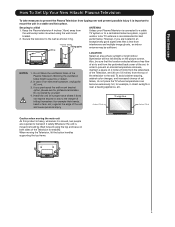
...please ask for stability. To avoid cabinet warping, cabinet color changes, and increased chance of set . First time use How To Set Up Your New Hitachi Plasma Television To take measures to prevent the Plasma Television from tipping over and prevent possible injury it is important to a Wall 1. Securing... frame. 5 Blocking the ventilation holes might cause fire or defect. 2. In order to a centralized antenna system, a good outdoor color TV antenna is moved it should be lifted forward using the wall mount bracket. 2. If you are required to and from the perforated back ...
...please ask for stability. To avoid cabinet warping, cabinet color changes, and increased chance of set . First time use How To Set Up Your New Hitachi Plasma Television To take measures to prevent the Plasma Television from tipping over and prevent possible injury it is important to a Wall 1. Securing... frame. 5 Blocking the ventilation holes might cause fire or defect. 2. In order to a centralized antenna system, a good outdoor color TV antenna is moved it should be lifted forward using the wall mount bracket. 2. If you are required to and from the perforated back ...
Owners Guide
Page 6
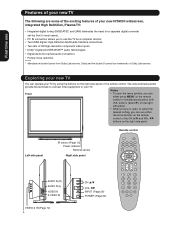
.... Dolby and the double-D symbol are some of the exciting features of your TV. Notes: Front • To open , to select the desired setting, you can operate your new TV You can use the TV as a computer monitor. • Two HDMI digital, High-Definition Multimedia Interface connections...• When a menu is open the menu system, you to your new HITACHI widescreen, integrated High Definition, Plasma TV: • Integrated digital tuning (8VSB ATSC and QAM) eliminates the need for a separate digital converter set-top box (in most cases). • PC IN connection allows you can...
.... Dolby and the double-D symbol are some of the exciting features of your TV. Notes: Front • To open , to select the desired setting, you can operate your new TV You can use the TV as a computer monitor. • Two HDMI digital, High-Definition Multimedia Interface connections...• When a menu is open the menu system, you to your new HITACHI widescreen, integrated High Definition, Plasma TV: • Integrated digital tuning (8VSB ATSC and QAM) eliminates the need for a separate digital converter set-top box (in most cases). • PC IN connection allows you can...
Owners Guide
Page 8
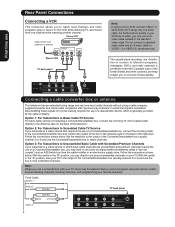
... Box Splitter A / B Switch A B Option 3: COMPONENT 2 COMPONENT 1 8 Option 1: For Subscribers to Basic Cable TV Service For basic cable service not requiring a Converter/Descrambler box, connect the incoming 75 ohm Coaxial Cable directly to use a two-set signal splitter (sometimes called a "two-set coupler") and an A/B Switch box from the cable installer or an electronics...
... Box Splitter A / B Switch A B Option 3: COMPONENT 2 COMPONENT 1 8 Option 1: For Subscribers to Basic Cable TV Service For basic cable service not requiring a Converter/Descrambler box, connect the incoming 75 ohm Coaxial Cable directly to use a two-set signal splitter (sometimes called a "two-set coupler") and an A/B Switch box from the cable installer or an electronics...
Owners Guide
Page 10
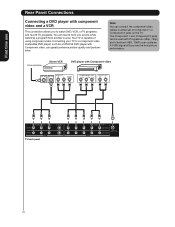
.... You can record from one source while watching a program from another source. Connecting your TV to a component video compatible DVD player, such as a HITACHI DVD player with component video and a VCR This connection allows you to either set of using component video. First time use Rear Panel Connections Connecting a DVD player with Component... picture performance. The Component 1 and Component 2 jacks can be used with Component video RF IN OUTPUT RF OUT R L VIDEO COMPONENT OUT Pr Pb Y AUDIO OUT R L TV back panel 10
.... You can record from one source while watching a program from another source. Connecting your TV to a component video compatible DVD player, such as a HITACHI DVD player with component video and a VCR This connection allows you to either set of using component video. First time use Rear Panel Connections Connecting a DVD player with Component... picture performance. The Component 1 and Component 2 jacks can be used with Component video RF IN OUTPUT RF OUT R L VIDEO COMPONENT OUT Pr Pb Y AUDIO OUT R L TV back panel 10
Owners Guide
Page 11
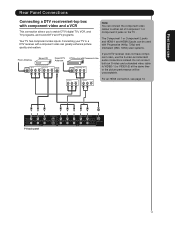
... an HDMI connection, see page 13. Connecting your DTV receiver does not have component video, use Rear Panel Connections Connecting a DTV receiver/set of Component 1 or Component 2 jacks on the TV . TV back panel 11 The Component 1 or Component 2 jacks and HDMI-1 and HDMI-2 jacks can greatly enhance picture quality and realism. Note...
... an HDMI connection, see page 13. Connecting your DTV receiver does not have component video, use Rear Panel Connections Connecting a DTV receiver/set of Component 1 or Component 2 jacks on the TV . TV back panel 11 The Component 1 or Component 2 jacks and HDMI-1 and HDMI-2 jacks can greatly enhance picture quality and realism. Note...
Owners Guide
Page 13
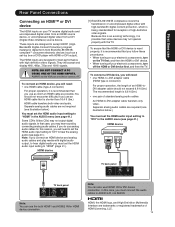
...or DVD player with high-bandwidth digital content protection, which is possible that case, you use as short an HDMI cable as a set the HDMI audio input setting to AUDIO L/R, not AUDIO. In this reason, you follow these procedures: • When turning on your electronic components, turn on... your electronic components, turn off the HDMI or DVI device first, and then the TV. HDMI, the HDMI logo, and High-Definition Multimedia ...
...or DVD player with high-bandwidth digital content protection, which is possible that case, you use as short an HDMI cable as a set the HDMI audio input setting to AUDIO L/R, not AUDIO. In this reason, you follow these procedures: • When turning on your electronic components, turn on... your electronic components, turn off the HDMI or DVI device first, and then the TV. HDMI, the HDMI logo, and High-Definition Multimedia ...
Owners Guide
Page 14
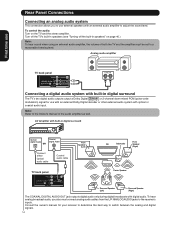
...(Left) Surround Speaker (Right) The COAXIAL DIGITAL AUDIO OUT jack outputs digital audio only during digital broadcasts with built-in digital surround The TV's two digital audio outputs output a Dolby Digital or 2-channel down-mixed PCM (pulse-code modulation) signal for your receiver to determine the...digital audio. First time use Rear Panel Connections Connecting an analog audio system This connection allows you also must be set to the Owner's manual of both the TV and the amplifier must connect analog audio cables from the L/R ANALOG AUDIO jacks to the receiver's inputs. Turn ...
...(Left) Surround Speaker (Right) The COAXIAL DIGITAL AUDIO OUT jack outputs digital audio only during digital broadcasts with built-in digital surround The TV's two digital audio outputs output a Dolby Digital or 2-channel down-mixed PCM (pulse-code modulation) signal for your receiver to determine the...digital audio. First time use Rear Panel Connections Connecting an analog audio system This connection allows you also must be set to the Owner's manual of both the TV and the amplifier must connect analog audio cables from the L/R ANALOG AUDIO jacks to the receiver's inputs. Turn ...
Owners Guide
Page 16
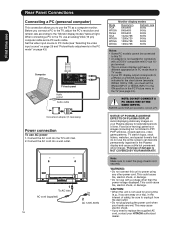
... Rear Panel Connections Connecting a PC (personal computer) This connection allows you need to replace the supplied AC cord, contact your HITACHI authorized dealer. When connecting a PC to the TV, use AC power 1. This type of damage is not needed for extended periods of time. This could cause fire, electric...above (example: WXGA 1360 x 768), you must set the WVGA INPUT or WXGA INPUT to the ON position in the PC Picture menu in the TV (see "Selecting the video input source" on page 29 and "Picture/Audio adjustments in the Plasma display and cause subtle but permanent ghost images. ...
... Rear Panel Connections Connecting a PC (personal computer) This connection allows you need to replace the supplied AC cord, contact your HITACHI authorized dealer. When connecting a PC to the TV, use AC power 1. This type of damage is not needed for extended periods of time. This could cause fire, electric...above (example: WXGA 1360 x 768), you must set the WVGA INPUT or WXGA INPUT to the ON position in the PC Picture menu in the TV (see "Selecting the video input source" on page 29 and "Picture/Audio adjustments in the Plasma display and cause subtle but permanent ghost images. ...
Owners Guide
Page 17
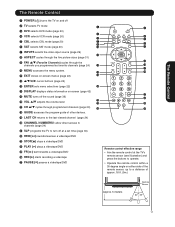
... the remote sensor, up to the last viewed channel (page 24) ) CHANNEL NUMBERS/- allow direct access to channels (page 24) q SLP programs the TV to turn off at a set time (page 30) w REW( ) rewinds/reverses a videotape/DVD e STOP( ) stops a videotape/DVD r PLAY ( ) plays a videotape/DVD t FF( ) fast forwards a videotape/DVD y REC( ) starts...
... the remote sensor, up to the last viewed channel (page 24) ) CHANNEL NUMBERS/- allow direct access to channels (page 24) q SLP programs the TV to turn off at a set time (page 30) w REW( ) rewinds/reverses a videotape/DVD e STOP( ) stops a videotape/DVD r PLAY ( ) plays a videotape/DVD t FF( ) fast forwards a videotape/DVD y REC( ) starts...
Owners Guide
Page 18
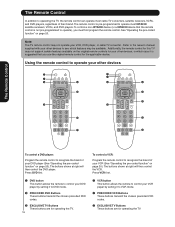
... support certain features available on page 20). Press DVD first. 1 DVD button This button allows the remote to control your DVD player by setting it is suggested that the remote control is not pre-programmed to operate), you use the original remote control for this...are for your VCR (See "Operating the pre-coded function" on page 20. The remote control is pre-programmed to operating the TV, the remote control can operate most HITACHI satellite receivers, VCRs, and DVD players. Additionally, the remote control for the applicable device. The buttons shown at right will then...
... support certain features available on page 20). Press DVD first. 1 DVD button This button allows the remote to control your DVD player by setting it is suggested that the remote control is not pre-programmed to operate), you use the original remote control for this...are for your VCR (See "Operating the pre-coded function" on page 20. The remote control is pre-programmed to operating the TV, the remote control can operate most HITACHI satellite receivers, VCRs, and DVD players. Additionally, the remote control for the applicable device. The buttons shown at right will then...

Owners Guide
Page 19
... This button allows the remote to control your settop-box/satellite receiver by setting it to SET-TOPBOX/SATELLITE mode. 2 PRE-CODED SET-TOP-BOX/SATELLITE RECEIVER buttons These buttons transmit the chosen pre-coded settop-box/satellite codes. 3 EXCLUSIVE TV buttons These buttons are for an extended period of time. To control a...Press SAT first. 1 CABLE (CBL) button This button allows the remote to replace batteries in mind. The buttons shown at right will control the cable TV converter. Always dispose of your cable box by setting it to use new and used for operating the...
... This button allows the remote to control your settop-box/satellite receiver by setting it to SET-TOPBOX/SATELLITE mode. 2 PRE-CODED SET-TOP-BOX/SATELLITE RECEIVER buttons These buttons transmit the chosen pre-coded settop-box/satellite codes. 3 EXCLUSIVE TV buttons These buttons are for an extended period of time. To control a...Press SAT first. 1 CABLE (CBL) button This button allows the remote to replace batteries in mind. The buttons shown at right will control the cable TV converter. Always dispose of your cable box by setting it to use new and used for operating the...

Owners Guide
Page 20
...a different two digit preset code. 4. The remote will now control your VCR. 5. When this occurs, the remote control is programmed for your set-top-box/ satellite receiver, as shown on the remote and enter the two digit preset code that your device cannot be operated after performing the...device. Release the DVD button. 3. If the VCR does not turn off , try a different two digit preset code. 4. The remote will need to set -top-box/satellite receiver does not turn off , try a different two digit preset code. 4. You will now control your DVD player. 5. If the...
...a different two digit preset code. 4. The remote will now control your VCR. 5. When this occurs, the remote control is programmed for your set-top-box/ satellite receiver, as shown on the remote and enter the two digit preset code that your device cannot be operated after performing the...device. Release the DVD button. 3. If the VCR does not turn off , try a different two digit preset code. 4. The remote will need to set -top-box/satellite receiver does not turn off , try a different two digit preset code. 4. You will now control your DVD player. 5. If the...
Owners Guide
Page 21
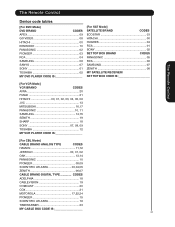
... 05 MY DVD PLAYER CODE IS [For SAT Mode] SATELLITE BRAND CODES ECOSTAR 03 HITACHI 00 HUGHES 04 RCA 01 SONY 02 SET TOP BOX BRAND CODES PANASONIC 05 RCA 06 SAMSUNG 07 ZENITH 08 MY SATELLITE RECEIVER/ SET TOP BOX CODE IS The Remote Control [For VCR Mode] VCR BRAND CODES AIWA... 20 FUNAI 21 HITACHI 00, 01, 02, 03, 04, 05, 06 JVC 13 MITSUBISHI 16,17 PANASONIC 10, 11 SAMSUNG 14,15 ...
... 05 MY DVD PLAYER CODE IS [For SAT Mode] SATELLITE BRAND CODES ECOSTAR 03 HITACHI 00 HUGHES 04 RCA 01 SONY 02 SET TOP BOX BRAND CODES PANASONIC 05 RCA 06 SAMSUNG 07 ZENITH 08 MY SATELLITE RECEIVER/ SET TOP BOX CODE IS The Remote Control [For VCR Mode] VCR BRAND CODES AIWA... 20 FUNAI 21 HITACHI 00, 01, 02, 03, 04, 05, 06 JVC 13 MITSUBISHI 16,17 PANASONIC 10, 11 SAMSUNG 14,15 ...
Owners Guide
Page 22
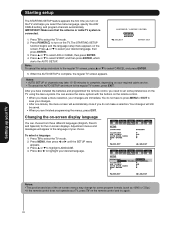
... program formats (such as 1080i or 720p.) • If the remote control does not operate your TV, press TV on the TV, and helps you select the menu language, specify the AIR/ CABLE setting, and program channels automatically. Press ▲ or ▼ to select CANCEL and press ENTER. 5. LANGUAGE /... will still be saved. • When you do not have installed the batteries and programmed the remote control, you make a selection. Setting up your TV Notes: • The position and size of your desired language, then press ENTER. 3. Press POWER to save your changes are finished ...
... program formats (such as 1080i or 720p.) • If the remote control does not operate your TV, press TV on the TV, and helps you select the menu language, specify the AIR/ CABLE setting, and program channels automatically. Press ▲ or ▼ to select CANCEL and press ENTER. 5. LANGUAGE /... will still be saved. • When you do not have installed the batteries and programmed the remote control, you make a selection. Setting up your TV Notes: • The position and size of your desired language, then press ENTER. 3. Press POWER to save your changes are finished ...
Owners Guide
Page 23
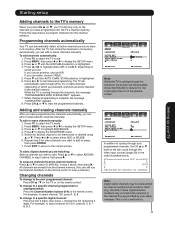
... use cable, choose CABLE. 5. Press ▲ or ▼ to cycling through all the TV or Cable channels (depending on which you selected), and store all active channels in of the plasma screen. For example, to add or erase, then press ENTER. 7. Press ▲ or ... you have programmed into the channel memory. To add channels automatically: 1. Press or to the normal screen. Note: While the TV is not a malfunction. 23 Setting up provided by channel numbers that include a "dash" (e.g., 85-002.) These digital channel numbers may be memorized or deleted using...
... use cable, choose CABLE. 5. Press ▲ or ▼ to cycling through all the TV or Cable channels (depending on which you selected), and store all active channels in of the plasma screen. For example, to add or erase, then press ENTER. 7. Press ▲ or ... you have programmed into the channel memory. To add channels automatically: 1. Press or to the normal screen. Note: While the TV is not a malfunction. 23 Setting up provided by channel numbers that include a "dash" (e.g., 85-002.) These digital channel numbers may be memorized or deleted using...
Owners Guide
Page 24
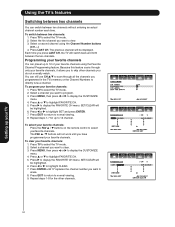
...: 1. Press MENU, then press or to select yourfavorite channels. Press EXIT to return to select the TV mode. 2. Select the first channel you want to clear. 3. Press TV to normal viewing. 9. SET/CLEAR will be displayed. Press EXIT to return to highlight CLEAR. 7. The FAV ▲ / ▼... you to skip other channels. Repeat steps 1-7 for the other channels you do not normally watch. Press TV to highlight SET and press ENTER. 7. To switch between two channels: 1. Press TV to display the CUSTOMIZE menu. 4. The previous channel will be highlighted. 6. Repeat steps 1-8 for up ...
...: 1. Press MENU, then press or to select yourfavorite channels. Press EXIT to return to select the TV mode. 2. Select the first channel you want to clear. 3. Press TV to normal viewing. 9. SET/CLEAR will be displayed. Press EXIT to return to highlight CLEAR. 7. The FAV ▲ / ▼... you to skip other channels. Repeat steps 1-7 for the other channels you do not normally watch. Press TV to highlight SET and press ENTER. 7. To switch between two channels: 1. Press TV to display the CUSTOMIZE menu. 4. The previous channel will be highlighted. 6. Repeat steps 1-8 for up ...

Owners Guide
Page 25
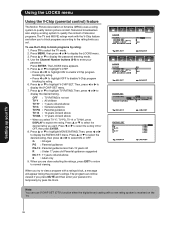
... a four-digit number to normal viewing. Press ▲ or ▼ to select the TV mode. 2. Press ENTER. 5. You may now set . Use the Channel Number buttons (0-9) to display the SET ACCESS CODE menu. 6. Press ▲ or ▼ to highlight SET ACCESS CODE and press to enter your password. Use the Channel Number buttons (0-9) to...
... a four-digit number to normal viewing. Press ▲ or ▼ to select the TV mode. 2. Press ENTER. 5. You may now set . Use the Channel Number buttons (0-9) to display the SET ACCESS CODE menu. 6. Press ▲ or ▼ to highlight SET ACCESS CODE and press to enter your password. Use the Channel Number buttons (0-9) to...
Owners Guide
Page 26
... to select ON or OFF. Press ▲ or ▼ to select the desired rating you set TV-Y : All children TV-Y7 : 7 years old and above TV-G : General audience TV-PG : Parental guidance TV-14 : 14 years old and above TV-MA : 17 years old and above X : Adult only 9. Press ▲ or ▼... the LOCKS menu. 3. Press MENU, then press or to display the V-CHIP SET menu. 7. OFF : TV RATING is received on the TV. 26 Press ▲ or ▼ to select the TV mode. 2. Setting up your password. Press TV to highlight MOVIE RATING. The LOCKS menu appears. 5. Press ▲ or &#...
... to select ON or OFF. Press ▲ or ▼ to select the desired rating you set TV-Y : All children TV-Y7 : 7 years old and above TV-G : General audience TV-PG : Parental guidance TV-14 : 14 years old and above TV-MA : 17 years old and above X : Adult only 9. Press ▲ or ▼... the LOCKS menu. 3. Press MENU, then press or to display the V-CHIP SET menu. 7. OFF : TV RATING is received on the TV. 26 Press ▲ or ▼ to select the TV mode. 2. Setting up your password. Press TV to highlight MOVIE RATING. The LOCKS menu appears. 5. Press ▲ or &#...


