
Owners Guide
Page 1
Manager Locks Setup Move SEL Sel ON-SCREEN DISPLAY USEFUL INFORMATION INDEX As an ENERGY STAR® Partner, Hitachi, Ltd. PROJECTION COLOR TV 46F500 51F500 57F500 OPERATING GUIDE 51G500 57G500 IMPORTANT SAFETY INSTRUCTIONS 2-3 FIRST TIME USE 4-19 THE REMOTE CONTROL Video Audio Ch. has determined that this product meets the ENERGY STAR® guidelines for energy efficiency. 20-31 32-56 57-63
Manager Locks Setup Move SEL Sel ON-SCREEN DISPLAY USEFUL INFORMATION INDEX As an ENERGY STAR® Partner, Hitachi, Ltd. PROJECTION COLOR TV 46F500 51F500 57F500 OPERATING GUIDE 51G500 57G500 IMPORTANT SAFETY INSTRUCTIONS 2-3 FIRST TIME USE 4-19 THE REMOTE CONTROL Video Audio Ch. has determined that this product meets the ENERGY STAR® guidelines for energy efficiency. 20-31 32-56 57-63
Owners Guide
Page 4
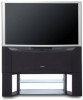
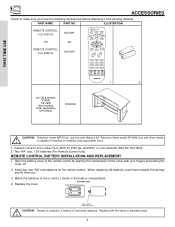
...1 2 3 4 5 6 7 8 9 ANT 0 INFO VID1 REC VID2 VID5 VID3 VID4 ASPECT VIRTUAL HD 1. 2. 46" TELEVISION STAND SP-46W (Not included, order separately) OPTIONAL H530056 CAUTION: Television model 46F500 for the remote control. When replacing old batteries, push them towards the springs and lift them out. 3. Open the battery cover of the...equivalent type. 4 Use with your fingers and pulling the cover off. 2. Match the batteries to the (+) and (-) marks in instability causing possible injury. 1. Replace with Hitachi's 46" Television Stand model SP-46W. PART NAME PART NO.
...1 2 3 4 5 6 7 8 9 ANT 0 INFO VID1 REC VID2 VID5 VID3 VID4 ASPECT VIRTUAL HD 1. 2. 46" TELEVISION STAND SP-46W (Not included, order separately) OPTIONAL H530056 CAUTION: Television model 46F500 for the remote control. When replacing old batteries, push them towards the springs and lift them out. 3. Open the battery cover of the...equivalent type. 4 Use with your fingers and pulling the cover off. 2. Match the batteries to the (+) and (-) marks in instability causing possible injury. 1. Replace with Hitachi's 46" Television Stand model SP-46W. PART NAME PART NO.
Owners Guide
Page 7
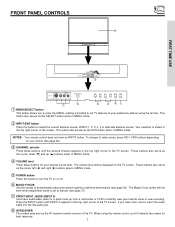
... 36). The Magic Focus button will be displayed on or off. ቧ MAGIC FOCUS Use this button to automatically adjust your preference without using the remote control, point it towards the screen for a quick hook-up (̆) buttons when in MENU mode. ብ VOLUME level Press these buttons for your...VIDEO: 5 appears in MENU mode. ቦ POWER button Press this button to turn the TV on the TV screen. VOL+ CH- NOTES: Your remote control does not have mono sound, insert the audio cable into the left (̇) and right (̈) buttons when in the top right corner of the...
... 36). The Magic Focus button will be displayed on or off. ቧ MAGIC FOCUS Use this button to automatically adjust your preference without using the remote control, point it towards the screen for a quick hook-up (̆) buttons when in MENU mode. ብ VOLUME level Press these buttons for your...VIDEO: 5 appears in MENU mode. ቦ POWER button Press this button to turn the TV on the TV screen. VOL+ CH- NOTES: Your remote control does not have mono sound, insert the audio cable into the left (̇) and right (̈) buttons when in the top right corner of the...
Owners Guide
Page 9
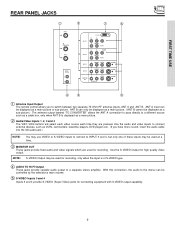
..., DVD players etc. (If you to switch between two separate 75-Ohm RF antenna inputs, ANT A and ANT B. NOTE: S-VIDEO Output may be controlled by the television's main volume. ቦ S-VIDEO Inputs 3 and 4 Inputs 3 and 4 provide S-VIDEO (Super Video) jacks for high quality video ... 3 R (MONO)/L VIDEO INPUT 4 R (MONO)/L VIDEO MONITOR OUT R L AUDIO VIDEO S-VIDEO S-VIDEO S-VIDEO ብ ቤ ቦ ቢ Antenna Input/Output The remote control allows you have mono sound, insert the audio cable into the left audio jack.) NOTE: You may use VIDEO or S-VIDEO inputs to connect to...
..., DVD players etc. (If you to switch between two separate 75-Ohm RF antenna inputs, ANT A and ANT B. NOTE: S-VIDEO Output may be controlled by the television's main volume. ቦ S-VIDEO Inputs 3 and 4 Inputs 3 and 4 provide S-VIDEO (Super Video) jacks for high quality video ... 3 R (MONO)/L VIDEO INPUT 4 R (MONO)/L VIDEO MONITOR OUT R L AUDIO VIDEO S-VIDEO S-VIDEO S-VIDEO ብ ቤ ቦ ቢ Antenna Input/Output The remote control allows you have mono sound, insert the audio cable into the left audio jack.) NOTE: You may use VIDEO or S-VIDEO inputs to connect to...
Owners Guide
Page 13
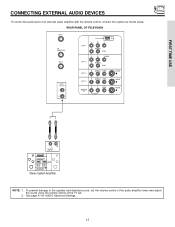
To prevent damage to the speaker and distorted sound, set the volume control of the audio amplifier lower and adjust the sound using the remote control of an external audio amplifier with the remote control, connect the system as shown below. REAR PANEL OF TELEVISION ANT A TO CONVERTER ANT B AUDIO TO HI-FI L R INPUT 1 INPUT... 4 R (MONO)/L VIDEO MONITOR OUT R L AUDIO VIDEO S-VIDEO S-VIDEO S-VIDEO LR INPUT Stereo System Amplifier NOTE: 1. FIRST TIME USE CONNECTING EXTERNAL AUDIO DEVICES To control the audio level of the TV set. 2. See page 41 for AUDIO Advanced Settings. 13
To prevent damage to the speaker and distorted sound, set the volume control of the audio amplifier lower and adjust the sound using the remote control of an external audio amplifier with the remote control, connect the system as shown below. REAR PANEL OF TELEVISION ANT A TO CONVERTER ANT B AUDIO TO HI-FI L R INPUT 1 INPUT... 4 R (MONO)/L VIDEO MONITOR OUT R L AUDIO VIDEO S-VIDEO S-VIDEO S-VIDEO LR INPUT Stereo System Amplifier NOTE: 1. FIRST TIME USE CONNECTING EXTERNAL AUDIO DEVICES To control the audio level of the TV set. 2. See page 41 for AUDIO Advanced Settings. 13
Owners Guide
Page 20
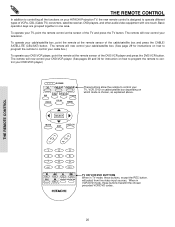
...types of the cable/satellite box and press the CABLE/ SATELLITE (CBL/SAT) button. To operate your TV, point the remote control at the remote sensor of VCRs, CBL (Cable TV) converters, satellite receiver, DVD players, and other audio/video equipment with one area....TV button. The remote will now control your television. THE REMOTE CONTROL 20 Basic operation keys are grouped together in TV mode, these buttons transmit the chosen precoded VCR/DVD codes. THE REMOTE CONTROL In addition to controlling all the functions on your HITACHI Projection TV, the new remote control is chosen, ...
...types of the cable/satellite box and press the CABLE/ SATELLITE (CBL/SAT) button. To operate your TV, point the remote control at the remote sensor of VCRs, CBL (Cable TV) converters, satellite receiver, DVD players, and other audio/video equipment with one area....TV button. The remote will now control your television. THE REMOTE CONTROL 20 Basic operation keys are grouped together in TV mode, these buttons transmit the chosen precoded VCR/DVD codes. THE REMOTE CONTROL In addition to controlling all the functions on your HITACHI Projection TV, the new remote control is chosen, ...
Owners Guide
Page 21
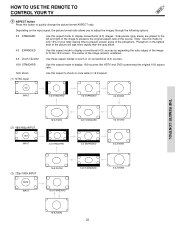
... 25, 26 and 27 for numeric entries. To delete (Del) the channel from the Favorite Channel, use the number keys to delete. THE REMOTE CONTROL VIDEO EXIT Contrast Next/Prev 100% Change Value SEL Return ብ SELECT, MENU, CURSOR buttons All the On-Screen Display features can be set... store the channel to select. To view a Favorite Channel use CURSOR ̇ or ̈ to access the Favorite Channels feature. HOW TO USE THE REMOTE TO CONTROL YOUR TV ቢ TV POWER button ባ PICTURE-IN-PICTURE ቤ VIDEO button ብ SELECT, MENU, CURSOR buttons ቦ VOLUME, MUTE buttons...
... 25, 26 and 27 for numeric entries. To delete (Del) the channel from the Favorite Channel, use the number keys to delete. THE REMOTE CONTROL VIDEO EXIT Contrast Next/Prev 100% Change Value SEL Return ብ SELECT, MENU, CURSOR buttons All the On-Screen Display features can be set... store the channel to select. To view a Favorite Channel use CURSOR ̇ or ̈ to access the Favorite Channels feature. HOW TO USE THE REMOTE TO CONTROL YOUR TV ቢ TV POWER button ባ PICTURE-IN-PICTURE ቤ VIDEO button ብ SELECT, MENU, CURSOR buttons ቦ VOLUME, MUTE buttons...
Owners Guide
Page 22
...number buttons. Ant A 10 ANT Ant B 28 ቩ VID1 ~ VID5 When the remote control is pressed. NOTE: The TV may also be performed by pressing CH up (̆) or down (̄). When the remote control is in Set-Top-Box mode (STB) these buttons will select between Antenna A and Antenna... ANTENNA/CABLE mode. (see page 51) ቨ ANTENNA button The ANT button will control the Set-Top-Box or satellite receiver, and execute the secondary function labeled. THE REMOTE CONTROL v v v HOW TO USE THE REMOTE TO CONTROL YOUR TV ቦ VOLUME, MUTE button Press the VOLUME up (̆) or down ...
...number buttons. Ant A 10 ANT Ant B 28 ቩ VID1 ~ VID5 When the remote control is pressed. NOTE: The TV may also be performed by pressing CH up (̆) or down (̄). When the remote control is in Set-Top-Box mode (STB) these buttons will select between Antenna A and Antenna... ANTENNA/CABLE mode. (see page 51) ቨ ANTENNA button The ANT button will control the Set-Top-Box or satellite receiver, and execute the secondary function labeled. THE REMOTE CONTROL v v v HOW TO USE THE REMOTE TO CONTROL YOUR TV ቦ VOLUME, MUTE button Press the VOLUME up (̆) or down ...
Owners Guide
Page 23
...and right of the image to quickly change the picture format ASPECT ratio. Phosphors in 16:9 aspect. (1) NTSC Input 4:3 INPUT 4:3 STANDARD 4:3 EXPANDED 4:3 ZOOM1 THE REMOTE CONTROL (2) 480i/480p INPUT 16:9 INPUT 16:9 ZOOM 4:3 STANDARD 16:9 STANDARD 4:3 EXPANDED 4:3 ZOOM2 4:3 ZOOM1 (3) 720p/1080i INPUT 16:9 INPUT 16:9 ZOOM 16:9 ...adjust the images through the following options. 4:3 STANDARD Use this aspect to display conventional (4:3) images. HOW TO USE THE REMOTE TO CONTROL YOUR TV ቪ ASPECT button Press this button to preserve the original aspect ratio of the source.
...and right of the image to quickly change the picture format ASPECT ratio. Phosphors in 16:9 aspect. (1) NTSC Input 4:3 INPUT 4:3 STANDARD 4:3 EXPANDED 4:3 ZOOM1 THE REMOTE CONTROL (2) 480i/480p INPUT 16:9 INPUT 16:9 ZOOM 4:3 STANDARD 16:9 STANDARD 4:3 EXPANDED 4:3 ZOOM2 4:3 ZOOM1 (3) 720p/1080i INPUT 16:9 INPUT 16:9 ZOOM 16:9 ...adjust the images through the following options. 4:3 STANDARD Use this aspect to display conventional (4:3) images. HOW TO USE THE REMOTE TO CONTROL YOUR TV ቪ ASPECT button Press this button to preserve the original aspect ratio of the source.
Owners Guide
Page 24
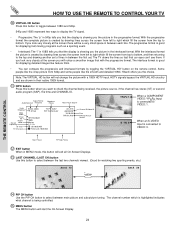
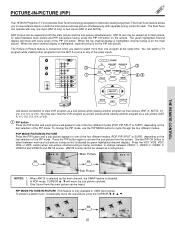
... 10:10 AM PIP Ant A 10 Channel ID/Video ID Time PIP/Sub-Picture Source S - Hitachi offers you want to VIDEO: 3. IN: 3 When an S-VIDEO Input is created by toggling the "VIRTUAL HD" button on the remote control. With the progressive format the complete picture is connected to check the channel being...this button to select between the last two channels viewed. (Good for watching two sporting events, etc.) Ant A 10 Ant A 39 LAST CH THE REMOTE CONTROL ተ PIP CH button Use the PIP CH button to the top and drawing another set of lines in their native 1080i format. ቭ INFO...
... 10:10 AM PIP Ant A 10 Channel ID/Video ID Time PIP/Sub-Picture Source S - Hitachi offers you want to VIDEO: 3. IN: 3 When an S-VIDEO Input is created by toggling the "VIRTUAL HD" button on the remote control. With the progressive format the complete picture is connected to check the channel being...this button to select between the last two channels viewed. (Good for watching two sporting events, etc.) Ant A 10 Ant A 39 LAST CH THE REMOTE CONTROL ተ PIP CH button Use the PIP CH button to the top and drawing another set of lines in their native 1080i format. ቭ INFO...
Owners Guide
Page 25
...for each. When ANT B is selected as main picture (ANT A, ANT B, V:1, V:2, V:3, V:4, or V:5). The green highlighted channel display will move with separate tuning control for the PIP sub-picture. To change the PIP mode, use the PIP MODE button to change between VIDEO: 1, VIDEO: 2, VIDEO: 3, VIDEO:4 and VIDEO:5... Picture-in 1080i input signal) To prevent a pattern burn, occasionally move the sub-picture using the CURSOR PIP 25 Ant A 10 THE REMOTE CONTROL PICTURE-IN-PICTURE (PIP) Your HITACHI Projection TV incorporates Dual Tuner technology designed for the main picture.
...for each. When ANT B is selected as main picture (ANT A, ANT B, V:1, V:2, V:3, V:4, or V:5). The green highlighted channel display will move with separate tuning control for the PIP sub-picture. To change the PIP mode, use the PIP MODE button to change between VIDEO: 1, VIDEO: 2, VIDEO: 3, VIDEO:4 and VIDEO:5... Picture-in 1080i input signal) To prevent a pattern burn, occasionally move the sub-picture using the CURSOR PIP 25 Ant A 10 THE REMOTE CONTROL PICTURE-IN-PICTURE (PIP) Your HITACHI Projection TV incorporates Dual Tuner technology designed for the main picture.

Owners Guide
Page 26
... screen. Each press of input signal. Closed Caption will be removed from the screen. SPLIT Ant A 10 Ant A 12 SWAP Ant A 12 Ant A 10 THE REMOTE CONTROL NOTES: 1. If no buttons are pressed when in SURF mode, auto-scanning will continuously scan channels in memory. (see page 42) If a channel is ON...
... screen. Each press of input signal. Closed Caption will be removed from the screen. SPLIT Ant A 10 Ant A 12 SWAP Ant A 12 Ant A 10 THE REMOTE CONTROL NOTES: 1. If no buttons are pressed when in SURF mode, auto-scanning will continuously scan channels in memory. (see page 42) If a channel is ON...

Owners Guide
Page 27
..., press the FREEZE button again. Main Picture Sub Picture FREEZE FREEZE Ant A 12 STROBE FREEZE(with PIP OFF) PIP should be in SURF mode. THE REMOTE CONTROL 27 To return the picture to cycle through the three different modes. Press the FREEZE button again to return to normal viewing. Press the FREEZE...
..., press the FREEZE button again. Main Picture Sub Picture FREEZE FREEZE Ant A 12 STROBE FREEZE(with PIP OFF) PIP should be in SURF mode. THE REMOTE CONTROL 27 To return the picture to cycle through the three different modes. Press the FREEZE button again to return to normal viewing. Press the FREEZE...
Owners Guide
Page 28
...'s code has not been precoded into the remote. 2. You must press the RECORD button twice to match the remote system of your VCR operating guide. 3. Aim the remote control at the VCR and press the POWER button. The remote control will now control your VCR. If your VCR cannot be ...DVD/VCR button on page 31. 5. When this occurs, the remote control is designed to control your VCR when the correct two digit preset code is entered. The remote will remember the codes you must first program the remote to record a program. ቤ EXCLUSIVE TV Buttons These buttons are...
...'s code has not been precoded into the remote. 2. You must press the RECORD button twice to match the remote system of your VCR operating guide. 3. Aim the remote control at the VCR and press the POWER button. The remote control will now control your VCR. If your VCR cannot be ...DVD/VCR button on page 31. 5. When this occurs, the remote control is designed to control your VCR when the correct two digit preset code is entered. The remote will remember the codes you must first program the remote to record a program. ቤ EXCLUSIVE TV Buttons These buttons are...
Owners Guide
Page 29
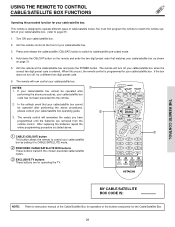
...EXIT LAST CH VOL CH ባ 1 2 3 4 5 6 7 8 9 ANT 0 INFO VID1 REC VID2 VID5 VID3 VID4 ASPECT VIRTUAL HD THE REMOTE CONTROL MY CABLE/SATELLITE BOX CODE IS: NOTE: Refer to instruction manual of the Cable/Satellite Box for operation of your cable/satellite box. Aim the...BOX buttons These buttons transmit the chosen precoded cable/satellite codes. ቤ EXCLUSIVE TV buttons These buttons are removed from the remote control. The remote will now control your cable/satellite box. 3. Press and release the cable/satellite (CBL/SAT) button to switch to page 31) 1....
...EXIT LAST CH VOL CH ባ 1 2 3 4 5 6 7 8 9 ANT 0 INFO VID1 REC VID2 VID5 VID3 VID4 ASPECT VIRTUAL HD THE REMOTE CONTROL MY CABLE/SATELLITE BOX CODE IS: NOTE: Refer to instruction manual of the Cable/Satellite Box for operation of your cable/satellite box. Aim the...BOX buttons These buttons transmit the chosen precoded cable/satellite codes. ቤ EXCLUSIVE TV buttons These buttons are removed from the remote control. The remote will now control your cable/satellite box. 3. Press and release the cable/satellite (CBL/SAT) button to switch to page 31) 1....

Owners Guide
Page 30
...you have programmed until the batteries are for the DVD player. 30 The remote control will now control your DVD player. After replacing the batteries repeat the entire programming procedure as shown on the remote and enter the two digit preset code that your DVD player cannot be operated...4708; EXCLUSIVE TV Buttons These buttons are removed from the remote control. Aim the remote control at the DVD player and press the POWER button. Aim the remote at the front of the buttons exclusively for operating the TV. The remote will turn off your DVD player when the correct two ...
...you have programmed until the batteries are for the DVD player. 30 The remote control will now control your DVD player. After replacing the batteries repeat the entire programming procedure as shown on the remote and enter the two digit preset code that your DVD player cannot be operated...4708; EXCLUSIVE TV Buttons These buttons are removed from the remote control. Aim the remote control at the DVD player and press the POWER button. Aim the remote at the front of the buttons exclusively for operating the TV. The remote will turn off your DVD player when the correct two ...
Owners Guide
Page 31
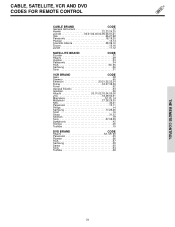
...REMOTE CONTROL CABLE BRAND CODE General Instrument 17 Hamlin 22,23,24,25 Jerrold 00,01,02,03,04,05,06,07,21 Oak 26,27,28 Panasonic 18,19,20 Pioneer 13,14 Scientific Atlanta 08,09,10 Tocom 15,16 Zenith 11,12 SATELLITE BRAND CODE Ecostar 32 Hitachi...20,21,22,23,24 Fisher 34,37,38,39 Funai 52 General Electric 33 Goldstar 36 Hitachi 00,01,02,03,04,05,06 JVC 18,49,50,51 Magnavox 12,13, 14... 42 Teknica 46 Toshiba 15 DVD BRAND CODE Hitachi 53, 59, 60 Panasonic 55 Pioneer 56 RCA 57 Samsung 59 Sanyo 60 Sony 54 Toshiba 58 THE REMOTE CONTROL 31
...REMOTE CONTROL CABLE BRAND CODE General Instrument 17 Hamlin 22,23,24,25 Jerrold 00,01,02,03,04,05,06,07,21 Oak 26,27,28 Panasonic 18,19,20 Pioneer 13,14 Scientific Atlanta 08,09,10 Tocom 15,16 Zenith 11,12 SATELLITE BRAND CODE Ecostar 32 Hitachi...20,21,22,23,24 Fisher 34,37,38,39 Funai 52 General Electric 33 Goldstar 36 Hitachi 00,01,02,03,04,05,06 JVC 18,49,50,51 Magnavox 12,13, 14... 42 Teknica 46 Toshiba 15 DVD BRAND CODE Hitachi 53, 59, 60 Panasonic 55 Pioneer 56 RCA 57 Samsung 59 Sanyo 60 Sony 54 Toshiba 58 THE REMOTE CONTROL 31
Owners Guide
Page 32
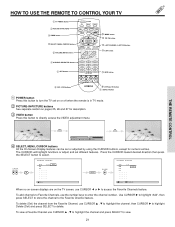
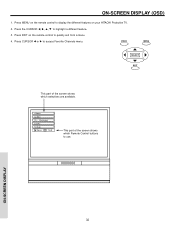
Press CURSOR ̇ or ̈ to display the different features on your HITACHI Projection TV. 2. Video Audio Ch. ON-SCREEN DISPLAY 32 Press MENU on the remote control to highlight a different feature. 3. Press EXIT on the remote control to access Favorite Channels menu. ON-SCREEN DISPLAY (OSD) 1. Press the CURSOR to quickly exit from a menu. 4. VIDEO MENU SELECT EXIT This part of the screen shows which selections are available. Manager Locks Setup Move SEL Sel This part of the screen shows which Remote Control buttons to use.
Press CURSOR ̇ or ̈ to display the different features on your HITACHI Projection TV. 2. Video Audio Ch. ON-SCREEN DISPLAY 32 Press MENU on the remote control to highlight a different feature. 3. Press EXIT on the remote control to access Favorite Channels menu. ON-SCREEN DISPLAY (OSD) 1. Press the CURSOR to quickly exit from a menu. 4. VIDEO MENU SELECT EXIT This part of the screen shows which selections are available. Manager Locks Setup Move SEL Sel This part of the screen shows which Remote Control buttons to use.
Owners Guide
Page 37
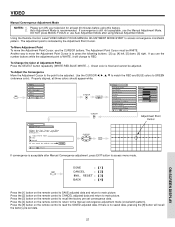
... point to recall the factory pre-set data. 37 MENU Video Audio Ch. Press the [3] button on the remote control to be WHITE. Press the [9] button on the remote control to SAVE adjusted data and return to correct for at least 20 minutes before using Manual Adjustment Mode. Auto Adjustment... way to main picture. Green color is WHITE, it will recall the factory pre-set convergence data. Press the [4] button on the remote control to CANCEL adjusted data and return to move the Adjustment Point Cursor, use the number buttons while the adjustment point is fixed and cannot ...
... point to recall the factory pre-set data. 37 MENU Video Audio Ch. Press the [3] button on the remote control to be WHITE. Press the [9] button on the remote control to SAVE adjusted data and return to correct for at least 20 minutes before using Manual Adjustment Mode. Auto Adjustment... way to main picture. Green color is WHITE, it will recall the factory pre-set convergence data. Press the [4] button on the remote control to CANCEL adjusted data and return to move the Adjustment Point Cursor, use the number buttons while the adjustment point is fixed and cannot ...

Owners Guide
Page 42
... Ant A CH# [2 3 4 5 6 7 8 9 Scan Off Off Off Off Off Off Off Off Move Set CH ID SEL Return Lock ] CURSOR CURSOR Ch. Press EXIT to the remote control channel ̆ or ̄ buttons. Manager Ant A CH# 2 3 4 5 6 7 8 9 Scan Off Off Off Off Off Off Off Off Move SEL Return CH ID Lock Ch. Manager...
... Ant A CH# [2 3 4 5 6 7 8 9 Scan Off Off Off Off Off Off Off Off Move Set CH ID SEL Return Lock ] CURSOR CURSOR Ch. Press EXIT to the remote control channel ̆ or ̄ buttons. Manager Ant A CH# 2 3 4 5 6 7 8 9 Scan Off Off Off Off Off Off Off Off Move SEL Return CH ID Lock Ch. Manager...


