Owners Guide
Page 2
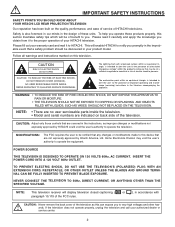
... television. NEVER CONNECT THE TELEVISION TO 50Hz, DIRECT CURRENT, OR ANYTHING OTHER THAN THE SPECIFIED VOLTAGE. CAUTION: Never remove the back cover of important operating and maintenance (servicing) instructions in the improbable event that are covered in the instructions, as this device that a safety problem should be discovered in your warranty card and mail it to operate the equipment. NO USER SERVICEABLE PARTS INSIDE. NOTE: This television receiver will...
... television. NEVER CONNECT THE TELEVISION TO 50Hz, DIRECT CURRENT, OR ANYTHING OTHER THAN THE SPECIFIED VOLTAGE. CAUTION: Never remove the back cover of important operating and maintenance (servicing) instructions in the improbable event that are covered in the instructions, as this device that a safety problem should be discovered in your warranty card and mail it to operate the equipment. NO USER SERVICEABLE PARTS INSIDE. NOTE: This television receiver will...
Owners Guide
Page 3
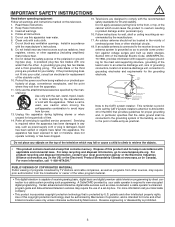
... is grounded so as programs from tip-over. 13. Dispose of receiving analog basic, digital basic and digital premium cable television programming by the man- For more information call "1-800-HITACHI." IMPORTANT SAFETY INSTRUCTIONS Read before operating equipment Follow all warnings and instructions marked on this product and its lamp in accordance with the cart, stand, tripod, brack- Clean only with the recommended safety...
... is grounded so as programs from tip-over. 13. Dispose of receiving analog basic, digital basic and digital premium cable television programming by the man- For more information call "1-800-HITACHI." IMPORTANT SAFETY INSTRUCTIONS Read before operating equipment Follow all warnings and instructions marked on this product and its lamp in accordance with the cart, stand, tripod, brack- Clean only with the recommended safety...
Owners Guide
Page 5
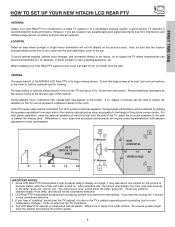
... cm (4 inches) from interference and multiple image ghosts, an indoor antenna may appear on the TV's functions. 4. LCD Rear PTV incorporates an advanced cooling fan system to a Hi-Fi system's external speakers, the best audio performance will be considered defective. 3. If you hear the cooling fan, it is free from the wall. Make sure to place it on . VIEWING The major benefit of the HITACHI LCD Rear PTV is...
... cm (4 inches) from interference and multiple image ghosts, an indoor antenna may appear on the TV's functions. 4. LCD Rear PTV incorporates an advanced cooling fan system to a Hi-Fi system's external speakers, the best audio performance will be considered defective. 3. If you hear the cooling fan, it is free from the wall. Make sure to place it on . VIEWING The major benefit of the HITACHI LCD Rear PTV is...

Owners Guide
Page 6
... TV's HDMI input. Phono Connector Used on all standard video and audio cables which connect to inputs and outputs located on the television. S-Video (Super Video) Connector This connector is used on the rear panel so you have phono connectors. Consult your external devices such as SetTop-Boxes or DVD players equipped with an HDMI output connection to the Photo Input. HDMI Cable This cable is used to connect your dealer or service store for the best sound quality. To outdoor antenna or CATV cable...
... TV's HDMI input. Phono Connector Used on all standard video and audio cables which connect to inputs and outputs located on the television. S-Video (Super Video) Connector This connector is used on the rear panel so you have phono connectors. Consult your external devices such as SetTop-Boxes or DVD players equipped with an HDMI output connection to the Photo Input. HDMI Cable This cable is used to connect your dealer or service store for the best sound quality. To outdoor antenna or CATV cable...
Owners Guide
Page 8
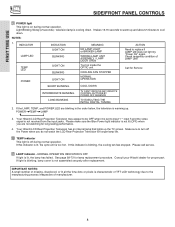
... lamp replacement procedure. Your Hitachi LCD Rear Projection Television has an internal lamp that lights up . See page 69-72 for proper part. It takes 12-15 seconds to warm up and about 2 minutes to input 1 ~ input 5 and the video signal is blinking, the cooling fan has stopped. INDICATOR LAMP LED TEMP LED POWER INDICATION LIGHT ON BLINKING LIGHT ON BLINKING LIGHT ON SHORT BLINKING MEANING NO LAMP LIGHT or BROKEN LAMP WRONG LAMP UNIT ASSEMBLY / LAMP DOOR OPEN Too hot inside the OPTIC unit COOLING FAN...
... lamp replacement procedure. Your Hitachi LCD Rear Projection Television has an internal lamp that lights up . See page 69-72 for proper part. It takes 12-15 seconds to warm up and about 2 minutes to input 1 ~ input 5 and the video signal is blinking, the cooling fan has stopped. INDICATOR LAMP LED TEMP LED POWER INDICATION LIGHT ON BLINKING LIGHT ON BLINKING LIGHT ON SHORT BLINKING MEANING NO LAMP LIGHT or BROKEN LAMP WRONG LAMP UNIT ASSEMBLY / LAMP DOOR OPEN Too hot inside the OPTIC unit COOLING FAN...
Owners Guide
Page 10
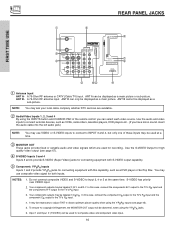
...; Antenna Input ANT A- In this case, connect the components B-Y output to the TV's PB input and the components R-Y output to Input 3, 4 or 5 at a time. ቤ MONITOR OUT These jacks provide fixed or variable audio and video signals which are available. ባ Audio/Video Inputs 1, 2, 3 and 4 By using the INPUTS button and CURSOR PAD of the remote control you have mono sound, insert the audio cable into the left audio jack.) NOTE: You may use composite video signal for both inputs. REAR PANEL...
...; Antenna Input ANT A- In this case, connect the components B-Y output to the TV's PB input and the components R-Y output to Input 3, 4 or 5 at a time. ቤ MONITOR OUT These jacks provide fixed or variable audio and video signals which are available. ባ Audio/Video Inputs 1, 2, 3 and 4 By using the INPUTS button and CURSOR PAD of the remote control you have mono sound, insert the audio cable into the left audio jack.) NOTE: You may use composite video signal for both inputs. REAR PANEL...

Owners Guide
Page 12
... B MONITOR OUT S-VIDEO INPUT 4 INPUT 3 INPUT 2 Y/ VIDEO PB INPUT 1 Y/ VIDEO PB VIDEO L AUDIO R AUDIO TO HI-FI (MONO) PR PR (MONO) (MONO) (MONO) TV AS CENTER CableCARD HDMIIN1SERT THIS END OPTICAL OUT Digital Audio Upgrade Card Apparatus Claims of the Rear Panel Jacks. RS232C 1 2 345 6 789 If the CableCARD is inserted. 3. Antenna B will not be available when CableCARD is properly installed or not installed, the TV will display the following respective screens. CableCARD is installed OR...
... B MONITOR OUT S-VIDEO INPUT 4 INPUT 3 INPUT 2 Y/ VIDEO PB INPUT 1 Y/ VIDEO PB VIDEO L AUDIO R AUDIO TO HI-FI (MONO) PR PR (MONO) (MONO) (MONO) TV AS CENTER CableCARD HDMIIN1SERT THIS END OPTICAL OUT Digital Audio Upgrade Card Apparatus Claims of the Rear Panel Jacks. RS232C 1 2 345 6 789 If the CableCARD is inserted. 3. Antenna B will not be available when CableCARD is properly installed or not installed, the TV will display the following respective screens. CableCARD is installed OR...
Owners Guide
Page 14
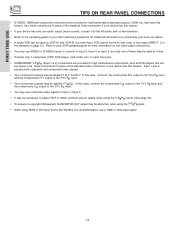
... adjust TINT to obtain optimum picture quality when using HDMI or DVI input from a Set-Top-Box, it is recommended to use VIDEO or S-VIDEO inputs to connect to Input 3, Input 4 or Input 5, but only one audio output (mono sound), connect it to the left audio jack on the television. • Refer to the operating guide of the standard video connection if your VCR operating guide for more information on page 13). FIRST TIME USE TIPS ON REAR PANEL CONNECTIONS • S-VIDEO, HDMI and component connections...
... adjust TINT to obtain optimum picture quality when using HDMI or DVI input from a Set-Top-Box, it is recommended to use VIDEO or S-VIDEO inputs to connect to Input 3, Input 4 or Input 5, but only one audio output (mono sound), connect it to the left audio jack on the television. • Refer to the operating guide of the standard video connection if your VCR operating guide for more information on page 13). FIRST TIME USE TIPS ON REAR PANEL CONNECTIONS • S-VIDEO, HDMI and component connections...
Owners Guide
Page 16
... laserdisc player to the previous channel. Select Antenna from coaxial shielded wire. ANT A CableCARD (Top of card faces right) ANT B MONITOR OUT S-VIDEO INPUT 4 INPUT 3 INPUT 2 Y/ VIDEO PB INPUT 1 Y/ VIDEO PB HDMI 1 VIDEO L AUDIO R AUDIO TO HI-FI PR PR (MONO) (MONO) (MONO) (MONO) TV AS CENTER OPTICAL OUT Digital Audio Upgrade Card Apparatus Claims of your choice (see page 25). RS232C 1 2 345 6 789 Audio Video OUTPUT VCR 16 CONNECTING A MONAURAL AUDIO SOURCE TO INPUT1~INPUT5 1. Connect the cable...
... laserdisc player to the previous channel. Select Antenna from coaxial shielded wire. ANT A CableCARD (Top of card faces right) ANT B MONITOR OUT S-VIDEO INPUT 4 INPUT 3 INPUT 2 Y/ VIDEO PB INPUT 1 Y/ VIDEO PB HDMI 1 VIDEO L AUDIO R AUDIO TO HI-FI PR PR (MONO) (MONO) (MONO) (MONO) TV AS CENTER OPTICAL OUT Digital Audio Upgrade Card Apparatus Claims of your choice (see page 25). RS232C 1 2 345 6 789 Audio Video OUTPUT VCR 16 CONNECTING A MONAURAL AUDIO SOURCE TO INPUT1~INPUT5 1. Connect the cable...
Owners Guide
Page 17
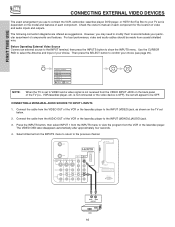
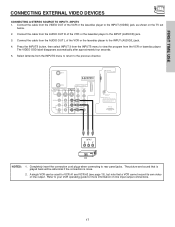
Select Antenna from the INPUTS menu to return to view the program from the VCR or laserdisc player. FIRST TIME USE CONNECTING EXTERNAL VIDEO DEVICES CONNECTING A STEREO SOURCE TO INPUT1~INPUT5 1. Press the INPUTS button, then select INPUT 3 from the AUDIO OUT L of the VCR or the laserdisc player to the INPUT (AUDIO/R) jack. 3. ANT A ANT B MONITOR OUT S-VIDEO INPUT 4 INPUT 3 INPUT 2 Y/ VIDEO PB INPUT 1 Y/ VIDEO PB HDMI 1 VIDEO L AUDIO R AUDIO TO HI-FI PR PR (MONO) (MONO) (MONO) (MONO) TV AS CENTER...
Select Antenna from the INPUTS menu to return to view the program from the VCR or laserdisc player. FIRST TIME USE CONNECTING EXTERNAL VIDEO DEVICES CONNECTING A STEREO SOURCE TO INPUT1~INPUT5 1. Press the INPUTS button, then select INPUT 3 from the AUDIO OUT L of the VCR or the laserdisc player to the INPUT (AUDIO/R) jack. 3. ANT A ANT B MONITOR OUT S-VIDEO INPUT 4 INPUT 3 INPUT 2 Y/ VIDEO PB INPUT 1 Y/ VIDEO PB HDMI 1 VIDEO L AUDIO R AUDIO TO HI-FI PR PR (MONO) (MONO) (MONO) (MONO) TV AS CENTER...

Owners Guide
Page 19
... of INPUT 1. 2. Connect the HDMI or DVI to HDMI connection cable from the output of device user settings determines final video appearance. 19 The HDMI input on the TV set -up of the HDTV set top box or DVD player. RS232C 1 2 345 6 789 HDMI Cable HDMI Output DVD Player or HDTV STB ANT B MONITOR OUT S-VIDEO INPUT 4 INPUT 3 INPUT 2 Y/ VIDEO PB INPUT 1 Y/ VIDEO PB HDMI 1 VIDEO L AUDIO R AUDIO TO HI-FI PR PR (MONO) (MONO) (MONO) (MONO) TV AS CENTER OPTICAL OUT Digital Audio Upgrade Card Apparatus Claims of U.S. RS232C 1 2 345 6 789 DVI to a display. 4. HDMI is...
... of INPUT 1. 2. Connect the HDMI or DVI to HDMI connection cable from the output of device user settings determines final video appearance. 19 The HDMI input on the TV set -up of the HDTV set top box or DVD player. RS232C 1 2 345 6 789 HDMI Cable HDMI Output DVD Player or HDTV STB ANT B MONITOR OUT S-VIDEO INPUT 4 INPUT 3 INPUT 2 Y/ VIDEO PB INPUT 1 Y/ VIDEO PB HDMI 1 VIDEO L AUDIO R AUDIO TO HI-FI PR PR (MONO) (MONO) (MONO) (MONO) TV AS CENTER OPTICAL OUT Digital Audio Upgrade Card Apparatus Claims of U.S. RS232C 1 2 345 6 789 DVI to a display. 4. HDMI is...
Owners Guide
Page 21
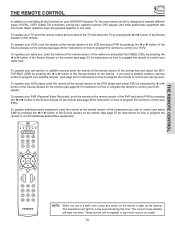
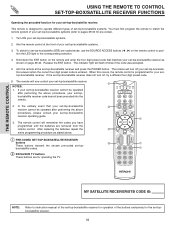
... HITACHI Projection TV, the new remote control is too bright. 21 Basic operation keys are in one time. To operate your set-top-box or satellite receiver point the remote at the remote sensor of the DVD player and select DVD by pressing the ̇ or ̈ button of the Source Access on the remote (see page 34 for instruction on how to program the remote to operate different types of VCRs, CATV (Cable TV) converters, set -top-box...
... HITACHI Projection TV, the new remote control is too bright. 21 Basic operation keys are in one time. To operate your set-top-box or satellite receiver point the remote at the remote sensor of the DVD player and select DVD by pressing the ̇ or ̈ button of the Source Access on the remote (see page 34 for instruction on how to program the remote to operate different types of VCRs, CATV (Cable TV) converters, set -top-box...
Owners Guide
Page 24
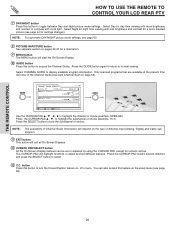
... Auto Channel Scan on the setup menu (see page 44 for a more brightness and contrast to display available program information. button Press this feature on page 52). The CURSOR PAD will exit all On-Screen Displays. ቮ CURSOR PAD/SELECT button All the On-Screen Display features can also access this button to highlight the channel of Antenna input (Analog, Digital) and Cable subscription. ቭ EXIT button This button will highlight functions or adjust...
... Auto Channel Scan on the setup menu (see page 44 for a more brightness and contrast to display available program information. button Press this feature on page 52). The CURSOR PAD will exit all On-Screen Displays. ቮ CURSOR PAD/SELECT button All the On-Screen Display features can also access this button to highlight the channel of Antenna input (Analog, Digital) and Cable subscription. ቭ EXIT button This button will highlight functions or adjust...
Owners Guide
Page 26
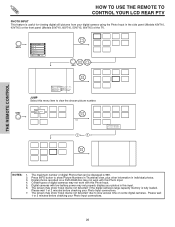
... Input. 4. The screen may not work with this Photo Input. 5. THE REMOTE CONTROL NOTES: 1. Please wait 1 or 2 minutes before checking your digital camera using the Photo Input in individual photos. 3. Date Resolution File Name JUMP Select this input. 6. Press INFO button to show "Input device not detected" due to view the chosen picture number. Please wait 1 or 2 minutes before checking your photos in this menu item to slow access time on a DVD...
... Input. 4. The screen may not work with this Photo Input. 5. THE REMOTE CONTROL NOTES: 1. Please wait 1 or 2 minutes before checking your digital camera using the Photo Input in individual photos. 3. Date Resolution File Name JUMP Select this input. 6. Press INFO button to show "Input device not detected" due to view the chosen picture number. Please wait 1 or 2 minutes before checking your photos in this menu item to slow access time on a DVD...

Owners Guide
Page 30
... ባ ቢ GUIDE C.C. Audio Video OUTPUT VCR Use above connection to watch a TV program while viewing other programs from any of the video inputs. Use the CURSOR PAD (̆, ̄) to view antenna inputs on the channel list. 30 PIP MODE Picture-in -Picture feature is convenient when you to move with a 1080i component or digital signal 4x3 Format. 3. THE REMOTE CONTROL PICTURE-IN-PICTURE (PIP) Your HITACHI LCD Rear PTV incorporates Two Tuner technology designed for limited viewing uses only. The Picture-in -Picture is not...
... ባ ቢ GUIDE C.C. Audio Video OUTPUT VCR Use above connection to watch a TV program while viewing other programs from any of the video inputs. Use the CURSOR PAD (̆, ̄) to view antenna inputs on the channel list. 30 PIP MODE Picture-in -Picture feature is convenient when you to move with a 1080i component or digital signal 4x3 Format. 3. THE REMOTE CONTROL PICTURE-IN-PICTURE (PIP) Your HITACHI LCD Rear PTV incorporates Two Tuner technology designed for limited viewing uses only. The Picture-in -Picture is not...
Owners Guide
Page 34
... the remote control to position the LED light to instruction manual of the set-top-box/satellite receiver for your settop-box/satellite receiver. The remote will turn off your set -top-box/satellite receiver. Turn ON your set -topbox/satellite receiver. 34 Hold down the ENT button on page 39-40. Release the ENT button. The indicator light will remember the codes you have programmed until the batteries are for operating the TV. ባ GUIDE ቢ...
... the remote control to position the LED light to instruction manual of the set-top-box/satellite receiver for your settop-box/satellite receiver. The remote will turn off your set -top-box/satellite receiver. Turn ON your set -topbox/satellite receiver. 34 Hold down the ENT button on page 39-40. Release the ENT button. The indicator light will remember the codes you have programmed until the batteries are for operating the TV. ባ GUIDE ቢ...
Owners Guide
Page 43
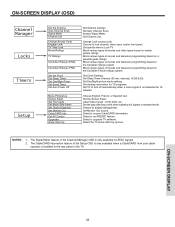
...Set Channel List. intervals, 00:30-3:00). ON-SCREEN DISPLAY (OSD) Channel Manager Locks Timers Setup Set the Antenna Auto Channel Scan Signal Meter Channel List Change Access Code Engage Lock TV Time Lock Movie Ratings TV Ratings Canadian Ratings (ENG) Canadian Ratings (FRN) Set the Clock Set Sleep Timer Set Day/Night Timer Set Event Timer Set Auto Power Off Menu Preference Screen Saver Set The Inputs Set Black Side Panel Set Closed Captions Set Monitor Out CableCARD Info Set AV Control Upgrades Quick Start Up Set Antenna settings. Set Monitor Out source. ON-SCREEN DISPLAY...
...Set Channel List. intervals, 00:30-3:00). ON-SCREEN DISPLAY (OSD) Channel Manager Locks Timers Setup Set the Antenna Auto Channel Scan Signal Meter Channel List Change Access Code Engage Lock TV Time Lock Movie Ratings TV Ratings Canadian Ratings (ENG) Canadian Ratings (FRN) Set the Clock Set Sleep Timer Set Day/Night Timer Set Event Timer Set Auto Power Off Menu Preference Screen Saver Set The Inputs Set Black Side Panel Set Closed Captions Set Monitor Out CableCARD Info Set AV Control Upgrades Quick Start Up Set Antenna settings. Set Monitor Out source. ON-SCREEN DISPLAY...

Owners Guide
Page 46
...% 50% High High Dynamic Night Video Color Management Color Decoding Auto Color Noise Reduction Auto Movie Mode Move SEL Select Off Low Off ON-SCREEN DISPLAY Color Management Use this function to adjust and balance the listed individual colors to make them either deeper or more pure depending on this input to the original factory settings. Video Color Management Color Decoding Auto Color Noise Reduction Auto Movie Mode Move SEL Select Off Low Off Video Color Management Set User Colors Magenta Red Yellow Green Cyan Blue Reset Phase...
...% 50% High High Dynamic Night Video Color Management Color Decoding Auto Color Noise Reduction Auto Movie Mode Move SEL Select Off Low Off ON-SCREEN DISPLAY Color Management Use this function to adjust and balance the listed individual colors to make them either deeper or more pure depending on this input to the original factory settings. Video Color Management Color Decoding Auto Color Noise Reduction Auto Movie Mode Move SEL Select Off Low Off Video Color Management Set User Colors Magenta Red Yellow Green Cyan Blue Reset Phase...
Owners Guide
Page 54
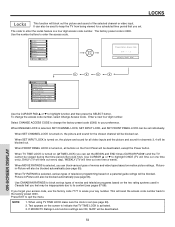
.... 54 ON-SCREEN DISPLAY When ENGAGE LOCK is 0000. When TV RATINGS is turned on, all video inputs and the picture and sound for channels 3, 4 will time out one time a week). Picture-in Canada that TV TIME LOCK is selected, you forget your access code, use the factory code 7777 to your key number. Use the number buttons to keep the TV from being viewed for the chosen channel will also be blocked out. When FRONT PANEL LOCK is selected, various...
.... 54 ON-SCREEN DISPLAY When ENGAGE LOCK is 0000. When TV RATINGS is turned on, all video inputs and the picture and sound for channels 3, 4 will time out one time a week). Picture-in Canada that TV TIME LOCK is selected, you forget your access code, use the factory code 7777 to your key number. Use the number buttons to keep the TV from being viewed for the chosen channel will also be blocked out. When FRONT PANEL LOCK is selected, various...
Owners Guide
Page 69
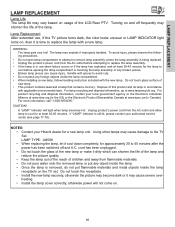
... LCD Rear PTV. For more information, call "1-800-HITACHI." A "LAMP" indicator will not come on and off and A.C. Using other lamps may cause damage to 45 minutes after the power has been switched off frequently may cause severe overheating. • Install the lamp cover correctly, otherwise power will light when lamp becomes hot. LAMP TYPE: LM500 • When replacing the lamp, let it dirty which can cause injury. Turning...
... LCD Rear PTV. For more information, call "1-800-HITACHI." A "LAMP" indicator will not come on and off and A.C. Using other lamps may cause damage to 45 minutes after the power has been switched off frequently may cause severe overheating. • Install the lamp cover correctly, otherwise power will light when lamp becomes hot. LAMP TYPE: LM500 • When replacing the lamp, let it dirty which can cause injury. Turning...


