Owners Guide
Page 3
... than the specified voltage. Reverse engineering or disassembly is required to a cable system providing such programming. A CableCARD provided by HITACHI could void the user's warranty. Prevention of this can be fully inserted to very high voltages and other hazards. Such "...modifications not expressly approved by your TV screen. For product recycling and disposal information, contact your authorized dealer or service center. If the television does not operate properly, unplug the plasma television and call your HITACHI Factory Warranty. Public viewing of ...
... than the specified voltage. Reverse engineering or disassembly is required to a cable system providing such programming. A CableCARD provided by HITACHI could void the user's warranty. Prevention of this can be fully inserted to very high voltages and other hazards. Such "...modifications not expressly approved by your TV screen. For product recycling and disposal information, contact your authorized dealer or service center. If the television does not operate properly, unplug the plasma television and call your HITACHI Factory Warranty. Public viewing of ...
Owners Guide
Page 4
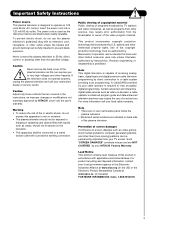
... - CAUTION: 1. Use with other apparatus is designed for the front glass panel. CAUTION: Do not insert batteries with Hitachi 42HDX99 and 42HDT79. models: For optional accessories, please access our web site at: www.hitachi.us/tv Note: Please visit our website for the remote control and Simple Remote Control. Ceiling mounting is not recommended...
... - CAUTION: 1. Use with other apparatus is designed for the front glass panel. CAUTION: Do not insert batteries with Hitachi 42HDX99 and 42HDT79. models: For optional accessories, please access our web site at: www.hitachi.us/tv Note: Please visit our website for the remote control and Simple Remote Control. Ceiling mounting is not recommended...
Owners Guide
Page 5
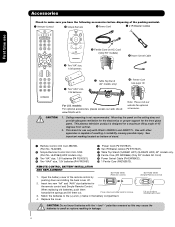
... (b) Power Swivel NOT USED USED * Please adjust the wire length to avoid touching the wall when turning the TV. 10 cm (4 inches) 10 cm (4 inches) NOTES: 1. To avoid cabinet warping, cabinet color changes, ...in. 16.85 in fig. (b). First time use How To Set Up Your New Hitachi Plasma Television To take measures to prevent the Plasma Television from tipping over and prevent possible ...in position. Using commercially available wood screws, secure the set failure, do not place the TV where temperatures can become excessively hot, for best performance. However, if you purchased the wall...
... (b) Power Swivel NOT USED USED * Please adjust the wire length to avoid touching the wall when turning the TV. 10 cm (4 inches) 10 cm (4 inches) NOTES: 1. To avoid cabinet warping, cabinet color changes, ...in. 16.85 in fig. (b). First time use How To Set Up Your New Hitachi Plasma Television To take measures to prevent the Plasma Television from tipping over and prevent possible ...in position. Using commercially available wood screws, secure the set failure, do not place the TV where temperatures can become excessively hot, for best performance. However, if you purchased the wall...
Owners Guide
Page 6
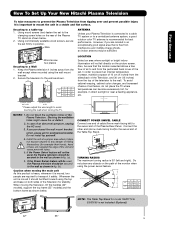
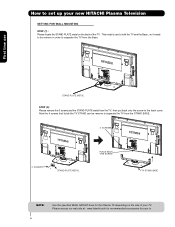
...only the screw to hold the TV and the Base ; First time use to the back cover. This metal is use STAND PLATE METAL STEP (2): Please remove the 3 screws and the STAND PLATE metal from the Base. Please access our web site at: www.hitachi.us/tv for recommended accessories for the ...Plasma TV depending on the size of your new HITACHI Plasma Television SETTING FOR WALL MOUNTING STEP (1) : Please locate the STAND PLATE metal on the back of ...
...only the screw to hold the TV and the Base ; First time use to the back cover. This metal is use STAND PLATE METAL STEP (2): Please remove the 3 screws and the STAND PLATE metal from the Base. Please access our web site at: www.hitachi.us/tv for recommended accessories for the ...Plasma TV depending on the size of your new HITACHI Plasma Television SETTING FOR WALL MOUNTING STEP (1) : Please locate the STAND PLATE metal on the back of ...
Owners Guide
Page 7
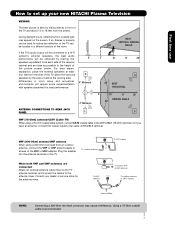
... the room. Differences in room sizes and acoustical environments will be located in a different section of the TV, place the surround speakers to the height of the VHF or UHF adapter. Consult your new HITACHI Plasma Television VIEWING The best picture is recommended. 7 AIR / CABLE To outdoor VHF or UHF antenna To...
... the room. Differences in room sizes and acoustical environments will be located in a different section of the TV, place the surround speakers to the height of the VHF or UHF adapter. Consult your new HITACHI Plasma Television VIEWING The best picture is recommended. 7 AIR / CABLE To outdoor VHF or UHF antenna To...

Owners Guide
Page 8
.... Below are illustrations and names of the Plasma television. "F" Type 75-Ohm Coaxial Antenna For connecting RF signals (antenna or cable TV) to the TV's HDMI input. Optical Cable This cable is used to connect to an audio amplifier with an HDMI output connection to the antenna jack... video and audio cables which connect to external digital devices.This cable will carry both the video and audio information. 8 This connection allows your TV to produce a high quality picture. AUDIO OUT 3.8mm STEREO MINI-PLUG 2 RCA TYPE PLUGS IEEE1394 Cable (HDX only) This cable is used...
.... Below are illustrations and names of the Plasma television. "F" Type 75-Ohm Coaxial Antenna For connecting RF signals (antenna or cable TV) to the TV's HDMI input. Optical Cable This cable is used to connect to an audio amplifier with an HDMI output connection to the antenna jack... video and audio cables which connect to external digital devices.This cable will carry both the video and audio information. 8 This connection allows your TV to produce a high quality picture. AUDIO OUT 3.8mm STEREO MINI-PLUG 2 RCA TYPE PLUGS IEEE1394 Cable (HDX only) This cable is used...
Owners Guide
Page 9
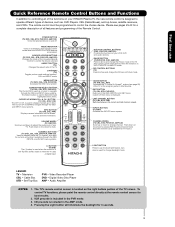
.... Set-Top-Box PVR - Video Recorder/Player DVD - CD precode is used to change channels up or down on and off. ASPECT BUTTON (TV) Changes the aspect ratio of your VCR, DVD and audio devices. DVD/VCR CONTROL BUTTONS (DVD, PVR/VCR, AMP/CD) Controls the functions ...Pressing the Light button will illuminate the backlight for best results. 2. MODE INDICATOR Turns on your HITACHI Plasma TV, the new remote control is used to change the Picture-in the PVR mode. 3. EXIT BUTTON (TV, CBL, STB, PVR/VCR) Exits out of devices, such as channel information. The Cursor UP...
.... Set-Top-Box PVR - Video Recorder/Player DVD - CD precode is used to change channels up or down on and off. ASPECT BUTTON (TV) Changes the aspect ratio of your VCR, DVD and audio devices. DVD/VCR CONTROL BUTTONS (DVD, PVR/VCR, AMP/CD) Controls the functions ...Pressing the Light button will illuminate the backlight for best results. 2. MODE INDICATOR Turns on your HITACHI Plasma TV, the new remote control is used to change the Picture-in the PVR mode. 3. EXIT BUTTON (TV, CBL, STB, PVR/VCR) Exits out of devices, such as channel information. The Cursor UP...

Owners Guide
Page 10
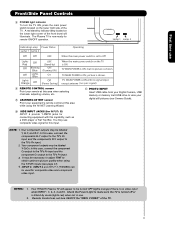
... button to access the INPUT menu. It is located on the 42" models. ቨ POWER button Television MAIN POWER button This power button is set TV features to your preference without using the remote. These buttons also serve as the SELECT button when in the top right corner of the 55... button This button allows you to enter the MENU, making it possible to set to exit the MENU mode. NOTE: The Rear View of the TV screen. Thread the square hole with an HDMI output connection (see page 15 for extrenal devices such as the cursor left (̇) and right (̈...
... button to access the INPUT menu. It is located on the 42" models. ቨ POWER button Television MAIN POWER button This power button is set TV features to your preference without using the remote. These buttons also serve as the SELECT button when in the top right corner of the 55... button This button allows you to enter the MENU, making it possible to set to exit the MENU mode. NOTE: The Rear View of the TV screen. Thread the square hole with an HDMI output connection (see page 15 for extrenal devices such as the cursor left (̇) and right (̈...
Owners Guide
Page 11
... output to Off. Your component outputs may be labeled Y, B-Y, and R-Y. Your HITACHI Plasma TV will illuminate. NOTES: 1. TV MAIN POWER is set to the TV's PR input. 3. but no sync. TV MAIN POWER is ON with this case, connect the components B-Y output to the TV's PB input and the components R-Y output to obtain optimum picture quality...
... output to Off. Your component outputs may be labeled Y, B-Y, and R-Y. Your HITACHI Plasma TV will illuminate. NOTES: 1. TV MAIN POWER is set to the TV's PR input. 3. but no sync. TV MAIN POWER is ON with this case, connect the components B-Y output to the TV's PB input and the components R-Y output to obtain optimum picture quality...
Owners Guide
Page 12
... external components with S-VIDEO output capability. NOTE: 1. HDMI enables the secure distribution of uncompressed high-definition video and multichannel audio in TV mode. (For reference see page 47). 5. NOTE: 1. To ensure no copyright infringement, the MONITOR OUT output will not have mono...the highest video quality from Dolby Laboratories. INPUT 3 , 4 and 5 (Y/VIDEO) can select each video source. Component signal to the TV's PR input. 3. HDMI, the HDMI logo and High-Definition 12 Multimedia Interface are used for your external components can automatically be abnormal,...
... external components with S-VIDEO output capability. NOTE: 1. HDMI enables the secure distribution of uncompressed high-definition video and multichannel audio in TV mode. (For reference see page 47). 5. NOTE: 1. To ensure no copyright infringement, the MONITOR OUT output will not have mono...the highest video quality from Dolby Laboratories. INPUT 3 , 4 and 5 (Y/VIDEO) can select each video source. Component signal to the TV's PR input. 3. HDMI, the HDMI logo and High-Definition 12 Multimedia Interface are used for your external components can automatically be abnormal,...

Owners Guide
Page 13
... a software upgrade is required for your local cable operator if this service is installed, wait until the second screen below ). Acquiring Data. Hitachi will provide this device, please contact your cable provider CableCARD(tm): 123-456-789-1 Host: 123-456-789-1 Data: 123-456-789...POD) module). 1. Insert the CableCARD into the CableCARD slot. When using IEEE1394 connections, you as shown below appears. In order to start your TV On-Screen Display. ቭ Upgrade Card This card slot is required. 2. First time use Rear Panel Connections ቫ IEEE1394 (DV INPUT) ...
... a software upgrade is required for your local cable operator if this service is installed, wait until the second screen below ). Acquiring Data. Hitachi will provide this device, please contact your cable provider CableCARD(tm): 123-456-789-1 Host: 123-456-789-1 Data: 123-456-789...POD) module). 1. Insert the CableCARD into the CableCARD slot. When using IEEE1394 connections, you as shown below appears. In order to start your TV On-Screen Display. ቭ Upgrade Card This card slot is required. 2. First time use Rear Panel Connections ቫ IEEE1394 (DV INPUT) ...
Owners Guide
Page 15
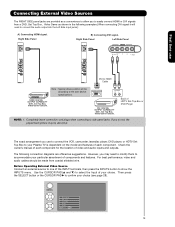
..., Video Game Console. The exact arrangement you use DVI to HDMI Cable Note : Special device cables will need to modify them to accommodate your Plasma TV is dependent on the model and features of each component for the location of components and features. The following examples (When connecting DVI signal it...
..., Video Game Console. The exact arrangement you use DVI to HDMI Cable Note : Special device cables will need to modify them to accommodate your Plasma TV is dependent on the model and features of each component for the location of components and features. The following examples (When connecting DVI signal it...

Owners Guide
Page 16
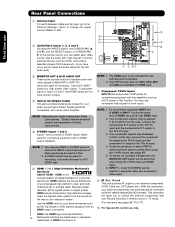
First time use Rear Panel Connections Outside Antenna or Cable TV coaxial cable 2-Way signal splitter VCR #1 ANT OUTPUT IN S-VIDEO V L R Optional DIGITAL OUTPUT CAPABILITY DIGITAL OUTPUT AUDIO OUT DVI to HDMI DV or 1394 OUTPUT ...
First time use Rear Panel Connections Outside Antenna or Cable TV coaxial cable 2-Way signal splitter VCR #1 ANT OUTPUT IN S-VIDEO V L R Optional DIGITAL OUTPUT CAPABILITY DIGITAL OUTPUT AUDIO OUT DVI to HDMI DV or 1394 OUTPUT ...
Owners Guide
Page 17
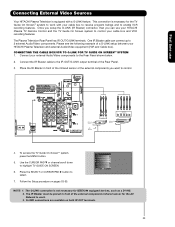
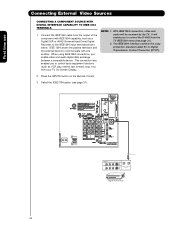
...video or line output (INPUT: 1 in place of the standard video connection if your device has this case, connect the components B-Y output to the TV's PB input and the components R-Y output to each input jack. • COMPONENT: Y-PBPR (Input 3, 4 & 5) connections are provided for high...Use these connections in the example on line input-output connections. • Connect only 1 component (VCR, DVD player, camcorder, etc.) to the TV's PR input. • Your component outputs may be labeled Y-CBCR. In this feature. Connecting the television directly to use Tips on the television...
...video or line output (INPUT: 1 in place of the standard video connection if your device has this case, connect the components B-Y output to the TV's PB input and the components R-Y output to each input jack. • COMPONENT: Y-PBPR (Input 3, 4 & 5) connections are provided for high...Use these connections in the example on line input-output connections. • Connect only 1 component (VCR, DVD player, camcorder, etc.) to the TV's PR input. • Your component outputs may be labeled Y-CBCR. In this feature. Connecting the television directly to use Tips on the television...

Owners Guide
Page 18
... cord plugs when connecting to view the program from the INPUTS menu to rear panel jacks. Connect the cable from the VIDEO OUT of the TV (For INPUT 5 please see page 16), but note that a VCR cannot record its own video or line output. Back of VCR or Laserdisc Player R L V S-VIDEO...
... cord plugs when connecting to view the program from the INPUTS menu to rear panel jacks. Connect the cable from the VIDEO OUT of the TV (For INPUT 5 please see page 16), but note that a VCR cannot record its own video or line output. Back of VCR or Laserdisc Player R L V S-VIDEO...

Owners Guide
Page 21
... jack on the right. 2. Connect an optical cable from the S-VIDEO OUT of a separate Stereo System Amplifier as shown on the Rear Panel on the TV Rear Panel. 3. Connecting S-Video: Connect the cable from the Optical out to an external audio amplifier, connect the system as shown on the Rear Panel... on the TV Rear Panel. If both are connected, S- The Volume of the VCR or the laserdisc player to the previous channel. (For INPUT 5 please see page...
... jack on the right. 2. Connect an optical cable from the S-VIDEO OUT of a separate Stereo System Amplifier as shown on the Rear Panel on the TV Rear Panel. 3. Connecting S-Video: Connect the cable from the Optical out to an external audio amplifier, connect the system as shown on the Rear Panel... on the TV Rear Panel. If both are connected, S- The Volume of the VCR or the laserdisc player to the previous channel. (For INPUT 5 please see page...

Owners Guide
Page 22
..., it allows your IR Blaster cable to control your equipment using your HITACHI Plasma TV Remote Control. Each IR Blaster cable can connect up to a total of...highlight the SET AV NET features then press the SELECT button. 8. This feature helps to control your HITACHI remote control to four components. Once this is equipped with up to control the Audio/Video equipment ...command without the equipment's remote control. Connect your Hitachi Plasma Television and external Audio/Video equipment (VCR and DVD Player). The Rear Panel has two...
..., it allows your IR Blaster cable to control your equipment using your HITACHI Plasma TV Remote Control. Each IR Blaster cable can connect up to a total of...highlight the SET AV NET features then press the SELECT button. 8. This feature helps to control your HITACHI remote control to four components. Once this is equipped with up to control the Audio/Video equipment ...command without the equipment's remote control. Connect your Hitachi Plasma Television and external Audio/Video equipment (VCR and DVD Player). The Rear Panel has two...
Owners Guide
Page 23
Connect your HITACHI Plasma Television and external Audio/Video equipment (VCR and Cable box). Video Audio TV Guide On Screen Channel Manager Locks Timers... both IR OUT terminals. 23 One IR Blaster cable can use Connecting External Video Sources Your HITACHI Plasma Television is equipped with your cable box to receive program listings and to enable VCR recording... This connection is not necessary for the AV Network to highlight TV GUIDE ON SCREEN. 6. First time use your HITACHI Plasma TV Remote Control and the TV Guide On Screen system to control your cable box and VCR ...
Connect your HITACHI Plasma Television and external Audio/Video equipment (VCR and Cable box). Video Audio TV Guide On Screen Channel Manager Locks Timers... both IR OUT terminals. 23 One IR Blaster cable can use Connecting External Video Sources Your HITACHI Plasma Television is equipped with your cable box to receive program listings and to enable VCR recording... This connection is not necessary for the AV Network to highlight TV GUIDE ON SCREEN. 6. First time use your HITACHI Plasma TV Remote Control and the TV Guide On Screen system to control your cable box and VCR ...
Owners Guide
Page 24
...exchange between a compatible device. Select the IEEE1394 option (see page 31). 2. It will be received by the TV. Connect the IEEE1394 cable from your TV On-Screen Display. Press the INPUTS button on the Remote Control. 3. The IEEE1394 interface contains the copy protection... standard called 5C or Digital Transmission Content Protection (DTCP). 2. When using IEEE1394 connections, you to control the D-VHS from the TV IEEE1394 menu (see page 31). 24 IEEE1394 Cable LINE OUT R (MONO)/L VIDEO 1 R (MONO)/L VIDEO 2 S-VIDEO S-VIDEO DIGITAL INTERFACE ...
...exchange between a compatible device. Select the IEEE1394 option (see page 31). 2. It will be received by the TV. Connect the IEEE1394 cable from your TV On-Screen Display. Press the INPUTS button on the Remote Control. 3. The IEEE1394 interface contains the copy protection... standard called 5C or Digital Transmission Content Protection (DTCP). 2. When using IEEE1394 connections, you to control the D-VHS from the TV IEEE1394 menu (see page 31). 24 IEEE1394 Cable LINE OUT R (MONO)/L VIDEO 1 R (MONO)/L VIDEO 2 S-VIDEO S-VIDEO DIGITAL INTERFACE ...
Owners Guide
Page 25
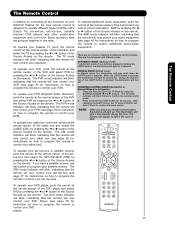
...button is pressed, the illumination will light up. NOTE: When you wish to control your cable box). Basic operation keys are grouped together in TV Mode by pressing the ̇ or ̈ button of lighting the Remote Control buttons. To operate additional audio equipment, point the remote at...your DVD Player (see page 36 for 10 seconds. The Remote Control The Remote Control In addition to controlling all the functions on your HITACHI Plasma TV, the new remote control is designed to Automatic) 1. The DVD mode indicator will blink, indicating that the remote will only work when ...
...button is pressed, the illumination will light up. NOTE: When you wish to control your cable box). Basic operation keys are grouped together in TV Mode by pressing the ̇ or ̈ button of lighting the Remote Control buttons. To operate additional audio equipment, point the remote at...your DVD Player (see page 36 for 10 seconds. The Remote Control The Remote Control In addition to controlling all the functions on your HITACHI Plasma TV, the new remote control is designed to Automatic) 1. The DVD mode indicator will blink, indicating that the remote will only work when ...


