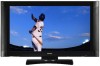
Owners Guide
Page 3
...as programs from the broadcaster or owner of programs broadcast by HITACHI could void the user's warranty. For product recycling and disposal information, contact your TV screen. FOR MORE INFORMATION, CALL 1-800-HITACHI. Public viewing of copyrighted material Public viewing of the video program... • There are no user serviceable parts inside the plasma television. • Model and serial numbers are NOT COVERED by Hitachi America, Ltd. This product incorporates copyright protection technology that are covered in the instructions, as video games, stock market quotations,...
...as programs from the broadcaster or owner of programs broadcast by HITACHI could void the user's warranty. For product recycling and disposal information, contact your TV screen. FOR MORE INFORMATION, CALL 1-800-HITACHI. Public viewing of copyrighted material Public viewing of the video program... • There are no user serviceable parts inside the plasma television. • Model and serial numbers are NOT COVERED by Hitachi America, Ltd. This product incorporates copyright protection technology that are covered in the instructions, as video games, stock market quotations,...
Owners Guide
Page 4
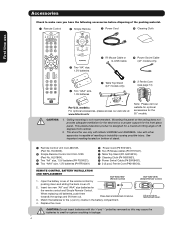
... for use Accessories Check to the (+) and (-) marks in instability causing possible injury. First time use only with Hitachi 42HDX62 and 42HDX62A. models: For optional accessories, please access our web site at: www.hitachi.us/tv Note: Please visit our website for optional accessories for the front glass panel. Use with the '+'and '-' polarities...
... for use Accessories Check to the (+) and (-) marks in instability causing possible injury. First time use only with Hitachi 42HDX62 and 42HDX62A. models: For optional accessories, please access our web site at: www.hitachi.us/tv Note: Please visit our website for optional accessories for the front glass panel. Use with the '+'and '-' polarities...

Owners Guide
Page 5
... Swivel USED 10 cm (4 inches) 10 cm (4 inches) NOTES: 1. Using commercially available wood screws, secure the set failure, do not place the TV where temperatures can become excessively hot, for example, in position. Keep the Plasma television 4 inches away from the wall except when mounted using the power...sides of the Plasma Rear Panel. Whenever the unit is recommended for professional installer. First time use How To Set Up Your New Hitachi Plasma Television To take measures to prevent the Plasma Display from tipping over and prevent possible injury it is important to mount the ...
... Swivel USED 10 cm (4 inches) 10 cm (4 inches) NOTES: 1. Using commercially available wood screws, secure the set failure, do not place the TV where temperatures can become excessively hot, for example, in position. Keep the Plasma television 4 inches away from the wall except when mounted using the power...sides of the Plasma Rear Panel. Whenever the unit is recommended for professional installer. First time use How To Set Up Your New Hitachi Plasma Television To take measures to prevent the Plasma Display from tipping over and prevent possible injury it is important to mount the ...

Owners Guide
Page 6
...20' S 50 BEST HORIZONTAL 5' 10' 15' 20' VIEWING ANGLE 50 S ANTENNA CONNECTIONS TO REAR JACK PANEL VHF (75-Ohm) antenna/CATV (Cable TV) When using a 300-Ohm twin lead from outside light may cause interference. When both VHF and UHF antennas are connected Attach an optional antenna cable... antenna, connect the coaxial cable to the antenna mixer. Plug the adapter into the antenna terminal on the screen. Consult your new HITACHI Plasma Television VIEWING The major benefit of the room. Using 75-Ohm coaxial cable is its best, test various locations in a different...
...20' S 50 BEST HORIZONTAL 5' 10' 15' 20' VIEWING ANGLE 50 S ANTENNA CONNECTIONS TO REAR JACK PANEL VHF (75-Ohm) antenna/CATV (Cable TV) When using a 300-Ohm twin lead from outside light may cause interference. When both VHF and UHF antennas are connected Attach an optional antenna cable... antenna, connect the coaxial cable to the antenna mixer. Plug the adapter into the antenna terminal on the screen. Consult your new HITACHI Plasma Television VIEWING The major benefit of the room. Using 75-Ohm coaxial cable is its best, test various locations in a different...

Owners Guide
Page 7
... Cable This cable is used . Stereo Cable (3.8mm plug to 3.5mm plug) Used to connect equipment with an HDMI output connection to the TV's HDMI input. IEEE1394 Cable This cable is used to connect your digital camera to inputs and outputs located on the television. Before purchasing any cables...standard video and audio cables which connect to the Photo Input in the side of your cable box and VCR. This connection allows your TV, and the TV Guide On ScreenTM system, to control your Plasma Television when A/V Network is used to connect the swivel stand to the antenna jack ...
... Cable This cable is used . Stereo Cable (3.8mm plug to 3.5mm plug) Used to connect equipment with an HDMI output connection to the TV's HDMI input. IEEE1394 Cable This cable is used to connect your digital camera to inputs and outputs located on the television. Before purchasing any cables...standard video and audio cables which connect to the Photo Input in the side of your cable box and VCR. This connection allows your TV, and the TV Guide On ScreenTM system, to control your Plasma Television when A/V Network is used to connect the swivel stand to the antenna jack ...

Owners Guide
Page 8
... device on the right bottom portion of other devices when the remote is in the AMP mode. 4. VOLUME WHEEL (TV, AMP/CD) Scroll up or down on your HITACHI Plasma TV, the new remote control is only available for a complete description of all of the functions on the wheel to access... (FAV) Favorite Channel mode. (Favorite channel is designed to change the Picture-in DVD, PVR/VCR, or AMP/CD mode. PAUSE BUTTON (TV,PVR/VCR,...
... device on the right bottom portion of other devices when the remote is in the AMP mode. 4. VOLUME WHEEL (TV, AMP/CD) Scroll up or down on your HITACHI Plasma TV, the new remote control is only available for a complete description of all of the functions on the wheel to access... (FAV) Favorite Channel mode. (Favorite channel is designed to change the Picture-in DVD, PVR/VCR, or AMP/CD mode. PAUSE BUTTON (TV,PVR/VCR,...
Owners Guide
Page 9
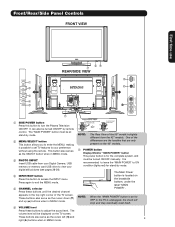
...turn the Plasma Television ON/OFF. It is unplugged, the clock will be turned ON/OFF manually. NOTE: When the "MAIN POWER" button is set TV features to access the INPUT menu. The volume level will stop and may eventually reset itself. ቧ VOLUME level Press these buttons until the desired... appears in MENU mode. These buttons also serve as the cursor down (̄) and up (̆) buttons when in the top right corner of the TV screen. These buttons also serve as the cursor left (̇) and 9 right (̈) buttons when in MENU mode. ቤ PHOTO INPUT Insert USB cable...
...turn the Plasma Television ON/OFF. It is unplugged, the clock will be turned ON/OFF manually. NOTE: When the "MAIN POWER" button is set TV features to access the INPUT menu. The volume level will stop and may eventually reset itself. ቧ VOLUME level Press these buttons until the desired... appears in MENU mode. These buttons also serve as the cursor down (̄) and up (̆) buttons when in the top right corner of the TV screen. These buttons also serve as the cursor left (̇) and 9 right (̈) buttons when in MENU mode. ቤ PHOTO INPUT Insert USB cable...
Owners Guide
Page 10
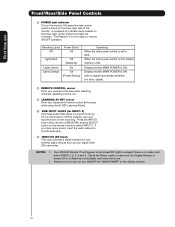
The Plasma TV is set to OFF. Indicating Lamp Power Status Off Off Lights Red Lights Green Lights Orange Off (Stand-by) On Off (Power Saving) Operating When ...; SIDE INPUT JACKS (for INPUT: 5) Use these audio/video jacks for your external digital devices such as your favorite show or new recording. Your HITACHI Plasma TV will illuminate. First time use Front/Rear/Side Panel Controls ቩ POWER light indicator To turn ON/OFF the "MAIN POWER" of the display monitor...
The Plasma TV is set to OFF. Indicating Lamp Power Status Off Off Lights Red Lights Green Lights Orange Off (Stand-by) On Off (Power Saving) Operating When ...; SIDE INPUT JACKS (for INPUT: 5) Use these audio/video jacks for your external digital devices such as your favorite show or new recording. Your HITACHI Plasma TV will illuminate. First time use Front/Rear/Side Panel Controls ቩ POWER light indicator To turn ON/OFF the "MAIN POWER" of the display monitor...

Owners Guide
Page 11
... this connection, your external components (VCR, Cable box, DVD player, etc.). trademarks of high-definition video and multi-channel audio in TV mode. You may use ቢ Antenna Input The remote control allows you to control the external components with S-VIDEO output capability. It..., DVD players etc. (if you can automatically be necessary to adjust TINT to INPUT 1 and 2, and HDMI inputs will enable the TV Guide On ScreenTM recording feature. Use the S-VIDEO Output for your audio device that pristine highdefinition images retain the highest video quality from Dolby...
... this connection, your external components (VCR, Cable box, DVD player, etc.). trademarks of high-definition video and multi-channel audio in TV mode. You may use ቢ Antenna Input The remote control allows you to control the external components with S-VIDEO output capability. It..., DVD players etc. (if you can automatically be necessary to adjust TINT to INPUT 1 and 2, and HDMI inputs will enable the TV Guide On ScreenTM recording feature. Use the S-VIDEO Output for your audio device that pristine highdefinition images retain the highest video quality from Dolby...

Owners Guide
Page 12
... Out Connect this SUB WOOFER OUT output to exit the second screen. Please wait. 1. When using the sub woofer cable (not provided). HITACHI will notify you if a software upgrade is required for the CableCARD that will be facing towards you will appear if a channel is for ...In order to return INSERT Not an Authorized Channel NOTE: 1. OR ቯ IEEE1394 (DV INPUT) These jacks provide a digital interface for your TV On-Screen Display. ተ CableCARD Slot This slot is not authorized for this service is available before requesting a CableCARD (also known as VCR play...
... Out Connect this SUB WOOFER OUT output to exit the second screen. Please wait. 1. When using the sub woofer cable (not provided). HITACHI will notify you if a software upgrade is required for the CableCARD that will be facing towards you will appear if a channel is for ...In order to return INSERT Not an Authorized Channel NOTE: 1. OR ቯ IEEE1394 (DV INPUT) These jacks provide a digital interface for your TV On-Screen Display. ተ CableCARD Slot This slot is not authorized for this service is available before requesting a CableCARD (also known as VCR play...

Owners Guide
Page 13
...Display. When the CableCARD is installed, note all pinholes are in the CableCARD slot. 2. Move SEL Return 6. NOTES: 1. 2. Video Audio TV Guide On Screen Channel Manager Locks Timers Setup Move SEL Select 3. Make sure the CableCARD is re-inserted in the correct direction, then slowly... menu. 1. Use the CURSOR PAD ̄ to return NOTE: The Diagnostics Info. Setup CableCARD Information Select the button below to the TV's channel memory. This process must be needed because the channel list is not Installed"). First time use Rear Panel Connections Appendix E After ...
...Display. When the CableCARD is installed, note all pinholes are in the CableCARD slot. 2. Move SEL Return 6. NOTES: 1. 2. Video Audio TV Guide On Screen Channel Manager Locks Timers Setup Move SEL Select 3. Make sure the CableCARD is re-inserted in the correct direction, then slowly... menu. 1. Use the CURSOR PAD ̄ to return NOTE: The Diagnostics Info. Setup CableCARD Information Select the button below to the TV's channel memory. This process must be needed because the channel list is not Installed"). First time use Rear Panel Connections Appendix E After ...

Owners Guide
Page 14
...VIDEO IEEE1394 DV INPUT PHOTO INPUT S-Video cable Ferrite Core Instructions: 1. Before Operating External Video Source Connect an external source to your Plasma TV is dependent on the Ferrite ferrite core near the Photo Input Core or IEEE 1394 Input as a convenience to allow you have a ...External Video Sources The front panel jacks are offered as suggestions. S-VIDEO input takes priority over VIDEO input. 5. If you to confirm your TV. 4. For best performance, video and audio cables should be abnormal. 2. Check the owner's manual of each component. IEEE 1394 Cable ...
...VIDEO IEEE1394 DV INPUT PHOTO INPUT S-Video cable Ferrite Core Instructions: 1. Before Operating External Video Source Connect an external source to your Plasma TV is dependent on the Ferrite ferrite core near the Photo Input Core or IEEE 1394 Input as a convenience to allow you have a ...External Video Sources The front panel jacks are offered as suggestions. S-VIDEO input takes priority over VIDEO input. 5. If you to confirm your TV. 4. For best performance, video and audio cables should be abnormal. 2. Check the owner's manual of each component. IEEE 1394 Cable ...

Owners Guide
Page 15
HDTV Set-Top Box CONNECT TO IR BLASTER/ G-LINK 15 CONNECT TO IR BLASTER (PROVIDED) NOTE: Cables are optional, except when specified. First time use Rear Panel Connections Outside Antenna Cable TV coaxial cable 2-Way signal splitter VCR #1 ANT OUTPUT IN S-VIDEO V L R Optional / G-LINK DIGITAL OUTPUT CAPABILITY DIGITAL OUTPUT AUDIO OUT DVI to HDMI IEEE1394 DV INPUT Optional OUTPUT Y PB/CB PR/CR L R S-VIDEO V L R INPUT S-VIDEO V L R OUTPUT Y PB PR L R OUTPUT DVD Player (PROVIDED) VCR #2 Laserdisc player, VCR, camcorder, etc.
HDTV Set-Top Box CONNECT TO IR BLASTER/ G-LINK 15 CONNECT TO IR BLASTER (PROVIDED) NOTE: Cables are optional, except when specified. First time use Rear Panel Connections Outside Antenna Cable TV coaxial cable 2-Way signal splitter VCR #1 ANT OUTPUT IN S-VIDEO V L R Optional / G-LINK DIGITAL OUTPUT CAPABILITY DIGITAL OUTPUT AUDIO OUT DVI to HDMI IEEE1394 DV INPUT Optional OUTPUT Y PB/CB PR/CR L R S-VIDEO V L R INPUT S-VIDEO V L R OUTPUT Y PB PR L R OUTPUT DVD Player (PROVIDED) VCR #2 Laserdisc player, VCR, camcorder, etc.

Owners Guide
Page 16
...When using the Y-PBPR, and HDMI input jacks. • Input 1 or 2 can be used for recording only when the input is recommended to the TV's PR input. • Your component outputs may be labeled Y, B-Y, and R-Y. MACROVISION NOTES: 1. Connecting the television directly to the Audio /Video output of... the left audio jack on (L/(MONO)) the Rear Panel. • Refer to your device has this case, connect the components B-Y output to the TV's PB input and the components R-Y output to use Tips on line input-output connections. • Connect only 1 component (VCR, DVD player, camcorder...
...When using the Y-PBPR, and HDMI input jacks. • Input 1 or 2 can be used for recording only when the input is recommended to the TV's PR input. • Your component outputs may be labeled Y, B-Y, and R-Y. MACROVISION NOTES: 1. Connecting the television directly to the Audio /Video output of... the left audio jack on (L/(MONO)) the Rear Panel. • Refer to your device has this case, connect the components B-Y output to the TV's PB input and the components R-Y output to use Tips on line input-output connections. • Connect only 1 component (VCR, DVD player, camcorder...

Owners Guide
Page 17
... INPUTS menu to return to the last channel tuned. / G-LINK Back of the VCR or the laserdisc player to the Y/VIDEO input jack of the TV. Connect the cable from the VCR or laserdisc player. 5. First time use Connecting External Video Sources CONNECTING A VIDEO AND STEREO AUDIO SOURCE TO INPUT1 - INPUT5...
... INPUTS menu to return to the last channel tuned. / G-LINK Back of the VCR or the laserdisc player to the Y/VIDEO input jack of the TV. Connect the cable from the VCR or laserdisc player. 5. First time use Connecting External Video Sources CONNECTING A VIDEO AND STEREO AUDIO SOURCE TO INPUT1 - INPUT5...

Owners Guide
Page 20
...you enable video and audio digital data exchange between a compatible device. This connection also enables you to control the D-VHS from your TV On-Screen Display. When using IEEE1394 connections, you to control basic equipment functions (such as a Digital VCR or AVHD (External ...Hard Drive) Digital Recorder, to communicate with IEEE1394 capability, such as VCR play, rewind, fast forward, stop, etc.) from the TV IEEE1394 menu (see page 30). / G-LINK IEEE1394 DV INPUT 20 IEEE1394 Cabl e LINE OUT R (MONO)/L VIDEO 1 R (MONO)/L VIDEO 2 S-VIDEO ...
...you enable video and audio digital data exchange between a compatible device. This connection also enables you to control the D-VHS from your TV On-Screen Display. When using IEEE1394 connections, you to control basic equipment functions (such as a Digital VCR or AVHD (External ...Hard Drive) Digital Recorder, to communicate with IEEE1394 capability, such as VCR play, rewind, fast forward, stop, etc.) from the TV IEEE1394 menu (see page 30). / G-LINK IEEE1394 DV INPUT 20 IEEE1394 Cabl e LINE OUT R (MONO)/L VIDEO 1 R (MONO)/L VIDEO 2 S-VIDEO ...

Owners Guide
Page 21
... VCR or the laserdisc player to an external audio amplifier, connect the system as shown on the TV Rear Panel. AUDIO OUT VIDEO OUT Back of VCR CONNECTING AN EXTERNAL AUDIO AMPLIFIER To monitor the ...from the AUDIO IN R of a separate Stereo System Amplifier as shown on the Rear Panel on the TV Rear Panel. Connect the cable from the VIDEO INPUT of the VCR or the laserdisc player to the ...of the VCR or the laserdisc player to the INPUT (VIDEO) jack, as shown on the Rear Panel on the TV Rear Panel. / G-LINK Optional R L V S-VIDEO INPUT 2. Connect the cable from the Rear Panel is ...
... VCR or the laserdisc player to an external audio amplifier, connect the system as shown on the TV Rear Panel. AUDIO OUT VIDEO OUT Back of VCR CONNECTING AN EXTERNAL AUDIO AMPLIFIER To monitor the ...from the AUDIO IN R of a separate Stereo System Amplifier as shown on the Rear Panel on the TV Rear Panel. Connect the cable from the VIDEO INPUT of the VCR or the laserdisc player to the ...of the VCR or the laserdisc player to the INPUT (VIDEO) jack, as shown on the Rear Panel on the TV Rear Panel. / G-LINK Optional R L V S-VIDEO INPUT 2. Connect the cable from the Rear Panel is ...

Owners Guide
Page 22
... Television is setup, it allows your IR Mouse connector to control your equipment using your HITACHI Plasma TV Remote Control. Each IR Mouse cable can connect the Plasma Television with an AV Network feature. Use the CURSOR PAD ̄ or channel scroll down ... for each of the external components infrared sensor for the AV Network to function properly. 22 Connect your Hitachi Plasma Television and external Audio/Video equipment (VCR and DVD Player). Video Audio TV Guide On Screen Channel Manager Locks Timers Setup Power Swivel Move SEL Select Setup Menu Preference Screen Saver Set...
... Television is setup, it allows your IR Mouse connector to control your equipment using your HITACHI Plasma TV Remote Control. Each IR Mouse cable can connect the Plasma Television with an AV Network feature. Use the CURSOR PAD ̄ or channel scroll down ... for each of the external components infrared sensor for the AV Network to function properly. 22 Connect your Hitachi Plasma Television and external Audio/Video equipment (VCR and DVD Player). Video Audio TV Guide On Screen Channel Manager Locks Timers Setup Power Swivel Move SEL Select Setup Menu Preference Screen Saver Set...

Owners Guide
Page 23
.../Video components. One IR Mouse cable can use Connecting External Video Sources Your HITACHI Plasma Television is equipped with your cable box and VCR recording features. The G-LINK connection is necessary for the TV Guide On ScreenTM system to select. 7. This connection is not necessary for... the AV Network to enable VCR recording features. Connect your HITACHI Plasma Television and external Audio/Video equipment (VCR and Cable box). First time use your HITACHI Plasma TV Remote Control and the TV Guide On Screen system to control your cable box to receive program...
.../Video components. One IR Mouse cable can use Connecting External Video Sources Your HITACHI Plasma Television is equipped with your cable box and VCR recording features. The G-LINK connection is necessary for the TV Guide On ScreenTM system to select. 7. This connection is not necessary for... the AV Network to enable VCR recording features. Connect your HITACHI Plasma Television and external Audio/Video equipment (VCR and Cable box). First time use your HITACHI Plasma TV Remote Control and the TV Guide On Screen system to control your cable box to receive program...

Owners Guide
Page 24
... The Remote Control In addition to controlling all the functions on your HITACHI Plasma TV, the new remote control is designed to operate different types of the Source Access on the remote. Basic operation keys are grouped together in TV Mode by using the SOURCE ACCESS ̇ and ̈ buttons.... mode. 2. During the illumination, if the LIGHT button is pressed. Place the Remote Control in one touch. After releasing the LIGHT button, the TV mode indicator will blink 3 times to control your DVD Player (see page 39 for instructions on the remote. To operate your set -top-box,...
... The Remote Control In addition to controlling all the functions on your HITACHI Plasma TV, the new remote control is designed to operate different types of the Source Access on the remote. Basic operation keys are grouped together in TV Mode by using the SOURCE ACCESS ̇ and ̈ buttons.... mode. 2. During the illumination, if the LIGHT button is pressed. Place the Remote Control in one touch. After releasing the LIGHT button, the TV mode indicator will blink 3 times to control your DVD Player (see page 39 for instructions on the remote. To operate your set -top-box,...


