
Owners Guide
Page 2
... has been dropped. 15. If the provided plug does not fit into apparatus, the apparatus has been exposed to the point of overhead power lines or other . Follow instructions for Our reputation has been built on this section illustrates safety tips which could cause the product to a...particular, specifies that may be of a sufficient magnitude to the CATV system installer: This reminder is used, use Please fill out your HITACHI plasma television. Please read it to the receiver be sure the antenna system is grounded so as recommended by the manufacturer, or sold with ...
... has been dropped. 15. If the provided plug does not fit into apparatus, the apparatus has been exposed to the point of overhead power lines or other . Follow instructions for Our reputation has been built on this section illustrates safety tips which could cause the product to a...particular, specifies that may be of a sufficient magnitude to the CATV system installer: This reminder is used, use Please fill out your HITACHI plasma television. Please read it to the receiver be sure the antenna system is grounded so as recommended by the manufacturer, or sold with ...
Owners Guide
Page 3
...Stewardship Canada at www.epsc.ca (in the instructions, as improper changes or modifications not expressly approved by your HITACHI Factory Warranty. FOR MORE INFORMATION, CALL 1-800-HITACHI. Use of screen damages Continuous on 120 volts 60 Hz, AC current. If the television does not operate properly...fixed (non-moving) patterns can be permanently imprinted onto your TV screen. Insert the power cord into a 120 volt 60 Hz outlet. Warning • To reduce the risk of fire or electric shock, do not use of the plasma television. Modifications The FCC requires the user to be placed...
...Stewardship Canada at www.epsc.ca (in the instructions, as improper changes or modifications not expressly approved by your HITACHI Factory Warranty. FOR MORE INFORMATION, CALL 1-800-HITACHI. Use of screen damages Continuous on 120 volts 60 Hz, AC current. If the television does not operate properly...fixed (non-moving) patterns can be permanently imprinted onto your TV screen. Insert the power cord into a 120 volt 60 Hz outlet. Warning • To reduce the risk of fire or electric shock, do not use of the plasma television. Modifications The FCC requires the user to be placed...
Owners Guide
Page 4
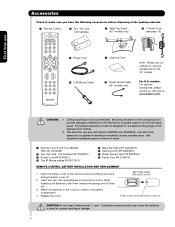
... off. 2. models: For optional accessories, please access our web site at: www.hitachi.us/tv CAUTION: 1. This plasma television product is not recommended. HL02066). · Two "AA" size, 1.5V batteries (P# FQ00021). » Power Cord (P# EV01841). ¿ Two IR Mouse cables (P# EY01641). ´ Table Top...REMOTE CONTROL BATTERY INSTALLATION AND REPLACEMENT 1. Replace the cover. This stand for use » Power Cord ¿ 2 IR Mouse Cable ² Cleaning Cloth ¶ Power Swivel Cable (42" models only) Note: Please visit our website for optional accessories for the front glass ...
... off. 2. models: For optional accessories, please access our web site at: www.hitachi.us/tv CAUTION: 1. This plasma television product is not recommended. HL02066). · Two "AA" size, 1.5V batteries (P# FQ00021). » Power Cord (P# EV01841). ¿ Two IR Mouse cables (P# EY01641). ´ Table Top...REMOTE CONTROL BATTERY INSTALLATION AND REPLACEMENT 1. Replace the cover. This stand for use » Power Cord ¿ 2 IR Mouse Cable ² Cleaning Cloth ¶ Power Swivel Cable (42" models only) Note: Please visit our website for optional accessories for the front glass ...
Owners Guide
Page 5
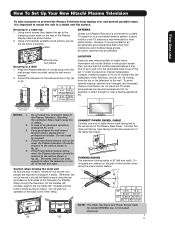
...table-top 1. If the Power Swivel feature will be used , the Plasma television should be secured to the wall as shown below . 2. Wire ANTENNA Unless your Plasma Television is connected to a cable TV system or to a centralized antenna system, a good outdoor color TV antenna is moved it should ...42" models), support the top frame (55" models) and the bottom frame as shown in an exceptionally good signal area that the location selected allows a free flow of air to and from the top of cable (Arrow mark facing left and right. First time use How To Set Up Your New Hitachi Plasma...
...table-top 1. If the Power Swivel feature will be used , the Plasma television should be secured to the wall as shown below . 2. Wire ANTENNA Unless your Plasma Television is connected to a cable TV system or to a centralized antenna system, a good outdoor color TV antenna is moved it should ...42" models), support the top frame (55" models) and the bottom frame as shown in an exceptionally good signal area that the location selected allows a free flow of air to and from the top of cable (Arrow mark facing left and right. First time use How To Set Up Your New Hitachi Plasma...
Owners Guide
Page 7
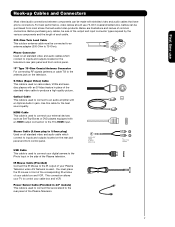
...is used . This connection allows your TV to the TV's HDMI input. AUDIO OUT 3.8mm STEREO MINI-PLUG 2 RCA TYPE PLUGS 7 Below are illustrations and names of common connectors. USB Cable This cable is used to connect your digital camera to the Photo Input in 42" models) This cable is used ... to inputs and outputs located on all standard video and audio cable which connect to the rear panel of the Plasma Television. Power Swivel Cable (Provided in the side of the Plasma television. Phono Connector Used on the rear jack panel and front control panel. Use this cable for the best ...
...is used . This connection allows your TV to the TV's HDMI input. AUDIO OUT 3.8mm STEREO MINI-PLUG 2 RCA TYPE PLUGS 7 Below are illustrations and names of common connectors. USB Cable This cable is used to connect your digital camera to the Photo Input in 42" models) This cable is used ... to inputs and outputs located on all standard video and audio cable which connect to the rear panel of the Plasma Television. Power Swivel Cable (Provided in the side of the Plasma television. Phono Connector Used on the rear jack panel and front control panel. Use this cable for the best ...
Owners Guide
Page 8
... is in the PVR mode. 3. ASPECT BUTTON (TV) Changes the aspect ratio of the Remote Control. VOLUME WHEEL (TV, AMP/CD) Scroll up or down on your HITACHI Plasma Television, the new remote control is designed to manually enter the TV channel, and used for numeric entry when navigating through...different types of your VCR, DVD and audio devices. EXIT BUTTON (TV, CBL, STB, PVR/VCR) Exits out of the TV screen. Television CBL - Cable Box STB - First time use the back light feature. Satellite Receiver NOTES: 1. POWER BUTTON (TV, DVD, CBL, STB, PVR/VCR, AMP/CD) Turns the ...
... is in the PVR mode. 3. ASPECT BUTTON (TV) Changes the aspect ratio of the Remote Control. VOLUME WHEEL (TV, AMP/CD) Scroll up or down on your HITACHI Plasma Television, the new remote control is designed to manually enter the TV channel, and used for numeric entry when navigating through...different types of your VCR, DVD and audio devices. EXIT BUTTON (TV, CBL, STB, PVR/VCR) Exits out of the TV screen. Television CBL - Cable Box STB - First time use the back light feature. Satellite Receiver NOTES: 1. POWER BUTTON (TV, DVD, CBL, STB, PVR/VCR, AMP/CD) Turns the ...
Owners Guide
Page 9
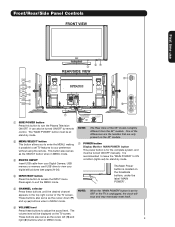
... Press these buttons until the desired channel appears in MENU mode. Firmly bind the cables. The Main Power button is located on the TV screen. Hook the band to turn the Plasma Television ON/OFF. NOTE: The Rear View of the differences are the handles that are only present on... the 42" models. ቨ POWER button Display Monitor MAIN POWER button This power button is for stand-by mode. Front/Rear/Side...
... Press these buttons until the desired channel appears in MENU mode. Firmly bind the cables. The Main Power button is located on the TV screen. Hook the band to turn the Plasma Television ON/OFF. NOTE: The Rear View of the differences are the handles that are only present on... the 42" models. ቨ POWER button Display Monitor MAIN POWER button This power button is for stand-by mode. Front/Rear/Side...

Owners Guide
Page 10
... control to select INPUT 5. A red stand-by ) On Off (Power Saving) Operating When the main power switch is set to be turned OFF (lights orange) if there is ON. Your HITACHI Plasma TV will illuminate. Display monitor MAIN POWER is ON with no signal input except antenna (no video input when... VIDEO: 1, 2, 3, 4 and 5. When the main power switch on the lower right corner of the front bezel will appear ...
... control to select INPUT 5. A red stand-by ) On Off (Power Saving) Operating When the main power switch is set to be turned OFF (lights orange) if there is ON. Your HITACHI Plasma TV will illuminate. Display monitor MAIN POWER is ON with no signal input except antenna (no video input when... VIDEO: 1, 2, 3, 4 and 5. When the main power switch on the lower right corner of the front bezel will appear ...
Owners Guide
Page 12
...this service is installed, wait until the second screen below appears. A digital cable subscription is installed ቮ To Power Swivel Connector Connects to the Power Swivel Table Top Stand. In order to cable terminal of card should be provided by your local cable operator to gain...Deployment (POD) module). 1. Please wait. If the CableCARD is properly installed or removed, the TV will be facing towards you if a software upgrade is for additional CableCARD information. HITACHI will notify you as Point of all information on page 80 for future software upgrades. OR ቯ...
...this service is installed, wait until the second screen below appears. A digital cable subscription is installed ቮ To Power Swivel Connector Connects to the Power Swivel Table Top Stand. In order to cable terminal of card should be provided by your local cable operator to gain...Deployment (POD) module). 1. Please wait. If the CableCARD is properly installed or removed, the TV will be facing towards you if a software upgrade is for additional CableCARD information. HITACHI will notify you as Point of all information on page 80 for future software upgrades. OR ቯ...
Owners Guide
Page 20
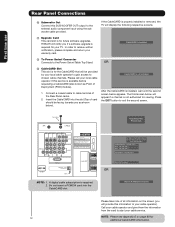
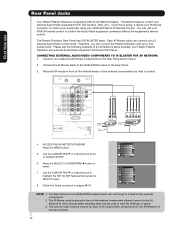
...setup, it allows your IR Mouse connector to control your equipment using your HITACHI Plasma TV Remote Control. CONNECTING EXTERNAL AUDIO/VIDEO COMPONENTS TO IR BLASTER FOR AV NETWORK 1. Video Audio Channel Manager Locks Timers Setup Power Swivel Move SEL Select Setup Menu Preference Screen Saver Set The Inputs Set ... to the Rear Panel shown below. 2. Connect the IR Mouse cable to the IR BLASTER output of an AV Network setup between your Hitachi Plasma Television and external Audio/Video equipment (VCR and DVD Player). ACCESS THE AV NET SETUP WIZARD Press the MENU button. 5. On-Screen ...
...setup, it allows your IR Mouse connector to control your equipment using your HITACHI Plasma TV Remote Control. CONNECTING EXTERNAL AUDIO/VIDEO COMPONENTS TO IR BLASTER FOR AV NETWORK 1. Video Audio Channel Manager Locks Timers Setup Power Swivel Move SEL Select Setup Menu Preference Screen Saver Set The Inputs Set ... to the Rear Panel shown below. 2. Connect the IR Mouse cable to the IR BLASTER output of an AV Network setup between your Hitachi Plasma Television and external Audio/Video equipment (VCR and DVD Player). ACCESS THE AV NET SETUP WIZARD Press the MENU button. 5. On-Screen ...
Owners Guide
Page 22
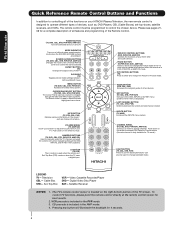
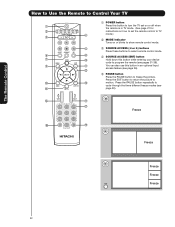
... Control How to Use the Remote to Control Your TV ቢ POWER button ቢ Press this button to turn the TV set on or off when the remote is in TV mode. (See page 21 for ባ instructions on how to set the remote control to TV ቤ ብ mode.) ባ MODE Indicator Turns on...
... Control How to Use the Remote to Control Your TV ቢ POWER button ቢ Press this button to turn the TV set on or off when the remote is in TV mode. (See page 21 for ባ instructions on how to set the remote control to TV ቤ ብ mode.) ባ MODE Indicator Turns on...
Owners Guide
Page 25
... view THUMBNAIL. 4. Press the CURSOR PAD ̇ or ̈ to navigate and select individual chosen photos. Next SEL Thumbnail [0-9] Jump 5. The maximum number of the TV. 1. Input 5 Photo Input Cable Air Input 1 Move SEL Sel. 2. Use the CURSOR PAD buttons ̆, ̄, ̇ or ̈ and the SELECT button to ... side panel of digital Photos that can be displayed is 999. 3. Press the SELECT button or CURSOR PAD ̈. Digital cameras with low battery power may not work with this input. 7. First time use The Remote Control How to Use the Remote to Control Your...
... view THUMBNAIL. 4. Press the CURSOR PAD ̇ or ̈ to navigate and select individual chosen photos. Next SEL Thumbnail [0-9] Jump 5. The maximum number of the TV. 1. Input 5 Photo Input Cable Air Input 1 Move SEL Sel. 2. Use the CURSOR PAD buttons ̆, ̄, ̇ or ̈ and the SELECT button to ... side panel of digital Photos that can be displayed is 999. 3. Press the SELECT button or CURSOR PAD ̈. Digital cameras with low battery power may not work with this input. 7. First time use The Remote Control How to Use the Remote to Control Your...
Owners Guide
Page 27
... default to WHITE. You can also delete a channel from WHITE to tune. When the TV power is turned ON. ቴ (-) DASH button Use the (-) DASH button with the (-) DASH button. Enter "0" first for the TV to highlighted GREEN. Channel selection may also be at a volume level 31 or greater, the...(̆ or ̄) to Favorite (FAV) channel mode. For Digital Channels, use The Remote Control How to Use the Remote to Control Your TV ቱ LAST CHANNEL (LAST CH) button Press this button to select channels, lock access code, etc. Press it was set to your regular ...
... default to WHITE. You can also delete a channel from WHITE to tune. When the TV power is turned ON. ቴ (-) DASH button Use the (-) DASH button with the (-) DASH button. Enter "0" first for the TV to highlighted GREEN. Channel selection may also be at a volume level 31 or greater, the...(̆ or ̄) to Favorite (FAV) channel mode. For Digital Channels, use The Remote Control How to Use the Remote to Control Your TV ቱ LAST CHANNEL (LAST CH) button Press this button to select channels, lock access code, etc. Press it was set to your regular ...
Owners Guide
Page 31
...NOTE: Refer to the corresponding selection. ቢ 4. The indicator light will remember the codes you have programmed until the batteries are for operating the TV. 31 When this occurs, the remote control is ባ ቢ programmed for your cable box. 2. NOTE: 1. Aim the remote control at ...the cable box and press the POWER button. If the cable box does not turn off , try a different four digit preset ቢ code. 6. To switch to Cable (CBL) pre-...
...NOTE: Refer to the corresponding selection. ቢ 4. The indicator light will remember the codes you have programmed until the batteries are for operating the TV. 31 When this occurs, the remote control is ባ ቢ programmed for your cable box. 2. NOTE: 1. Aim the remote control at ...the cable box and press the POWER button. If the cable box does not turn off , try a different four digit preset ቢ code. 6. To switch to Cable (CBL) pre-...
Owners Guide
Page 32
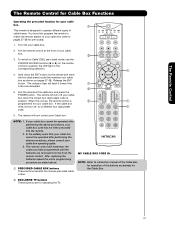
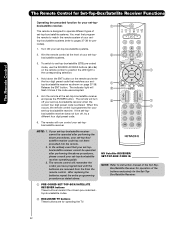
.... ቢ PRE-CODED SET-TOP-BOX/SATELLITE RECEIVER buttons These buttons transmit the chosen pre-coded settop-box/satellite codes. ባ EXCLUSIVE TV buttons These buttons are removed from the from the remote control. Aim the remote at the front of your settop-box/satellite systems (refer ...to match the remote system of your settop-box/satellite receiver as stated above. If the set -top-box/satellite receiver and press the POWER button. In the unlikely event that matches your set-top- ባ box/satellite systems. 3. The Remote Control The Remote Control for Set-Top...
.... ቢ PRE-CODED SET-TOP-BOX/SATELLITE RECEIVER buttons These buttons transmit the chosen pre-coded settop-box/satellite codes. ባ EXCLUSIVE TV buttons These buttons are removed from the from the remote control. Aim the remote at the front of your settop-box/satellite systems (refer ...to match the remote system of your settop-box/satellite receiver as stated above. If the set -top-box/satellite receiver and press the POWER button. In the unlikely event that matches your set-top- ባ box/satellite systems. 3. The Remote Control The Remote Control for Set-Top...
Owners Guide
Page 33
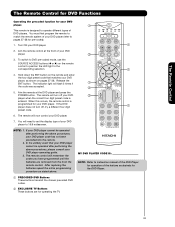
...player when the correct four digit preset code is designed to 16:9 widescreen. Aim the remote control at the DVD player and press the POWER button. Aim the remote at the front of your DVD player to operate different types of DVD players. NOTE: 1. The Remote Control ...system of the buttons exclusively for the DVD Player. ቢ PRECODED DVD Buttons These buttons transmit the chosen precoded DVD codes. ባ EXCLUSIVE TV Buttons These buttons are removed from the from the remote control. You must first program the remote to the corresponding selection. ቢ 4. ...
...player when the correct four digit preset code is designed to 16:9 widescreen. Aim the remote control at the DVD player and press the POWER button. Aim the remote at the front of your DVD player to operate different types of DVD players. NOTE: 1. The Remote Control ...system of the buttons exclusively for the DVD Player. ቢ PRECODED DVD Buttons These buttons transmit the chosen precoded DVD codes. ባ EXCLUSIVE TV Buttons These buttons are removed from the from the remote control. You must first program the remote to the corresponding selection. ቢ 4. ...
Owners Guide
Page 34
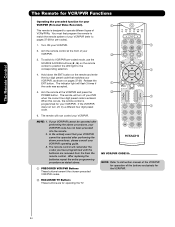
Aim the remote control at the VCR/PVR and press the ባ POWER button. The remote will flash 3 times if ቢ the code was accepted. 5....instruction manual of the VCR/PVR for operation of the buttons exclusively for the VCR/PVR. ባ EXCLUSIVE TV Buttons These buttons are removed from the from the remote control. The remote control will turn off your PVR ...light will now control your VCR/PVR. When this occurs, the remote control is programmed for operating the TV. 34 The remote will remember the codes you have programmed until the batteries are for your VCR/PVR...
Aim the remote control at the VCR/PVR and press the ባ POWER button. The remote will flash 3 times if ቢ the code was accepted. 5....instruction manual of the VCR/PVR for operation of the buttons exclusively for the VCR/PVR. ባ EXCLUSIVE TV Buttons These buttons are removed from the from the remote control. The remote control will turn off your PVR ...light will now control your VCR/PVR. When this occurs, the remote control is programmed for operating the TV. 34 The remote will remember the codes you have programmed until the batteries are for your VCR/PVR...

Owners Guide
Page 35
...off , try a different four digit preset code. 6. Repeat steps 1 - 6 if you have programmed until the batteries are for operating the TV. 35 If your Audio component cannot be operated after performing the above procedures, your Audio component operating guide. 3. In the unlikely event that ... to position the LED light to ባ the corresponding selection. 4. Aim the remote control at the Audio component and press ቢ the POWER button. Release the ENT button. The remote will flash 3 times if the code was accepted. 5. The remote control will turn off your ...
...off , try a different four digit preset code. 6. Repeat steps 1 - 6 if you have programmed until the batteries are for operating the TV. 35 If your Audio component cannot be operated after performing the above procedures, your Audio component operating guide. 3. In the unlikely event that ... to position the LED light to ባ the corresponding selection. 4. Aim the remote control at the Audio component and press ቢ the POWER button. Release the ENT button. The remote will flash 3 times if the code was accepted. 5. The remote control will turn off your ...
Owners Guide
Page 37
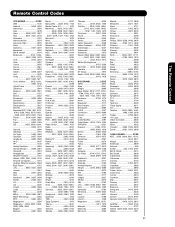
...HP 1972 Harley Davidson 0000 Harman/Kardon ......0038, 0081 Harwood 0072 Headquarter 0046 Hewlett Packard 1972 Hitachi 0000, 0041, 0042, 0105 Howard Computers............1972 Hughes Network Systems 0042 iBuy Power 1972 JVC 0067, 0041, 0008 Jensen 0041 KEC 0037, 0278 KLH 0072 Kenwood ......0041, 0067... 0699, 0769 Gateway 1073 Go Video ......0744, 0715, 0783 0833, 0869, 1075 Gradiente 0651 Greenhill 0717 Grundig 0705 Harman/Kardon 0702 Hitachi ..........0573, 0664, 0695 Hiteker 0672 IRT 0783 Initial 0717 Integra 0627 Hiteker 0672 JBL 0702 JVC......0623, 0558, 0867, 1901 KLH...
...HP 1972 Harley Davidson 0000 Harman/Kardon ......0038, 0081 Harwood 0072 Headquarter 0046 Hewlett Packard 1972 Hitachi 0000, 0041, 0042, 0105 Howard Computers............1972 Hughes Network Systems 0042 iBuy Power 1972 JVC 0067, 0041, 0008 Jensen 0041 KEC 0037, 0278 KLH 0072 Kenwood ......0041, 0067... 0699, 0769 Gateway 1073 Go Video ......0744, 0715, 0783 0833, 0869, 1075 Gradiente 0651 Greenhill 0717 Grundig 0705 Harman/Kardon 0702 Hitachi ..........0573, 0664, 0695 Hiteker 0672 IRT 0783 Initial 0717 Integra 0627 Hiteker 0672 JBL 0702 JVC......0623, 0558, 0867, 1901 KLH...
Owners Guide
Page 39
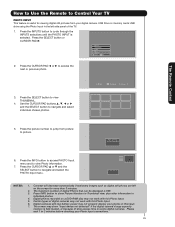
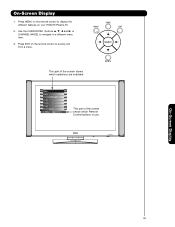
Press MENU on the remote control to display the different features on the remote control to quickly exit from a menu. This part of the screen shows which selections are available. On-Screen Display 1. Video Audio Channel Manager Locks Timers Setup Power Swivel Move SEL Select This part of the screen shows which Remote Control buttons to a different menu item. 3. Press EXIT on your HITACHI Plasma TV. 2. Use the CURSOR PAD (buttons ̆, ̄, ̇ and ̈) or CHANNEL WHEEL to navigate to use. On-Screen Display 39
Press MENU on the remote control to display the different features on the remote control to quickly exit from a menu. This part of the screen shows which selections are available. On-Screen Display 1. Video Audio Channel Manager Locks Timers Setup Power Swivel Move SEL Select This part of the screen shows which Remote Control buttons to a different menu item. 3. Press EXIT on your HITACHI Plasma TV. 2. Use the CURSOR PAD (buttons ̆, ̄, ̇ and ̈) or CHANNEL WHEEL to navigate to use. On-Screen Display 39


