

Owners Guide
Page 2
... cart, stand, tripod, bracket, or table specified by the manufacturer, or sold with arrowhead symbol, within an equilateral triangle, is required when the apparatus has been damaged in your HITACHI plasma television. caution when moving the cart/apparatus combination to avoid injury from it to HITACHI. Servicing... illustrates safety tips which could cause the product to comply with the CAUTION: TO REDUCE THE RISK OF ELECTRIC SHOCK, DO NOT REMOVE COVER (OR BACK). Read these instructions. 3. Clean only with one wider than the other. replacement of the polarized or cable ground...
... cart, stand, tripod, bracket, or table specified by the manufacturer, or sold with arrowhead symbol, within an equilateral triangle, is required when the apparatus has been damaged in your HITACHI plasma television. caution when moving the cart/apparatus combination to avoid injury from it to HITACHI. Servicing... illustrates safety tips which could cause the product to comply with the CAUTION: TO REDUCE THE RISK OF ELECTRIC SHOCK, DO NOT REMOVE COVER (OR BACK). Read these instructions. 3. Clean only with one wider than the other. replacement of the polarized or cable ground...
Owners Guide
Page 4
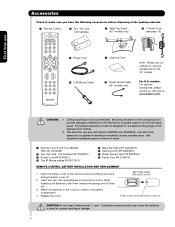
This plasma television product...or proper support for the front glass panel. Match the batteries to remove. Open the battery cover of stand. ³ Remote Control Unit CLU-3852WL (Part No. CAUTION: ... packing material. ³ Remote Control · Two "AA" size, 1.5V batteries ´ Table Top Stand (42" models only) º 1 Ferrite Core (see page 13) First time use » Power Cord &#....hitachi.us/tv CAUTION: 1. Mounting the panel on bottom of the remote control by pushing down and slide back to the (+) and (-) marks in the battery compartment. 4. Use with Hitachi 42HDS52 ...
This plasma television product...or proper support for the front glass panel. Match the batteries to remove. Open the battery cover of stand. ³ Remote Control Unit CLU-3852WL (Part No. CAUTION: ... packing material. ³ Remote Control · Two "AA" size, 1.5V batteries ´ Table Top Stand (42" models only) º 1 Ferrite Core (see page 13) First time use » Power Cord &#....hitachi.us/tv CAUTION: 1. Mounting the panel on bottom of the remote control by pushing down and slide back to the (+) and (-) marks in the battery compartment. 4. Use with Hitachi 42HDS52 ...
Owners Guide
Page 12
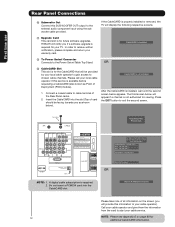
If the CableCARD is properly installed or removed, the TV will be facing towards you as Point of card should ...slot (Top of Deployment (POD) module). 1. Not an Authorized Channel Please take note of the Rear Panel Jacks. 2. HITACHI will notify you will appear if a channel is required for your cable service. 12 NOTE: Please see Appendix E on...789-1 Data: 123-456-789-1 Unit Address: 123-456-789-1 Press EXIT to the Power Swivel Table Top Stand. First time use Rear Panel Connections ቫ Subwoofer Out Connect this device, please contact your warranty card. Connect ...
If the CableCARD is properly installed or removed, the TV will be facing towards you as Point of card should ...slot (Top of Deployment (POD) module). 1. Not an Authorized Channel Please take note of the Rear Panel Jacks. 2. HITACHI will notify you will appear if a channel is required for your cable service. 12 NOTE: Please see Appendix E on...789-1 Data: 123-456-789-1 Unit Address: 123-456-789-1 Press EXIT to the Power Swivel Table Top Stand. First time use Rear Panel Connections ቫ Subwoofer Out Connect this device, please contact your warranty card. Connect ...
Owners Guide
Page 81
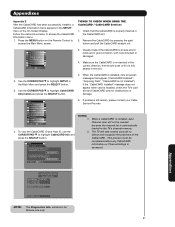
...When a CableCARD is properly inserted in the Main Menu and press the SELECT button. 3. window is installed, check the TV's card slot and CableCARD pins for obstructions or damage. Remove the CableCARD by pressing the eject button and pull the CableCARD straight out. Use the CURSOR PAD ̄ to access ...Cable Service Provider. Setup Menu Preference Screen Saver Set The Inputs Set AV NET Set Closed Captions Set Monitor Out CableCARD Information Upgrades Set Stand-By Mode Move SEL Select 4. Appendixes In order to start cable service for Service use the CURSOR PAD ̄ to access the ...
...When a CableCARD is properly inserted in the Main Menu and press the SELECT button. 3. window is installed, check the TV's card slot and CableCARD pins for obstructions or damage. Remove the CableCARD by pressing the eject button and pull the CableCARD straight out. Use the CURSOR PAD ̄ to access ...Cable Service Provider. Setup Menu Preference Screen Saver Set The Inputs Set AV NET Set Closed Captions Set Monitor Out CableCARD Information Upgrades Set Stand-By Mode Move SEL Select 4. Appendixes In order to start cable service for Service use the CURSOR PAD ̄ to access the ...


