

Owners Guide
Page 2
... the user to the presence of uninsulated "dangerous voltage" within an equilateral triangle, is used, use this discharge unit, connection to the CATV system installer: This reminder is connected to the receiver be discovered in the improbable event that produce heat. plasma television. 1. Heed all instructions. 5. Clean only with the apparatus. Do not block any heat sources such as power-supply cord or plug is...
... the user to the presence of uninsulated "dangerous voltage" within an equilateral triangle, is used, use this discharge unit, connection to the CATV system installer: This reminder is connected to the receiver be discovered in the improbable event that produce heat. plasma television. 1. Heed all instructions. 5. Clean only with the apparatus. Do not block any heat sources such as power-supply cord or plug is...
Owners Guide
Page 3
... box. This product incorporates copyright protection technology that are indicated on -screen displays such as improper changes or modifications not expressly approved by direct connection to view encrypted digital programming. Important Safety Instructions Power source This plasma television is designed to operate on -demand, a cable operator's enhanced program guide and data-enhanced television services may require the use the plasma television's (polarized) plug with an extension cord, receptacle, or other sources, may void the user...
... box. This product incorporates copyright protection technology that are indicated on -screen displays such as improper changes or modifications not expressly approved by direct connection to view encrypted digital programming. Important Safety Instructions Power source This plasma television is designed to operate on -demand, a cable operator's enhanced program guide and data-enhanced television services may require the use the plasma television's (polarized) plug with an extension cord, receptacle, or other sources, may void the user...
Owners Guide
Page 5
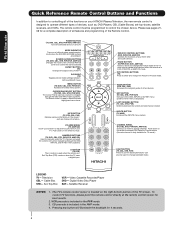
... color changes, and increased chance of set firmly in an exceptionally good signal area that is free from interference and multiple image ghosts, an indoor antenna may be sure that the location selected allows a free flow of the Plasma Rear Panel. Securing to a Wall 1. CONNECT POWER SWIVEL CABLE Connect one end of the Table Top Stand. Wood screw two places Securing to a table-top 1. C D NOTE: The Table Top Stand and Power Swivel cable for model 55HDS52...
... color changes, and increased chance of set firmly in an exceptionally good signal area that is free from interference and multiple image ghosts, an indoor antenna may be sure that the location selected allows a free flow of the Plasma Rear Panel. Securing to a Wall 1. CONNECT POWER SWIVEL CABLE Connect one end of the Table Top Stand. Wood screw two places Securing to a table-top 1. C D NOTE: The Table Top Stand and Power Swivel cable for model 55HDS52...
Owners Guide
Page 8
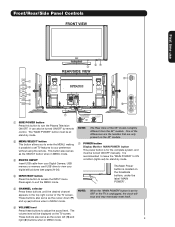
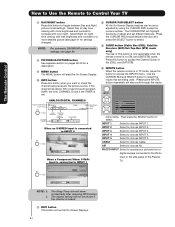
... for best results. 2. The remote control must be used to change the Picture-in the AMP mode. 4. MODE INDICATOR Turns on or blinks to control the chosen device. MENU BUTTON (TV, DVD, CBL, STB, PVR/VCR) Accesses the OSD menu system. PIP CONTROL BUTTONS (TV) Press to adjust the audio level of the Universal Remote Control to mute. INPUTS BUTTON (TV, AMP) Accesses the INPUTS menu system. Satellite Receiver NOTES: 1. CD precode is located on the screen, such as , DVD Players, CBL (Cable Boxes), set-top-boxes, satellite receivers...
... for best results. 2. The remote control must be used to change the Picture-in the AMP mode. 4. MODE INDICATOR Turns on or blinks to control the chosen device. MENU BUTTON (TV, DVD, CBL, STB, PVR/VCR) Accesses the OSD menu system. PIP CONTROL BUTTONS (TV) Press to adjust the audio level of the Universal Remote Control to mute. INPUTS BUTTON (TV, AMP) Accesses the INPUTS menu system. Satellite Receiver NOTES: 1. CD precode is located on the screen, such as , DVD Players, CBL (Cable Boxes), set-top-boxes, satellite receivers...
Owners Guide
Page 9
...; VIDEO S-VIDEO ̆ INPUT 5 L/MONO AUDIO R ቨ ቢ SIDE POWER button Press this button to access the INPUT menu. The "MAIN POWER" button must be turned ON/OFF manually. These buttons also serve as the SELECT button when in the top right corner of the TV screen. NOTE: The Rear View of the differences are the handles that are only present on the 42" models. ቨ POWER button Display Monitor MAIN POWER button This power button is for stand-by mode...
...; VIDEO S-VIDEO ̆ INPUT 5 L/MONO AUDIO R ቨ ቢ SIDE POWER button Press this button to access the INPUT menu. The "MAIN POWER" button must be turned ON/OFF manually. These buttons also serve as the SELECT button when in the top right corner of the TV screen. NOTE: The Rear View of the differences are the handles that are only present on the 42" models. ቨ POWER button Display Monitor MAIN POWER button This power button is for stand-by mode...

Owners Guide
Page 10
... sync. Your HITACHI Plasma TV will illuminate. Check the Power Light to make sure the Display Monitor is set to be turned OFF (lights orange) if there is ON with no signal input except antenna (no video input when VIDEO: 1, 2, 3, 4 and 5. Remote Control can not turn the monitor ON, press the main power switch located on the lower right corner of the front bezel will appear to OFF. A red stand-by mode (lights red) when not in use. 2. Press the INPUTS button...
... sync. Your HITACHI Plasma TV will illuminate. Check the Power Light to make sure the Display Monitor is set to be turned OFF (lights orange) if there is ON with no signal input except antenna (no video input when VIDEO: 1, 2, 3, 4 and 5. Remote Control can not turn the monitor ON, press the main power switch located on the lower right corner of the front bezel will appear to OFF. A red stand-by mode (lights red) when not in use. 2. Press the INPUTS button...
Owners Guide
Page 11
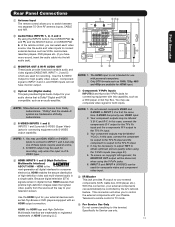
... trademarks or registered Do not connect anything to the TV's PR input. 4. S-VIDEO has priority over VIDEO input. 2. INPUT 3 and INPUT 4 (Y/VIDEO) can select each video source. Because digital television (DTV) signals remain in TV mode. Rear Panel Connections First time use ቢ Antenna Input ቢ ባቨቩ ቧ The remote control allows you to switch between two separate 75-Ohm RF antenna inputs, CABLE and AIR. ቤ ቦ ባ Audio/Video INPUTS 1, 2, 3 and 4 By using the INPUTS button, the CURSOR PAD (̆ and...
... trademarks or registered Do not connect anything to the TV's PR input. 4. S-VIDEO has priority over VIDEO input. 2. INPUT 3 and INPUT 4 (Y/VIDEO) can select each video source. Because digital television (DTV) signals remain in TV mode. Rear Panel Connections First time use ቢ Antenna Input ቢ ባቨቩ ቧ The remote control allows you to switch between two separate 75-Ohm RF antenna inputs, CABLE and AIR. ቤ ቦ ባ Audio/Video INPUTS 1, 2, 3 and 4 By using the INPUTS button, the CURSOR PAD (̆ and...
Owners Guide
Page 13
... Side Panel INPUT 5 Left Side Panel INPUT 5 R L/MONO ̆ AUDIO VIDEO S-VIDEO PHOTO INPUT R L/MONO ̆ AUDIO VIDEO S-VIDEO PHOTO INPUT S-Video Cable (Optional, see page 24). However, you use to connect the VCR, camcorder, laserdisc player, DVD player, or HDTV Set Top Box to your choice. Use the CURSOR PAD (̆ and ̄) to pinch the cable. Fold and close the ferrite core while being careful not to select the Antenna or Input of your Plasma TV is...
... Side Panel INPUT 5 Left Side Panel INPUT 5 R L/MONO ̆ AUDIO VIDEO S-VIDEO PHOTO INPUT R L/MONO ̆ AUDIO VIDEO S-VIDEO PHOTO INPUT S-Video Cable (Optional, see page 24). However, you use to connect the VCR, camcorder, laserdisc player, DVD player, or HDTV Set Top Box to your choice. Use the CURSOR PAD (̆ and ̄) to pinch the cable. Fold and close the ferrite core while being careful not to select the Antenna or Input of your Plasma TV is...

Owners Guide
Page 17
... HDTV set top box or DVD player to a display. 4. Completely insert the connection cord plugs when connecting to the INPUT (AUDIO/R) jack as your HDMI INPUT (1 or 2). The picture and sound that encrypts video signals when using a DVI to view the program from the AUDIO OUT L of uncompressed video to the HDMI input as shown on the Rear Panel below . 2. HDMI is loose. 2. The connected digital output device controls the HDMI interface so proper setup of the HDTV set top box or DVD player to rear panel jacks. When using HDMI connections to HDMI Cable LR OUTPUT DIGITAL OUTPUT...
... HDTV set top box or DVD player to a display. 4. Completely insert the connection cord plugs when connecting to the INPUT (AUDIO/R) jack as your HDMI INPUT (1 or 2). The picture and sound that encrypts video signals when using a DVI to view the program from the AUDIO OUT L of uncompressed video to the HDMI input as shown on the Rear Panel below . 2. HDMI is loose. 2. The connected digital output device controls the HDMI interface so proper setup of the HDTV set top box or DVD player to rear panel jacks. When using HDMI connections to HDMI Cable LR OUTPUT DIGITAL OUTPUT...
Owners Guide
Page 18
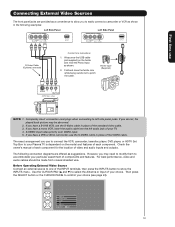
... the INPUT (AUDIO/R) jack. 5. Press the INPUTS button, then select INPUT 4 from the Laserdisc/DVD player or HDTV set top box to the INPUT (AUDIO/L) jack. 6. OUTPUT L R Y PB PR OR HDTV Set-Top Box OUTPUT Back of the Laserdisc/DVD player or HDTV set top box. 7. See page 15 for tips on the Rear The picture and sound that is loose. 2. Select CABLE or AIR to return to view the program from the INPUTS menu to the last channel tuned. First time use Connecting External Video Sources CONNECTING...
... the INPUT (AUDIO/R) jack. 5. Press the INPUTS button, then select INPUT 4 from the Laserdisc/DVD player or HDTV set top box to the INPUT (AUDIO/L) jack. 6. OUTPUT L R Y PB PR OR HDTV Set-Top Box OUTPUT Back of the Laserdisc/DVD player or HDTV set top box. 7. See page 15 for tips on the Rear The picture and sound that is loose. 2. Select CABLE or AIR to return to view the program from the INPUTS menu to the last channel tuned. First time use Connecting External Video Sources CONNECTING...

Owners Guide
Page 19
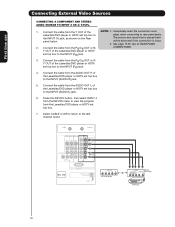
... VIDEO out jack on the TV Rear Panel. Optional R L V S-VIDEO INPUT VCR or other external components 3. It does not output component video. 1. Connect the cable from the INPUTS menu to return to the OUTPUT (AUDIO/L) jack on the TV Rear Panel. 2. Connect the cable from the VCR or the laserdisc player. 4. Press the INPUTS button, then select INPUT 2 from the INPUTS menu to view the program from the AUDIO OUT of the VCR or the laserdisc player to the previous channel...
... VIDEO out jack on the TV Rear Panel. Optional R L V S-VIDEO INPUT VCR or other external components 3. It does not output component video. 1. Connect the cable from the INPUTS menu to return to the OUTPUT (AUDIO/L) jack on the TV Rear Panel. 2. Connect the cable from the VCR or the laserdisc player. 4. Press the INPUTS button, then select INPUT 2 from the INPUTS menu to view the program from the AUDIO OUT of the VCR or the laserdisc player to the previous channel...
Owners Guide
Page 20
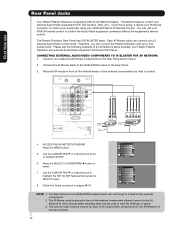
... Rear Panel. 3. CONNECTING EXTERNAL AUDIO/VIDEO COMPONENTS TO IR BLASTER FOR AV NETWORK 1. Use the CURSOR PAD ̄ or channel scroll to select. 7. Video Audio Channel Manager Locks Timers Setup Power Swivel Move SEL Select Setup Menu Preference Screen Saver Set The Inputs Set AV NET Set Closed Captions Set Monitor Out Upgrades Quick Start Up Move SEL Return NOTE: 1. Place the IR mouse in place. 3. On-Screen Display The Remote Control First time use your HITACHI Plasma TV Remote Control. Once this is equipped with up to control the Audio/Video...
... Rear Panel. 3. CONNECTING EXTERNAL AUDIO/VIDEO COMPONENTS TO IR BLASTER FOR AV NETWORK 1. Use the CURSOR PAD ̄ or channel scroll to select. 7. Video Audio Channel Manager Locks Timers Setup Power Swivel Move SEL Select Setup Menu Preference Screen Saver Set The Inputs Set AV NET Set Closed Captions Set Monitor Out Upgrades Quick Start Up Move SEL Return NOTE: 1. Place the IR mouse in place. 3. On-Screen Display The Remote Control First time use your HITACHI Plasma TV Remote Control. Once this is equipped with up to control the Audio/Video...

Owners Guide
Page 21
... your HITACHI Plasma TV, the new remote control is designed to control your set-top-box). NOTE: When you have a satellite receiver, use this time. Place the Remote Control in one touch. The STB mode indicator will blink, indicating that the remote will now control your set-top-box (see page 35 for instruction on how to program the remote to control your DVD player). 21 To operate additional audio equipment, point the remote at the remote sensor...
... your HITACHI Plasma TV, the new remote control is designed to control your set-top-box). NOTE: When you have a satellite receiver, use this time. Place the Remote Control in one touch. The STB mode indicator will blink, indicating that the remote will now control your set-top-box (see page 35 for instruction on how to program the remote to control your DVD player). 21 To operate additional audio equipment, point the remote at the remote sensor...
Owners Guide
Page 24
... used. Select Day for day time viewing with more brightness and contrast to INPUT 3 S-IN:3 480i 11:00PM INFO Day CC Off 4:3 Expanded When a Component Video: Y-PbPr Input is locked. ቭ EXIT button This button will exit all On-Screen Displays. 24 AM --:-- PM ST TV-14 V Audio Broadcast Broadcast Rating Closed Captioning Day CC Off Cable 6 11:00PM Aspect Mode 16:9 Standard Main Picture Source Time When an S-VIDEO Input is connected...
... used. Select Day for day time viewing with more brightness and contrast to INPUT 3 S-IN:3 480i 11:00PM INFO Day CC Off 4:3 Expanded When a Component Video: Y-PbPr Input is locked. ቭ EXIT button This button will exit all On-Screen Displays. 24 AM --:-- PM ST TV-14 V Audio Broadcast Broadcast Rating Closed Captioning Day CC Off Cable 6 11:00PM Aspect Mode 16:9 Standard Main Picture Source Time When an S-VIDEO Input is connected...
Owners Guide
Page 32
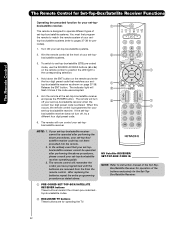
... POWER button. Aim the remote at the front of the buttons exclusively for the Set-TopBox/Satellite Receiver. ቢ PRE-CODED SET-TOP-BOX/SATELLITE RECEIVER buttons These buttons transmit the chosen pre-coded settop-box/satellite codes. ባ EXCLUSIVE TV buttons These buttons are removed from the from the remote control. To switch to pages 37-38 for precodes). 1. In the unlikely event that matches your set -top-box/satellite (STB) pre-coded mode, use the SOURCE...
... POWER button. Aim the remote at the front of the buttons exclusively for the Set-TopBox/Satellite Receiver. ቢ PRE-CODED SET-TOP-BOX/SATELLITE RECEIVER buttons These buttons transmit the chosen pre-coded settop-box/satellite codes. ባ EXCLUSIVE TV buttons These buttons are removed from the from the remote control. To switch to pages 37-38 for precodes). 1. In the unlikely event that matches your set -top-box/satellite (STB) pre-coded mode, use the SOURCE...
Owners Guide
Page 40
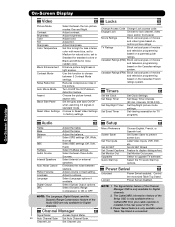
... cable operator is installed in the rear panel of the Audio OSD are only available for Digital channels. 2. Set this function to Standard for standard colors or Black and White for TV programs. On-Screen Display AudAiuodio Treble Bass Balance SRS BBE TruBass Audio Source Internal Speakers Auto Noise Cancel Perfect Volume Loudness Language Digital Output DRC Adjust the treble. Enhance picture brightness in standard mode. ChaCnhnaenlnMeal nMaagnearger Signal Meter Access Signal Meter. 40 Auto Channel Scan Set Auto Channel Scan. Control the motorized Table Top Stand...
... cable operator is installed in the rear panel of the Audio OSD are only available for Digital channels. 2. Set this function to Standard for standard colors or Black and White for TV programs. On-Screen Display AudAiuodio Treble Bass Balance SRS BBE TruBass Audio Source Internal Speakers Auto Noise Cancel Perfect Volume Loudness Language Digital Output DRC Adjust the treble. Enhance picture brightness in standard mode. ChaCnhnaenlnMeal nMaagnearger Signal Meter Access Signal Meter. 40 Auto Channel Scan Set Auto Channel Scan. Control the motorized Table Top Stand...
Owners Guide
Page 58
... select your HITACHI Plasma TV Remote Control. Use the CURSOR PAD ̄ or CHANNEL WHEEL to select. NOTE: 1. When using REMOTE mode, any of your VCR, laserdisc player, or DVD player. Screen Saver Set The Inputs Set AV NET Set Closed Captions 5. Press the SELECT button to or highlight SET AV NET feature. Once the TV has been turned on your remote control is used again. However, intended operation is now reset and will turn your external Audio/Video equipment using the AUTO LINK...
... select your HITACHI Plasma TV Remote Control. Use the CURSOR PAD ̄ or CHANNEL WHEEL to select. NOTE: 1. When using REMOTE mode, any of your VCR, laserdisc player, or DVD player. Screen Saver Set The Inputs Set AV NET Set Closed Captions 5. Press the SELECT button to or highlight SET AV NET feature. Once the TV has been turned on your remote control is used again. However, intended operation is now reset and will turn your external Audio/Video equipment using the AUTO LINK...
Owners Guide
Page 69
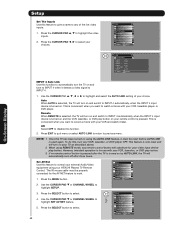
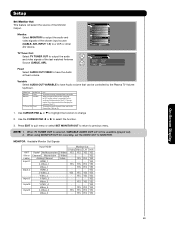
... YES YES Video_1 - Setup Menu Preference Screen Saver Set The Inputs Set AV NET Set Closed Captions Set Monitor Out Upgrades Set Stand-by changing the volume of the last watched Antenna OR Video Out : Monitor Source (CABLE, AIR). YES Cable) Analog Channel Video - Video Out Monitor Monitor Audio Out Fixed Variable TV Tuner Out Fixed Use To record currently viewed Video and Audio. YES YES YES Input4 Y-PbPr_4 - - - YES Video_4 - Press EXIT to quit menu or select SET MONITOR OUT to return to output the audio Setup Set Monitor Out and video signals of the...
... YES YES Video_1 - Setup Menu Preference Screen Saver Set The Inputs Set AV NET Set Closed Captions Set Monitor Out Upgrades Set Stand-by changing the volume of the last watched Antenna OR Video Out : Monitor Source (CABLE, AIR). YES Cable) Analog Channel Video - Video Out Monitor Monitor Audio Out Fixed Variable TV Tuner Out Fixed Use To record currently viewed Video and Audio. YES YES YES Input4 Y-PbPr_4 - - - YES Video_4 - Press EXIT to quit menu or select SET MONITOR OUT to return to output the audio Setup Set Monitor Out and video signals of the...
Owners Guide
Page 76
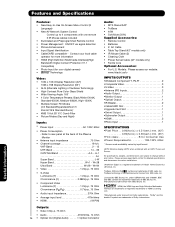
... Mute (50%) Supplied Accessories: • Remote Control • Batteries • 6' AC Cable • Table Top Stand (42" models only) • IR Mouse Cable (2) • Cleaning Cloth • Power Swivel Cable (42" models only) • Ferrite Core Optional Accessories: • For U.S. Please access www.hitachi.com/tv for detailed specifications and dimensions for your digital camera) • Technology Video: • 1024 x 1024 Display Resolution (42") 1366 x 768 Display Resolution (55") • ALiS (Alternate Lighting of Surfaces...
... Mute (50%) Supplied Accessories: • Remote Control • Batteries • 6' AC Cable • Table Top Stand (42" models only) • IR Mouse Cable (2) • Cleaning Cloth • Power Swivel Cable (42" models only) • Ferrite Core Optional Accessories: • For U.S. Please access www.hitachi.com/tv for detailed specifications and dimensions for your digital camera) • Technology Video: • 1024 x 1024 Display Resolution (42") 1366 x 768 Display Resolution (55") • ALiS (Alternate Lighting of Surfaces...
Owners Guide
Page 79
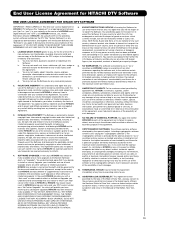
... a HITACHI brand digital television (the "DTV"), and HITACHI America, Ltd., Home Electronics Division ("HITACHI"). IF YOU DO NOT AGREE WITH ALL THE TERMS AND CONDITIONS OF THIS AGREEMENT OR ALL THE TERMS AND CONDITIONS OF ANY DIFFERENT OR SUPPLEMENTARY LICENSE THAT MAY ACCOMPANY SUCH UPGRADE, (A) DO NOT USE ANY HITACHI-PROVIDED FLASH CARD OR OTHER MEDIA, (B) DO NOT PERFORM INSTALL ANY HITACHI-PROVIDED UPGRADE SOFTWARE...
... a HITACHI brand digital television (the "DTV"), and HITACHI America, Ltd., Home Electronics Division ("HITACHI"). IF YOU DO NOT AGREE WITH ALL THE TERMS AND CONDITIONS OF THIS AGREEMENT OR ALL THE TERMS AND CONDITIONS OF ANY DIFFERENT OR SUPPLEMENTARY LICENSE THAT MAY ACCOMPANY SUCH UPGRADE, (A) DO NOT USE ANY HITACHI-PROVIDED FLASH CARD OR OTHER MEDIA, (B) DO NOT PERFORM INSTALL ANY HITACHI-PROVIDED UPGRADE SOFTWARE...


