
Owners Guide
Page 2
Please fill out your product model. NO USER SERVICEABLE PARTS INSIDE. NOTE: • There are no user serviceable parts inside the AVC center/display monitor. • Model and serial numbers are not expressly approved by HITACHI could void the user's authority to operate the Plasma Television. MODIFICATIONS: The FCC requires the user to you to persons. POWER SOURCE THIS PLASMA TELEVISION IS DESIGNED TO OPERATE ON 120 VOLTS 60Hz, AC CURRENT. Follow...
Please fill out your product model. NO USER SERVICEABLE PARTS INSIDE. NOTE: • There are no user serviceable parts inside the AVC center/display monitor. • Model and serial numbers are not expressly approved by HITACHI could void the user's authority to operate the Plasma Television. MODIFICATIONS: The FCC requires the user to you to persons. POWER SOURCE THIS PLASMA TELEVISION IS DESIGNED TO OPERATE ON 120 VOLTS 60Hz, AC CURRENT. Follow...
Owners Guide
Page 3
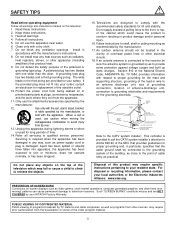
... close to the point of the video program material. 3 Use only with the cart, stand, tripod, bracket, or table specified by the manufacturer. 17. SAFETY TIPS Read before operating equipment Follow all warnings and instructions marked on this apparatus near any way, such as power-supply cord or plug is grounded so as programs from other fixed (nonmoving) patterns can cause permanent damage to television receivers. Such "SCREEN BURNS...
... close to the point of the video program material. 3 Use only with the cart, stand, tripod, bracket, or table specified by the manufacturer. 17. SAFETY TIPS Read before operating equipment Follow all warnings and instructions marked on this apparatus near any way, such as power-supply cord or plug is grounded so as programs from other fixed (nonmoving) patterns can cause permanent damage to television receivers. Such "SCREEN BURNS...
Owners Guide
Page 4
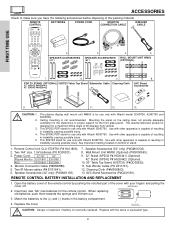
PDP TV STAND (OPTIONAL) 50STD3 Table Top Stand Subwoofer Cable Cleaning Cloth 32" (SPD32 P#H520441) 42" (SPD42 P#H520442) 8. See important marking located on bottom of explosion if battery is incorrectly replaced. REMOTE CONTROL BATTERY INSTALLATION AND REPLACEMENT 1. CAUTION: Danger of stand. 1. This plasma television product is capable of resulting in instability causing possible injury. This SPD32 PDP stand for the front glass panel. Use with Hitachi 42HDT50. Wall Mount Unit WM50 (Optional...
PDP TV STAND (OPTIONAL) 50STD3 Table Top Stand Subwoofer Cable Cleaning Cloth 32" (SPD32 P#H520441) 42" (SPD42 P#H520442) 8. See important marking located on bottom of explosion if battery is incorrectly replaced. REMOTE CONTROL BATTERY INSTALLATION AND REPLACEMENT 1. CAUTION: Danger of stand. 1. This plasma television product is capable of resulting in instability causing possible injury. This SPD32 PDP stand for the front glass panel. Use with Hitachi 42HDT50. Wall Mount Unit WM50 (Optional...

Owners Guide
Page 6
... AC cords. 3. POWER STANDBY (RED) ON (GREEN) VOL- CH+ INPUT/EXIT AUDIO VIDEO CONTROL CENTER PULL AUDIO VIDEO CONTROL CENTER CH+ INPUT/EXIT CH- Secure the monitor to a centralized antenna system, a good outdoor color TV antenna is connected to a cable TV system or to the wall as shown below . 10cm (4 inches) or more Stabilization bolts (Provided) Wood Screw 32" Wire Wood screw two places 50" AVC Vertical Position (Using AVC Stand) 1. To avoid cabinet warping, cabinet color changes, and...
... AC cords. 3. POWER STANDBY (RED) ON (GREEN) VOL- CH+ INPUT/EXIT AUDIO VIDEO CONTROL CENTER PULL AUDIO VIDEO CONTROL CENTER CH+ INPUT/EXIT CH- Secure the monitor to a centralized antenna system, a good outdoor color TV antenna is connected to a cable TV system or to the wall as shown below . 10cm (4 inches) or more Stabilization bolts (Provided) Wood Screw 32" Wire Wood screw two places 50" AVC Vertical Position (Using AVC Stand) 1. To avoid cabinet warping, cabinet color changes, and...
Owners Guide
Page 7
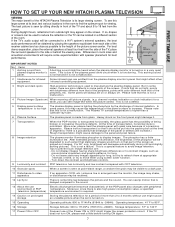
... the picture screen center. This is its best, test various locations in the room to -2484ft). Moreover, since there is also high power consumption value, a specified television (temperature) temperature environment is turned on in a different section of the room. If the TV does not turn ON, please wait a little before turning ON again. 7 HOW TO SET UP YOUR NEW HITACHI PLASMA TELEVISION FIRST TIME USE VIEWING The...
... the picture screen center. This is its best, test various locations in the room to -2484ft). Moreover, since there is also high power consumption value, a specified television (temperature) temperature environment is turned on in a different section of the room. If the TV does not turn ON, please wait a little before turning ON again. 7 HOW TO SET UP YOUR NEW HITACHI PLASMA TELEVISION FIRST TIME USE VIEWING The...
Owners Guide
Page 8
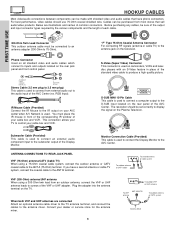
... rear jack panel and front control panel. RGB Input). You must be connected to an antenna adapter (300-Ohm to the ANT A (75-Ohm) terminal. S-Video (Super Video) Connector This connector is used to connect the Display Monitor to the subwoofer output of the Display Monitor. Subwoofer Cable (Provided) This cable is used to connect an external audio component input to the AVC Center. Before purchasing any cables, be set correctly to inputs and outputs located on the television. FIRST TIME USE...
... rear jack panel and front control panel. RGB Input). You must be connected to an antenna adapter (300-Ohm to the ANT A (75-Ohm) terminal. S-Video (Super Video) Connector This connector is used to connect the Display Monitor to the subwoofer output of the Display Monitor. Subwoofer Cable (Provided) This cable is used to connect an external audio component input to the AVC Center. Before purchasing any cables, be set correctly to inputs and outputs located on the television. FIRST TIME USE...
Owners Guide
Page 10
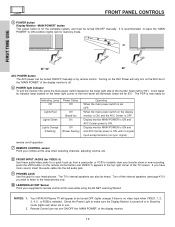
... area while using the AV NET Learning Wizard. Your HITACHI Plasma TV will only turn the monitor ON, press the main power switch located on the lower right corner of the TV screen. Remote Control can also be turned ON/OFF manually or by ) On Lights Orange Off (Flashing) (Power Saving) Operating When the main power switch is ON. FRONT PANEL CONTROLS ቦ POWER button Display Monitor "MAIN POWER" button This power button is for a quick hook-up from...
... area while using the AV NET Learning Wizard. Your HITACHI Plasma TV will only turn the monitor ON, press the main power switch located on the lower right corner of the TV screen. Remote Control can also be turned ON/OFF manually or by ) On Lights Orange Off (Flashing) (Power Saving) Operating When the main power switch is ON. FRONT PANEL CONTROLS ቦ POWER button Display Monitor "MAIN POWER" button This power button is for a quick hook-up from...

Owners Guide
Page 11
... AVC Box's PB input and the components R-Y output to connect external devices, such as a DVD player or Set Top Box. It may be labeled Y-CBCR. S-VIDEO output may be displayed as a main picture (ANT B cannot be necessary to adjust TINT to Input 3, 4 or 5 at a time. 2. INPUT 1 does not accept composite video signal. TO MONITOR ቫ INPUT 1 R R AUDIO OUT RGB AC IN TruBass SRS and symbol are pressed. FIRST TIME USE REAR PANEL JACKS 32"/42" Monitor Bottom View REAR PANEL...
... AVC Box's PB input and the components R-Y output to connect external devices, such as a DVD player or Set Top Box. It may be labeled Y-CBCR. S-VIDEO output may be displayed as a main picture (ANT B cannot be necessary to adjust TINT to Input 3, 4 or 5 at a time. 2. INPUT 1 does not accept composite video signal. TO MONITOR ቫ INPUT 1 R R AUDIO OUT RGB AC IN TruBass SRS and symbol are pressed. FIRST TIME USE REAR PANEL JACKS 32"/42" Monitor Bottom View REAR PANEL...
Owners Guide
Page 14
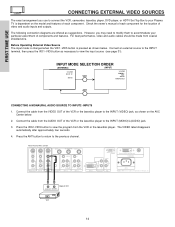
... program from the AUDIO OUT of the VCR or the laserdisc player to accommodate your Plasma TV is pressed as necessary to the previous channel. Press the ANT button to return to view the input source (see page 31). Back of SRS Labs, Inc. FIRST TIME USE CONNECTING EXTERNAL VIDEO SOURCES The exact arrangement you may need to modify them to the INPUT (VIDEO) jack, as suggestions. Connect the cable...
... program from the AUDIO OUT of the VCR or the laserdisc player to accommodate your Plasma TV is pressed as necessary to the previous channel. Press the ANT button to return to view the input source (see page 31). Back of SRS Labs, Inc. FIRST TIME USE CONNECTING EXTERNAL VIDEO SOURCES The exact arrangement you may need to modify them to the INPUT (VIDEO) jack, as suggestions. Connect the cable...

Owners Guide
Page 16
...AUDIO INPUT 1 ANALOG INPUT L AUDIO DVI-HDTV L/(MONO) AUDIO Please use HITACHI specified cable. Completely insert the connection cord plugs when connecting to the INPUT (AUDIO/L) jack. 4. Connect the cable from the HDTV set top box or DVD player to the previous channel. Press the VID1 button to a display. 4. Back of SRS Labs, Inc. FIRST TIME USE CONNECTING EXTERNAL VIDEO SOURCES CONNECTING S-VIDEO VCR OR LASERDISC PLAYER 1. The connected digital output device controls the DVI interface so proper set top box or DVD player to the INPUT (AUDIO/R) jack. 3. Rear...
...AUDIO INPUT 1 ANALOG INPUT L AUDIO DVI-HDTV L/(MONO) AUDIO Please use HITACHI specified cable. Completely insert the connection cord plugs when connecting to the INPUT (AUDIO/L) jack. 4. Connect the cable from the HDTV set top box or DVD player to the previous channel. Press the VID1 button to a display. 4. Back of SRS Labs, Inc. FIRST TIME USE CONNECTING EXTERNAL VIDEO SOURCES CONNECTING S-VIDEO VCR OR LASERDISC PLAYER 1. The connected digital output device controls the DVI interface so proper set top box or DVD player to the INPUT (AUDIO/R) jack. 3. Rear...

Owners Guide
Page 26
..., two, or three numbers to the channel display on your TV, then enter the remaining two numbers using the number buttons. Once set . 3:32 PM Ant A 22 Stereo R 1080i Format Time Main Picture Source Audio Broadcast Broadcast Rating Signal Format 3:32 PM S-IN:3 VID 3 When an S-VIDEO Input is connected to VIDEO: 3. Channel selection may not receive some channels if you are used to select channels, lock access code, etc. NOTE: The Plasma TV may also be...
..., two, or three numbers to the channel display on your TV, then enter the remaining two numbers using the number buttons. Once set . 3:32 PM Ant A 22 Stereo R 1080i Format Time Main Picture Source Audio Broadcast Broadcast Rating Signal Format 3:32 PM S-IN:3 VID 3 When an S-VIDEO Input is connected to VIDEO: 3. Channel selection may not receive some channels if you are used to select channels, lock access code, etc. NOTE: The Plasma TV may also be...
Owners Guide
Page 27
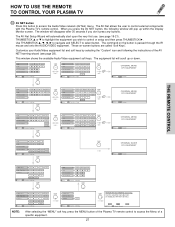
... Cable Box Set Top Box Custom SETUP Move INFO Device Setting THUMB STICK HITACHI AV NET WIZARD (Learning) Use this button to access the Audio/Video network (AV Net) menu. These on the button is passed through the IR mouse and onto the AUDIO/VIDEO equipment. The equipment list will scroll up within the Display Monitor screen. DVD VCR PV Recorder AV Receiver POWER 1 4 7 Move SEL Previous Page MENU 2 5 8 0 MORE 3 6 9 THUMB STICK SELECT MENU MENU ORIGINAL MENU...
... Cable Box Set Top Box Custom SETUP Move INFO Device Setting THUMB STICK HITACHI AV NET WIZARD (Learning) Use this button to access the Audio/Video network (AV Net) menu. These on the button is passed through the IR mouse and onto the AUDIO/VIDEO equipment. The equipment list will scroll up within the Display Monitor screen. DVD VCR PV Recorder AV Receiver POWER 1 4 7 Move SEL Previous Page MENU 2 5 8 0 MORE 3 6 9 THUMB STICK SELECT MENU MENU ORIGINAL MENU...
Owners Guide
Page 28
... allows the user to use equipment that is not supported by using the Plasma TV remote control. Highlight CUSTOM, and THUMBSTICK ̈ to continue. Select MODIFY to make changes on page 21. TV Softkeys POWER MENU Done Move Continue SEL Select SELECT EXIT No Done THUMB STICK SELECT HITACHI AV NET WIZARD (Learning) DVD2 (Custom) Video Input Audio Input No Connection No Connection Transmission Test POWER PLAY CH UP...
... allows the user to use equipment that is not supported by using the Plasma TV remote control. Highlight CUSTOM, and THUMBSTICK ̈ to continue. Select MODIFY to make changes on page 21. TV Softkeys POWER MENU Done Move Continue SEL Select SELECT EXIT No Done THUMB STICK SELECT HITACHI AV NET WIZARD (Learning) DVD2 (Custom) Video Input Audio Input No Connection No Connection Transmission Test POWER PLAY CH UP...

Owners Guide
Page 36
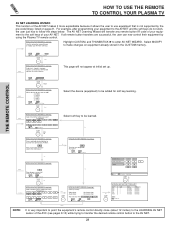
... the remote command set of the buttons exclusively for the Cable Box. 36 NOTES: 1. This remote is programmed for your cable box. 2. After replacing the batteries repeat the entire programming procedure as the cable box ENTER button if required. 5. If the cable box does not turn off , try a different two digit preset code. 6. THE REMOTE CONTROL MENU LAST CH GUIDE/TV SCHD VID 4 VID 5 POWER STB CBL VCRSOURCE WIZARTDAPE AMP 3 TV CD DVD 1 2 5 6 9 4 7 8 INFO MODE 0 ASPECT...
... the remote command set of the buttons exclusively for the Cable Box. 36 NOTES: 1. This remote is programmed for your cable box. 2. After replacing the batteries repeat the entire programming procedure as the cable box ENTER button if required. 5. If the cable box does not turn off , try a different two digit preset code. 6. THE REMOTE CONTROL MENU LAST CH GUIDE/TV SCHD VID 4 VID 5 POWER STB CBL VCRSOURCE WIZARTDAPE AMP 3 TV CD DVD 1 2 5 6 9 4 7 8 INFO MODE 0 ASPECT...
Owners Guide
Page 37
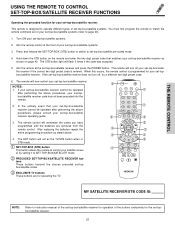
... two digit preset code. 6. The remote will flash 3 times if the code was accepted. 5. The STB button light will turn off your set -topbox/satellite codes. ቤ EXCLUSIVE TV buttons These buttons are removed from the remote control. After replacing the batteries repeat the entire programming procedure as stated above procedures, your set -top-box/satellite receiver as the TV/STB button when in STB mode. ቢ SET-TOP-BOX (STB) button This button allows the remote to control...
... two digit preset code. 6. The remote will flash 3 times if the code was accepted. 5. The STB button light will turn off your set -topbox/satellite codes. ቤ EXCLUSIVE TV buttons These buttons are removed from the remote control. After replacing the batteries repeat the entire programming procedure as stated above procedures, your set -top-box/satellite receiver as the TV/STB button when in STB mode. ቢ SET-TOP-BOX (STB) button This button allows the remote to control...

Owners Guide
Page 42
... Scan, and Lock settings in the picture. Set specific time to maintain constant color levels even after a program or channel changes. Manager Locks Setup Picture Mode Contrast Brightness Color Tint Sharpness Color Temperature Black Enhancement Contrast Mode Reset Video Settings Color Management Color Decoding Auto Color Noise Reduction Auto Movie Mode OSD (On-Screen Display) Select between the two picture modes; Adjust color. It also maintains natural flesh tones while preserving fidelity of movies and television programming based on and off when watching 4:3 signals in fixed setting...
... Scan, and Lock settings in the picture. Set specific time to maintain constant color levels even after a program or channel changes. Manager Locks Setup Picture Mode Contrast Brightness Color Tint Sharpness Color Temperature Black Enhancement Contrast Mode Reset Video Settings Color Management Color Decoding Auto Color Noise Reduction Auto Movie Mode OSD (On-Screen Display) Select between the two picture modes; Adjust color. It also maintains natural flesh tones while preserving fidelity of movies and television programming based on and off when watching 4:3 signals in fixed setting...

Owners Guide
Page 45
... User Colors setting. Press down on THUMB STICK to default settings. Use THUMBSTICK ̄ to highlight and adjust individual colors. THUMB STICK SELECT Video Picture Mode Contrast Brightness Color Tint Sharpness Color Temperature Black Enhancement Contrast Mode Reset Video Settings Move SEL Select ANT A/B Day 100% 50% 50% Night 50% High High Dynamic THUMB STICK Video Color Management Color Decoding Auto Color Noise Reduction Auto Movie Mode Move SEL Select ANT A/B Off Low Off ON-SCREEN DISPLAY Color...
... User Colors setting. Press down on THUMB STICK to default settings. Use THUMBSTICK ̄ to highlight and adjust individual colors. THUMB STICK SELECT Video Picture Mode Contrast Brightness Color Tint Sharpness Color Temperature Black Enhancement Contrast Mode Reset Video Settings Move SEL Select ANT A/B Day 100% 50% 50% Night 50% High High Dynamic THUMB STICK Video Color Management Color Decoding Auto Color Noise Reduction Auto Movie Mode Move SEL Select ANT A/B Off Low Off ON-SCREEN DISPLAY Color...

Owners Guide
Page 62
... to automatically turn the TV on using REMOTE mode, any of the main picture will be sure to input 2. High Definition Television - All component color system settings will affect only color component input you to change tint and color coordinates for use with your video input device play button. 3. When the Plasma Television is powered OFF, BLACK SIDE PANEL feature will be reset before AUTO LINK is convenient when you are currently viewing. ON-SCREEN DISPLAY 62 This...
... to automatically turn the TV on using REMOTE mode, any of the main picture will be sure to input 2. High Definition Television - All component color system settings will affect only color component input you to change tint and color coordinates for use with your video input device play button. 3. When the Plasma Television is powered OFF, BLACK SIDE PANEL feature will be reset before AUTO LINK is convenient when you are currently viewing. ON-SCREEN DISPLAY 62 This...
Owners Guide
Page 80
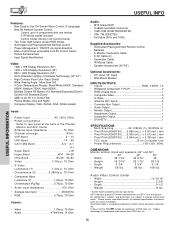
...(32HDT50) • Soft Mute (50% and 100%) Supplied Accessories: • Illuminated Preprogrammed Remote Control • Batteries • 9' Monitor Connection Cable • 6' AC Cable (2) • Subwoofer Cable • IR Mouse Cable • Speaker Accessories (42"/50") Optional Accessories: • 42" stand, 32" stand • Wall Mount Bracket INPUTS/OUTPUTS • Inputs RGB, VIDEO 1-5 • Wideband Component Y, Pb,Pr 2 • RGB: Analog Input 1 • Composite Video 4 • S-Video 3 • Antenna (RF) Inputs 2 • Converter Box Output 1 • Audio Output...
...(32HDT50) • Soft Mute (50% and 100%) Supplied Accessories: • Illuminated Preprogrammed Remote Control • Batteries • 9' Monitor Connection Cable • 6' AC Cable (2) • Subwoofer Cable • IR Mouse Cable • Speaker Accessories (42"/50") Optional Accessories: • 42" stand, 32" stand • Wall Mount Bracket INPUTS/OUTPUTS • Inputs RGB, VIDEO 1-5 • Wideband Component Y, Pb,Pr 2 • RGB: Analog Input 1 • Composite Video 4 • S-Video 3 • Antenna (RF) Inputs 2 • Converter Box Output 1 • Audio Output...
Owners Guide
Page 83
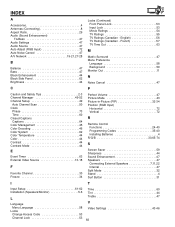
... Timer 63 External Video Source 13-18 F Favorite Channel 30 Freeze 34 Perfect Volume 47 Picture Mode 43 Picture-in-Picture (PIP 32-34 Position (RGB Input) Horizontal 72 Vertical 72 R Remote Control Functions 24-40 Programming Codes 35-40 Installing Batteries 4 R/G/B 30,65-74 S Screen Saver 59 Sharpness 44 Sound Enhancement 47 Speakers 47 Connecting External Speakers 7,11,22 Internal 47 Split Mode 32 Stand 4 Surf Button 31 I T Input Setup 61-62 Installation (Speakers/Monitor 5-6 L Language Menu Language 58 Locks Change Access Code 53 Channel Lock 53 Time...
... Timer 63 External Video Source 13-18 F Favorite Channel 30 Freeze 34 Perfect Volume 47 Picture Mode 43 Picture-in-Picture (PIP 32-34 Position (RGB Input) Horizontal 72 Vertical 72 R Remote Control Functions 24-40 Programming Codes 35-40 Installing Batteries 4 R/G/B 30,65-74 S Screen Saver 59 Sharpness 44 Sound Enhancement 47 Speakers 47 Connecting External Speakers 7,11,22 Internal 47 Split Mode 32 Stand 4 Surf Button 31 I T Input Setup 61-62 Installation (Speakers/Monitor 5-6 L Language Menu Language 58 Locks Change Access Code 53 Channel Lock 53 Time...


