
User Guide
Page 2
... services. The only warranties for technical or editorial errors or omissions contained herein. Product notice This guide describes features that are set forth in the United States and/or other countries. To access the latest user guide, go to http://www.hp.com/support, and select your country. First Edition: Jul 2018 Document Part Number: L24506-001 ii © 2018 HP...
... services. The only warranties for technical or editorial errors or omissions contained herein. Product notice This guide describes features that are set forth in the United States and/or other countries. To access the latest user guide, go to http://www.hp.com/support, and select your country. First Edition: Jul 2018 Document Part Number: L24506-001 ii © 2018 HP...

User Guide
Page 3
NOTE: Text set off in this manner indicates that failure to equipment or loss of life. iii About This Guide This guide provides information on monitor features, setting up the monitor, and technical specifications. Text set off in this manner provides important supplemental information. CAUTION: Text set off in this manner indicates that failure to follow directions could result in damage to follow directions could result in bodily harm or loss of information. WARNING!
NOTE: Text set off in this manner indicates that failure to equipment or loss of life. iii About This Guide This guide provides information on monitor features, setting up the monitor, and technical specifications. Text set off in this manner provides important supplemental information. CAUTION: Text set off in this manner indicates that failure to follow directions could result in damage to follow directions could result in bodily harm or loss of information. WARNING!
User Guide
Page 4
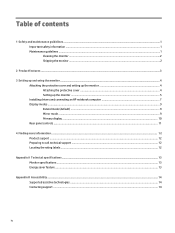
... ...1 Cleaning the monitor ...2 Shipping the monitor ...2 2 Product features ...3 3 Setting up and using the monitor ...4 Attaching the protective cover and setting up the monitor 4 Attaching the protective cover ...4 Setting up the monitor ...5 Installing drivers and connecting an HP notebook computer 7 Display modes ...9 Extend mode (default) ...9 Mirror mode ...9 Primary display ...10 Rear panel controls ...11 4 Finding more information ...12 Product support ...12 Preparing to call technical support ...12 Locating the rating labels ...12 Appendix A Technical specifications ...13 Monitor...
... ...1 Cleaning the monitor ...2 Shipping the monitor ...2 2 Product features ...3 3 Setting up and using the monitor ...4 Attaching the protective cover and setting up the monitor 4 Attaching the protective cover ...4 Setting up the monitor ...5 Installing drivers and connecting an HP notebook computer 7 Display modes ...9 Extend mode (default) ...9 Mirror mode ...9 Primary display ...10 Rear panel controls ...11 4 Finding more information ...12 Product support ...12 Preparing to call technical support ...12 Locating the rating labels ...12 Appendix A Technical specifications ...13 Monitor...
User Guide
Page 5
... and turning off when not in the operating instructions. WARNING! CAUTION: Use the appropriate and correctly sized furniture designed to http://www.hp.com/support, and select your HP LCD monitor. If the monitor is not operating properly or has been dropped or damaged, contact an authorized HP dealer, reseller, or service provider. ● Use only a power source and connection appropriate for this product yourself. Select Drivers & Downloads...
... and turning off when not in the operating instructions. WARNING! CAUTION: Use the appropriate and correctly sized furniture designed to http://www.hp.com/support, and select your HP LCD monitor. If the monitor is not operating properly or has been dropped or damaged, contact an authorized HP dealer, reseller, or service provider. ● Use only a power source and connection appropriate for this product yourself. Select Drivers & Downloads...

User Guide
Page 6
Turn off the monitor and unplug the USB cable from the back of water and Isopropyl alcohol. CAUTION: Spray the cleaner onto a cloth and use cleaners that contain any petroleum based materials such as benzene, thinner, or any volatile substance to gently wipe the screen surface. Shipping the monitor Keep the original packing box in a storage area. CAUTION: Do not...
Turn off the monitor and unplug the USB cable from the back of water and Isopropyl alcohol. CAUTION: Spray the cleaner onto a cloth and use cleaners that contain any petroleum based materials such as benzene, thinner, or any volatile substance to gently wipe the screen surface. Shipping the monitor Keep the original packing box in a storage area. CAUTION: Do not...
User Guide
Page 7
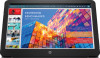
... resolutions ● Single USB 3.0 connection for power and video (with USB 3.0 cable provided) ● LED backlit panel with ultra-thin screen ● Integrated, adjustable stand transforms into carrying case that folds flat for fast, easy transport ● Built-in back panel control buttons for your product, go to http://www.hp.com/support and follow the instructions to find in your product. Then select User Guides. IMPORTANT Before using the monitor, please install the driver...
... resolutions ● Single USB 3.0 connection for power and video (with USB 3.0 cable provided) ● LED backlit panel with ultra-thin screen ● Integrated, adjustable stand transforms into carrying case that folds flat for fast, easy transport ● Built-in back panel control buttons for your product, go to http://www.hp.com/support and follow the instructions to find in your product. Then select User Guides. IMPORTANT Before using the monitor, please install the driver...
User Guide
Page 8
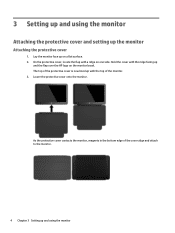
... a flat surface. 2. Lower the protective cover onto the monitor. As the protective cover contacts the monitor, magnets in the bottom edge of the protective cover is now lined up the monitor Attaching the protective cover 1. The top of the cover align and attach to the monitor. 4 Chapter 3 Setting up and the flap over the HP logo on the monitor bezel. 3 Setting up and using the monitor...
... a flat surface. 2. Lower the protective cover onto the monitor. As the protective cover contacts the monitor, magnets in the bottom edge of the protective cover is now lined up the monitor Attaching the protective cover 1. The top of the cover align and attach to the monitor. 4 Chapter 3 Setting up and the flap over the HP logo on the monitor bezel. 3 Setting up and using the monitor...
User Guide
Page 9
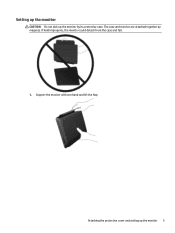
The case and monitor are attached together by its protective case. Attaching the protective cover and setting up the monitor by magnets. Setting up the monitor CAUTION: Do not pick up the monitor 5 If held improperly, the monitor could detach from the case and fall. 1. Support the monitor with one hand and lift the flap.
The case and monitor are attached together by its protective case. Attaching the protective cover and setting up the monitor by magnets. Setting up the monitor CAUTION: Do not pick up the monitor 5 If held improperly, the monitor could detach from the case and fall. 1. Support the monitor with one hand and lift the flap.
User Guide
Page 10
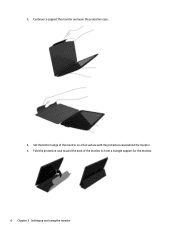
Fold the protective case toward the back of the monitor on a flat surface with the protective case behind the monitor. 4. Continue to form a triangle support for the monitor. 6 Chapter 3 Setting up and using the monitor Set the bottom edge of the monitor to support the monitor and open the protective case. 3. 2.
Fold the protective case toward the back of the monitor on a flat surface with the protective case behind the monitor. 4. Continue to form a triangle support for the monitor. 6 Chapter 3 Setting up and using the monitor Set the bottom edge of the monitor to support the monitor and open the protective case. 3. 2.
User Guide
Page 11
....hp.com/support and follow the on your computer and connected the monitor to the computer in one of the provided USB "Y" cable into two USB 2.0 ports on the monitor. DisplayLink supports and tests a single graphics card (GPU) installed in SLI mode ● Multiple WDDM graphics drivers active at once Do not turn on power to the monitor until you have installed the drivers on -screen instructions to -date drivers. 2. SIS graphics cards...
....hp.com/support and follow the on your computer and connected the monitor to the computer in one of the provided USB "Y" cable into two USB 2.0 ports on the monitor. DisplayLink supports and tests a single graphics card (GPU) installed in SLI mode ● Multiple WDDM graphics drivers active at once Do not turn on power to the monitor until you have installed the drivers on -screen instructions to -date drivers. 2. SIS graphics cards...

User Guide
Page 12
... the cable is seated properly in the system tray: Click the icon to open the menu to http://www.hp.com/support and follow the on the rear of the monitor. 3. After installing the software and connecting the monitor, the following sources: ● Go to select your display mode and control the attached monitor. If the monitor does not turn on the computer. 2. Press the power button on -screen instructions to USB 2.0 ports...
... the cable is seated properly in the system tray: Click the icon to open the menu to http://www.hp.com/support and follow the on the rear of the monitor. 3. After installing the software and connecting the monitor, the following sources: ● Go to select your display mode and control the attached monitor. If the monitor does not turn on the computer. 2. Press the power button on -screen instructions to USB 2.0 ports...
User Guide
Page 13
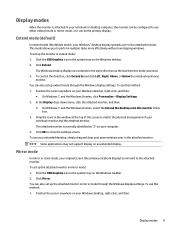
... multiple tasks more effectively without overlapping windows. Position the cursor anywhere on your Windows desktop, right-click, and then: ● On Windows 7, and the Windows 8 series, click Personalize > Display Settings. 2. In the Display drop-down menu, click the attached monitor, and then: ● On Windows 7, and the Windows 8 series, select the Extend the desktop onto this mode was used. 3. This mode allows you to and click Left...
... multiple tasks more effectively without overlapping windows. Position the cursor anywhere on your Windows desktop, right-click, and then: ● On Windows 7, and the Windows 8 series, click Personalize > Display Settings. 2. In the Display drop-down menu, click the attached monitor, and then: ● On Windows 7, and the Windows 8 series, select the Extend the desktop onto this mode was used. 3. This mode allows you to and click Left...
User Guide
Page 14
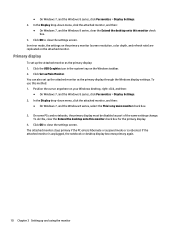
... Windows 7, and the Windows 8 series, clear the Extend the desktop onto this monitor check box. 3. To do this, clear the Extend the desktop onto this method: 1. ● On Windows 7, and the Windows 8 series, click Personalize > Display Settings. 2. In mirror mode, the settings on the primary monitor (screen resolution, color depth, and refresh rate) are replicated on your Windows desktop, right-click, and then: ● On Windows 7, and the Windows 8 series, click Personalize > Display Settings...
... Windows 7, and the Windows 8 series, clear the Extend the desktop onto this monitor check box. 3. To do this, clear the Extend the desktop onto this method: 1. ● On Windows 7, and the Windows 8 series, click Personalize > Display Settings. 2. In mirror mode, the settings on the primary monitor (screen resolution, color depth, and refresh rate) are replicated on your Windows desktop, right-click, and then: ● On Windows 7, and the Windows 8 series, click Personalize > Display Settings...

User Guide
Page 15
Rear panel controls 11 Rear panel controls Icon 1 2 3 Button Power Plus Minus Function Turns the screen on or off Increases brightness Decreases brightness NOTE: Brightness has been adjusted to optimized and no brightness adjust allowed under Win 10 OS.
Rear panel controls 11 Rear panel controls Icon 1 2 3 Button Power Plus Minus Function Turns the screen on or off Increases brightness Decreases brightness NOTE: Brightness has been adjusted to optimized and no brightness adjust allowed under Win 10 OS.
User Guide
Page 16
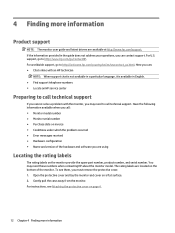
... information available when you call: ● Monitor model number ● Monitor serial number ● Purchase date on page 4. 12 Chapter 4 Finding more information Product support NOTE: The monitor user guide and latest drivers are using Locating the rating labels The rating labels on a flat surface. 2. To see Attaching the protective cover on invoice ● Conditions under which the problem occurred ● Error messages received ● Hardware configuration ●...
... information available when you call: ● Monitor model number ● Monitor serial number ● Purchase date on page 4. 12 Chapter 4 Finding more information Product support NOTE: The monitor user guide and latest drivers are using Locating the rating labels The rating labels on a flat surface. 2. To see Attaching the protective cover on invoice ● Conditions under which the problem occurred ● Error messages received ● Hardware configuration ●...
User Guide
Page 17
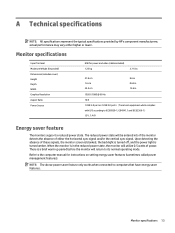
... the power light is a brief warm up period before the monitor will return to computers that have energy saver features. Upon detecting the absence of power. There is turned amber. Monitor specifications 13 A Technical specifications NOTE: All specifications represent the typical specifications provided by HP's component manufacturers; Monitor specifications Input Terminal Maximum Weight (Unpacked) Dimensions (includes cover) Height Depth Width Graphics Resolution Aspect Ratio Power Source USB for instructions on setting energy...
... the power light is a brief warm up period before the monitor will return to computers that have energy saver features. Upon detecting the absence of power. There is turned amber. Monitor specifications 13 A Technical specifications NOTE: All specifications represent the typical specifications provided by HP's component manufacturers; Monitor specifications Input Terminal Maximum Weight (Unpacked) Dimensions (includes cover) Height Depth Width Graphics Resolution Aspect Ratio Power Source USB for instructions on setting energy...
User Guide
Page 18
... technologies HP products support a wide variety of our products and services and welcome feedback from users. If you require technical support or have an issue with a product or would like to tell us if you are constantly refining the accessibility of operating system assistive technologies and can be configured to work with additional assistive technologies. to 9 p.m. Mountain...
... technologies HP products support a wide variety of our products and services and welcome feedback from users. If you require technical support or have an issue with a product or would like to tell us if you are constantly refining the accessibility of operating system assistive technologies and can be configured to work with additional assistive technologies. to 9 p.m. Mountain...
Quick Setup Guide
Page 1
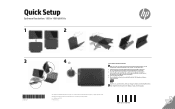
... turn on power to the monitor until you have installed the drivers on your display mode and control the attached monitor. Turn on power to the computer with either a USB3.0 port on the computer or two USB2.0 ports on the computer. 3. Note: Brightness has been optimized for the monitor. 2. After installing the software and connecting the monitor, the following icon appears in the system tray: Click the icon to open the menu...
... turn on power to the monitor until you have installed the drivers on your display mode and control the attached monitor. Turn on power to the computer with either a USB3.0 port on the computer or two USB2.0 ports on the computer. 3. Note: Brightness has been optimized for the monitor. 2. After installing the software and connecting the monitor, the following icon appears in the system tray: Click the icon to open the menu...


