
User Guide
Page 48
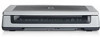
... through the ADF. Clean and maintain the automatic document feeder (ADF) The ADF requires periodic cleaning depending on scanned images, cleaning the ADF window might need to clean the ADF window. 1. Set up to the next step. 5. For...Use the cleaning cloth in the ADF ● Clean the ADF window ● Clean the feed-roller assembly manually ● Maintain the ADF Use the cleaning cloth in the ADF. Follow the steps for the components to ...scanning a document through 5. Place up a cleaning routine that is recommended. Open the scanner lid. 46 HP Scanjet 8300 series
... through the ADF. Clean and maintain the automatic document feeder (ADF) The ADF requires periodic cleaning depending on scanned images, cleaning the ADF window might need to clean the ADF window. 1. Set up to the next step. 5. For...Use the cleaning cloth in the ADF ● Clean the ADF window ● Clean the feed-roller assembly manually ● Maintain the ADF Use the cleaning cloth in the ADF. Follow the steps for the components to ...scanning a document through 5. Place up a cleaning routine that is recommended. Open the scanner lid. 46 HP Scanjet 8300 series
User Guide
Page 50
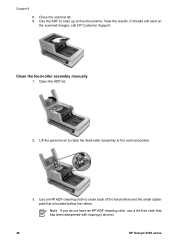
...that has been dampened with isopropyl alcohol. 48 HP Scanjet 8300 series Use the ADF to scan up to the vertical position. 3. If streaks still exist on the scanned images, call HP Customer Support. Close the scanner lid. 9. Clean the feed-roller assembly manually 1. View the results. Open the ADF lid.... 2. Note If you do not have an HP ADF cleaning cloth, use a lint-free cloth that ...
...that has been dampened with isopropyl alcohol. 48 HP Scanjet 8300 series Use the ADF to scan up to the vertical position. 3. If streaks still exist on the scanned images, call HP Customer Support. Close the scanner lid. 9. Clean the feed-roller assembly manually 1. View the results. Open the ADF lid.... 2. Note If you do not have an HP ADF cleaning cloth, use a lint-free cloth that ...
User Guide
Page 51
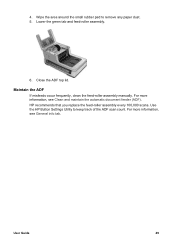
Use the HP Button Settings Utility to remove any paper dust. 5. User Guide 49 For more information, see General info tab. Wipe the area around the small rubber pad to keep track of the ADF scan count. HP recommends that you replace the feed-roller assembly every 100,000 scans. Lower the green tab and feed-roller assembly. 6. Close the ADF top lid. For more information, see Clean and maintain the automatic document feeder (ADF). Maintain the ADF If misfeeds occur frequently, clean the feed-roller assembly manually. 4.
Use the HP Button Settings Utility to remove any paper dust. 5. User Guide 49 For more information, see General info tab. Wipe the area around the small rubber pad to keep track of the ADF scan count. HP recommends that you replace the feed-roller assembly every 100,000 scans. Lower the green tab and feed-roller assembly. 6. Close the ADF top lid. For more information, see Clean and maintain the automatic document feeder (ADF). Maintain the ADF If misfeeds occur frequently, clean the feed-roller assembly manually. 4.
User Guide
Page 60
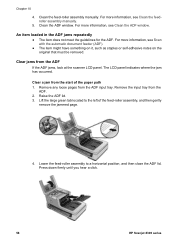
For more information, see Clean the feedroller assembly manually. 5. Clear a jam from the ADF. 2. Remove the input tray from the start...and then close the ADF lid. Clean the ADF window. Press down firmly until you hear a click. 58 HP Scanjet 8300 series Clear jams from the ADF input tray. Lower the feed-roller assembly to the left of the paper path... the original that must be removed. Raise the ADF lid. 3. Chapter 10 4. Clean the feed-roller assembly manually. For more information, see Clean the ADF window. The LCD panel indicates where the jam has occurred. Remove ...
For more information, see Clean the feedroller assembly manually. 5. Clear a jam from the ADF. 2. Remove the input tray from the start...and then close the ADF lid. Clean the ADF window. Press down firmly until you hear a click. 58 HP Scanjet 8300 series Clear jams from the ADF input tray. Lower the feed-roller assembly to the left of the paper path... the original that must be removed. Raise the ADF lid. 3. Chapter 10 4. Clean the feed-roller assembly manually. For more information, see Clean the ADF window. The LCD panel indicates where the jam has occurred. Remove ...


