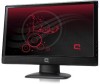
User's Guide q1859, q2009, q2159 LCD Display
Page 2
... document contains proprietary information that is a trademark owned by its products for technical or editorial errors or omissions contained herein. HP supports lawful use of technology and does not endorse or encourage the use or reliability of Adobe Systems Incorporated. ENERGY STAR and ...the ENERGY STAR logo are trademarks of its software on equipment that is subject to another language without notice. HP shall not be construed as constituting an additional warranty. Hewlett-Packard Company 10955 Tantau Avenue Cupertino, California 95014-0770 USA Copyright...
... document contains proprietary information that is a trademark owned by its products for technical or editorial errors or omissions contained herein. HP supports lawful use of technology and does not endorse or encourage the use or reliability of Adobe Systems Incorporated. ENERGY STAR and ...the ENERGY STAR logo are trademarks of its software on equipment that is subject to another language without notice. HP shall not be construed as constituting an additional warranty. Hewlett-Packard Company 10955 Tantau Avenue Cupertino, California 95014-0770 USA Copyright...
User's Guide q1859, q2009, q2159 LCD Display
Page 5
... Contents Notational Conventions...iii Notes, Cautions, and Warnings...iii Product Features 1-1 Compaq LCD Monitors...1-1 Features ...1-1 Safety and Maintenance Guidelines 2-1 Important Safety Information ...2-1 Safety Precautions ...2-1 Maintenance Guidelines...2-2 Cleaning the Monitor ...2-2 Setting Up the Monitor 3-1 Unpacking the Monitor...3-1 Installing the Monitor ...3-1 Preparing the monitor for desktop use 3-1 Preparing the monitor for wall-mounting 3-2 Connecting the VGA (Analog) Cable 3-5 To connect the...
... Contents Notational Conventions...iii Notes, Cautions, and Warnings...iii Product Features 1-1 Compaq LCD Monitors...1-1 Features ...1-1 Safety and Maintenance Guidelines 2-1 Important Safety Information ...2-1 Safety Precautions ...2-1 Maintenance Guidelines...2-2 Cleaning the Monitor ...2-2 Setting Up the Monitor 3-1 Unpacking the Monitor...3-1 Installing the Monitor ...3-1 Preparing the monitor for desktop use 3-1 Preparing the monitor for wall-mounting 3-2 Connecting the VGA (Analog) Cable 3-5 To connect the...
User's Guide q1859, q2009, q2159 LCD Display
Page 7
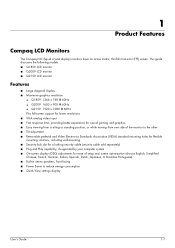
... the following models: ■ Q1859 LCD monitor ■ Q2009 LCD monitor ■ Q2159 LCD monitor Features ■ Large diagonal display ■ Maximum graphics resolution: ❏ Q1859: 1366 x 768 @ 60Hz ❏ Q2009: 1600 x 900 @ 60Hz ❏ Q2159: 1920 x 1080 @ 60Hz Plus full-screen support for lower resolutions ■ VGA analog...9632; Power Saver to reduce energy consumption ■ Quick View settings display User's Guide 1-1 1 Product Features Compaq LCD Monitors The Compaq LCD (liquid crystal display) monitors have an active matrix, thin-film transistor (TFT) screen.
... the following models: ■ Q1859 LCD monitor ■ Q2009 LCD monitor ■ Q2159 LCD monitor Features ■ Large diagonal display ■ Maximum graphics resolution: ❏ Q1859: 1366 x 768 @ 60Hz ❏ Q2009: 1600 x 900 @ 60Hz ❏ Q2159: 1920 x 1080 @ 60Hz Plus full-screen support for lower resolutions ■ VGA analog...9632; Power Saver to reduce energy consumption ■ Quick View settings display User's Guide 1-1 1 Product Features Compaq LCD Monitors The Compaq LCD (liquid crystal display) monitors have an active matrix, thin-film transistor (TFT) screen.

User's Guide q1859, q2009, q2159 LCD Display
Page 11
...mounted. Prepare a flat area to the LCD screen; You may need a flat, soft, protected area for wall-mounting. Turn off the computer and other attached devices. 3. You may need a Phillips screwdriver for preparing the monitor for placing the monitor screen-down on a desktop or wall-...mount it for desktop use CAUTION: The screen is fragile. Connect the monitor cables after you have installed the monitor. doing so can install the monitor on a flat, soft, protected table or desk surface with the support column overhanging the edge. 2. Make sure all contents are included. See...
...mounted. Prepare a flat area to the LCD screen; You may need a flat, soft, protected area for wall-mounting. Turn off the computer and other attached devices. 3. You may need a Phillips screwdriver for preparing the monitor for placing the monitor screen-down on a desktop or wall-...mount it for desktop use CAUTION: The screen is fragile. Connect the monitor cables after you have installed the monitor. doing so can install the monitor on a flat, soft, protected table or desk surface with the support column overhanging the edge. 2. Make sure all contents are included. See...
User's Guide q1859, q2009, q2159 LCD Display
Page 12
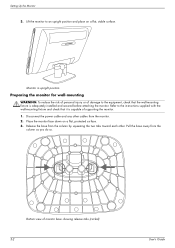
... other cables from the monitor. 2. Setting Up the Monitor 3. Release the base from the column as you do so. Disconnect the power cable and any other . Monitor in upright position Preparing the monitor for wall-mounting WARNING: To reduce the risk of personal injury or of supporting the monitor. 1. Bottom view of monitor base showing release tabs...
... other cables from the monitor. 2. Setting Up the Monitor 3. Release the base from the column as you do so. Disconnect the power cable and any other . Monitor in upright position Preparing the monitor for wall-mounting WARNING: To reduce the risk of personal injury or of supporting the monitor. 1. Bottom view of monitor base showing release tabs...
User's Guide q1859, q2009, q2159 LCD Display
Page 13
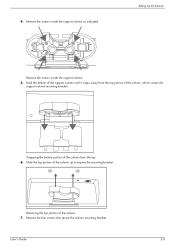
Rock the bottom of the column, which covers the support column mounting bracket. Removing the top portion of the column up to expose the mounting bracket. User's Guide 3-3 Snapping the bottom portion of the column from the top portion of the support column until it snaps away from the top 6. Remove the screws inside the support column 5. Slide the top portion of the column 7. 4. Setting Up the Monitor Remove the screws inside the support column as indicated. Remove the four screws that secure the column mounting bracket.
Rock the bottom of the column, which covers the support column mounting bracket. Removing the top portion of the column up to expose the mounting bracket. User's Guide 3-3 Snapping the bottom portion of the column from the top portion of the support column until it snaps away from the top 6. Remove the screws inside the support column 5. Slide the top portion of the column 7. 4. Setting Up the Monitor Remove the screws inside the support column as indicated. Remove the four screws that secure the column mounting bracket.
User's Guide q1859, q2009, q2159 LCD Display
Page 19
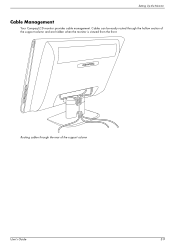
Cables can be easily routed through the rear of the support column and are hidden when the monitor is viewed from the front. Setting Up the Monitor Cable Management Your Compaq LCD monitor provides cable management. Routing cables through the hollow section of the support column User's Guide 3-9
Cables can be easily routed through the rear of the support column and are hidden when the monitor is viewed from the front. Setting Up the Monitor Cable Management Your Compaq LCD monitor provides cable management. Routing cables through the hollow section of the support column User's Guide 3-9
User's Guide q1859, q2009, q2159 LCD Display
Page 21
... on the download pages. 6. Restart the computer. 6. Select Download Drivers and Software. 4. Installing the monitor driver software from the CD To install the monitor driver software from the CD, in case of drivers and software files from the HP Support site: 1. Downloading updated drivers from the Internet To download the latest version of an...
... on the download pages. 6. Restart the computer. 6. Select Download Drivers and Software. 4. Installing the monitor driver software from the CD To install the monitor driver software from the CD, in case of drivers and software files from the HP Support site: 1. Downloading updated drivers from the Internet To download the latest version of an...
User's Guide q1859, q2009, q2159 LCD Display
Page 26
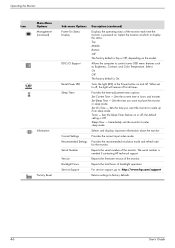
... - Sets the time you want the monitor to wake up from sleep mode. The serial number is Off. Sets the current time in the Power button on or off at which to off, the light will remain off ; the default setting is needed if contacting HP technical support. Provides the current input video...
... - Sets the time you want the monitor to wake up from sleep mode. The serial number is Off. Sets the current time in the Power button on or off at which to off, the light will remain off ; the default setting is needed if contacting HP technical support. Provides the current input video...
User's Guide q1859, q2009, q2159 LCD Display
Page 27
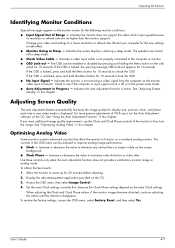
...select Image Control. 4. To restore the factory settings, access the OSD menu, select Factory Reset, and then select Yes. Indicates the monitor does not support the video card's input signal because its resolution or refresh rate are turned off or in the power-saver mode. ■ Auto ... value to fine tune the image. Display the adjustment-pattern application provided on the main Clock settings. The speakers are set higher than the monitor supports. To obtain the best results: 1. Set the main Clock settings correctly first, because the Clock Phase settings depend on the CD. 3....
...select Image Control. 4. To restore the factory settings, access the OSD menu, select Factory Reset, and then select Yes. Indicates the monitor does not support the video card's input signal because its resolution or refresh rate are turned off or in the power-saver mode. ■ Auto ... value to fine tune the image. Display the adjustment-pattern application provided on the main Clock settings. The speakers are set higher than the monitor supports. To obtain the best results: 1. Set the main Clock settings correctly first, because the Clock Phase settings depend on the CD. 3....
User's Guide q1859, q2009, q2159 LCD Display
Page 28
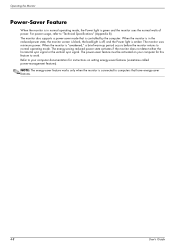
...the computer. The energy-saving reduced power state activates if the monitor does not detect either the horizontal sync signal or the vertical sync signal. NOTE: The energy-saver feature works only when the monitor is connected to normal operating mode. Refer to your computer for... power usage, refer to work. Operating the Monitor Power-Saver Feature When the monitor is in the reduced-power state, the monitor screen is blank, the backlight is off, and the Power light is amber. The monitor uses minimum power. The monitor also supports a power-saver mode that have energy-saver ...
...the computer. The energy-saving reduced power state activates if the monitor does not detect either the horizontal sync signal or the vertical sync signal. NOTE: The energy-saver feature works only when the monitor is connected to normal operating mode. Refer to your computer for... power usage, refer to work. Operating the Monitor Power-Saver Feature When the monitor is in the reduced-power state, the monitor screen is blank, the backlight is off, and the Power light is amber. The monitor uses minimum power. The monitor also supports a power-saver mode that have energy-saver ...
User's Guide q1859, q2009, q2159 LCD Display
Page 31
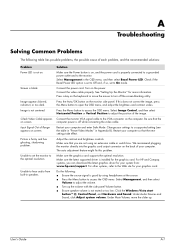
... or too dark. Check Video Cable appears on the power. Unable to set to turn off while connecting the video cable. Connect the monitor VGA signal cable to the optimal resolution. Make sure that you can download the latest graphics driver for your settings to adjust the volume... to adjust the position of your system from built-in speakers. For HP and Compaq systems, you are not using headphones at the source. ■ Press the Menu button to hear audio from : www.hp.com/support. Do the following table lists possible problems, the possible cause of Range...
... or too dark. Check Video Cable appears on the power. Unable to set to turn off while connecting the video cable. Connect the monitor VGA signal cable to the optimal resolution. Make sure that you can download the latest graphics driver for your settings to adjust the volume... to adjust the position of your system from built-in speakers. For HP and Compaq systems, you are not using headphones at the source. ■ Press the Menu button to hear audio from : www.hp.com/support. Do the following table lists possible problems, the possible cause of Range...
User's Guide q1859, q2009, q2159 LCD Display
Page 32
... connected to work, you are bent. The LED should be in this section, you contact customer service, refer to HP Technical Support at: http://www.hp.com/support Select your monitor. Check the monitor's video cable, and make sure that the Compaq monitor drivers are bent. Monitor is present in its slot. The rating label is capable of the...
... connected to work, you are bent. The LED should be in this section, you contact customer service, refer to HP Technical Support at: http://www.hp.com/support Select your monitor. Check the monitor's video cable, and make sure that the Compaq monitor drivers are bent. Monitor is present in its slot. The rating label is capable of the...
User's Guide q1859, q2009, q2159 LCD Display
Page 36
...to use in normal operating mode at : http://www.hp.com/support Power Cord Set Requirements The monitor power supply is not specific to be rated for the product and for use , contact your Compaq LCD Monitor, refer to the HP Web site at a supported resolution and refresh rate, from the product. The power... cord must be walked on or pinched by all LCD displays used in that country/region. The first is the more...
...to use in normal operating mode at : http://www.hp.com/support Power Cord Set Requirements The monitor power supply is not specific to be rated for the product and for use , contact your Compaq LCD Monitor, refer to the HP Web site at a supported resolution and refresh rate, from the product. The power... cord must be walked on or pinched by all LCD displays used in that country/region. The first is the more...


