User's Guide q1859, q2009, q2159 LCD Display
Page 5
... Contents Notational Conventions...iii Notes, Cautions, and Warnings...iii Product Features 1-1 Compaq LCD Monitors...1-1 Features ...1-1 Safety and Maintenance Guidelines 2-1 Important Safety Information ...2-1 Safety Precautions ...2-1 Maintenance Guidelines...2-2 Cleaning the Monitor ...2-2 Setting Up the Monitor 3-1 Unpacking the Monitor...3-1 Installing the Monitor ...3-1 Preparing the monitor for desktop use 3-1 Preparing the monitor for wall-mounting 3-2 Connecting the VGA (Analog) Cable 3-5 To connect the...
... Contents Notational Conventions...iii Notes, Cautions, and Warnings...iii Product Features 1-1 Compaq LCD Monitors...1-1 Features ...1-1 Safety and Maintenance Guidelines 2-1 Important Safety Information ...2-1 Safety Precautions ...2-1 Maintenance Guidelines...2-2 Cleaning the Monitor ...2-2 Setting Up the Monitor 3-1 Unpacking the Monitor...3-1 Installing the Monitor ...3-1 Preparing the monitor for desktop use 3-1 Preparing the monitor for wall-mounting 3-2 Connecting the VGA (Analog) Cable 3-5 To connect the...
User's Guide q1859, q2009, q2159 LCD Display
Page 6
Table of Contents Technical Specifications B-1 Compaq LCD Monitors...B-1 Preset Video Modes ...B-3 LCD Monitor Quality and Pixel Policy...B-4 Power Cord Set Requirements ...B-4 Agency Regulatory Notices C-1 Federal Communications Commission Notice C-1 Modifications...C-1 Cables ...C-1 Declaration of Conformity for Products Marked with... in Private Households in the European Union C-3 Japanese Notice...C-3 Japanese Power Cord Notice...C-3 Japanese Material Content Declaration C-3 Korean Notice ...C-3 EPA ENERGY STAR Compliance ...C-4 HP Recycling Program...C-4 Index ...D-1 vi User's Guide
Table of Contents Technical Specifications B-1 Compaq LCD Monitors...B-1 Preset Video Modes ...B-3 LCD Monitor Quality and Pixel Policy...B-4 Power Cord Set Requirements ...B-4 Agency Regulatory Notices C-1 Federal Communications Commission Notice C-1 Modifications...C-1 Cables ...C-1 Declaration of Conformity for Products Marked with... in Private Households in the European Union C-3 Japanese Notice...C-3 Japanese Power Cord Notice...C-3 Japanese Material Content Declaration C-3 Korean Notice ...C-3 EPA ENERGY STAR Compliance ...C-4 HP Recycling Program...C-4 Index ...D-1 vi User's Guide
User's Guide q1859, q2009, q2159 LCD Display
Page 7
This guide discusses the following models: ■ Q1859 LCD monitor ■ Q2009 LCD monitor ■ Q2159 LCD monitor Features ■ Large diagonal display ■ Maximum graphics resolution: ❏ Q1859: 1366 x 768 @ 60Hz ❏ Q2009: 1600 x 900 @ 60Hz ❏ Q2159: 1920 x 1080 @ 60Hz Plus full-screen support for lower resolutions &#...9632; Power Saver to reduce energy consumption ■ Quick View settings display User's Guide 1-1 1 Product Features Compaq LCD Monitors The Compaq LCD (liquid crystal display) monitors have an active matrix, thin-film transistor (TFT) screen.
This guide discusses the following models: ■ Q1859 LCD monitor ■ Q2009 LCD monitor ■ Q2159 LCD monitor Features ■ Large diagonal display ■ Maximum graphics resolution: ❏ Q1859: 1366 x 768 @ 60Hz ❏ Q2009: 1600 x 900 @ 60Hz ❏ Q2159: 1920 x 1080 @ 60Hz Plus full-screen support for lower resolutions &#...9632; Power Saver to reduce energy consumption ■ Quick View settings display User's Guide 1-1 1 Product Features Compaq LCD Monitors The Compaq LCD (liquid crystal display) monitors have an active matrix, thin-film transistor (TFT) screen.
User's Guide q1859, q2009, q2159 LCD Display
Page 14
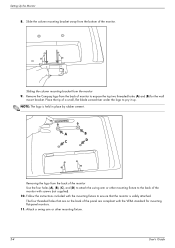
Remove the Compaq logo from the monitor 9. Sliding the column mounting bracket from the back of monitor to ensure that are on the back of the monitor. A B C D Removing the logo from the bottom of the panel are compliant with screws (not supplied). 10. Attach a swing arm or other mounting fixture... to pry it up. Place the tip of a small, flat blade screwdriver under the logo to the back of the monitor Use the four holes (A), (B), (C), and (D) to attach the swing arm or other mounting fixture. 3-4 User's Guide The four threaded holes that the...
Remove the Compaq logo from the monitor 9. Sliding the column mounting bracket from the back of monitor to ensure that are on the back of the monitor. A B C D Removing the logo from the bottom of the panel are compliant with screws (not supplied). 10. Attach a swing arm or other mounting fixture... to pry it up. Place the tip of a small, flat blade screwdriver under the logo to the back of the monitor Use the four holes (A), (B), (C), and (D) to attach the swing arm or other mounting fixture. 3-4 User's Guide The four threaded holes that the...
User's Guide q1859, q2009, q2159 LCD Display
Page 15
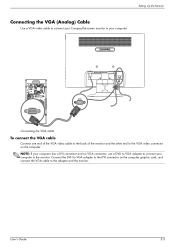
... end of the VGA video cable to the back of the monitor and the other end to the adapter and the monitor. Setting Up the Monitor Connecting the VGA (Analog) Cable Use a VGA video cable to connect your Compaq flat-screen monitor to the monitor. User's Guide 3-5 NOTE: If your computer has a DVI connector and no...
... end of the VGA video cable to the back of the monitor and the other end to the adapter and the monitor. Setting Up the Monitor Connecting the VGA (Analog) Cable Use a VGA video cable to connect your Compaq flat-screen monitor to the monitor. User's Guide 3-5 NOTE: If your computer has a DVI connector and no...
User's Guide q1859, q2009, q2159 LCD Display
Page 19
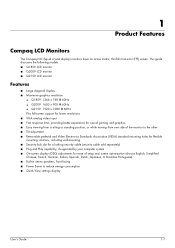
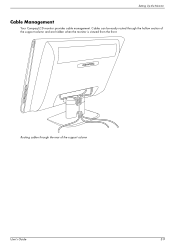
Routing cables through the hollow section of the support column User's Guide 3-9 Cables can be easily routed through the rear of the support column and are hidden when the monitor is viewed from the front. Setting Up the Monitor Cable Management Your Compaq LCD monitor provides cable management.
Routing cables through the hollow section of the support column User's Guide 3-9 Cables can be easily routed through the rear of the support column and are hidden when the monitor is viewed from the front. Setting Up the Monitor Cable Management Your Compaq LCD monitor provides cable management.
User's Guide q1859, q2009, q2159 LCD Display
Page 31
... Bezel Power LED option is set to Off and, if so, set the monitor to the monitor. Turn on the monitor side panel. Press the Auto/OK button on the power. Press the Menu ... Power LED. Select Management in speakers. Connect the video cable properly. We recommend plugging the monitor directly into the graphic card output connector on the keyboard or move the slider up the volume... low: Click the Windows Vista start button™ , Control Panel, and Hardware and Sound. For HP and Compaq systems, you are not using headphones at the source. ■ Press the Menu button to access ...
... Bezel Power LED option is set to Off and, if so, set the monitor to the monitor. Turn on the monitor side panel. Press the Auto/OK button on the power. Press the Menu ... Power LED. Select Management in speakers. Connect the video cable properly. We recommend plugging the monitor directly into the graphic card output connector on the keyboard or move the slider up the volume... low: Click the Windows Vista start button™ , Control Panel, and Hardware and Sound. For HP and Compaq systems, you are not using headphones at the source. ■ Press the Menu button to access ...
User's Guide q1859, q2009, q2159 LCD Display
Page 32
..." in the "Operating the Monitor" chapter for your monitor. Check the monitor's video cable, and make sure that the Compaq monitor drivers are bent. Refer to the support page for more information. Getting Support from the monitor as far away from hp.com Before you need these numbers when contacting HP about your monitor is capable of hardware and...
..." in the "Operating the Monitor" chapter for your monitor. Check the monitor's video cable, and make sure that the Compaq monitor drivers are bent. Refer to the support page for more information. Getting Support from the monitor as far away from hp.com Before you need these numbers when contacting HP about your monitor is capable of hardware and...

User's Guide q1859, q2009, q2159 LCD Display
Page 33
Compaq LCD Monitors Face treatment: Glare polarizer with hard coating Input Terminals: ■ VGA connector Specifications model Q1859 Display Type: ... altitude) Operating Temperature: Non-Operating Temperature: Relative Humidity (non-condensing): Operating Humidity: Non-Operating Humidity: Power Source: Power Consumption: Sleep Power Consumption: TFT LCD active matrix 18.5 in. (47.0 cm) diagonal -5o to +25o 9.5 lb (4.3 Kg) 14.0 x 18.0 x 7.2 in. (355 x...or lower. B Technical Specifications All specifications represent the typical specifications provided by HP's component manufacturers;
Compaq LCD Monitors Face treatment: Glare polarizer with hard coating Input Terminals: ■ VGA connector Specifications model Q1859 Display Type: ... altitude) Operating Temperature: Non-Operating Temperature: Relative Humidity (non-condensing): Operating Humidity: Non-Operating Humidity: Power Source: Power Consumption: Sleep Power Consumption: TFT LCD active matrix 18.5 in. (47.0 cm) diagonal -5o to +25o 9.5 lb (4.3 Kg) 14.0 x 18.0 x 7.2 in. (355 x...or lower. B Technical Specifications All specifications represent the typical specifications provided by HP's component manufacturers;
User's Guide q1859, q2009, q2159 LCD Display
Page 36
... to improve its ability to produce displays with the monitor meets the requirements for the voltage and current marked on a specific background. B-4 User's Guide Nevertheless, the display may have questions about your Compaq LCD Monitor, refer to the HP Web site at a supported resolution and refresh rate,... from the product. This is common to use in normal operating mode at : http://www.hp.com/support Power Cord Set Requirements The monitor power supply is small ...
... to improve its ability to produce displays with the monitor meets the requirements for the voltage and current marked on a specific background. B-4 User's Guide Nevertheless, the display may have questions about your Compaq LCD Monitor, refer to the HP Web site at a supported resolution and refresh rate,... from the product. This is common to use in normal operating mode at : http://www.hp.com/support Power Cord Set Requirements The monitor power supply is small ...


