User's Guide q1859, q2009, q2159 LCD Display
Page 5
... use 3-1 Preparing the monitor for wall-mounting 3-2 Connecting the VGA (Analog) Cable 3-5 To connect the VGA cable...3-5 Audio and Video Cables and Adapters 3-6 Connecting the Audio Cable...3-7 Connecting the Power Cable ...3-8 Cable Management...3-9 Adjusting the Tilt...3-10 Operating the Monitor 4-1 CD Software and Utilities ...4-1 Installing Drivers...4-1 Installing the monitor driver software from the CD 4-1 Downloading updated drivers from the Internet 4-1 Using the Auto Adjustment Function 4-2 Side-Panel Controls...4-3 Using the On-Screen Display (OSD) ...4-4 OSD Menu Selections...
... use 3-1 Preparing the monitor for wall-mounting 3-2 Connecting the VGA (Analog) Cable 3-5 To connect the VGA cable...3-5 Audio and Video Cables and Adapters 3-6 Connecting the Audio Cable...3-7 Connecting the Power Cable ...3-8 Cable Management...3-9 Adjusting the Tilt...3-10 Operating the Monitor 4-1 CD Software and Utilities ...4-1 Installing Drivers...4-1 Installing the monitor driver software from the CD 4-1 Downloading updated drivers from the Internet 4-1 Using the Auto Adjustment Function 4-2 Side-Panel Controls...4-3 Using the On-Screen Display (OSD) ...4-4 OSD Menu Selections...
User's Guide q1859, q2009, q2159 LCD Display
Page 6
Table of Contents Technical Specifications B-1 Compaq LCD Monitors...B-1 Preset Video Modes ...B-3 LCD Monitor Quality and Pixel Policy...B-4 Power Cord Set Requirements ...B-4 Agency Regulatory Notices C-1 Federal Communications Commission Notice C-1 Modifications...C-1 Cables ...C-1 Declaration of Conformity for Products Marked with FCC Logo, United States Only C-1 Materials Disposal ...C-2 Chemical Substances ...C-2 Canadian Notice ...C-2 Avis Canadien ...C-2 European Union Regulatory Notice ...C-2 Disposal of Waste Equipment by Users in Private Households in the...
Table of Contents Technical Specifications B-1 Compaq LCD Monitors...B-1 Preset Video Modes ...B-3 LCD Monitor Quality and Pixel Policy...B-4 Power Cord Set Requirements ...B-4 Agency Regulatory Notices C-1 Federal Communications Commission Notice C-1 Modifications...C-1 Cables ...C-1 Declaration of Conformity for Products Marked with FCC Logo, United States Only C-1 Materials Disposal ...C-2 Chemical Substances ...C-2 Canadian Notice ...C-2 Avis Canadien ...C-2 European Union Regulatory Notice ...C-2 Disposal of Waste Equipment by Users in Private Households in the...
User's Guide q1859, q2009, q2159 LCD Display
Page 7
...; VGA analog video input ■ Fast response time, providing better experience for casual gaming and graphics ■ Easy viewing from a sitting or standing position, or while moving from one side of the monitor to the other ■ Tilt adjustment ■ Removable pedestal and Video Electronics Standards Association (VESA) standard mounting holes for flexible mounting solutions, including wall-mounting ■ Security lock slot for a locking security cable (security cable sold separately) ■ Plug...
...; VGA analog video input ■ Fast response time, providing better experience for casual gaming and graphics ■ Easy viewing from a sitting or standing position, or while moving from one side of the monitor to the other ■ Tilt adjustment ■ Removable pedestal and Video Electronics Standards Association (VESA) standard mounting holes for flexible mounting solutions, including wall-mounting ■ Security lock slot for a locking security cable (security cable sold separately) ■ Plug...
User's Guide q1859, q2009, q2159 LCD Display
Page 10
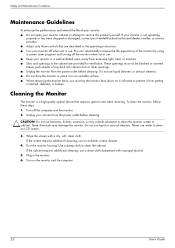
... instructions. ■ Turn your monitor off the computer and the monitor. 2. Unplug your monitor from the power outlet before cleaning. CAUTION: Do not use liquid cleaners or aerosol cleaners. ■ Do not drop the monitor or place it from excessive light, heat, or moisture. ■ Slots and openings in the cabinet are described in use water to clean an LCD screen. 3. If the screen requires additional cleaning, use...
... instructions. ■ Turn your monitor off the computer and the monitor. 2. Unplug your monitor from the power outlet before cleaning. CAUTION: Do not use liquid cleaners or aerosol cleaners. ■ Do not drop the monitor or place it from excessive light, heat, or moisture. ■ Slots and openings in the cabinet are described in use water to clean an LCD screen. 3. If the screen requires additional cleaning, use...

User's Guide q1859, q2009, q2159 LCD Display
Page 11
... monitor on a flat, soft, protected table or desk surface with the support column overhanging the edge. 2. Make sure all contents are included. You may need a flat, soft, protected area for installation. 5. Installing the monitor base User's Guide 3-1 You may need a straight-slot screwdriver to secure some cables. Avoid touching or applying pressure to assemble the monitor. Store the packing box. 2. Preparing the monitor for wall-mounting. 3 Setting Up the Monitor Unpacking the Monitor...
... monitor on a flat, soft, protected table or desk surface with the support column overhanging the edge. 2. Make sure all contents are included. You may need a flat, soft, protected area for installation. 5. Installing the monitor base User's Guide 3-1 You may need a straight-slot screwdriver to secure some cables. Avoid touching or applying pressure to assemble the monitor. Store the packing box. 2. Preparing the monitor for wall-mounting. 3 Setting Up the Monitor Unpacking the Monitor...
User's Guide q1859, q2009, q2159 LCD Display
Page 15
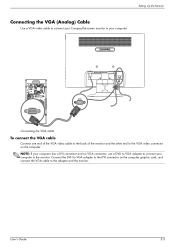
... VGA cable To connect the VGA cable Connect one end of the VGA video cable to the back of the monitor and the other end to the VGA video connector on the computer graphic card, and connect the VGA cable to the adapter and the monitor. Connect the DVI-I to VGA adapter to connect your computer to the monitor. User's Guide 3-5 NOTE: If your computer. Setting Up the Monitor Connecting the VGA (Analog) Cable Use a VGA video cable to connect your Compaq flat-screen monitor to your computer has a DVI connector and no VGA connector, use a DVI-I to VGA adapter...
... VGA cable To connect the VGA cable Connect one end of the VGA video cable to the back of the monitor and the other end to the VGA video connector on the computer graphic card, and connect the VGA cable to the adapter and the monitor. Connect the DVI-I to VGA adapter to connect your computer to the monitor. User's Guide 3-5 NOTE: If your computer. Setting Up the Monitor Connecting the VGA (Analog) Cable Use a VGA video cable to connect your Compaq flat-screen monitor to your computer has a DVI connector and no VGA connector, use a DVI-I to VGA adapter...
User's Guide q1859, q2009, q2159 LCD Display
Page 19
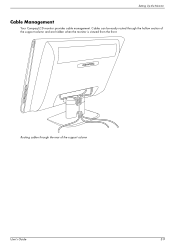
Routing cables through the hollow section of the support column User's Guide 3-9 Setting Up the Monitor Cable Management Your Compaq LCD monitor provides cable management. Cables can be easily routed through the rear of the support column and are hidden when the monitor is viewed from the front.
Routing cables through the hollow section of the support column User's Guide 3-9 Setting Up the Monitor Cable Management Your Compaq LCD monitor provides cable management. Cables can be easily routed through the rear of the support column and are hidden when the monitor is viewed from the front.
User's Guide q1859, q2009, q2159 LCD Display
Page 21
.... User's Guide 4-1 4 Operating the Monitor CD Software and Utilities The CD that is included with this monitor contains drivers and software that the proper resolutions and refresh rates appear in the Display Control Panel settings. Select the language. 3. Restart the computer. 6. Refer to install the digitally signed monitor drivers (INF or ICM files) manually from the Internet. The software download pages for your monitor. Installing the monitor driver software from the CD To install the monitor driver software from the HP Support site...
.... User's Guide 4-1 4 Operating the Monitor CD Software and Utilities The CD that is included with this monitor contains drivers and software that the proper resolutions and refresh rates appear in the Display Control Panel settings. Select the language. 3. Restart the computer. 6. Refer to install the digitally signed monitor drivers (INF or ICM files) manually from the Internet. The software download pages for your monitor. Installing the monitor driver software from the CD To install the monitor driver software from the HP Support site...
User's Guide q1859, q2009, q2159 LCD Display
Page 22
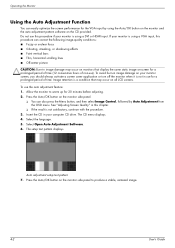
... static image on-screen for the VGA input by Auto Adjustment from the OSD menu. To avoid burn-in your monitor is using a VGA input, this chapter. ❏ If the result is using a DVI or HDMI input. To use ). The CD menu displays. 4. Select Open Auto Adjustment Software. 6. Operating the Monitor Using the Auto Adjustment Function You can also press the Menu button, and then select Image Control, followed by using the Auto/OK button on the monitor and the auto adjustment pattern software on the CD provided. Auto adjustment setup...
... static image on-screen for the VGA input by Auto Adjustment from the OSD menu. To avoid burn-in your monitor is using a VGA input, this chapter. ❏ If the result is using a DVI or HDMI input. To use ). The CD menu displays. 4. Select Open Auto Adjustment Software. 6. Operating the Monitor Using the Auto Adjustment Function You can also press the Menu button, and then select Image Control, followed by using the Auto/OK button on the monitor and the auto adjustment pattern software on the CD provided. Auto adjustment setup...
User's Guide q1859, q2009, q2159 LCD Display
Page 23
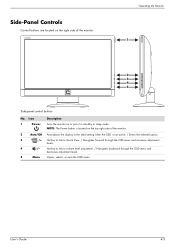
... Quick View. / Navigates forward through the OSD menu and decreases adjustment levels. 5 Menu Opens, selects, or exits the OSD menu. User's Guide 4-3 Side-Panel Controls Control buttons are located on or puts it in standby or sleep mode. NOTE: The Power button is located on the top right side of the monitor: Operating the Monitor 1 2 3 4 5 Side-panel control buttons No. Icon 1 Power Description Turns the monitor on the right side of the monitor. 2 Auto/OK Auto-adjusts the display to the ideal setting...
... Quick View. / Navigates forward through the OSD menu and decreases adjustment levels. 5 Menu Opens, selects, or exits the OSD menu. User's Guide 4-3 Side-Panel Controls Control buttons are located on or puts it in standby or sleep mode. NOTE: The Power button is located on the top right side of the monitor: Operating the Monitor 1 2 3 4 5 Side-panel control buttons No. Icon 1 Power Description Turns the monitor on the right side of the monitor. 2 Auto/OK Auto-adjusts the display to the ideal setting...
User's Guide q1859, q2009, q2159 LCD Display
Page 24
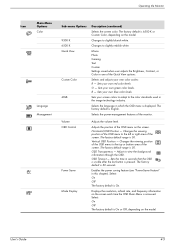
... to change the horizontal screen image (VGA input only). Adjusts the vertical position of the screen. Minimizes any horizontal noise, and clear or sharpen the image of characters (VGA input only). 4-4 User's Guide If the monitor is not already on, press the Power button to remove any vertical bars or strips visible on the monitor. 2. The menu moves to the bottom if you to turn on the screen background. Contrast Adjusts the contrast level of the picture (VGA input only). Adjusts the horizontal position...
... to change the horizontal screen image (VGA input only). Adjusts the vertical position of the screen. Minimizes any horizontal noise, and clear or sharpen the image of characters (VGA input only). 4-4 User's Guide If the monitor is not already on, press the Power button to remove any vertical bars or strips visible on the monitor. 2. The menu moves to the bottom if you to turn on the screen background. Contrast Adjusts the contrast level of the picture (VGA input only). Adjusts the horizontal position...
User's Guide q1859, q2009, q2159 LCD Display
Page 25
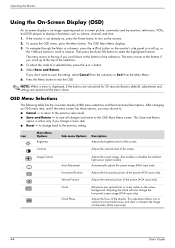
... Settings saved when user adjusts the Brightness, Contrast, or Color in this chapter). Selects and adjusts your own red color levels. B - The factory default is On. Horizontal OSD Position - OSD Transparency - Sets your own color scales: R - Selects the power-management features of the OSD menu on the screen each time the OSD Main Menu is pressed. Vertical OSD Position - Select: On Off The factory default is English. Select: On Off The factory default is 50. Volume OSD Control Power Saver Mode Display Adjusts the volume level. The factory default range...
... Settings saved when user adjusts the Brightness, Contrast, or Color in this chapter). Selects and adjusts your own red color levels. B - The factory default is On. Horizontal OSD Position - OSD Transparency - Sets your own color scales: R - Selects the power-management features of the OSD menu on the screen each time the OSD Main Menu is pressed. Vertical OSD Position - Select: On Off The factory default is English. Select: On Off The factory default is 50. Volume OSD Control Power Saver Mode Display Adjusts the volume level. The factory default range...
User's Guide q1859, q2009, q2159 LCD Display
Page 26
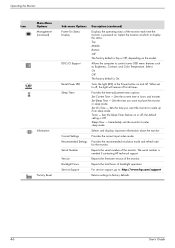
... sleep mode. Sets the time you want to control some OSD menu features such as Brightness, Contrast, and Color Temperature. Reports the serial number of backlight operation. Sets the current time in sleep mode. Selects and displays important information about the monitor. Provides the recommended resolution mode and refresh rate for the monitor. Operating the Monitor Icon Main Menu Options Management (continued) Information Factory Reset Sub-menu Options Power-On Status Display DDC/CI Support Bezel Power LED Sleep Timer Current Settings Recommended Settings Serial Number...
... sleep mode. Sets the time you want to control some OSD menu features such as Brightness, Contrast, and Color Temperature. Reports the serial number of backlight operation. Sets the current time in sleep mode. Selects and displays important information about the monitor. Provides the recommended resolution mode and refresh rate for the monitor. Operating the Monitor Icon Main Menu Options Management (continued) Information Factory Reset Sub-menu Options Power-On Status Display DDC/CI Support Bezel Power LED Sleep Timer Current Settings Recommended Settings Serial Number...
User's Guide q1859, q2009, q2159 LCD Display
Page 27
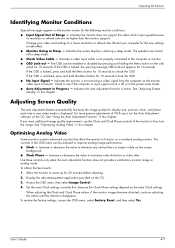
... monitor does not support the video card's input signal because its resolution or refresh rate are turned off or in the power-saver mode. ■ Auto Adjustment in this chapter. See "Adjusting Screen Quality" in this chapter. See "Using the Auto Adjustment Function" in this chapter. Increase or decrease the value to unlock the OSD. To restore the factory settings, access the OSD menu, select Factory Reset, and then select Yes. User's Guide 4-7 Indicates the screen display is locked, the warning message OSD Lock...
... monitor does not support the video card's input signal because its resolution or refresh rate are turned off or in the power-saver mode. ■ Auto Adjustment in this chapter. See "Adjusting Screen Quality" in this chapter. See "Using the Auto Adjustment Function" in this chapter. Increase or decrease the value to unlock the OSD. To restore the factory settings, access the OSD menu, select Factory Reset, and then select Yes. User's Guide 4-7 Indicates the screen display is locked, the warning message OSD Lock...
User's Guide q1859, q2009, q2159 LCD Display
Page 28
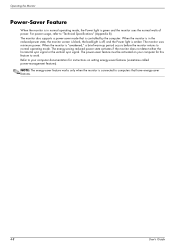
... When the monitor is in the reduced-power state, the monitor screen is blank, the backlight is off, and the Power light is green and the monitor uses the normal watts of power. The energy-saving reduced power state activates if the monitor does not detect either the horizontal sync signal or the vertical sync signal. For power usage, refer to "Technical Specifications" (Appendix B). The monitor also supports a power-saver mode that have energy-saver features. 4-8 User's Guide
... When the monitor is in the reduced-power state, the monitor screen is blank, the backlight is off, and the Power light is green and the monitor uses the normal watts of power. The energy-saving reduced power state activates if the monitor does not detect either the horizontal sync signal or the vertical sync signal. For power usage, refer to "Technical Specifications" (Appendix B). The monitor also supports a power-saver mode that have energy-saver features. 4-8 User's Guide
User's Guide q1859, q2009, q2159 LCD Display
Page 31
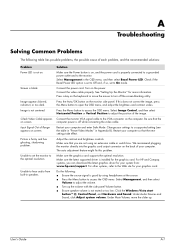
... speaker volume is not muted or too low: Click the Windows Vista start button™ , Control Panel, and Hardware and Sound. Check if the Bezel Power LED option is set to Off and, if so, set the monitor to access the OSD menu. Connect the power cord. Press a key on , and the power cord is properly connected to a grounded power outlet and to open the OSD menu, and adjust the brightness and contrast scales. Select Image Control, and then select Horizontal Position or Vertical Position...
... speaker volume is not muted or too low: Click the Windows Vista start button™ , Control Panel, and Hardware and Sound. Check if the Bezel Power LED option is set to Off and, if so, set the monitor to access the OSD menu. Connect the power cord. Press a key on , and the power cord is properly connected to a grounded power outlet and to open the OSD menu, and adjust the brightness and contrast scales. Select Image Control, and then select Horizontal Position or Vertical Position...
User's Guide q1859, q2009, q2159 LCD Display
Page 32
... maximum refresh rate that the Compaq monitor drivers are compatible with Plug and Play. For technical support contact information, refer to the computer. Check the monitor's video cable, and make sure that you are bent. Compaq monitor drivers are also available at the resolution that none of monitor) ■ Monitor serial number (located on label on the monitor provides the product number and serial number. The computer power switch should be snugly seated in the On position. Getting Support...
... maximum refresh rate that the Compaq monitor drivers are compatible with Plug and Play. For technical support contact information, refer to the computer. Check the monitor's video cable, and make sure that you are bent. Compaq monitor drivers are also available at the resolution that none of monitor) ■ Monitor serial number (located on label on the monitor provides the product number and serial number. The computer power switch should be snugly seated in the On position. Getting Support...

User's Guide q1859, q2009, q2159 LCD Display
Page 33
Compaq LCD Monitors Face treatment: Glare polarizer with hard coating Input Terminals: ■ VGA connector Specifications model Q1859 Display Type: Viewable Image Size: Tilt: Maximum Weight (unpacked): Dimensions (h x w x d): Maximum Graphics Resolution: Text Mode: Dot Pitch: Horizontal Frequency (analog mode): Vertical Frequency (analog mode): Environmental Requirements Temperature (independent of altitude) Operating Temperature: Non-Operating Temperature: Relative Humidity (non-condensing): Operating Humidity: Non-Operating Humidity: Power Source: Power Consumption: Sleep Power ...
Compaq LCD Monitors Face treatment: Glare polarizer with hard coating Input Terminals: ■ VGA connector Specifications model Q1859 Display Type: Viewable Image Size: Tilt: Maximum Weight (unpacked): Dimensions (h x w x d): Maximum Graphics Resolution: Text Mode: Dot Pitch: Horizontal Frequency (analog mode): Vertical Frequency (analog mode): Environmental Requirements Temperature (independent of altitude) Operating Temperature: Non-Operating Temperature: Relative Humidity (non-condensing): Operating Humidity: Non-Operating Humidity: Power Source: Power Consumption: Sleep Power ...
User's Guide q1859, q2009, q2159 LCD Display
Page 36
... whole pixel is always off (a dark spot on the product's electrical ratings label. If you should be rated for the product and for use , contact your Compaq LCD Monitor, refer to the HP Web site at a supported resolution and refresh rate, from the product. B-4 User's Guide Nevertheless, the display may have questions about your HP-authorized service provider. These imperfections are made. This is not specific to the plug...
... whole pixel is always off (a dark spot on the product's electrical ratings label. If you should be rated for the product and for use , contact your Compaq LCD Monitor, refer to the HP Web site at a supported resolution and refresh rate, from the product. B-4 User's Guide Nevertheless, the display may have questions about your HP-authorized service provider. These imperfections are made. This is not specific to the plug...

User's Guide q1859, q2009, q2159 LCD Display
Page 43
... panel 4-2 - 4-3 software and utilities CD 4-1 specifications B-1 - B-4 tilt adjustment 3-10 troubleshooting A-1 - A adjustments tilt 3-10 audio and video cables and adapters 3-6 C cable management 3-9 cleaning 2-2 connecting audio cable 3-7 power cable 3-8 VGA 3-5 F features 1-1 I installing 3-1 - 3-10 M maintenance cleaning 2-2 guidelines 2-2 monitor conditions Auto Adjustment in Progress 4-7 Check Video Cable 4-7 Input Signal Out of Range 4-7 Monitor Going to Sleep 4-7 No Input Signal 4-7 OSD Lock-out 4-7 monitor operation 4-1 - 4-8 monitor setup 3-1 - 3-10 D Index P power cable connecting...
... panel 4-2 - 4-3 software and utilities CD 4-1 specifications B-1 - B-4 tilt adjustment 3-10 troubleshooting A-1 - A adjustments tilt 3-10 audio and video cables and adapters 3-6 C cable management 3-9 cleaning 2-2 connecting audio cable 3-7 power cable 3-8 VGA 3-5 F features 1-1 I installing 3-1 - 3-10 M maintenance cleaning 2-2 guidelines 2-2 monitor conditions Auto Adjustment in Progress 4-7 Check Video Cable 4-7 Input Signal Out of Range 4-7 Monitor Going to Sleep 4-7 No Input Signal 4-7 OSD Lock-out 4-7 monitor operation 4-1 - 4-8 monitor setup 3-1 - 3-10 D Index P power cable connecting...


