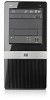
Quick Setup & Getting Started Guide
Page 16
... and replacement, troubleshooting, Desktop Management, setup utilities, safety, routine care, connector pin assignments, POST error messages, diagnostic indicator lights and error codes. ● Safety & Regulatory Information Guide-Provides safety and regulatory information that ensures compliance with the computer, try...only) for more information about using the Computer Setup utility. To access the publications, select Start > All Programs > HP User Manuals. also includes basic troubleshooting information should you can reconfigure the power button to the system board. On some models...
Quick Setup & Getting Started Guide
Page 17
The flashing lights are error codes that you know is blank, plug the monitor into the...● If the screen is functioning properly. ● If you are working on page 10 in resolving problems online, HP Instant Support Professional Edition provides you in this guide for more general suggestions. ● Refer to the Maintenance and Service Guide...cable into a different video port on the front of the computer to the comprehensive online technical support at : http://www.hp.com/go/ ispe. NOTE: The Drive Protection System (DPS) Self-Test software is available on some models only. ...
Quick Setup & Getting Started Guide
Page 18
The flashing lights are plugged into a working electrical outlet. ● Check to see that the voltage select switch (some models) is dim. ● Press and hold any key. Access the Business Support Center (BSC) at http://www.hp.com/go/ bizsupport for the latest online support information, software and drivers... ● Spend time troubleshooting the problem with the computer, monitor, or software, see that the monitor is turned on and the green monitor light is on. ● Check the Power LED on the front of the monitor if the monitor is set to ensure that was recently installed...
Hardware Reference Guide - HP Pro 2000 and 3000 Series Microtower Business PCs
Page 13
... the memory module socket (1), and insert the memory module into an active AC outlet. On HP Pro 3000 systems with Intel processors, populate the DIMM sockets in the following order: DIMM1, DIMM2, DIMM3... Locate the memory module sockets on the system board, voltage is still present. 5. On HP Pro 3000 systems with the tab on the memory socket. 8. Match the notch on state, voltage ...personal injury from the power outlet and disconnect any additional modules. 10. WARNING! NOTE: On HP Pro 2000 systems, populate the DIMM sockets in the closed position (3). 9. Repeat steps 7 and ...
Hardware Reference Guide - HP Pro 2000 and 3000 Series Microtower Business PCs
Page 20
... the first SATA optical drive to the white SATA connector on the system board. ● Always populate the dark blue and white connectors before the light blue and orange connectors. ● The system does not support Parallel ATA (PATA) optical drives or PATA hard drives. ● If needed..., HP has provided extra drive retainer screws on the interior of the front bezel that are discharged of work and damage to liquids, temperature extremes, or ...
Hardware Reference Guide - HP Pro 2000 and 3000 Series Microtower Business PCs
Page 23
... install the two M3 metric retainer screws (2) as shown in the illustration below. Figure 18 Connecting the Power and Data Cables 12. Refer to the light blue or orange system board connector. 11. Replace the front bezel and access panel. 13. Reconnect the power cord and turn on page 14 for...
Hardware Reference Guide - HP Pro 2000 and 3000 Series Microtower Business PCs
Page 43
Cleaning ● Clean the panel and controls with a soft, dry cloth or a soft cloth lightly moistened with sufficient packing material to high humidity, extreme temperatures, mechanical vibration, or direct sunlight. Turn off . 2. Optical Drive Precautions Be sure to ship the ... diskettes. This may cause it to protect the drive while in the board slots before you operate the unit immediately, it checked by an authorized HP service provider. Pack the system components and external devices in transit.
Maintenance & Service Guide: HP Pro 3000/3010/3080 Business PCs
Page 14
...bezel appearance and drive configuration varies by model. Figure 1-5 Front Panel Components Table 1-1 Front Panel Components 1 5.25-inch Optical Drive1 6 Hard Drive Activity Light 2 5.25-inch Optical Drive Bay 7 Optical Drive Eject Button 3 3.5-inch Media Card Reader (optional)2 8 Microphone Connector 4 Recovery/Reset Button3 9 ...1 Some models have a bezel blank covering the 3.5-inch drive bay. 3 Not available on all models 4 Chapter 1 Product Features Microtower Models Serviceability Features The Microtower computer includes features that make it easy to upgrade and service.
Maintenance & Service Guide: HP Pro 3000/3010/3080 Business PCs
Page 15
...1 xD 2 MicroSD ● xD-Picture Card (xD) ● MicroSD (T-Flash) ● MicroSDHC 3 Media Card Reader Activity Light 4 SD/MMC+/miniSD ● Secure Digital (SD) ● Secure Digital High Capacity (SDHC) ● MiniSD ● MiniSDHC...PRO/MS PRO DUO ● Memory Stick (MS) ● Memory Stick Select ● Memory Stick PRO ● MagicGate Memory Stick (MG) ● Memory Stick Duo (MS Duo) Duo (MS PRO Duo) ● Memory Stick PRO- ● MagicGate Memory Duo ● Memory Stick PRO (MS PRO) HG Duo ● Memory Stick Micro (M2) (adapter required) Microtower...
Maintenance & Service Guide: HP Pro 3000/3010/3080 Business PCs
Page 18
... Panel Components 1 Media card reader (optional)2 6 USB (Universal Serial Bus) 2.0 Ports 2 5.25-inch Optical Drive (optional)1 7 Microphone Connector 4 Hard Drive Activity Light 8 Headphone Connector 3 Optical Drive Activity Light 9 Power On Light 5 Optical Drive Eject Button 10 Dual-State Power Button 1 Some models have a bezel blank covering the 3.5-inch drive bay. 2 Some models have...
Maintenance & Service Guide: HP Pro 3000/3010/3080 Business PCs
Page 41
To clean the tops of the keys or the keyboard body, follow the procedures described below: ● To remove light stains or dirt, use plain water with a clean, lint-free cloth or swab. ● For stronger stains, use isopropyl (rubbing) alcohol. Routine Care 31 Always ...
Maintenance & Service Guide: HP Pro 3000/3010/3080 Business PCs
Page 60
CAUTION: Always pull the connector - Cable Connections HP Pro 3000/3080 System board connectors are color-coded to find the proper connection....USB2 SATA1 SATA2 SATA3 SATA4 SPKR MEDIA Connector Color white white maroon white yellow white black white dark blue white light blue orange white black Description Power supply, 24-pin Power supply, 4-pin Chassis fan Heat sink fan Front I/O... drive Speaker Media card reader 50 Chapter 6 Removal and Replacement Procedures Microtower (MT) Chassis 2. NEVER pull on the cable could damage the cable and result in a failed power supply.
Maintenance & Service Guide: HP Pro 3000/3010/3080 Business PCs
Page 61
Connector Name Not labeled ATX_CPU CHASSIS_FAN1 CPU_FAN J_AUDIO J_USB1 F_PANEL JUSB2 SATA0 SATA1 SATA2 SATA3 Connector Color white white maroon white yellow white black white dark blue white light blue orange Description Power supply, 24-pin Power supply, 4-pin Chassis fan Heat sink fan Front I/O audio Front I/O USB Power button Media card reader Primary hard drive Primary optical drive Second hard drive Second optical drive Cable Management 51 HP Pro 3010 System board connectors are color-coded to make it easier to find the proper connection.
Maintenance & Service Guide: HP Pro 3000/3010/3080 Business PCs
Page 63
... the first SATA optical drive to the white SATA1 connector on the system board. ● Always populate the dark blue and white connectors before the light blue and orange connectors. ● The system does not support Parallel ATA (PATA) optical drives or PATA hard drives. ● If needed..., HP has provided extra drive retainer screws on or in standby mode. Handle a drive carefully; Avoid exposing a hard drive to secure the drives in a bubble-pack ...
Maintenance & Service Guide: HP Pro 3000/3010/3080 Business PCs
Page 65
HP Pro 3000/3080 1 SATA1 SATA1 2 SATA2 SATA2 3 SATA3 SATA3 4 SATA4 SATA4 5 Media Card Reader MEDIA Color dark blue white light blue orange black System Board Label - HP Pro 3010 SATA0 SATA1 SATA2 SATA3 F_USB2 Color dark blue white light blue orange white Drives 55 Figure 6-17 System Board Drive Connections - HP Pro 3010 Table 6-4 System Board Drive Connectors No. System Board Connector System Board Label -
Maintenance & Service Guide: HP Pro 3000/3010/3080 Business PCs
Page 110
...AUDIO FRNT USB1 JFP1 FRNT USB2 SATA1 SATA2 SATA3 SATA4 SPKR MEDIA Connector Color white white maroon white yellow white black white dark blue white light blue orange white black Description Power supply, 24-pin Power supply, 4-pin Chassis fan Heat sink fan Front I/O audio Front I /O ...drive Primary optical drive Second hard drive Second optical drive Speaker Media card reader HP Pro 3010 System board connectors are color-coded to make it easier to find the proper connection. Cable Connections HP Pro 3000/3080 System board connectors are color-coded to make it easier to find the...
Maintenance & Service Guide: HP Pro 3000/3010/3080 Business PCs
Page 111
... for optional drive (diskette drive shown) 2 3.5-inch internal hard drive bay 3 5.25-inch external drive bay for more information. Connector Name SATA2 SATA3 Connector Color light blue orange Description Second hard drive Second optical drive Drives A Torx T-15 screwdriver is needed to the Computer Setup (F10) Utility Guide for optional drive...
Maintenance & Service Guide: HP Pro 3000/3010/3080 Business PCs
Page 152
Access the Business Support Center (BSC) at : http://www.hp.com/ go /bizsupport for your region (115V or 230V). ● Check that the computer is turned on and the green power light is on and the monitor light is dim. ● Press and hold any key on . ● Listen for at.... ● Wake the computer by pressing and holding the power button for beeps from the computer. To assist you in resolving problems online, HP Instant Support Professional Edition provides you with the computer, monitor, or software, see the following to ensure that was recently added to your system....
Maintenance & Service Guide: HP Pro 3000/3010/3080 Business PCs
Page 154
... update the RTC date and time). If the problem persists, replace the RTC battery. See the Hardware Reference Guide for instructions on . The Num Lock light should not be on the keypad. WARNING! Computer will lose any key. Press the Num Lock key. When the computer is plugged into an AC...
Maintenance & Service Guide: HP Pro 3000/3010/3080 Business PCs
Page 160
...card. Check the manufacturer's documentation included with the gold contact on the right of the Memory Stick/PRO card is not in the locked position. Media card is a read-only memory (ROM) card. ...out of compatible cards. Refer to Windows, the reader and the inserted cards are turning the PC on the bottom of the SD card is not in the wrong slot, or is used...icon, and select Eject. Cause Solution The inserted media card has boot capability. The green LED will light if inserted properly. Do not know how to the media card. Table C-4 Solving Media Card Reader Problems...