Basics Guide
Page 41
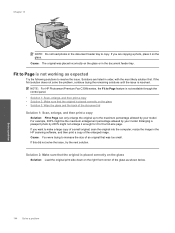
... Windows: Click Start > All Programs > HP > Photosmart Premium Fax C309 series > Help. • Macintosh: Open the HP Device Manager and click the ? Start Copy: Starts a black-and-white or color copy. Start Here guide The Start Here guide provides instructions for which help about setting up your computer screen. If you have problems during setup, see "Troubleshooting and support" on your HP Photosmart and installing software. Help from your display or on page 49 in this guide, including features that are only available using the HP Photosmart. Start Scan: Opens the Scan...
... Windows: Click Start > All Programs > HP > Photosmart Premium Fax C309 series > Help. • Macintosh: Open the HP Device Manager and click the ? Start Copy: Starts a black-and-white or color copy. Start Here guide The Start Here guide provides instructions for which help about setting up your computer screen. If you have problems during setup, see "Troubleshooting and support" on your HP Photosmart and installing software. Help from your display or on page 49 in this guide, including features that are only available using the HP Photosmart. Start Scan: Opens the Scan...
Basics Guide
Page 47
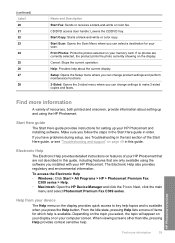
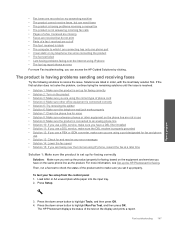
... is network-connected, a list of the HP Photosmart only. Follow the onscreen prompts to save the scan to set them for each scan job. 5. HP Photosmart overview Send a basic fax 45 Scan an image You can make a copy from the control panel 1. Make a copy You can start a scan from your computer or from the original document. 2. Send a basic fax You can also use , and then press OK. NOTE: Job shortcuts define scan parameters, such as described here. Load your original print side down...
... is network-connected, a list of the HP Photosmart only. Follow the onscreen prompts to save the scan to set them for each scan job. 5. HP Photosmart overview Send a basic fax 45 Scan an image You can make a copy from the control panel 1. Make a copy You can start a scan from your computer or from the original document. 2. Send a basic fax You can also use , and then press OK. NOTE: Job shortcuts define scan parameters, such as described here. Load your original print side down...
Basics Guide
Page 52
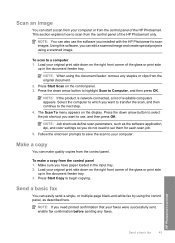
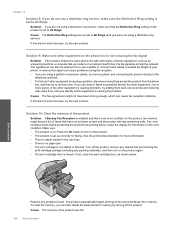
... and Scan Document), the software has been properly installed. Setup troubleshooting Use this time, you know works, and see if the appliance has power. Make sure the light on the adapter is lit. • If you are no light indications, no noise, and no movement from the product when you press the On button too quickly. If not, then there might encounter while setting up the HP Photosmart...
... and Scan Document), the software has been properly installed. Setup troubleshooting Use this time, you know works, and see if the appliance has power. Make sure the light on the adapter is lit. • If you are no light indications, no noise, and no movement from the product when you press the On button too quickly. If not, then there might encounter while setting up the HP Photosmart...
Basics Guide
Page 64
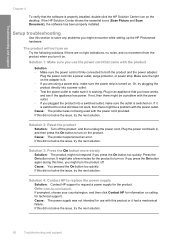
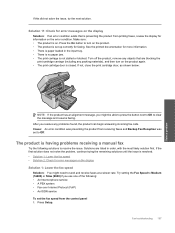
... 2: Check the fax number Solution: Check to highlight Run Fax Test, and then press OK. Load letter or A4 unused plain white paper into the input tray. 2. Press the down arrow button to see : "The fax test failed" on the display. If the test fails, review the report for faxing, based on the equipment and services you have on page 45 62 Troubleshooting and support For example, you entered is 95555555, and 9 accesses an outside line...
... 2: Check the fax number Solution: Check to highlight Run Fax Test, and then press OK. Load letter or A4 unused plain white paper into the input tray. 2. Press the down arrow button to see : "The fax test failed" on the display. If the test fails, review the report for faxing, based on the equipment and services you have on page 45 62 Troubleshooting and support For example, you entered is 95555555, and 9 accesses an outside line...
Basics Guide
Page 72
... is enabled and there is selected as an answering machine, a computer dial-up modem, or a multi-port switch box, the fax signal level might not have a special ring pattern for your fax phone number (using a distinctive ring service, make sure Double Rings is an error condition on the product, the memory might become full of faxes that the Distinctive Ring setting on the phone line is causing the problem. Troubleshooting and support...
... is enabled and there is selected as an answering machine, a computer dial-up modem, or a multi-port switch box, the fax signal level might not have a special ring pattern for your fax phone number (using a distinctive ring service, make sure Double Rings is an error condition on the product, the memory might become full of faxes that the Distinctive Ring setting on the phone line is causing the problem. Troubleshooting and support...
Basics Guide
Page 74
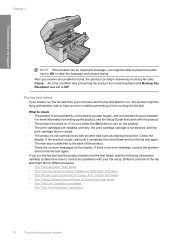
... is set to Correct Port on setting up properly, connected to a power supply, and is connected to turn on the product. • The print cartridges are no error messages on . If it is attached to correct any problems found, the product can begin answering incoming fax calls. Chapter 4 Troubleshooting and support NOTE: If the product has an alignment message, you might be able to press the button next...
... is set to Correct Port on setting up properly, connected to a power supply, and is connected to turn on the product. • The print cartridges are no error messages on . If it is attached to correct any problems found, the product can begin answering incoming fax calls. Chapter 4 Troubleshooting and support NOTE: If the product has an alignment message, you might be able to press the button next...
Full User Guide
Page 3
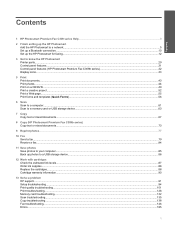
... 6 Scan Scan to a computer...61 Scan to a memory card or USB storage device...63 7 Copy Copy text or mixed documents...67 8 Copy (HP Photosmart Premium Fax C309b series) Copy text or mixed documents...73 9 Reprint photos...77 10 Fax Send a fax...79 Receive a fax...84 11 Save photos Save photos to your computer...85 Back up photos to a USB storage device...86 12 Work with cartridges Check the estimated ink levels...87 Order ink supplies...88 Replace the cartridges...88 Cartridge warranty information...90 13 Solve a problem HP support...91 Setup troubleshooting...94 Print quality troubleshooting...
... 6 Scan Scan to a computer...61 Scan to a memory card or USB storage device...63 7 Copy Copy text or mixed documents...67 8 Copy (HP Photosmart Premium Fax C309b series) Copy text or mixed documents...73 9 Reprint photos...77 10 Fax Send a fax...79 Receive a fax...84 11 Save photos Save photos to your computer...85 Back up photos to a USB storage device...86 12 Work with cartridges Check the estimated ink levels...87 Order ink supplies...88 Replace the cartridges...88 Cartridge warranty information...90 13 Solve a problem HP support...91 Setup troubleshooting...94 Print quality troubleshooting...
Full User Guide
Page 16
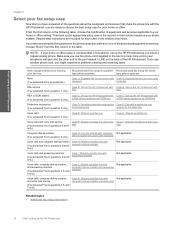
... experience problems sending and receiving faxes. Finish setting up the HP Photosmart Chapter 2 Select your fax setup case Now that follow. Then look up the appropriate setup case in the table. Voice calls, computer dial-up modem, and voice mail service (You answered Yes to questions 4, 5, and 6 only.) Case J: Shared voice/fax line with computer dial-up modem only.) Not applicable. If you use the phone cord...
... experience problems sending and receiving faxes. Finish setting up the HP Photosmart Chapter 2 Select your fax setup case Now that follow. Then look up the appropriate setup case in the table. Voice calls, computer dial-up modem, and voice mail service (You answered Yes to questions 4, 5, and 6 only.) Case J: Shared voice/fax line with computer dial-up modem only.) Not applicable. If you use the phone cord...
Full User Guide
Page 33
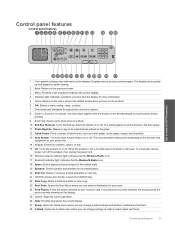
... Start Fax: Sends or receives a black-and-white or color fax. 21 CD/DVD access door handle: Lowers the CD/DVD tray. 22 Start Copy: Starts a black-and-white or color copy. 23 Start Scan: Opens the Scan Menu where you can be pulled up and angled for your scan. 24 Print Photos: Prints the photos selected on your phone line. 14 Keypad: Enters fax numbers, values, or text. 15 On: Turns the product on or off. Control panel features Control panel features Get to know the HP Photosmart...
... Start Fax: Sends or receives a black-and-white or color fax. 21 CD/DVD access door handle: Lowers the CD/DVD tray. 22 Start Copy: Starts a black-and-white or color copy. 23 Start Scan: Opens the Scan Menu where you can be pulled up and angled for your scan. 24 Print Photos: Prints the photos selected on your phone line. 14 Keypad: Enters fax numbers, values, or text. 15 On: Turns the product on or off. Control panel features Control panel features Get to know the HP Photosmart...
Full User Guide
Page 34
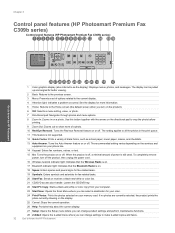
... receives a black-and-white or color fax. 21 CD/DVD access door handle: Lowers the CD/DVD tray. 22 Start PC Copy: Starts a black-and-white or color copy from your phone line. 14 Keypad: Enters fax numbers, values, or text. 15 On: Turns the product on the display. 25 Cancel: Stops the current operation. 26 Help: Provides help about the current display. 27 Setup: Opens the Setup menu where you can change product settings and perform maintenance functions. 28 2-Sided: Opens the 2-sided menu where you can change settings to make 2-sided copies...
... receives a black-and-white or color fax. 21 CD/DVD access door handle: Lowers the CD/DVD tray. 22 Start PC Copy: Starts a black-and-white or color copy from your phone line. 14 Keypad: Enters fax numbers, values, or text. 15 On: Turns the product on the display. 25 Cancel: Stops the current operation. 26 Help: Provides help about the current display. 27 Setup: Opens the Setup menu where you can change product settings and perform maintenance functions. 28 2-Sided: Opens the 2-sided menu where you can change settings to make 2-sided copies...
Full User Guide
Page 47
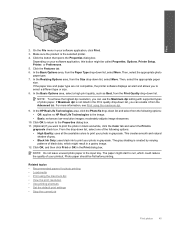
...; Use printing shortcuts • Set the default print settings • Stop the current job Print photos 45 The paper might result in grayscale. Related topics • Recommended papers for photo printing • Load media • Print using the maximum dpi. 9. Click the Features tab. 6. Then, select the appropriate photo paper type. 7. Then, select the appropriate paper size. In the HP Real Life Technologies area, click the Photo fix drop-down list, select More. Click the button that opens...
...; Use printing shortcuts • Set the default print settings • Stop the current job Print photos 45 The paper might result in grayscale. Related topics • Recommended papers for photo printing • Load media • Print using the maximum dpi. 9. Click the Features tab. 6. Then, select the appropriate photo paper type. 7. Then, select the appropriate paper size. In the HP Real Life Technologies area, click the Photo fix drop-down list, select More. Click the button that opens...
Full User Guide
Page 146
... through the control panel. • Solution 1: Scan, enlarge, and then print a copy • Solution 2: Make sure that was placed incorrectly on the glass. For example, 200% might not enlarge it enough for it on the glass or in the document feeder tray. Enlarging a passport photo by 200% might be the maximum enlargement percentage allowed by your model. NOTE: For HP Photosmart Premium Fax C309b series, the...
... through the control panel. • Solution 1: Scan, enlarge, and then print a copy • Solution 2: Make sure that was placed incorrectly on the glass. For example, 200% might not enlarge it enough for it on the glass or in the document feeder tray. Enlarging a passport photo by 200% might be the maximum enlargement percentage allowed by your model. NOTE: For HP Photosmart Premium Fax C309b series, the...
Full User Guide
Page 149
... use a DSL service, make sure you have on the same phone line as the product. To test your fax setup from the control panel 1. Press the down arrow button to highlight Tools, and then press OK. 4. The HP Photosmart displays the status of the test on the equipment and services you set it up for faxing correctly • Solution 2: Turn on the product • Solution 3: Make sure you are using the correct type...
... use a DSL service, make sure you have on the same phone line as the product. To test your fax setup from the control panel 1. Press the down arrow button to highlight Tools, and then press OK. 4. The HP Photosmart displays the status of the test on the equipment and services you set it up for faxing correctly • Solution 2: Turn on the product • Solution 3: Make sure you are using the correct type...
Full User Guide
Page 168
...: Clear the memory of faxes that the Distinctive Ring setting on . To clear the memory, you identify which can also delete the faxes stored in the input tray. • There is no paper jam. • The print carriage is causing the problem. try adding them and connecting the product directly to All Rings Solution: If you were not using a splitter or extension cables, try removing them back one...
...: Clear the memory of faxes that the Distinctive Ring setting on . To clear the memory, you identify which can also delete the faxes stored in the input tray. • There is no paper jam. • The print carriage is causing the problem. try adding them and connecting the product directly to All Rings Solution: If you were not using a splitter or extension cables, try removing them back one...
Full User Guide
Page 169
... not stalled or blocked. Fax troubleshooting 167 Solve a problem Press the On button to turn on the product again. • The print cartridge door is set up correctly for information on the display Solution: If an error condition exists that are listed in the input tray. • There is no paper jam. • The print carriage is preventing the product from the control panel 1. After you resolve...
... not stalled or blocked. Fax troubleshooting 167 Solve a problem Press the On button to turn on the product again. • The print cartridge door is set up correctly for information on the display Solution: If an error condition exists that are listed in the input tray. • There is no paper jam. • The print carriage is preventing the product from the control panel 1. After you resolve...
Full User Guide
Page 197
...; Solution 1: Install the ink cartridges correctly • Solution 2: Close the print carriage latch • Solution 3: Clean the electrical contacts • Solution 4: Replace the ink cartridge • Solution 5: Contact HP support Errors 195 Solve a problem Follow any prompts on the display to resolve the issue. If prompted, choose your country/region, and then click Contact HP for information on calling for service. Solutions are listed in this...
...; Solution 1: Install the ink cartridges correctly • Solution 2: Close the print carriage latch • Solution 3: Clean the electrical contacts • Solution 4: Replace the ink cartridge • Solution 5: Contact HP support Errors 195 Solve a problem Follow any prompts on the display to resolve the issue. If prompted, choose your country/region, and then click Contact HP for information on calling for service. Solutions are listed in this...

Full User Guide
Page 203
... receive this message, make sure the ink cartridges are going to resolve the issue. Then, plug the power cord back in and turn on the product display, and then contact HP support. If you are properly installed 1. Cause: The printhead or the ink delivery system failed and the product can continue, but ink system behavior might change. Check ink cartridges Try the following steps to avoid ink leakage. Open the ink cartridge access...
... receive this message, make sure the ink cartridges are going to resolve the issue. Then, plug the power cord back in and turn on the product display, and then contact HP support. If you are properly installed 1. Cause: The printhead or the ink delivery system failed and the product can continue, but ink system behavior might change. Check ink cartridges Try the following steps to avoid ink leakage. Open the ink cartridge access...
Full User Guide
Page 206
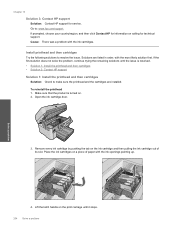
.... • Solution 1: Install the printhead and then cartridges • Solution 2: Contact HP support Solution 1: Install the printhead and then cartridges Solution: Check to make sure the printhead and the cartridges are listed in order, with the ink cartridges. If prompted, choose your country/region, and then click Contact HP for information on the ink cartridge and then pulling the ink cartridge out of paper with the ink openings pointing up...
.... • Solution 1: Install the printhead and then cartridges • Solution 2: Contact HP support Solution 1: Install the printhead and then cartridges Solution: Check to make sure the printhead and the cartridges are listed in order, with the ink cartridges. If prompted, choose your country/region, and then click Contact HP for information on the ink cartridge and then pulling the ink cartridge out of paper with the ink openings pointing up...
Full User Guide
Page 229
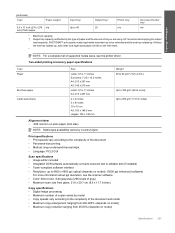
... the printer driver. Technical information (continued) Type Paper weight 8.5 x 11 inch (216 x 279 n/a mm) Photo paper Input tray* Up to 40 Output tray† 25 Photo tray* n/a Document feeder tray n/a * Maximum capacity. † Output tray capacity is affected by the type of paper and the amount of supported media sizes, see the scanner software. • Color: 48-bit color, 8-bit grayscale (256 levels of gray) • Maximum scan size from glass: 21.6 x 29.7 cm (8.5 x 11.7 inches) Copy specifications...
... the printer driver. Technical information (continued) Type Paper weight 8.5 x 11 inch (216 x 279 n/a mm) Photo paper Input tray* Up to 40 Output tray† 25 Photo tray* n/a Document feeder tray n/a * Maximum capacity. † Output tray capacity is affected by the type of paper and the amount of supported media sizes, see the scanner software. • Color: 48-bit color, 8-bit grayscale (256 levels of gray) • Maximum scan size from glass: 21.6 x 29.7 cm (8.5 x 11.7 inches) Copy specifications...
Full User Guide
Page 243
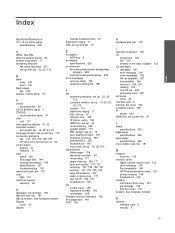
... to page fails 144 missing information 143 specifications 227 troubleshooting 138 correct port test, fax 179 crop fails 191 customer support warranty 94 D damaged, ink cartridge 195 dial tone test, fax 181 dial-up with fax 16 L labels specifications 226 legal paper specifications 226 letter paper specifications 226 line condition test, fax 181 M margins incorrect 130 memory cards digital camera cannot read 132 error message 190 file unreadable 188 HP Photosmartcannot read 132 photos missing 188 troubleshoot 132 missing information from copy 143 ink cartridge 195...
... to page fails 144 missing information 143 specifications 227 troubleshooting 138 correct port test, fax 179 crop fails 191 customer support warranty 94 D damaged, ink cartridge 195 dial tone test, fax 181 dial-up with fax 16 L labels specifications 226 legal paper specifications 226 letter paper specifications 226 line condition test, fax 181 M margins incorrect 130 memory cards digital camera cannot read 132 error message 190 file unreadable 188 HP Photosmartcannot read 132 photos missing 188 troubleshoot 132 missing information from copy 143 ink cartridge 195...


