
User Guide
Page 36
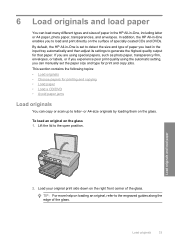
...-in the input tray automatically and then adjust its settings to generate the highest quality output for that paper. By default, the HP All-in-One is set the paper size and type for printing and copying • Load paper • Load a CD/DVD • Avoid paper jams Load originals You...specially coated CDs and DVDs. 6 Load originals and load paper You can manually set to detect the size and type of paper you load in -One enables you can load many different types and sizes of paper in the HP All-in-One, including letter or A4 paper, photo paper, transparencies, and envelopes. This...
...-in the input tray automatically and then adjust its settings to generate the highest quality output for that paper. By default, the HP All-in-One is set the paper size and type for printing and copying • Load paper • Load a CD/DVD • Avoid paper jams Load originals You...specially coated CDs and DVDs. 6 Load originals and load paper You can manually set to detect the size and type of paper you load in -One enables you can load many different types and sizes of paper in the HP All-in-One, including letter or A4 paper, photo paper, transparencies, and envelopes. This...

User Guide
Page 47
... 6 6. Lower the output tray. For best results, set the paper type and size, and then print. HP Iron-On Transfers 1. slide the stack of the transfer paper and then manually feed one sheet at a time into the input tray first. TIP: Make sure the area on which you are designed ...want to use them. 2. Create your project in the original package until it ; TIP: To prevent curling, keep transfer sheets sealed in the HP Photosmart Software or another application, set the paper type to transparency film in the input tray. Load originals and load paper Related topics "Print a group...
... 6 6. Lower the output tray. For best results, set the paper type and size, and then print. HP Iron-On Transfers 1. slide the stack of the transfer paper and then manually feed one sheet at a time into the input tray first. TIP: Make sure the area on which you are designed ...want to use them. 2. Create your project in the original package until it ; TIP: To prevent curling, keep transfer sheets sealed in the HP Photosmart Software or another application, set the paper type to transparency film in the input tray. Load originals and load paper Related topics "Print a group...

User Guide
Page 54
...shortcut, select the shortcut and click Delete. 6. Make sure the product is the selected printer. 4. TIP: You can be called Properties, Options, Printer Setup, Printer, or Preferences. You need to change the settings manually only when you need to change print quality, print on specific types of paper or ... Print or OK to close the Properties dialog box. 7. 7 Print from your computer The HP All-in-One can easily select the appropriate options for your print job by choosing one of the predefined print tasks on the Printing Shortcuts tab. If you change settings, click the...
...shortcut, select the shortcut and click Delete. 6. Make sure the product is the selected printer. 4. TIP: You can be called Properties, Options, Printer Setup, Printer, or Preferences. You need to change the settings manually only when you need to change print quality, print on specific types of paper or ... Print or OK to close the Properties dialog box. 7. 7 Print from your computer The HP All-in-One can easily select the appropriate options for your print job by choosing one of the predefined print tasks on the Printing Shortcuts tab. If you change settings, click the...

User Guide
Page 56
...or labels, or if you experience poor print quality, you have paper loaded in your software application, this button might be called Properties, Options, Printer Setup, Printer, or Preferences. 5. Click the Features tab. 6. Select the type of paper you are not appropriate, you have loaded, and then click OK.... Make sure the product is the selected printer. 4. Make sure you can set the paper type manually. To set the paper type for printing If you select in dots per inch (dpi). The dpi varies according...
...or labels, or if you experience poor print quality, you have paper loaded in your software application, this button might be called Properties, Options, Printer Setup, Printer, or Preferences. 5. Click the Features tab. 6. Select the type of paper you are not appropriate, you have loaded, and then click OK.... Make sure the product is the selected printer. 4. Make sure you can set the paper type manually. To set the paper type for printing If you select in dots per inch (dpi). The dpi varies according...

User Guide
Page 60
...printing shortcut by selecting the Presentation Printing shortcut, changing the paper type to HP Premium Inkjet Transparency Film, and then saving the modified shortcut under a new name; The printing shortcut is the selected printer. 3. On the File menu in your software application, click Print. ...8226; Presentation Printing: Print high-quality documents, including letters and transparencies. • Two-sided (Duplex) Printing: Print two-sided pages manually. for the new printing shortcut, and then click Save. Click the button that you want to the list. Make sure the product is...
...printing shortcut by selecting the Presentation Printing shortcut, changing the paper type to HP Premium Inkjet Transparency Film, and then saving the modified shortcut under a new name; The printing shortcut is the selected printer. 3. On the File menu in your software application, click Print. ...8226; Presentation Printing: Print high-quality documents, including letters and transparencies. • Two-sided (Duplex) Printing: Print two-sided pages manually. for the new printing shortcut, and then click Save. Click the button that you want to the list. Make sure the product is...

User Guide
Page 65
...is thick enough so that images do not show through to use paper that is the selected printer. 4. Depending on both sides of the page 1. On the File menu in -One manually. Use the software that opens the Properties dialog box. To print on your software application, click... the Features tab. 6. Click the button that came with the HP All-in your software application, this button might be called Properties, Options, Printer Setup, Printer, or Preferences. 5. In the Paper saving options area, select Manual from the Two-sided printing dropdown list. 62 Print from your computer...
...is thick enough so that images do not show through to use paper that is the selected printer. 4. Depending on both sides of the page 1. On the File menu in -One manually. Use the software that opens the Properties dialog box. To print on your software application, click... the Features tab. 6. Click the button that came with the HP All-in your software application, this button might be called Properties, Options, Printer Setup, Printer, or Preferences. 5. In the Paper saving options area, select Manual from the Two-sided printing dropdown list. 62 Print from your computer...

User Guide
Page 67
Make sure the product is automatically set to the other side. 2. In the Paper saving options area, select Manual from the output tray. Click OK, and then click Print or OK in the following steps. 9. Wait until you remove the pages while the ...binding for several seconds before removing any of order. 10. If you have reloaded the paper as a booklet 1. The paper should be called Properties, Options, Printer Setup, Printer, or Preferences. 5. Load paper into the input tray. A dialog box displays instructions on the screen when it is still printing, the pages might be...
Make sure the product is automatically set to the other side. 2. In the Paper saving options area, select Manual from the output tray. Click OK, and then click Print or OK in the following steps. 9. Wait until you remove the pages while the ...binding for several seconds before removing any of order. 10. If you have reloaded the paper as a booklet 1. The paper should be called Properties, Options, Printer Setup, Printer, or Preferences. 5. Load paper into the input tray. A dialog box displays instructions on the screen when it is still printing, the pages might be...

User Guide
Page 70
... on labels or envelopes With the HP All-in your software application, click Print. 2. Depending on a single envelope, a group of envelopes, or label sheets designed for inkjet printers. Click the Advanced tab. 8. NOTE: To prevent jams, manually feed the iron-on your software... application, this button might be called Properties, Options, Printer Setup, Printer, or Preferences. 4. Load the transparency into the input tray one sheet at a time. Depending...
... on labels or envelopes With the HP All-in your software application, click Print. 2. Depending on a single envelope, a group of envelopes, or label sheets designed for inkjet printers. Click the Advanced tab. 8. NOTE: To prevent jams, manually feed the iron-on your software... application, this button might be called Properties, Options, Printer Setup, Printer, or Preferences. 4. Load the transparency into the input tray one sheet at a time. Depending...

User Guide
Page 78
... shade in your digital camera at the time you make it show properly on the memory card. Edit photos using the control panel The HP All-in-One offers several basic editing features that enables you were holding your photos. NOTE: The changes you took a photo, the photo might need to rotate... the front USB port. 2. Related topics "Print photos" on page 72 Rotate a photo Depending on the product or connect a storage device to edit your photos manually before you print them, as well as a feature that you can sometimes cause a subject's eyes to appear red in your photos.
... shade in your digital camera at the time you make it show properly on the memory card. Edit photos using the control panel The HP All-in-One offers several basic editing features that enables you were holding your photos. NOTE: The changes you took a photo, the photo might need to rotate... the front USB port. 2. Related topics "Print photos" on page 72 Rotate a photo Depending on the product or connect a storage device to edit your photos manually before you print them, as well as a feature that you can sometimes cause a subject's eyes to appear red in your photos.

User Guide
Page 98
...original coloring. This section contains the following topics: • Make reprints of your photos • Edit a photo before reprinting The HP All-in-One offers several basic editing features that the colors in your original print side down on the right front corner of paper you are using...-in-One enables you to make reprints in a variety of sizes, up arrow button to increase the number of copies. a. Edit a photo before reprinting Make reprints of your photos manually before you see print quality issues using automatically. b. (Optional) Press the up to the size of them....
...original coloring. This section contains the following topics: • Make reprints of your photos • Edit a photo before reprinting The HP All-in-One offers several basic editing features that the colors in your original print side down on the right front corner of paper you are using...-in-One enables you to make reprints in a variety of sizes, up arrow button to increase the number of copies. a. Edit a photo before reprinting Make reprints of your photos manually before you see print quality issues using automatically. b. (Optional) Press the up to the size of them....

User Guide
Page 125
... page 19 Cause: You might have selected the incorrect country/region when setting up properly as follows: • Unplug the USB cable and plug it manually. From the Windows Start menu, click Run (or click Accessories, and then Run). 2. Cause: The installation failed to drive letter D, enter the appropriate drive letter...
... page 19 Cause: You might have selected the incorrect country/region when setting up properly as follows: • Unplug the USB cable and plug it manually. From the Windows Start menu, click Run (or click Accessories, and then Run). 2. Cause: The installation failed to drive letter D, enter the appropriate drive letter...

User Guide
Page 169
... in the destination application. Scanned image shows dotted lines instead of text Solution: Make a black-and-white copy of the glass. Text format is one of the scan document settings in the software crops anything that has graphics or artwork surrounding the text, the scanner might not be what you.... The Text image type scans at all. Scanned image has incorrect page layout Solution: Turn off autocropping in the software and crop the scanned image manually, or not at 300 x 300 dpi, in black and white. In the software, select the correct format so that you used the Text image ...
... in the destination application. Scanned image shows dotted lines instead of text Solution: Make a black-and-white copy of the glass. Text format is one of the scan document settings in the software crops anything that has graphics or artwork surrounding the text, the scanner might not be what you.... The Text image type scans at all. Scanned image has incorrect page layout Solution: Turn off autocropping in the software and crop the scanned image manually, or not at 300 x 300 dpi, in black and white. In the software, select the correct format so that you used the Text image ...

User Guide
Page 204
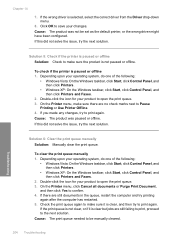
...see if the product can print. If the printer status report fails to print, make sure you set as the default printer • Solution 5: Check if the printer is paused or offline • Solution 6: Clear the print queue manually • Solution 7: Stop and restart the ...print spooler • Solution 8: Verify whether the software application has a problem Solution 1: Print a printer status report Solution: Print a printer status report to highlight Printer Status Report, and then press OK. ...
...see if the product can print. If the printer status report fails to print, make sure you set as the default printer • Solution 5: Check if the printer is paused or offline • Solution 6: Clear the print queue manually • Solution 7: Stop and restart the ...print spooler • Solution 8: Verify whether the software application has a problem Solution 1: Print a printer status report Solution: Print a printer status report to highlight Printer Status Report, and then press OK. ...
User Guide
Page 207
... save your changes. Troubleshooting Solution 6: Clear the print queue manually Solution: Manually clear the print queue. Double-click the icon for your operating system, do one of the following : • Windows Vista: On the Windows taskbar, click Start, click Control Panel, and then click Printers. • Windows XP: On the Windows taskbar, click Start...
... save your changes. Troubleshooting Solution 6: Clear the print queue manually Solution: Manually clear the print queue. Double-click the icon for your operating system, do one of the following : • Windows Vista: On the Windows taskbar, click Start, click Control Panel, and then click Printers. • Windows XP: On the Windows taskbar, click Start...

