

Setup Guide
Page 2
...follow the onscreen instructions. Problem: (Windows only) You did not see the screen prompting you to connect the USB cable. Mac: HP Photosmart Studio allows you to organize, manage, and edit your computer, you have not already done so, load photo paper in [country...cable until prompted. Insert the memory card from a memory card a. Action: Cancel all screens. www.hp.com Printed in ‑One CD. Troubleshooting Use HP software Print a photo from your HP device and software, including device status, settings, supplies ordering, and help. Press OK to display photo...
...follow the onscreen instructions. Problem: (Windows only) You did not see the screen prompting you to connect the USB cable. Mac: HP Photosmart Studio allows you to organize, manage, and edit your computer, you have not already done so, load photo paper in [country...cable until prompted. Insert the memory card from a memory card a. Action: Cancel all screens. www.hp.com Printed in ‑One CD. Troubleshooting Use HP software Print a photo from your HP device and software, including device status, settings, supplies ordering, and help. Press OK to display photo...
User Guide
Page 4
...HP Photosmart C5300 All-in-One series Help 7 2 HP All-in-One overview The HP All-in-One at a glance...9 Control panel overview...10 Control panel features...10 Display icons...12 Display sleep state...12 Menu overview...12 Copy Menu...12 Photo Menu...13 Scan Menu...13 Setup Menu...13 Help Menu...13 Enter text using... the visual keyboard 14 Use the HP Photosmart Software 14 3 Find more information...17 4 Finish setting up the HP All-in-One Set your preferences...19 Set your language and country/region 19 Set the ...
...HP Photosmart C5300 All-in-One series Help 7 2 HP All-in-One overview The HP All-in-One at a glance...9 Control panel overview...10 Control panel features...10 Display icons...12 Display sleep state...12 Menu overview...12 Copy Menu...12 Photo Menu...13 Scan Menu...13 Setup Menu...13 Help Menu...13 Enter text using... the visual keyboard 14 Use the HP Photosmart Software 14 3 Find more information...17 4 Finish setting up the HP All-in-One Set your preferences...19 Set your language and country/region 19 Set the ...
User Guide
Page 5
... types of paper 44 Load a CD/DVD...45 Avoid paper jams...49 7 Print from your computer Print from a software application 51 Make the HP All-in-One the default printer 52 Change the print settings for the current job 52 Set the paper size...52 Set the paper type for printing 53 View......56 Create printing shortcuts...57 Delete printing shortcuts...57 Perform special print jobs...58 Print a borderless image...58 Print a photo on photo paper 59 Print using Maximum dpi...60 Print onto a CD/DVD...61 Print on both sides of the page 62 Print a multiple-page document as a booklet 63 Print ...
... types of paper 44 Load a CD/DVD...45 Avoid paper jams...49 7 Print from your computer Print from a software application 51 Make the HP All-in-One the default printer 52 Change the print settings for the current job 52 Set the paper size...52 Set the paper type for printing 53 View......56 Create printing shortcuts...57 Delete printing shortcuts...57 Perform special print jobs...58 Print a borderless image...58 Print a photo on photo paper 59 Print using Maximum dpi...60 Print onto a CD/DVD...61 Print on both sides of the page 62 Print a multiple-page document as a booklet 63 Print ...

User Guide
Page 6
... brightness of your photos 78 Apply special color effects to your photos 78 9 Use the scan features Scan an image...81 Scan an original to a computer 81...Edit a scanned image...83 Edit a scanned document...83 Stop scanning...84 10 Use the copy features Make a copy...85 Preview your copy job...86 Change the... margin...92 Improve the quality of a copy 92 Stop copying...93 11 Use the reprint features Make reprints of your photos...95 Edit a photo before ... Apply special color effects to your photos 98 12 Maintain the HP All-in-One Work with ink cartridges...99 Information on ink cartridges and the...
... brightness of your photos 78 Apply special color effects to your photos 78 9 Use the scan features Scan an image...81 Scan an original to a computer 81...Edit a scanned image...83 Edit a scanned document...83 Stop scanning...84 10 Use the copy features Make a copy...85 Preview your copy job...86 Change the... margin...92 Improve the quality of a copy 92 Stop copying...93 11 Use the reprint features Make reprints of your photos...95 Edit a photo before ... Apply special color effects to your photos 98 12 Maintain the HP All-in-One Work with ink cartridges...99 Information on ink cartridges and the...
User Guide
Page 9
Contents Environmental product stewardship program 288 Paper use...289 Plastics...289 Material safety data sheets 289 Recycling program...289 HP inkjet supplies recycling program 289 Energy Star® notice...289 Attention California users 289 Battery disposal in the Netherlands 290 Battery disposal in Taiwan 290 ... Japan about the power cord 294 Noise emission statement for Germany 294 Toxic and hazardous substance table 294 Declaration of conformity (European Economic Area 295 HP Photosmart C5300 All-in-One series declaration of conformity 295 Index...297 6
Contents Environmental product stewardship program 288 Paper use...289 Plastics...289 Material safety data sheets 289 Recycling program...289 HP inkjet supplies recycling program 289 Energy Star® notice...289 Attention California users 289 Battery disposal in the Netherlands 290 Battery disposal in Taiwan 290 ... Japan about the power cord 294 Noise emission statement for Germany 294 Toxic and hazardous substance table 294 Declaration of conformity (European Economic Area 295 HP Photosmart C5300 All-in-One series declaration of conformity 295 Index...297 6

User Guide
Page 10
..." on page 17 • "Finish setting up the HP All-in-One" on page 287 HP Photosmart C5300 All-inOne series Help HP Photosmart C5300 All-in -One" on page 99 • "Shop for ink supplies" on page 115 • "HP warranty and support" on page 281 • "Technical information..." on page 19 • "How do I?" on page 31 • "Load originals and load paper" on page 33 • "Print from your computer" on page 51 • "Use...
..." on page 17 • "Finish setting up the HP All-in-One" on page 287 HP Photosmart C5300 All-inOne series Help HP Photosmart C5300 All-in -One" on page 99 • "Shop for ink supplies" on page 115 • "HP warranty and support" on page 281 • "Technical information..." on page 19 • "How do I?" on page 31 • "Load originals and load paper" on page 33 • "Print from your computer" on page 51 • "Use...
User Guide
Page 12
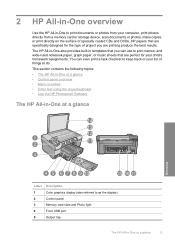
... display (also referred to print narrow- This section contains the following topics: • The HP All-in-One at a glance • Control panel overview • Menu overview • Enter text using the visual keyboard • Use the HP Photosmart Software The HP All-in -One at a glance 9 and wide-ruled notebook paper, graph paper, or music sheets that...
... display (also referred to print narrow- This section contains the following topics: • The HP All-in-One at a glance • Control panel overview • Menu overview • Enter text using the visual keyboard • Use the HP Photosmart Software The HP All-in -One at a glance 9 and wide-ruled notebook paper, graph paper, or music sheets that...

User Guide
Page 13
... panel features The following diagram and related table provide a quick reference to as the icons and sleep state on the display. Overview 10 HP All-in -One control panel features. Chapter 2 (continued) Label Description 6 Paper tray extender (also referred to as the tray extender) 7 CD/DVD...One overview Control panel overview This section describes the functions of the control panel buttons and lights, as well as the input tray) 10 Photo tray 11 CD/DVD access door 12 Ink cartridge door 13 Glass 14 Lid backing 15 Rear door 16 Rear USB port 17 Power connection* * Use...
... panel features The following diagram and related table provide a quick reference to as the icons and sleep state on the display. Overview 10 HP All-in -One control panel features. Chapter 2 (continued) Label Description 6 Paper tray extender (also referred to as the tray extender) 7 CD/DVD...One overview Control panel overview This section describes the functions of the control panel buttons and lights, as well as the input tray) 10 Photo tray 11 CD/DVD access door 12 Ink cartridge door 13 Glass 14 Lid backing 15 Rear door 16 Rear USB port 17 Power connection* * Use...

User Guide
Page 14
... display for more of a photo. This feature turns on your computer screen. Start Copy Color: Starts a color copy. Depending on the topic you can also use the arrow buttons to pan around the photo and select a different area to adjust the crop box for your memory card. To completely remove power... options related to learn more about it. Setup: Opens the Setup menu where you can also use this button when a photo is shown on the display at 100%, the Fit to Page feature is still used. Help: Opens the Help Menu on the display. On: Turns the product on or off . Menu...
... display for more of a photo. This feature turns on your computer screen. Start Copy Color: Starts a color copy. Depending on the topic you can also use the arrow buttons to pan around the photo and select a different area to adjust the crop box for your memory card. To completely remove power... options related to learn more about it. Setup: Opens the Setup menu where you can also use this button when a photo is shown on the display at 100%, the Fit to Page feature is still used. Help: Opens the Help Menu on the display. On: Turns the product on or off . Menu...

User Guide
Page 16
... from the Home screen. It is showing on the control panel or select Scan from the Home screen or insert a memory card. Use Control Panel Menu overview 13 Printable School Papers Tools Preferences Bluetooth Help Menu The Help Menu provides quick access to USB Flash Drive Setup ... topics, the help appears on the control panel. Overview Create View & Print Save Scan Menu The following options are available when you select one of the remaining topics, the help topics. If you press Setup on the display. Lighter/Darker Preview Crop Paper Size Paper Type Margin Shift...
... from the Home screen. It is showing on the control panel or select Scan from the Home screen or insert a memory card. Use Control Panel Menu overview 13 Printable School Papers Tools Preferences Bluetooth Help Menu The Help Menu provides quick access to USB Flash Drive Setup ... topics, the help appears on the control panel. Overview Create View & Print Save Scan Menu The following options are available when you select one of the remaining topics, the help topics. If you press Setup on the display. Lighter/Darker Preview Crop Paper Size Paper Type Margin Shift...

User Guide
Page 17
...and then press OK. Chapter 2 (continued) Insert Ink Cartridges Load Printable CD/DVD Load Paper in Photo Tray Load Paper in -One overview For example, the visual keyboard automatically appears when you highlight the appropriate letter, number, or symbol, press OK on Scanner ...button on the visual keyboard, and then press OK. • To enter symbols, select the .@! Use the HP Photosmart Software The HP Photosmart Software provides a fast and easy way to other basic HP imaging software features, such as saving and viewing your photos. To enter lowercase letters, uppercase letters, ...
...and then press OK. Chapter 2 (continued) Insert Ink Cartridges Load Printable CD/DVD Load Paper in Photo Tray Load Paper in -One overview For example, the visual keyboard automatically appears when you highlight the appropriate letter, number, or symbol, press OK on Scanner ...button on the visual keyboard, and then press OK. • To enter symbols, select the .@! Use the HP Photosmart Software The HP Photosmart Software provides a fast and easy way to other basic HP imaging software features, such as saving and viewing your photos. To enter lowercase letters, uppercase letters, ...

User Guide
Page 18
For more information on using the HP Photosmart Software: • Check the Contents panel on the left. Overview Use the HP Photosmart Software 15 Look for the HP Photosmart Software Help contents book at the top. • If you do not see the HP Photosmart Software Help contents book at the top of the Contents panel, access the software help through the HP Solution Center.
For more information on using the HP Photosmart Software: • Check the Contents panel on the left. Overview Use the HP Photosmart Software 15 Look for the HP Photosmart Software Help contents book at the top. • If you do not see the HP Photosmart Software Help contents book at the top of the Contents panel, access the software help through the HP Solution Center.
User Guide
Page 20
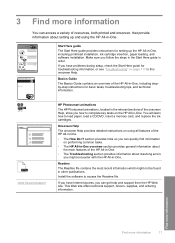
... file contains the most recent information which might encounter with the HP All-in-One. This Web site offers technical support, drivers, supplies, and ordering information. www.hp.com/support HP Photosmart animations The HP Photosmart animations, located in the relevant sections of the onscreen Help, ... the ink cartridges. Basics Guide The Basics Guide contains an overview of the HP All-in-One, including stepby-step instructions for troubleshooting information, or see "Troubleshooting" on using the HP All-in-One. If you have Internet access, you can get help and support from the...
... file contains the most recent information which might encounter with the HP All-in-One. This Web site offers technical support, drivers, supplies, and ordering information. www.hp.com/support HP Photosmart animations The HP Photosmart animations, located in the relevant sections of the onscreen Help, ... the ink cartridges. Basics Guide The Basics Guide contains an overview of the HP All-in-One, including stepby-step instructions for troubleshooting information, or see "Troubleshooting" on using the HP All-in-One. If you have Internet access, you can get help and support from the...

User Guide
Page 22
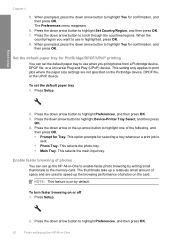
... on the display Set your language and country/region 1. To set your language and country/region The language setting determines which language the HP All-in-One uses to scroll through the languages. When the language you have completed the steps in your Start Here guide, refer to... if necessary, adjust the general settings described in this section to help you finish setting up the HP All-inOne After you want to this section. Finish setup 4 Finish setting up the HP All-in-One. Press the down arrow button to highlight Set Language, and then press OK. 4. This section ...
... on the display Set your language and country/region 1. To set your language and country/region The language setting determines which language the HP All-in-One uses to scroll through the languages. When the language you have completed the steps in your Start Here guide, refer to... if necessary, adjust the general settings described in this section to help you finish setting up the HP All-inOne After you want to this section. Finish setup 4 Finish setting up the HP All-in-One. Press the down arrow button to highlight Set Language, and then press OK. 4. This section ...
User Guide
Page 23
... OK. Press the down arrow button to highlight Preferences, and then press OK. 20 Finish setting up the HP All-in -One Press Setup. 2. Press the down arrow button to highlight Device-Printer Tray Select, and then press OK. 4. The thumbnails take up arrow button to the memory card. Enable ... the down arrow or the up a relatively small amount of space and are not specified on or off 1. To set the default paper tray to use when you print photos from a Pictbridge device, DPOF file, or a Universal Plug and Play (UPnP) device. NOTE: This feature is sent. • Photo...
... OK. Press the down arrow button to highlight Preferences, and then press OK. 20 Finish setting up the HP All-in -One Press Setup. 2. Press the down arrow button to highlight Device-Printer Tray Select, and then press OK. 4. The thumbnails take up arrow button to the memory card. Enable ... the down arrow or the up a relatively small amount of space and are not specified on or off 1. To set the default paper tray to use when you print photos from a Pictbridge device, DPOF file, or a Universal Plug and Play (UPnP) device. NOTE: This feature is sent. • Photo...
User Guide
Page 24
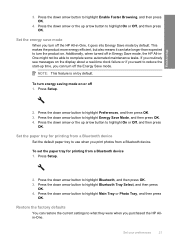
...highlight On or Off, and then press OK. Set the paper tray for printing from a Bluetooth device. To turn off the HP All-in Energy Save mode, the HP All-inOne might not be able to what they were when you print photos from a Bluetooth device 1. To set the paper... tray for printing from a Bluetooth device Set the default paper tray to use when you purchased the HP Allin-One. Restore the factory defaults You can restore the current settings to complete some automated maintenance tasks. Press the down arrow or the ...
...highlight On or Off, and then press OK. Set the paper tray for printing from a Bluetooth device. To turn off the HP All-in Energy Save mode, the HP All-inOne might not be able to what they were when you print photos from a Bluetooth device 1. To set the paper... tray for printing from a Bluetooth device Set the default paper tray to use when you purchased the HP Allin-One. Restore the factory defaults You can restore the current settings to complete some automated maintenance tasks. Press the down arrow or the ...

User Guide
Page 25
... the product. Press Setup. 2. Press the down arrow button to highlight Restore Factory Defaults, and then press OK. The factory default settings are not using the product. Press the down arrow button to highlight Demo Mode, and then press OK. 4. Play a slideshow on a computer, when you are restored...setup Chapter 4 NOTE: Restoring the factory defaults will not go to highlight Tools, and then press OK. 3. The HP All-in-One shows a short set up the HP All-in -One Press the down arrow button to highlight On or Off, and then press OK. 22 Finish setting up arrow button ...
... the product. Press Setup. 2. Press the down arrow button to highlight Restore Factory Defaults, and then press OK. The factory default settings are not using the product. Press the down arrow button to highlight Demo Mode, and then press OK. 4. Play a slideshow on a computer, when you are restored...setup Chapter 4 NOTE: Restoring the factory defaults will not go to highlight Tools, and then press OK. 3. The HP All-in-One shows a short set up the HP All-in -One Press the down arrow button to highlight On or Off, and then press OK. 22 Finish setting up arrow button ...
User Guide
Page 26
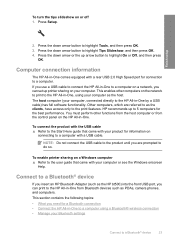
...equipped with a USB cable. Press the down arrow button to highlight On or Off, and then press OK. Computer connection information The HP All-in -One, using a Bluetooth® wireless connection • Manage your computer. The host computer (your computer as PDAs, camera phones, and computers....up to highlight Tips Slideshow, and then press OK. 4. Other computers, which are prompted to a computer. Finish setup 2. HP recommends up printer sharing on the network to print to the print features. You must perform other computers on your Bluetooth settings Connect to the ...
...equipped with a USB cable. Press the down arrow button to highlight On or Off, and then press OK. Computer connection information The HP All-in -One, using a Bluetooth® wireless connection • Manage your computer. The host computer (your computer as PDAs, camera phones, and computers....up to highlight Tips Slideshow, and then press OK. 4. Other computers, which are prompted to a computer. Finish setup 2. HP recommends up printer sharing on the network to print to the print features. You must perform other computers on your Bluetooth settings Connect to the ...

User Guide
Page 27
...the device address. With a Bluetooth connection you can check the printer status, as well as with a USB connection. However, stand-alone copy functions are still available. To find out the device address of the HP All-in-One in order to establish a connection. Press the down arrow ...button until Device Address is printing. Connect the HP All-in-One to a computer using a Bluetooth® wireless connection A Bluetooth connection provides a quick ...
...the device address. With a Bluetooth connection you can check the printer status, as well as with a USB connection. However, stand-alone copy functions are still available. To find out the device address of the HP All-in-One in order to establish a connection. Press the down arrow ...button until Device Address is printing. Connect the HP All-in-One to a computer using a Bluetooth® wireless connection A Bluetooth connection provides a quick ...

User Guide
Page 28
...computer. Connect to the product, install the USB connection first. If your Bluetooth® adapter supports the Microsoft stack but you use only one of installing the software is to the computer on the computer. If you do not have installed the product software on the ... with Service Pack 2 installed on your computer, but it will install automatically using the Microsoft stack 1. To install and print using the Widcomm stack. Finish setup the HP All-in , just make sure the printer driver is available for your computer, make sure your computer is started . 4. If you...
...computer. Connect to the product, install the USB connection first. If your Bluetooth® adapter supports the Microsoft stack but you use only one of installing the software is to the computer on the computer. If you do not have installed the product software on the ... with Service Pack 2 installed on your computer, but it will install automatically using the Microsoft stack 1. To install and print using the Widcomm stack. Finish setup the HP All-in , just make sure the printer driver is available for your computer, make sure your computer is started . 4. If you...


