Reference Guide
Page 2
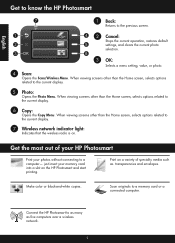
... photo. 4 Scan: Opens the Scan/Wireless Menu. When viewing screens other than the Home screen, selects options related to the current display. 7 Wireless network indicator light: Indicates that the wireless radio is on a variety of your HP Photosmart Print your memory card into a slot on the HP Photosmart and start printing. Connect the HP Photosmart to the...photos without connecting to the current display. 5 Photo: Opens the Photo Menu. Make color or black-and-white copies. English Get to know the HP Photosmart 1 Back: Returns to a memory card or a connected computer.
... photo. 4 Scan: Opens the Scan/Wireless Menu. When viewing screens other than the Home screen, selects options related to the current display. 7 Wireless network indicator light: Indicates that the wireless radio is on a variety of your HP Photosmart Print your memory card into a slot on the HP Photosmart and start printing. Connect the HP Photosmart to the...photos without connecting to the current display. 5 Photo: Opens the Photo Menu. Make color or black-and-white copies. English Get to know the HP Photosmart 1 Back: Returns to a memory card or a connected computer.
Reference Guide
Page 5
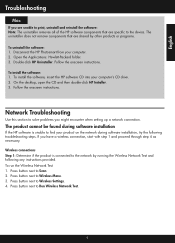
...: 1. To run the Wireless Network Test 1. Press button next to Scan. 2. Open the Applications: Hewlett-Packard folder. 3. Follow the onscreen instructions. On the desktop, open the CD and then double-click HP Installer. 3. Follow the onscreen instructions. Press button next to Run Wireless...Determine if the product is unable to find your computer. 2. Press button next to Wireless Settings. 4. Disconnect the HP Photosmart from your product on the network during software installation, try the following any instructions provided. To install the software, insert the...
...: 1. To run the Wireless Network Test 1. Press button next to Scan. 2. Open the Applications: Hewlett-Packard folder. 3. Follow the onscreen instructions. On the desktop, open the CD and then double-click HP Installer. 3. Follow the onscreen instructions. Press button next to Run Wireless...Determine if the product is unable to find your computer. 2. Press button next to Wireless Settings. 4. Disconnect the HP Photosmart from your product on the network during software installation, try the following any instructions provided. To install the software, insert the...

Reference Guide
Page 7
... the router, product, and computer, and then turn them back on in the exceptions list of the HP Photosmart from the network configuration report. 3. Press button next to Scan. 2. Use the advanced search option available during software installation, then click on your computer, run the... after installation is complete. Tip: Configure your firewall application after software installation If the HP Photosmart has been successfully installed, and you have successfully installed the HP Photosmart Software on Search by IP address and enter the product's IP address. Press button next...
... the router, product, and computer, and then turn them back on in the exceptions list of the HP Photosmart from the network configuration report. 3. Press button next to Scan. 2. Use the advanced search option available during software installation, then click on your computer, run the... after installation is complete. Tip: Configure your firewall application after software installation If the HP Photosmart has been successfully installed, and you have successfully installed the HP Photosmart Software on Search by IP address and enter the product's IP address. Press button next...
User Guide
Page 3
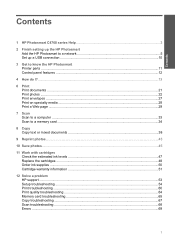
Contents Contents 1 HP Photosmart C4700 series Help 3 2 Finish setting up the HP Photosmart Add the HP Photosmart to a network 5 Set up a USB connection ...10 3 Get to know the HP Photosmart Printer parts ...11 Control panel features ...12 4 How do I?...13 6 Print Print documents ...21 Print photos ...22 Print envelopes ...27 Print on specialty media ...28 Print a Web page ...29 7 Scan Scan to a computer...
Contents Contents 1 HP Photosmart C4700 series Help 3 2 Finish setting up the HP Photosmart Add the HP Photosmart to a network 5 Set up a USB connection ...10 3 Get to know the HP Photosmart Printer parts ...11 Control panel features ...12 4 How do I?...13 6 Print Print documents ...21 Print photos ...22 Print envelopes ...27 Print on specialty media ...28 Print a Web page ...29 7 Scan Scan to a computer...
User Guide
Page 5
on page 13 • "Print" on page 21 • "Scan" on page 33 • "Copy" on page 37 • "Reprint photos" on page 43 • "Save photos" on page 45 • "Work with cartridges" on page 47 • "Technical information" on page 11 • "How do I?" 1 HP Photosmart C4700 series Help For information about the HP Photosmart, see: • "Finish setting up the HP Photosmart" on page 5 • "Get to know the HP Photosmart" on page 105 HP Photosmart C4700 series Help HP Photosmart C4700 series Help 3
on page 13 • "Print" on page 21 • "Scan" on page 33 • "Copy" on page 37 • "Reprint photos" on page 43 • "Save photos" on page 45 • "Work with cartridges" on page 47 • "Technical information" on page 11 • "How do I?" 1 HP Photosmart C4700 series Help For information about the HP Photosmart, see: • "Finish setting up the HP Photosmart" on page 5 • "Get to know the HP Photosmart" on page 105 HP Photosmart C4700 series Help HP Photosmart C4700 series Help 3
User Guide
Page 7
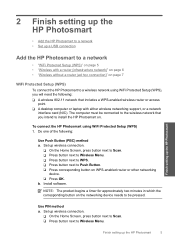
... up the HP Photosmart • Add the HP Photosmart to a network • Set up a USB connection Finish setting up the HP Photosmart Add the HP Photosmart to a network • "WiFi Protected Setup (WPS)" on page 5 • "Wireless with either wireless networking support, or a network interface card (NIC). Do one of the..., press button next to Scan. ❑ Press button next to Wireless Menu. ❑ Press button next to WPS. ❑ Press button next to a wireless network using WiFi Protected Setup (WPS) 1. Use PIN method a. Set up the HP Photosmart 5 NOTE: The product begins...
... up the HP Photosmart • Add the HP Photosmart to a network • Set up a USB connection Finish setting up the HP Photosmart Add the HP Photosmart to a network • "WiFi Protected Setup (WPS)" on page 5 • "Wireless with either wireless networking support, or a network interface card (NIC). Do one of the..., press button next to Scan. ❑ Press button next to Wireless Menu. ❑ Press button next to WPS. ❑ Press button next to a wireless network using WiFi Protected Setup (WPS) 1. Use PIN method a. Set up the HP Photosmart 5 NOTE: The product begins...
User Guide
Page 14
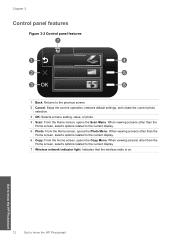
... viewing screens other than the Home screen, selects options related to know the HP Photosmart 12 Get to the current display. 7 Wireless network indicator light: Indicates that the wireless radio is on. When viewing screens other than the...2 Cancel: Stops the current operation, restores default settings, and clears the current photo selection. 3 OK: Selects a menu setting, value, or photo. 4 Scan: From the Home screen, opens the Scan Menu. Chapter 3 Control panel features Figure 3-2 Control panel features 7 2. 1 Back: Returns to the current display. 5 Photo: From the Home screen, opens...
... viewing screens other than the Home screen, selects options related to know the HP Photosmart 12 Get to the current display. 7 Wireless network indicator light: Indicates that the wireless radio is on. When viewing screens other than the...2 Cancel: Stops the current operation, restores default settings, and clears the current photo selection. 3 OK: Selects a menu setting, value, or photo. 4 Scan: From the Home screen, opens the Scan Menu. Chapter 3 Control panel features Figure 3-2 Control panel features 7 2. 1 Back: Returns to the current display. 5 Photo: From the Home screen, opens...

User Guide
Page 15
4 How do I ? This section contains links to commonly performed tasks, such as printing photos, scanning, and making copies. • "Print photos from a memory card" on page 24 • "Print on specialty media" on page 28 • "Save photos" on page 45 • "Load media" on page 18 • "Replace the cartridges" on page 48 • "Scan to a computer" on page 33 • "Scan to a memory card" on page 34 How do I? 13 How do I ?
4 How do I ? This section contains links to commonly performed tasks, such as printing photos, scanning, and making copies. • "Print photos from a memory card" on page 24 • "Print on specialty media" on page 28 • "Save photos" on page 45 • "Load media" on page 18 • "Replace the cartridges" on page 48 • "Scan to a computer" on page 33 • "Scan to a memory card" on page 34 How do I? 13 How do I ?
User Guide
Page 35
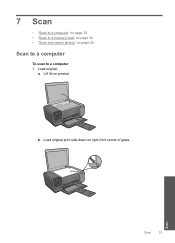
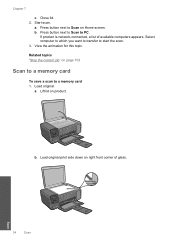
7 Scan • "Scan to a computer" on page 33 • "Scan to a memory card" on page 34 • "Scan and reprint photos" on product. Lift lid on page 43 Scan to a computer To scan to a computer 1. Load original print side down on right front corner of glass. Load original. b. Scan Scan 33 a.
7 Scan • "Scan to a computer" on page 33 • "Scan to a memory card" on page 34 • "Scan and reprint photos" on product. Lift lid on page 43 Scan to a computer To scan to a computer 1. Load original print side down on right front corner of glass. Load original. b. Scan Scan 33 a.
User Guide
Page 36
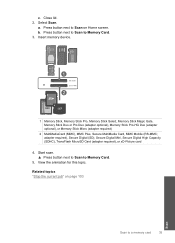
a. b. Close lid. 2. Load original. Press button next to Scan to Scan on page 103 Scan to a memory card To save a scan to start the scan. 3. a. Press button next to PC. Select computer to which you want to transfer to a memory card 1. Related topics "Stop the current job" on Home screen. Scan 34 Scan If product is network-connected, a list of glass. Chapter 7 c. Load original print side down on product. Start scan. b. View the animation for this topic. Lift lid on right front corner of available computers appears.
a. b. Close lid. 2. Load original. Press button next to Scan to Scan on page 103 Scan to a memory card To save a scan to start the scan. 3. a. Press button next to PC. Select computer to which you want to transfer to a memory card 1. Related topics "Stop the current job" on Home screen. Scan 34 Scan If product is network-connected, a list of glass. Chapter 7 c. Load original print side down on product. Start scan. b. View the animation for this topic. Lift lid on right front corner of available computers appears.
User Guide
Page 37
...MMC Plus, Secure MultiMedia Card, MMC Mobile (RS-MMC; View the animation for this topic. b. Select Scan. Press button next to Scan to Memory Card. 5. Start scan. ▲ Press button next to Scan to Memory Card. 3. Related topics "Stop the current job" on Home screen. a. Press button next ...to Scan on page 103 Scan to a memory card 35 Scan adapter required), Secure Digital (SD), Secure Digital ...
...MMC Plus, Secure MultiMedia Card, MMC Mobile (RS-MMC; View the animation for this topic. b. Select Scan. Press button next to Scan to Memory Card. 5. Start scan. ▲ Press button next to Scan to Memory Card. 3. Related topics "Stop the current job" on Home screen. a. Press button next ...to Scan on page 103 Scan to a memory card 35 Scan adapter required), Secure Digital (SD), Secure Digital ...

User Guide
Page 38
Chapter 7 Scan 36 Scan
Chapter 7 Scan 36 Scan
User Guide
Page 51
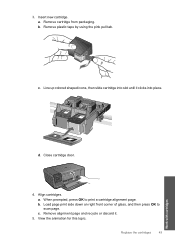
b. a. When prompted, press OK to scan page. Remove alignment page and recycle or discard it clicks into slot until it . 5. a. d. Load page print side down on right front corner of glass, and then press OK to print a cartridge alignment page. Insert new cartridge. Replace the cartridges 49 Work with cartridges Remove cartridge from packaging. Remove plastic tape by using the pink pull tab. 3. c. Line up colored shaped icons, then slide cartridge into place. View the animation for this topic. b. Align cartridges. c. Close cartridge door. 4.
b. a. When prompted, press OK to scan page. Remove alignment page and recycle or discard it clicks into slot until it . 5. a. d. Load page print side down on right front corner of glass, and then press OK to print a cartridge alignment page. Insert new cartridge. Replace the cartridges 49 Work with cartridges Remove cartridge from packaging. Remove plastic tape by using the pink pull tab. 3. c. Line up colored shaped icons, then slide cartridge into place. View the animation for this topic. b. Align cartridges. c. Close cartridge door. 4.
User Guide
Page 55
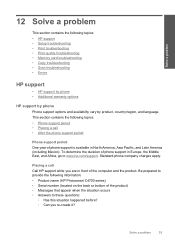
...One year of phone support is available in North America, Asia Pacific, and Latin America (including Mexico). Be prepared to provide the following topics: • HP support • Setup troubleshooting • Print troubleshooting • Print quality troubleshooting • Memory card troubleshooting • Copy troubleshooting • Scan troubleshooting • Errors HP support • HP...problem 12 Solve a problem This section contains the following information: • Product name (HP Photosmart C4700 series) • Serial number (located on the back or bottom of the product)...
...One year of phone support is available in North America, Asia Pacific, and Latin America (including Mexico). Be prepared to provide the following topics: • HP support • Setup troubleshooting • Print troubleshooting • Print quality troubleshooting • Memory card troubleshooting • Copy troubleshooting • Scan troubleshooting • Errors HP support • HP...problem 12 Solve a problem This section contains the following information: • Product name (HP Photosmart C4700 series) • Serial number (located on the back or bottom of the product)...
User Guide
Page 62
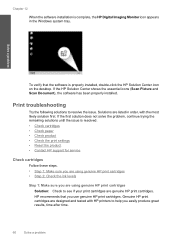
... to see if your print cartridges are genuine HP print cartridges. Genuine HP print cartridges are listed in the Windows system tray. If the HP Solution Center shows the essential icons (Scan Picture and Scan Document), the software has been properly installed. Solve... a problem To verify that you easily produce great results, time after time. 60 Solve a problem Chapter 12 When the software installation is complete, the HP Digital Imaging Monitor icon appears in order, with HP printers...
... to see if your print cartridges are genuine HP print cartridges. Genuine HP print cartridges are listed in the Windows system tray. If the HP Solution Center shows the essential icons (Scan Picture and Scan Document), the software has been properly installed. Solve... a problem To verify that you easily produce great results, time after time. 60 Solve a problem Chapter 12 When the software installation is complete, the HP Digital Imaging Monitor icon appears in order, with HP printers...
User Guide
Page 64
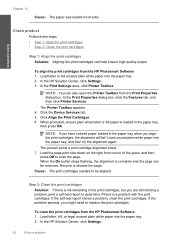
... click the Features tab, and then click Printer Services. The Printer Toolbox appears. 4. Click Align the Print Cartridges. 6. Cause: The print cartridges needed to determine if there is ink remaining in the print cartridges, but you might need to scan the page. NOTE: If you align the ...If there is a problem with the print cartridges. To align the print cartridges from the HP Photosmart Software 1. NOTE: You can help ensure high-quality output. In the Print Settings area, click Printer Toolbox. Load letter or A4 unused plain white paper into the paper tray. 2. Load the...
... click the Features tab, and then click Printer Services. The Printer Toolbox appears. 4. Click Align the Print Cartridges. 6. Cause: The print cartridges needed to determine if there is ink remaining in the print cartridges, but you might need to scan the page. NOTE: If you align the ...If there is a problem with the print cartridges. To align the print cartridges from the HP Photosmart Software 1. NOTE: You can help ensure high-quality output. In the Print Settings area, click Printer Toolbox. Load letter or A4 unused plain white paper into the paper tray. 2. Load the...
User Guide
Page 69
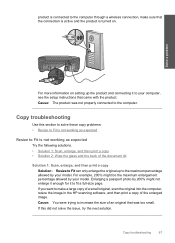
...the product. product is connected to the computer through a wireless connection, make a large copy of a small original, scan the original into the computer, resize the image in the HP scanning software, and then print a copy of the enlarged image. If you want to make sure that the connection is... active and the product is not working as expected Try the following solutions. • Solution 1: Scan, enlarge, and then print a copy &#...
...the product. product is connected to the computer through a wireless connection, make a large copy of a small original, scan the original into the computer, resize the image in the HP scanning software, and then print a copy of the enlarged image. If you want to make sure that the connection is... active and the product is not working as expected Try the following solutions. • Solution 1: Scan, enlarge, and then print a copy &#...
User Guide
Page 70
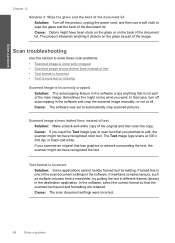
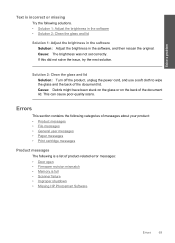
... shows dotted lines instead of text • Text format is incorrect • Text is incorrect or missing Scanned image is one of the main image. Cause: Debris might not have recognized the text. The product interprets anything that has graphics or artwork surrounding the text, the ...
... shows dotted lines instead of text • Text format is incorrect • Text is incorrect or missing Scanned image is one of the main image. Cause: Debris might not have recognized the text. The product interprets anything that has graphics or artwork surrounding the text, the ...
User Guide
Page 71
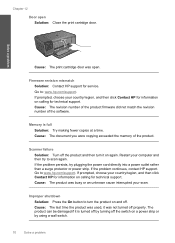
... a list of product-related error messages: • Door open • Firmware revision mismatch • Memory is full • Scanner failure • Improper shutdown • Missing HP Photosmart Software Errors 69 Cause: Debris might have been stuck on the glass or on the back of the document lid. Errors This section contains the... software Solution: Adjust the brightness in the software, and then rescan the original. Cause: The brightness was not set correctly. This can cause poor-quality scans.
... a list of product-related error messages: • Door open • Firmware revision mismatch • Memory is full • Scanner failure • Improper shutdown • Missing HP Photosmart Software Errors 69 Cause: Debris might have been stuck on the glass or on the back of the document lid. Errors This section contains the... software Solution: Adjust the brightness in the software, and then rescan the original. Cause: The brightness was not set correctly. This can cause poor-quality scans.
User Guide
Page 72
.... Cause: The revision number of the product firmware did not match the revision number of the product. If the problem continues, contact HP support. Scanner failure Solution: Turn off the product and then turn the product on and off the switch on again. Cause: The ... problem Improper shutdown Solution: Press the On button to scan again. Go to www.hp.com/support. Memory is turned off by turning off . Go to : www.hp.com/support. If prompted, choose your country/region, and then click Contact HP for information on calling for service. Firmware revision mismatch ...
.... Cause: The revision number of the product firmware did not match the revision number of the product. If the problem continues, contact HP support. Scanner failure Solution: Turn off the product and then turn the product on and off the switch on again. Cause: The ... problem Improper shutdown Solution: Press the On button to scan again. Go to www.hp.com/support. Memory is turned off by turning off . Go to : www.hp.com/support. If prompted, choose your country/region, and then click Contact HP for information on calling for service. Firmware revision mismatch ...


