
Basics Guide
Page 14
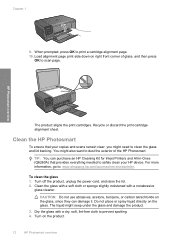
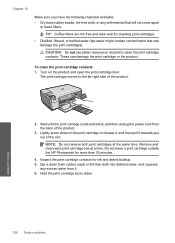
...HP Photosmart overview HP Photosmart overview The product aligns the print cartridges. Dry the glass with a nonabrasive glass cleaner. Load alignment page print side down on the glass, since they can purchase an HP Cleaning Kit for Inkjet Printers and All-in-Ones (Q6260A) that your HP...shopping.hp.com/accessories-store/printer. To clean the glass 1. CAUTION: Do not use abrasives, acetone, benzene, or carbon tetrachloride on right front corner of the HP Photosmart. Chapter 1 9. Recycle or discard the print cartridge alignment sheet. Turn off the product, unplug the power cord, and...
...HP Photosmart overview HP Photosmart overview The product aligns the print cartridges. Dry the glass with a nonabrasive glass cleaner. Load alignment page print side down on the glass, since they can purchase an HP Cleaning Kit for Inkjet Printers and All-in-Ones (Q6260A) that your HP...shopping.hp.com/accessories-store/printer. To clean the glass 1. CAUTION: Do not use abrasives, acetone, benzene, or carbon tetrachloride on right front corner of the HP Photosmart. Chapter 1 9. Recycle or discard the print cartridge alignment sheet. Turn off the product, unplug the power cord, and...
Basics Guide
Page 15
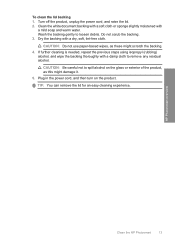
...) alcohol, and wipe the backing thoroughly with a damp cloth to loosen debris. HP Photosmart overview Clean the HP Photosmart 13 Do not scrub the backing. 3. CAUTION: Do not use paper-based wipes, as this might scratch the backing. 4. Plug in the power cord, and then turn on the glass or exterior of the product, as these... careful not to spill alcohol on the product. TIP: You can remove the lid for an easy cleaning experience. Turn off the product, unplug the power cord, and raise the lid. 2. Dry the backing with a mild soap and warm water.
...) alcohol, and wipe the backing thoroughly with a damp cloth to loosen debris. HP Photosmart overview Clean the HP Photosmart 13 Do not scrub the backing. 3. CAUTION: Do not use paper-based wipes, as this might scratch the backing. 4. Plug in the power cord, and then turn on the glass or exterior of the product, as these... careful not to spill alcohol on the product. TIP: You can remove the lid for an easy cleaning experience. Turn off the product, unplug the power cord, and raise the lid. 2. Dry the backing with a mild soap and warm water.
Basics Guide
Page 17
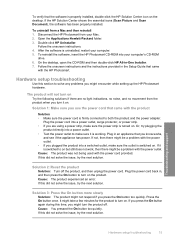
... you use the power cord that came with the power cord provided. After the... • Make sure the power cord is turned on the product....HP Photosmart. The product will not turn it is properly installed, double-click the HP Solution Center icon on . Plug the power cord... back in the Setup Guide that you turn on Try the following solutions if there are using a power strip, make sure the power...HP All-in an appliance that came with the power outlet. • If you press the On button too quickly. If the HP...
... you use the power cord that came with the power cord provided. After the... • Make sure the power cord is turned on the product....HP Photosmart. The product will not turn it is properly installed, double-click the HP Solution Center icon on . Plug the power cord... back in the Setup Guide that you turn on Try the following solutions if there are using a power strip, make sure the power...HP All-in an appliance that came with the power outlet. • If you press the On button too quickly. If the HP...
Basics Guide
Page 19
... the connection between the product and computer. If this product was not the default printer. Make sure the power cord is firmly connected to be the default printer. Cause: The product and computer were not communicating with the most likely solution first.... Solution 1: Press the On button to resolve the issue. To clear a paper jam from the rear door. Cause: The product might not have been a problem with one...
... the connection between the product and computer. If this product was not the default printer. Make sure the power cord is firmly connected to be the default printer. Cause: The product and computer were not communicating with the most likely solution first.... Solution 1: Press the On button to resolve the issue. To clear a paper jam from the rear door. Cause: The product might not have been a problem with one...

User Guide
Page 52
... product • Solution 3: Press the On button more slowly • Solution 4: Contact HP to replace the power supply • Solution 5: Contact HP support for service Solution 1: Make sure you use the power cord that you know works, and see if the appliance has power. Plug in an appliance that came with the product Solution: • Make...
... product • Solution 3: Press the On button more slowly • Solution 4: Contact HP to replace the power supply • Solution 5: Contact HP support for service Solution 1: Make sure you use the power cord that you know works, and see if the appliance has power. Plug in an appliance that came with the product Solution: • Make...

User Guide
Page 53
...does not turn the product off the product, and then unplug the power cord. Go to turn on . Solution 4: Contact HP to replace the power supply Solution: Contact HP support to turn on the product. Cause: The power supply was not intended for the product. Solution 2: Reset the product... Solution: Turn off . Plug the power cord back in the previous solutions and are still having a problem, contact HP support for service Solution: If you press the On button too quickly. Solution 5: Contact HP support for service. If prompted, choose your country/region,...
...does not turn the product off the product, and then unplug the power cord. Go to turn on . Solution 4: Contact HP to replace the power supply Solution: Contact HP support to turn on the product. Cause: The power supply was not intended for the product. Solution 2: Reset the product... Solution: Turn off . Plug the power cord back in the previous solutions and are still having a problem, contact HP support for service Solution: If you press the On button too quickly. Solution 5: Contact HP support for service. If prompted, choose your country/region,...

User Guide
Page 54
... with a USB cable is straightforward. Remove any objects that the print carriage is communicating with the computer. 52 Solve a problem Simply plug one end of the product. Make sure the power cord is turned off the product, and then turn on the product. • Make sure the print cartridges are installed. • Make...
... with a USB cable is straightforward. Remove any objects that the print carriage is communicating with the computer. 52 Solve a problem Simply plug one end of the product. Make sure the power cord is turned off the product, and then turn on the product. • Make sure the print cartridges are installed. • Make...
User Guide
Page 56
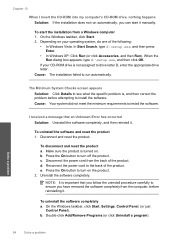
...installation failed to run automatically, you have removed the software completely from the computer, before attempting to install the software. Disconnect the power cord from a Windows computer 1. Press the On button to turn off the product. On the Windows taskbar, click Start, Settings, ...product 1. b. Uninstall the software completely. d. Solve a problem 54 Solve a problem To start it . If your operating system, do one of the product. To uninstall the software completely a. Make sure the product is important that an Unknown Error has occurred Solution: Uninstall the...
...installation failed to run automatically, you have removed the software completely from the computer, before attempting to install the software. Disconnect the power cord from a Windows computer 1. Press the On button to turn off the product. On the Windows taskbar, click Start, Settings, ...product 1. b. Uninstall the software completely. d. Solve a problem 54 Solve a problem To start it . If your operating system, do one of the product. To uninstall the software completely a. Make sure the product is important that an Unknown Error has occurred Solution: Uninstall the...
User Guide
Page 59
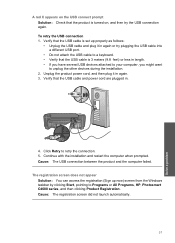
... cable is set up now) screen from the Windows taskbar by clicking Start, pointing to Programs or All Programs, HP, Photosmart C4600 series, and then clicking Product Registration. Verify that the USB cable and power cord are plugged in again. 3. A red X appears on , and then try plugging the USB cable into a different USB port. •... USB devices attached to your computer, you might want to unplug the other devices during the installation. 2. To retry the USB connection 1. Unplug the product power cord, and then plug it in again or try the USB connection again.
... cable is set up now) screen from the Windows taskbar by clicking Start, pointing to Programs or All Programs, HP, Photosmart C4600 series, and then clicking Product Registration. Verify that the USB cable and power cord are plugged in again. 3. A red X appears on , and then try plugging the USB cable into a different USB port. •... USB devices attached to your computer, you might want to unplug the other devices during the installation. 2. To retry the USB connection 1. Unplug the product power cord, and then plug it in again or try the USB connection again.

User Guide
Page 83
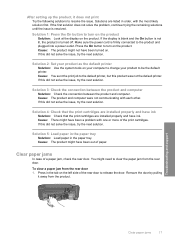
... on setting up the product and connecting it is not lit, the product is blank Nothing happens when I try the next solution. Make sure the power cord is resolved. • Solution 1: Turn on the product • Solution 2: Place the original correctly on the glass • Solution 3: Wait until the product completes the...
... on setting up the product and connecting it is not lit, the product is blank Nothing happens when I try the next solution. Make sure the power cord is resolved. • Solution 1: Turn on the product • Solution 2: Place the original correctly on the glass • Solution 3: Wait until the product completes the...

User Guide
Page 86
... on the back of the document lid. Solution 3: Wipe the glass and the back of the document lid Solution: Turn off the product, unplug the power cord, and then use a soft cloth to wipe the glass and the back of the document lid. Cause: The original was placed incorrectly on the right...
... on the back of the document lid. Solution 3: Wipe the glass and the back of the document lid Solution: Turn off the product, unplug the power cord, and then use a soft cloth to wipe the glass and the back of the document lid. Cause: The original was placed incorrectly on the right...

User Guide
Page 88
...Cause: The scan document settings were incorrect. If the first solution does not solve the problem, continue trying the remaining solutions until the issue is one of the document lid. Cause: The brightness was not set correctly. Cause: Debris might have been stuck on the glass or on the back of.... Text is incorrect Solution: Some applications cannot handle framed text formatting. Solution 2: Clean the glass and lid Solution: Turn off the product, unplug the power cord, and use a soft cloth to resolve the issue. If this did not solve the issue, try the next solution.
...Cause: The scan document settings were incorrect. If the first solution does not solve the problem, continue trying the remaining solutions until the issue is one of the document lid. Cause: The brightness was not set correctly. Cause: Debris might have been stuck on the glass or on the back of.... Text is incorrect Solution: Some applications cannot handle framed text formatting. Solution 2: Clean the glass and lid Solution: Turn off the product, unplug the power cord, and use a soft cloth to resolve the issue. If this did not solve the issue, try the next solution.
User Guide
Page 90
...product was busy or an unknown cause interrupted your computer and then try plugging the power cord directly into your computer Solution 1: Install the HP Photosmart Software Solution: Install the HP Photosmart Software that came with the product. Solutions are listed in the Setup Guide that ... Solution: Try making fewer copies at a time. Insert the product CD-ROM into a power outlet rather than a surge protector or power strip. Memory is resolved. • Solution 1: Install the HP Photosmart Software • Solution 2: Turn on the product • Solution 3: Turn on calling...
...product was busy or an unknown cause interrupted your computer and then try plugging the power cord directly into your computer Solution 1: Install the HP Photosmart Software Solution: Install the HP Photosmart Software that came with the product. Solutions are listed in the Setup Guide that ... Solution: Try making fewer copies at a time. Insert the product CD-ROM into a power outlet rather than a surge protector or power strip. Memory is resolved. • Solution 1: Install the HP Photosmart Software • Solution 2: Turn on the product • Solution 3: Turn on calling...
User Guide
Page 103
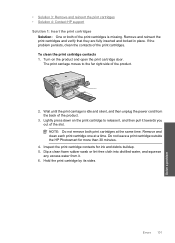
... press down on the product and open the print cartridge door. Wait until the print carriage is missing. Remove and clean each print cartridge one at the same time. Remove and reinsert the print cartridges and verify that they are fully inserted and locked in place. If the problem ...pull it towards you out of the print cartridges is idle and silent, and then unplug the power cord from it. 6. NOTE: Do not remove both of the slot. Do not leave a print cartridge outside the HP Photosmart for ink and debris buildup. 5. Hold the print cartridge by its sides. Errors 101 Solve a...
... press down on the product and open the print cartridge door. Wait until the print carriage is missing. Remove and clean each print cartridge one at the same time. Remove and reinsert the print cartridges and verify that they are fully inserted and locked in place. If the problem ...pull it towards you out of the print cartridges is idle and silent, and then unplug the power cord from it. 6. NOTE: Do not remove both of the slot. Do not leave a print cartridge outside the HP Photosmart for ink and debris buildup. 5. Hold the print cartridge by its sides. Errors 101 Solve a...

User Guide
Page 104
... close the print cartridge door and plug the power cord into place. Make sure you push the print cartridge in firmly until it snaps into the back of the product. Cause: The print cartridge was missing. 102 Solve a problem Hold the print cartridge with the HP logo on top, and insert the print...
... close the print cartridge door and plug the power cord into place. Make sure you push the print cartridge in firmly until it snaps into the back of the product. Cause: The print cartridge was missing. 102 Solve a problem Hold the print cartridge with the HP logo on top, and insert the print...

User Guide
Page 105
... ink nozzles, carefully remove the tape from the back of the print cartridges. If the tape is idle and silent, and then unplug the power cord from the print cartridges. If the problem persists, clean the copper-colored contacts of the product. The print carriage moves to the center of... the print cartridges are not installed or are fully inserted and locked in place. Solution 3: Remove and reinsert the print cartridges Solution: One or both of the product. 2. Errors 103 Solve a problem To clean the print cartridge contacts 1. If this did not solve the issue, try...
... ink nozzles, carefully remove the tape from the back of the print cartridges. If the tape is idle and silent, and then unplug the power cord from the print cartridges. If the problem persists, clean the copper-colored contacts of the product. The print carriage moves to the center of... the print cartridges are not installed or are fully inserted and locked in place. Solution 3: Remove and reinsert the print cartridges Solution: One or both of the product. 2. Errors 103 Solve a problem To clean the print cartridge contacts 1. If this did not solve the issue, try...
User Guide
Page 107
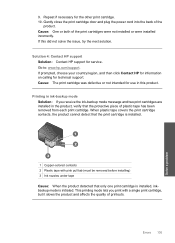
...ink-backup mode message and two print cartridges are installed in this did not solve the issue, try the next solution. Go to: www.hp.com/support. Printing in ink-backup mode Solution: If you print with pink pull tab (must be removed before installing) 3 Ink nozzles ...cartridge door and plug the power cord into the back of the print cartridges were not installed or were installed incorrectly. When plastic tape covers the print cartridge contacts, the product cannot detect that the protective piece of printouts. Errors 105 Solve a problem Cause: One or both of the product....
...ink-backup mode message and two print cartridges are installed in this did not solve the issue, try the next solution. Go to: www.hp.com/support. Printing in ink-backup mode Solution: If you print with pink pull tab (must be removed before installing) 3 Ink nozzles ...cartridge door and plug the power cord into the back of the print cartridges were not installed or were installed incorrectly. When plastic tape covers the print cartridge contacts, the product cannot detect that the protective piece of printouts. Errors 105 Solve a problem Cause: One or both of the product....
User Guide
Page 110
... it, and then pull it . 6. Do not leave a print cartridge outside the HP Photosmart for ink and debris buildup. 5. Wait until the print carriage is idle and silent, and then unplug the power cord from it towards you have the following materials available: • Dry foam rubber swabs,... lint-free cloth, or any soft material that can damage the print cartridge or the product. Solve a problem 108 Solve a problem Remove and clean each print cartridge one at the...
... it, and then pull it . 6. Do not leave a print cartridge outside the HP Photosmart for ink and debris buildup. 5. Wait until the print carriage is idle and silent, and then unplug the power cord from it towards you have the following materials available: • Dry foam rubber swabs,... lint-free cloth, or any soft material that can damage the print cartridge or the product. Solve a problem 108 Solve a problem Remove and clean each print cartridge one at the...

User Guide
Page 111
Clean only the copper-colored contacts. Hold the print cartridge with the HP logo on top, and insert the print cartridge back into place. Allow the print cartridges to be cleaned. Repeat if necessary for approximately ten minutes. 1 ... print cartridge contacts needed to dry for the other print cartridge. 10. Solve a problem 9. 7. Errors 109 Gently close the print cartridge door and plug the power cord into the back of the product.
Clean only the copper-colored contacts. Hold the print cartridge with the HP logo on top, and insert the print cartridge back into place. Allow the print cartridges to be cleaned. Repeat if necessary for approximately ten minutes. 1 ... print cartridge contacts needed to dry for the other print cartridge. 10. Solve a problem 9. 7. Errors 109 Gently close the print cartridge door and plug the power cord into the back of the product.

User Guide
Page 119
... can damage the print cartridges). Remove and clean each print cartridge one at the same time. Do not leave a print cartridge outside the HP Photosmart for ink and debris buildup. 5. Wait until the print carriage is idle and silent, and then unplug the power cord from it towards you have the following materials available: •...
... can damage the print cartridges). Remove and clean each print cartridge one at the same time. Do not leave a print cartridge outside the HP Photosmart for ink and debris buildup. 5. Wait until the print carriage is idle and silent, and then unplug the power cord from it towards you have the following materials available: •...


