HP Notebook Series - Maintenance, Shipping and Travel Guide
Page 7
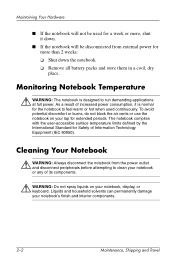
... to run demanding applications at full power. Liquids and household solvents can permanently damage your lap for more than 2 weeks: ❏ Shut down the notebook. ❏ Remove all battery packs and store them in a cool, dry place. To avoid potential discomfort or burns, do not block the air vents or use the...
... to run demanding applications at full power. Liquids and household solvents can permanently damage your lap for more than 2 weeks: ❏ Shut down the notebook. ❏ Remove all battery packs and store them in a cool, dry place. To avoid potential discomfort or burns, do not block the air vents or use the...
HP Notebook Series - Maintenance, Shipping and Travel Guide
Page 13
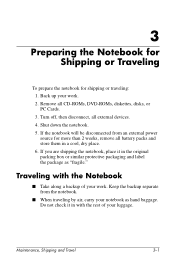
..., DVD-ROMs, diskettes, disks, or PC Cards. 3. If you are shipping the notebook, place it in a cool, dry place. 6. Maintenance, Shipping and Travel 3-1 Back up your notebook as "fragile." Remove all external devices. 4. 3 Preparing the Notebook for Shipping or Traveling To prepare the notebook for more than 2 weeks, remove all battery packs and store them in...
..., DVD-ROMs, diskettes, disks, or PC Cards. 3. If you are shipping the notebook, place it in a cool, dry place. 6. Maintenance, Shipping and Travel 3-1 Back up your notebook as "fragile." Remove all external devices. 4. 3 Preparing the Notebook for Shipping or Traveling To prepare the notebook for more than 2 weeks, remove all battery packs and store them in...

Maintenance and Service Guide
Page 3
Contents Introduction...vii Product Information...1-1 Features ...1-8 Operation...1-14 Specifications ...1-18 Internal Design...1-24 Removal and Replacement 2-1 Disassembly Flowchart ...2-3 Removing the Battery ...2-4 Removing an SDRAM Module...2-5 Removing the Wireless LAN Mini PCI Card 2-7 Removing the Hard Disk Drive...2-9 Recovering the Factory Software...2-11 Replacing Small Parts ...2-12 ...
Contents Introduction...vii Product Information...1-1 Features ...1-8 Operation...1-14 Specifications ...1-18 Internal Design...1-24 Removal and Replacement 2-1 Disassembly Flowchart ...2-3 Removing the Battery ...2-4 Removing an SDRAM Module...2-5 Removing the Wireless LAN Mini PCI Card 2-7 Removing the Hard Disk Drive...2-9 Recovering the Factory Software...2-11 Replacing Small Parts ...2-12 ...
Maintenance and Service Guide
Page 4
...17 Figure 2-13. Removing the Switchboard PCA 2-18 Figure 2-14. Removing the Hard Disk Drive Guide 2-53 iv Service Manual Removing the Battery ...2-4 Figure 2-3. Removing the CD/DVD Drive 2-21 Figure 2-16. AMD CPU Module Release 2-47 Figure 2-30. Removing the Motherboard 2-...51 Figure 2-35. Back View ...1-9 Figure 1-3. Resetting the Notebook ...1-17 Figure 1-8. Removing an SDRAM Module 2-5 Figure 2-4. Disconnecting the Speaker Cable 2-14 Figure 2-11. Removing the Display Assembly 2-24 Figure...
...17 Figure 2-13. Removing the Switchboard PCA 2-18 Figure 2-14. Removing the Hard Disk Drive Guide 2-53 iv Service Manual Removing the Battery ...2-4 Figure 2-3. Removing the CD/DVD Drive 2-21 Figure 2-16. AMD CPU Module Release 2-47 Figure 2-30. Removing the Motherboard 2-...51 Figure 2-35. Back View ...1-9 Figure 1-3. Resetting the Notebook ...1-17 Figure 1-8. Removing an SDRAM Module 2-5 Figure 2-4. Disconnecting the Speaker Cable 2-14 Figure 2-11. Removing the Display Assembly 2-24 Figure...
Maintenance and Service Guide
Page 14
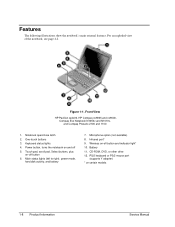
... on and off button 6. Wireless on certain models 1-8 Product Information Service Manual Features The following illustrations show the notebook's main external features. Front View HP Pavilion ze4x00, HP Compaq nx9005 and nx9000, Compaq Evo Notebook N1050v and N1010v, and Compaq Presario 2100 and 1100 1. Microphone option (not available) 8. Battery 11. For an exploded view of the...
... on and off button 6. Wireless on certain models 1-8 Product Information Service Manual Features The following illustrations show the notebook's main external features. Front View HP Pavilion ze4x00, HP Compaq nx9005 and nx9000, Compaq Evo Notebook N1050v and N1010v, and Compaq Presario 2100 and 1100 1. Microphone option (not available) 8. Battery 11. For an exploded view of the...
Maintenance and Service Guide
Page 17
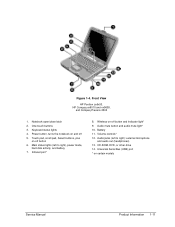
Main status lights (left to right), power mode, hard disk activity, and battery 7. Battery 11. Figure 1-4. Front View HP Pavilion ze5x00, HP Compaq nx9010 and nx9008, and Compaq Presario 2500 1. Power button, turns the notebook on -off 5. Wireless on and off button and indicator light* 9. CD-ROM, DVD, ...light* 10. Keyboard status lights 4. Universal Serial Bus (USB) port * on -off button 6. Volume controls* 12. Notebook open/close latch 2. Audio jacks (left to right): external microphone and audio out (headphones) 13. Infrared port* 8. One-touch buttons 3.
Main status lights (left to right), power mode, hard disk activity, and battery 7. Battery 11. Figure 1-4. Front View HP Pavilion ze5x00, HP Compaq nx9010 and nx9008, and Compaq Presario 2500 1. Power button, turns the notebook on -off 5. Wireless on and off button and indicator light* 9. CD-ROM, DVD, ...light* 10. Keyboard status lights 4. Universal Serial Bus (USB) port * on -off button 6. Volume controls* 12. Notebook open/close latch 2. Audio jacks (left to right): external microphone and audio out (headphones) 13. Infrared port* 8. One-touch buttons 3.
Maintenance and Service Guide
Page 21
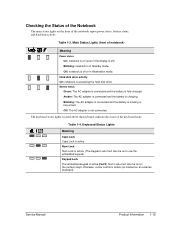
...is active. Service Manual Product Information 1-15 Checking the Status of the Notebook The main status lights on for the numeric keys; Off: notebook is charging. Amber: The AC adapter is connected and the battery is off ). Num Lock Num Lock is fully charged. The keyboard status... lights, located above the keyboard, indicate the states of the notebook report power status, battery status, and hard disk activity. Battery status Green: The AC adapter is connected and the battery is active. (The Keypad Lock must also be on to use the embedded keypad)....
...is active. Service Manual Product Information 1-15 Checking the Status of the Notebook The main status lights on for the numeric keys; Off: notebook is charging. Amber: The AC adapter is connected and the battery is off ). Num Lock Num Lock is fully charged. The keyboard status... lights, located above the keyboard, indicate the states of the notebook report power status, battery status, and hard disk activity. Battery status Green: The AC adapter is connected and the battery is active. (The Keypad Lock must also be on to use the embedded keypad)....
Maintenance and Service Guide
Page 25
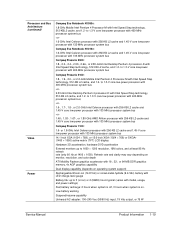
... Intel Celeron processor with 256-KB L2 cache and 1.45-V core low-power processor with 133-MHz processor system bus Compaq Evo Notebook N1010v: 1.6-GHz Intel Celeron processor with 256-KB L2 cache and 1.45-V core low-power processor with 133-MHz processor system ...graphics capability Dual display capability (depends on . Processor and Bus Architecture (continued) Video Power Compaq Evo Notebook N1050v: 1.8-GHz Mobile Intel Pentium 4 Processor-M with model, usage, and power settings) Fast battery recharge: 2 hours when system is off, 3 hours when system is on operating system support) ...
... Intel Celeron processor with 256-KB L2 cache and 1.45-V core low-power processor with 133-MHz processor system bus Compaq Evo Notebook N1010v: 1.6-GHz Intel Celeron processor with 256-KB L2 cache and 1.45-V core low-power processor with 133-MHz processor system ...graphics capability Dual display capability (depends on . Processor and Bus Architecture (continued) Video Power Compaq Evo Notebook N1050v: 1.8-GHz Mobile Intel Pentium 4 Processor-M with model, usage, and power settings) Fast battery recharge: 2 hours when system is off, 3 hours when system is on operating system support) ...
Maintenance and Service Guide
Page 27
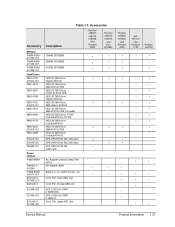
... HD 60 GB (5400 rpm) • SPS-DRV HD 80 GB • (4200 rpm) AC-Adapter-Ultraslim Delta 75W s/PFC AC-Adapter, 90W • • Battery, Li ion 4.4AHr 8 Cell Li ion • • Cord, Pwr, Austr ABG (2w) Cord, Pwr, Europe ABB (2w) SPS-CORD-AC PWR 2 WIRE-INTL ...SPS-CORD-AC PWR 2 WIRE-IT Cord, Pwr, Japan ABJ (2w) Pavilion ze4200, nx9000, and Presario 2100 • • • • • • • • • Evo N1010v and Presario 1100 • • • • • &#...
... HD 60 GB (5400 rpm) • SPS-DRV HD 80 GB • (4200 rpm) AC-Adapter-Ultraslim Delta 75W s/PFC AC-Adapter, 90W • • Battery, Li ion 4.4AHr 8 Cell Li ion • • Cord, Pwr, Austr ABG (2w) Cord, Pwr, Europe ABB (2w) SPS-CORD-AC PWR 2 WIRE-INTL ...SPS-CORD-AC PWR 2 WIRE-IT Cord, Pwr, Japan ABJ (2w) Pavilion ze4200, nx9000, and Presario 2100 • • • • • • • • • Evo N1010v and Presario 1100 • • • • • &#...
Maintenance and Service Guide
Page 30
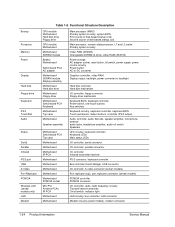
... models), modem connector 1-24 Product Information Service Manual Functional Structure Description CPU module Motherboard Hard disk drive Floppy drive CPU module Motherboard Motherboard SDRAM module Battery Motherboard Switchboard PCA AC adapter Motherboard SDRAM module Display assembly Motherboard Hard disk drive Motherboard Floppy drive Motherboard Switchboard PCA Keyboard Motherboard Top case Motherboard...
... models), modem connector 1-24 Product Information Service Manual Functional Structure Description CPU module Motherboard Hard disk drive Floppy drive CPU module Motherboard Motherboard SDRAM module Battery Motherboard Switchboard PCA AC adapter Motherboard SDRAM module Display assembly Motherboard Hard disk drive Motherboard Floppy drive Motherboard Switchboard PCA Keyboard Motherboard Top case Motherboard...
Maintenance and Service Guide
Page 31
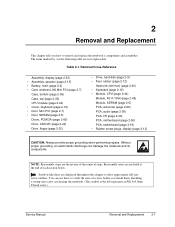
...head screw). Table 2-1. Reassembly notes are user-replaceable. Installing a wrong-size screw can damage the notebook and its components. Service Manual Removal and Replacement 2-1 NOTE: Reassembly steps are displayed throughout this chapter to remove and replace... the notebook's components and assemblies. Removal Cross-Reference Assembly, display (page 2-23) • Assembly, speaker (page 2-15) • Battery, main (page 2-4) • Card, wireless LAN Mini PCI (page 2-7) Case, ...
...head screw). Table 2-1. Reassembly notes are user-replaceable. Installing a wrong-size screw can damage the notebook and its components. Service Manual Removal and Replacement 2-1 NOTE: Reassembly steps are displayed throughout this chapter to remove and replace... the notebook's components and assemblies. Removal Cross-Reference Assembly, display (page 2-23) • Assembly, speaker (page 2-15) • Battery, main (page 2-4) • Card, wireless LAN Mini PCI (page 2-7) Case, ...
Maintenance and Service Guide
Page 34
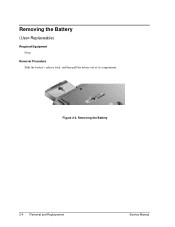
Removing the Battery (User-Replaceable) Required Equipment None Removal Procedure Slide the battery's release latch, and then pull the battery out of its compartment. Figure 2-2. Removing the Battery 2-4 Removal and Replacement Service Manual
Removing the Battery (User-Replaceable) Required Equipment None Removal Procedure Slide the battery's release latch, and then pull the battery out of its compartment. Figure 2-2. Removing the Battery 2-4 Removal and Replacement Service Manual
Maintenance and Service Guide
Page 35
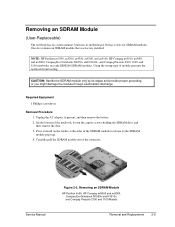
...HP Pavilion ze5300, ze5200, ze4300, ze4200, and ze4100, HP Compaq nx9010, nx9005 and nx9000, Compaq Evo Notebook N1050v and N1010v, and Compaq Presario 2500, 2100, and 1100 notebooks use only DDR266 SDRAM modules. Unplug the AC adapter, if present, and then remove the battery. 2. Removing an SDRAM Module (User-Replaceable) The notebook...On the bottom of module prevents the notebook from booting. One slot contains an SDRAM module that was factory installed. Removing an SDRAM Module HP Pavilion 4x00, HP Compaq nx9005 and nx9000, Compaq Evo Notebook N1050v and N1010v, and Compaq Presario ...
...HP Pavilion ze5300, ze5200, ze4300, ze4200, and ze4100, HP Compaq nx9010, nx9005 and nx9000, Compaq Evo Notebook N1050v and N1010v, and Compaq Presario 2500, 2100, and 1100 notebooks use only DDR266 SDRAM modules. Unplug the AC adapter, if present, and then remove the battery. 2. Removing an SDRAM Module (User-Replaceable) The notebook...On the bottom of module prevents the notebook from booting. One slot contains an SDRAM module that was factory installed. Removing an SDRAM Module HP Pavilion 4x00, HP Compaq nx9005 and nx9000, Compaq Evo Notebook N1050v and N1010v, and Compaq Presario ...
Maintenance and Service Guide
Page 37
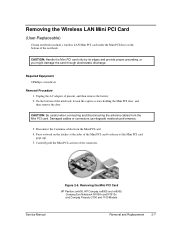
... from the Mini PCI card. Press outward on the bottom of the notebook. Removing the Mini PCI Card HP Pavilion ze4x00, HP Compaq nx9005 and nx9000, Compaq Evo Notebook N1050v and N1010v, and Compaq Presario 2100 and 1100 Models Service Manual ...Removal and Replacement 2-7 Damaged cables or connectors can degrade notebook performance. 3. On the bottom of the connector. Figure 2-5. Unplug the AC adapter, if present, and then remove the battery...
... from the Mini PCI card. Press outward on the bottom of the notebook. Removing the Mini PCI Card HP Pavilion ze4x00, HP Compaq nx9005 and nx9000, Compaq Evo Notebook N1050v and N1010v, and Compaq Presario 2100 and 1100 Models Service Manual ...Removal and Replacement 2-7 Damaged cables or connectors can degrade notebook performance. 3. On the bottom of the connector. Figure 2-5. Unplug the AC adapter, if present, and then remove the battery...
Maintenance and Service Guide
Page 39
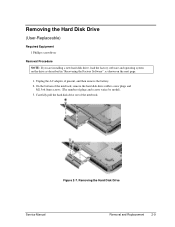
... M2.5×6.0mm screws. (The number of the notebook. Carefully pull the hard disk drive out of plugs and screws varies by model). 3. Removing the Hard Disk Drive Service Manual Removal and Replacement 2-9 Unplug the AC adapter, if present, and then remove the battery. 2. Removing the Hard Disk Drive (User-Replaceable) Required...
... M2.5×6.0mm screws. (The number of the notebook. Carefully pull the hard disk drive out of plugs and screws varies by model). 3. Removing the Hard Disk Drive Service Manual Removal and Replacement 2-9 Unplug the AC adapter, if present, and then remove the battery. 2. Removing the Hard Disk Drive (User-Replaceable) Required...
Maintenance and Service Guide
Page 43
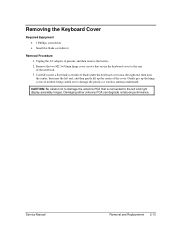
... remove the battery. 2. CAUTION: Be careful not to damage the antenna PCA that secure the keyboard cover to the rear of the cover. Remove the two M2.5×4.0mm hinge cover screws that is connected to damage the plastics or wireless antenna underneath. Damaging either antenna PCA can degrade notebook performance. Service... lift up the hinge covers if needed, being careful not to the left and right display assembly hinges. Gently pry up the center of the notebook. 3.
... remove the battery. 2. CAUTION: Be careful not to damage the antenna PCA that secure the keyboard cover to the rear of the cover. Remove the two M2.5×4.0mm hinge cover screws that is connected to damage the plastics or wireless antenna underneath. Damaging either antenna PCA can degrade notebook performance. Service... lift up the hinge covers if needed, being careful not to the left and right display assembly hinges. Gently pry up the center of the notebook. 3.
Maintenance and Service Guide
Page 45
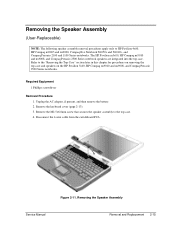
... the battery. 2. Remove the keyboard cover (page 2-13). 3. Disconnect the 4-wire cable from the switchboard PCA. Removing the Speaker Assembly Service Manual Removal and Replacement 2-15 Figure 2-11. The HP Pavilion ze5x00, HP Compaq nx9010 and nx9008, and Compaq Presario 2500 Series notebook speakers ...Remove the M2.5×6.0mm screw that secures the speaker assembly to HP Pavilion 4x00, HP Compaq nx9005 and nx9000, Compaq Evo Notebook N1050v and N1010v, and Compaq Presario 2100 and 1100 Series notebooks. Removing the Speaker Assembly (User-Replaceable) NOTE: The following speaker ...
... the battery. 2. Remove the keyboard cover (page 2-13). 3. Disconnect the 4-wire cable from the switchboard PCA. Removing the Speaker Assembly Service Manual Removal and Replacement 2-15 Figure 2-11. The HP Pavilion ze5x00, HP Compaq nx9010 and nx9008, and Compaq Presario 2500 Series notebook speakers ...Remove the M2.5×6.0mm screw that secures the speaker assembly to HP Pavilion 4x00, HP Compaq nx9005 and nx9000, Compaq Evo Notebook N1050v and N1010v, and Compaq Presario 2100 and 1100 Series notebooks. Removing the Speaker Assembly (User-Replaceable) NOTE: The following speaker ...

Maintenance and Service Guide
Page 46
... top case, and then lower the keyboard into place. 2-16 Removal and Replacement Service Manual Unplug the AC adapter, if present, and then remove the battery. 2. Lift up on the bottom of its normal position, and then reconnect the keyboard cable. • Slide the metal tabs on the keyboard at the...
... top case, and then lower the keyboard into place. 2-16 Removal and Replacement Service Manual Unplug the AC adapter, if present, and then remove the battery. 2. Lift up on the bottom of its normal position, and then reconnect the keyboard cable. • Slide the metal tabs on the keyboard at the...
Maintenance and Service Guide
Page 48
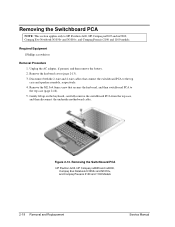
Removing the Switchboard PCA HP Pavilion 4x00, HP Compaq nx9005 and nx9000, Compaq Evo Notebook N1050v and N1010v, and Compaq Presario 2100 and 1100 Models 2-18 Removal and Replacement Service Manual Gently lift up on the keyboard...then remove the battery. 2. Removing the Switchboard PCA NOTE: This section applies only to the top case and speaker assembly, respectively. 4. Required Equipment 1 Phillips screwdriver Removal Procedure 1. Remove the M2.5×4.0mm screw that connect the switchboard PCA to HP Pavilion 4x00, HP Compaq nx9005 and nx9000, Compaq Evo Notebook N1050v and ...
Removing the Switchboard PCA HP Pavilion 4x00, HP Compaq nx9005 and nx9000, Compaq Evo Notebook N1050v and N1010v, and Compaq Presario 2100 and 1100 Models 2-18 Removal and Replacement Service Manual Gently lift up on the keyboard...then remove the battery. 2. Removing the Switchboard PCA NOTE: This section applies only to the top case and speaker assembly, respectively. 4. Required Equipment 1 Phillips screwdriver Removal Procedure 1. Remove the M2.5×4.0mm screw that connect the switchboard PCA to HP Pavilion 4x00, HP Compaq nx9005 and nx9000, Compaq Evo Notebook N1050v and ...
Maintenance and Service Guide
Page 49
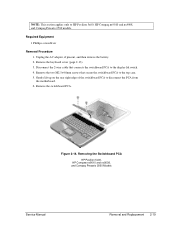
... to the display lid switch. 4. Remove the switchboard PCA. Gently lift up on the rear right edge of the switchboard PCA to HP Pavilion 5x00, HP Compaq nx9010 and nx9008, and Compaq Presario 2500 models. Remove the two M2.5×4.0mm screws that connects the switchboard PCA to the ...top case. 5. Remove the keyboard cover (page 2-13). 3. Unplug the AC adapter, if present, and then remove the battery. 2. NOTE: This section applies only ...
... to the display lid switch. 4. Remove the switchboard PCA. Gently lift up on the rear right edge of the switchboard PCA to HP Pavilion 5x00, HP Compaq nx9010 and nx9008, and Compaq Presario 2500 models. Remove the two M2.5×4.0mm screws that connects the switchboard PCA to the ...top case. 5. Remove the keyboard cover (page 2-13). 3. Unplug the AC adapter, if present, and then remove the battery. 2. NOTE: This section applies only ...


