HP Pavilion Entertainment PC - Quick Reference Guide
Page 15
... site. Updating the software installed on disc, as the computer is updated frequently by the hardware manufacturer to optional software or external devices. Save your work and close all open applications. 2. Shut down the computer through the operating system by using the software, refer to the manufacturer's instructions, which may be provided on the computer Most software, including the operating system, is connected to the Internet. Important updates to the software included...
... site. Updating the software installed on disc, as the computer is updated frequently by the hardware manufacturer to optional software or external devices. Save your work and close all open applications. 2. Shut down the computer through the operating system by using the software, refer to the manufacturer's instructions, which may be provided on the computer Most software, including the operating system, is connected to the Internet. Important updates to the software included...
HP Pavilion Entertainment PC - Quick Reference Guide
Page 21
... the operating system. 441259-001.book Page 5 Wednesday, February 14, 2007 9:21 AM Troubleshooting ■ Turn on the computer is blue. Quick Reference 3-5 For compatibility information, refer to its power adapter and the cable modem, and that the wireless device is turned on and the wireless light on the device as instructed in the device user guide. For more information about updating drivers, select Start > Help and Support. The home wireless network connection is not working...
... the operating system. 441259-001.book Page 5 Wednesday, February 14, 2007 9:21 AM Troubleshooting ■ Turn on the computer is blue. Quick Reference 3-5 For compatibility information, refer to its power adapter and the cable modem, and that the wireless device is turned on and the wireless light on the device as instructed in the device user guide. For more information about updating drivers, select Start > Help and Support. The home wireless network connection is not working...
HP Pavilion Entertainment PC - Quick Reference Guide
Page 28
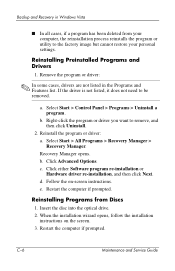
b. Click either Software program re-installation or Hardware driver re-installation, and then click Next. e. Remove the program or driver: ✎ In some cases, drivers are reinstalling is not listed, it does not need to the factory image but cannot restore your computer, the reinstallation process reinstalls the program or utility to be removed. The Recovery Manager tool opens. Restart the computer if prompted. 4-6 Quick Reference a. Select Start > Control Panel > Programs > Uninstall...
b. Click either Software program re-installation or Hardware driver re-installation, and then click Next. e. Remove the program or driver: ✎ In some cases, drivers are reinstalling is not listed, it does not need to the factory image but cannot restore your computer, the reinstallation process reinstalls the program or utility to be removed. The Recovery Manager tool opens. Restart the computer if prompted. 4-6 Quick Reference a. Select Start > Control Panel > Programs > Uninstall...
HP Pavilion dv6000 Notebook PC Maintenance and Service Guide
Page 19
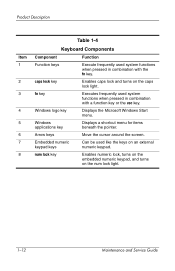
... key Displays the Microsoft Windows Start menu. caps lock key Enables caps lock and turns on the num lock light. 1-12 Maintenance and Service Guide Product Description Item 1 2 3 4 5 6 7 8 Table 1-4 Keyboard Components Component Function Function keys Execute frequently used like the keys on an external numeric keypad. num lock key Enables numeric lock, turns on the embedded numeric keypad, and turns on the caps lock light. Windows applications key Displays a shortcut menu for items beneath the pointer. Embedded numeric keypad keys Can be used system functions...
... key Displays the Microsoft Windows Start menu. caps lock key Enables caps lock and turns on the num lock light. 1-12 Maintenance and Service Guide Product Description Item 1 2 3 4 5 6 7 8 Table 1-4 Keyboard Components Component Function Function keys Execute frequently used like the keys on an external numeric keypad. num lock key Enables numeric lock, turns on the embedded numeric keypad, and turns on the caps lock light. Windows applications key Displays a shortcut menu for items beneath the pointer. Embedded numeric keypad keys Can be used system functions...
HP Pavilion dv6000 Notebook PC Maintenance and Service Guide
Page 38
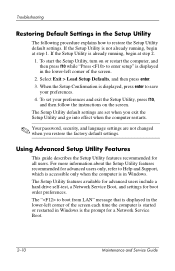
... users. To start the Setup Utility, turn on the screen. The Setup Utility features available for advanced users include a hard drive self-test, a Network Service Boot, and settings for a Network Service Boot. 2-10 Maintenance and Service Guide The " to restore the Setup Utility default settings. Troubleshooting Restoring Default Settings in the Setup Utility The following procedure explains how to boot from LAN" message that is displayed in the lower-left corner of the screen each time the computer is started or restarted in Windows is the prompt for boot order...
... users. To start the Setup Utility, turn on the screen. The Setup Utility features available for advanced users include a hard drive self-test, a Network Service Boot, and settings for a Network Service Boot. 2-10 Maintenance and Service Guide The " to restore the Setup Utility default settings. Troubleshooting Restoring Default Settings in the Setup Utility The following procedure explains how to boot from LAN" message that is displayed in the lower-left corner of the screen each time the computer is started or restarted in Windows is the prompt for boot order...
HP Pavilion dv6000 Notebook PC Maintenance and Service Guide
Page 243
... Discs 1. If the driver is not listed, it does not need to remove, and then click Uninstall. 2. a. Select Start > Control Panel > Programs > Uninstall a program. Click Advanced Options. C-6 Maintenance and Service Guide Click either Software program re-installation or Hardware driver re-installation, and then click Next. b. e. Reinstalling Programs from your computer, the reinstallation process reinstalls the program or utility to the factory image but cannot restore your personal settings. Insert the disc...
... Discs 1. If the driver is not listed, it does not need to remove, and then click Uninstall. 2. a. Select Start > Control Panel > Programs > Uninstall a program. Click Advanced Options. C-6 Maintenance and Service Guide Click either Software program re-installation or Hardware driver re-installation, and then click Next. b. e. Reinstalling Programs from your computer, the reinstallation process reinstalls the program or utility to the factory image but cannot restore your personal settings. Insert the disc...
HP Pavilion dv6000 Notebook PC Maintenance and Service Guide
Page 276
...board removal 5-31 spare part number 3-3, 3-38, 5-31 power connector 1-10 power cord set requirements F-2 spare part numbers 3-29, 3-31 power light 1-6 power management features 1-5 power, troubleshooting 2-18 previous/rewind button 1-17 processor removal 5-69 spare part numbers 3-9, 3-35, 3-36, 3-40, 3-41, 3-42, 3-44, 5-69 R rear components 1-8 recovering from partition on hard drive Windows Vista C-7 Windows XP B-8 recovering from the recovery discs Windows Vista C-7 Windows XP B-8 remote control, spare part numbers 3-28, 3-34, 3-41, 3-42 removal preliminaries 4-1 procedures 5-1 replacement...
...board removal 5-31 spare part number 3-3, 3-38, 5-31 power connector 1-10 power cord set requirements F-2 spare part numbers 3-29, 3-31 power light 1-6 power management features 1-5 power, troubleshooting 2-18 previous/rewind button 1-17 processor removal 5-69 spare part numbers 3-9, 3-35, 3-36, 3-40, 3-41, 3-42, 3-44, 5-69 R rear components 1-8 recovering from partition on hard drive Windows Vista C-7 Windows XP B-8 recovering from the recovery discs Windows Vista C-7 Windows XP B-8 remote control, spare part numbers 3-28, 3-34, 3-41, 3-42 removal preliminaries 4-1 procedures 5-1 replacement...
Setup Instructions
Page 2
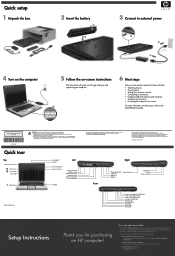
... and hardware • Creating recovery discs • Protecting the computer from threats and viruses. Quick tour Top Internal microphones* DVD button* Power button Power light Media button Camera light* Camera* Left Volume mute button Volume scroll zone Security cable slot S-Video-out jack External monitor port Expansion port 3 RJ-45 (network) jack RJ-11 (modem) jack TouchPad *Select models only For more information on these activities: • Watching movies • Playing games • Setting up a wireless network • Connecting to Help and Support today! Replace...
... and hardware • Creating recovery discs • Protecting the computer from threats and viruses. Quick tour Top Internal microphones* DVD button* Power button Power light Media button Camera light* Camera* Left Volume mute button Volume scroll zone Security cable slot S-Video-out jack External monitor port Expansion port 3 RJ-45 (network) jack RJ-11 (modem) jack TouchPad *Select models only For more information on these activities: • Watching movies • Playing games • Setting up a wireless network • Connecting to Help and Support today! Replace...
Drives - Windows XP
Page 9
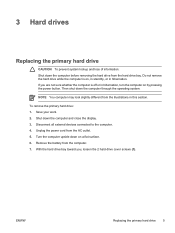
... 2 hard drive cover screws (1). Save your work. 2. Remove the battery from the AC outlet. 5. Turn the computer upside down on by pressing the power button. Unplug the power cord from the computer. 7. To remove the primary hard drive: 1. Disconnect all external devices connected to the computer. 4. ENWW Replacing the primary hard drive 5 Then shut down the computer and close the display. 3. Shut down the computer through the operating system. 3 Hard drives Replacing the primary hard drive...
... 2 hard drive cover screws (1). Save your work. 2. Remove the battery from the AC outlet. 5. Turn the computer upside down on by pressing the power button. Unplug the power cord from the computer. 7. To remove the primary hard drive: 1. Disconnect all external devices connected to the computer. 4. ENWW Replacing the primary hard drive 5 Then shut down the computer and close the display. 3. Shut down the computer through the operating system. 3 Hard drives Replacing the primary hard drive...
Drives - Windows XP
Page 19
Index A airport security devices 1 C CD inserting 10 removing, with power 11 removing, without power 12 CD drive 9 D drive light 3 drives caring for 1 drive light 3 hard 5, 6 optical 9 secondary hard 7 See also hard drive, optical drive DVD inserting 10 removing, with power 11 removing, without power 12 DVD drive 9 O optical disc inserting 10 removing, with power 11 removing, without power 12 optical drive 9 S secondary hard drive 7 standby 13 H hard disk drive installing 6 removing 5 replacing 5 hard drive installing 6 removing 5 replacing 5 hibernation 13 L light, drive 3 ENWW Index 15
Index A airport security devices 1 C CD inserting 10 removing, with power 11 removing, without power 12 CD drive 9 D drive light 3 drives caring for 1 drive light 3 hard 5, 6 optical 9 secondary hard 7 See also hard drive, optical drive DVD inserting 10 removing, with power 11 removing, without power 12 DVD drive 9 O optical disc inserting 10 removing, with power 11 removing, without power 12 optical drive 9 S secondary hard drive 7 standby 13 H hard disk drive installing 6 removing 5 replacing 5 hard drive installing 6 removing 5 replacing 5 hibernation 13 L light, drive 3 ENWW Index 15

Multimedia
Page 3
... Removing an optical disc when running on battery or external power 14 Removing an optical disc when no computer power is available 15 Using the media activity functions ...16 Using the media activity hotkeys 16 Using the media activity buttons (select models only 17 Previous/rewind button 17 Play/pause button 17 Next/fast forward button 18 Stop button ...18 2 Working with multimedia software Opening preinstalled multimedia software 20 Installing multimedia software from a disc 20 Using multimedia software ...20 Preventing playback disruptions ...21 Changing DVD region settings...
... Removing an optical disc when running on battery or external power 14 Removing an optical disc when no computer power is available 15 Using the media activity functions ...16 Using the media activity hotkeys 16 Using the media activity buttons (select models only 17 Previous/rewind button 17 Play/pause button 17 Next/fast forward button 18 Stop button ...18 2 Working with multimedia software Opening preinstalled multimedia software 20 Installing multimedia software from a disc 20 Using multimedia software ...20 Preventing playback disruptions ...21 Changing DVD region settings...
Multimedia
Page 27
... 19 copyright warning 22 D DVD changing region setting 22 inserting 13 playing 21 protecting 19 removing, with power 14 removing, without power 15 writing to 19 DVD button 5 DVD region settings 22 E earbuds 1 external monitor port 7 H headphones 1 J jacks audio-in (microphone) 1, 3 audio-out (headphone) 1, 3 S-Video-out 8 M media activity buttons 17 media activity hotkeys 16 Media button 5 microphones, supported 3 monitor, connecting 7 multimedia software described 19 using 20 mute button 2, 4 O optical disc inserting 13 removing, with power 14 removing, without power 15 writing to 19 optical...
... 19 copyright warning 22 D DVD changing region setting 22 inserting 13 playing 21 protecting 19 removing, with power 14 removing, without power 15 writing to 19 DVD button 5 DVD region settings 22 E earbuds 1 external monitor port 7 H headphones 1 J jacks audio-in (microphone) 1, 3 audio-out (headphone) 1, 3 S-Video-out 8 M media activity buttons 17 media activity hotkeys 16 Media button 5 microphones, supported 3 monitor, connecting 7 multimedia software described 19 using 20 mute button 2, 4 O optical disc inserting 13 removing, with power 14 removing, without power 15 writing to 19 optical...
Multimedia - Windows XP
Page 13
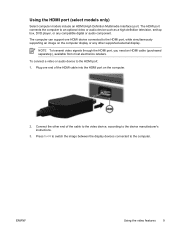
... other supported external display. To connect a video or audio device to the device manufacturer's instructions. 3. Press fn+f4 to switch the image between the display devices connected to an optional video or audio device such as a high-definition television, set-top box, DVD player, or any other end of the HDMI cable into the HDMI port on the computer display or any compatible digital or audio component. NOTE To transmit video signals through the HDMI port, you need an HDMI cable...
... other supported external display. To connect a video or audio device to the device manufacturer's instructions. 3. Press fn+f4 to switch the image between the display devices connected to an optional video or audio device such as a high-definition television, set-top box, DVD player, or any other end of the HDMI cable into the HDMI port on the computer display or any compatible digital or audio component. NOTE To transmit video signals through the HDMI port, you need an HDMI cable...
Notebook Tour - Windows XP
Page 7
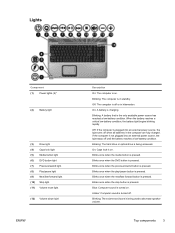
... being used to decrease speaker volume. Blinking: The hard drive or optical drive is in hibernation. Blinks once when the play/pause button is turned off until the battery reaches a low-battery condition. Amber: Computer sound is pressed. Blinking: The volume scroll zone is pressed. Blinks once when the stop button is being accessed. Blinks once when the next/fast forward button is on . Lights Component (1) Power lights (2)* (2) Battery light (3) Drive light (4) Caps lock light (5) Media button light (6) DVD button light (7) Previous/rewind light (8) Play/pause light...
... being used to decrease speaker volume. Blinking: The hard drive or optical drive is in hibernation. Blinks once when the play/pause button is turned off until the battery reaches a low-battery condition. Amber: Computer sound is pressed. Blinking: The volume scroll zone is pressed. Blinks once when the stop button is being accessed. Blinks once when the next/fast forward button is on . Lights Component (1) Power lights (2)* (2) Battery light (3) Drive light (4) Caps lock light (5) Media button light (6) DVD button light (7) Previous/rewind light (8) Play/pause light...
Security - Windows XP
Page 6
... types of passwords can also use the same password for a Setup Utility feature and for more than one Setup Utility feature. NOTE Select models include a separate numeric keypad, which functions exactly like the keyboard number keys. ● A password must be entered at a Setup Utility prompt. For example, if you set in Windows or in Windows must be entered at a Windows prompt. The following tables list Windows and Setup Utility passwords and describe their functions. A password set in the non-Windows Setup Utility preinstalled...
... types of passwords can also use the same password for a Setup Utility feature and for more than one Setup Utility feature. NOTE Select models include a separate numeric keypad, which functions exactly like the keyboard number keys. ● A password must be entered at a Setup Utility prompt. For example, if you set in Windows or in Windows must be entered at a Windows prompt. The following tables list Windows and Setup Utility passwords and describe their functions. A password set in the non-Windows Setup Utility preinstalled...
Setup Utility - Windows XP
Page 9
... an option to return to change boot order" message that is displayed in Windows. For more information about the Setup Utility features recommended for advanced users only, refer to select Exit > Exit Saving Changes, and then press enter. Then use the arrow keys to the Help and Support Center, which is accessible only when the computer is the prompt for a Network Service Boot. ENWW Using advanced Setup Utility features 5 The Setup Utility features...
... an option to return to change boot order" message that is displayed in Windows. For more information about the Setup Utility features recommended for advanced users only, refer to select Exit > Exit Saving Changes, and then press enter. Then use the arrow keys to the Help and Support Center, which is accessible only when the computer is the prompt for a Network Service Boot. ENWW Using advanced Setup Utility features 5 The Setup Utility features...
Software Update, Backup and Recovery - Windows XP
Page 6
... download a BIOS update: 1. At the download area: a. Make a note of the screen. 2. You will be displayed by pressing fn+esc (if you are already in Microsoft® Windows®) or by opening the Setup Utility. Identify the BIOS update that provides software for displaying BIOS information: 1. You may need to an optional power source. If the Setup Utility does not open with the system information displayed, use the Setup Utility for your computer: Select Start > Help and Support...
... download a BIOS update: 1. At the download area: a. Make a note of the screen. 2. You will be displayed by pressing fn+esc (if you are already in Microsoft® Windows®) or by opening the Setup Utility. Identify the BIOS update that provides software for displaying BIOS information: 1. You may need to an optional power source. If the Setup Utility does not open with the system information displayed, use the Setup Utility for your computer: Select Start > Help and Support...

TouchPad and Keyboard
Page 15
... . A USB mouse can temporarily alternate the functions of keys on the embedded numeric keypad between their standard keyboard functions and their standard keyboard functions. Enabling and disabling the embedded numeric keypad Press fn+num lk to their keypad functions by the icon in uppercase. Using an external numeric keypad Most keys on most keypad keys function like the keys on the keypad performs the function indicated by using the ports on...
... . A USB mouse can temporarily alternate the functions of keys on the embedded numeric keypad between their standard keyboard functions and their standard keyboard functions. Enabling and disabling the embedded numeric keypad Press fn+num lk to their keypad functions by the icon in uppercase. Using an external numeric keypad Most keys on most keypad keys function like the keys on the keypad performs the function indicated by using the ports on...
Wireless (Select Models Only) - Windows XP
Page 11
Identifying a WLAN device To set up your wireless network, identify that is displayed. Right-click in the My Computer window. 3. NOTE If no WLAN device is listed, either your computer: 1. ENWW Identifying a WLAN device 7 Select Properties > Hardware tab > Device Manager > Network Adapters. 4. The listing for the WLAN device is installed on your computer does not have an integrated WLAN device, or the driver for a WLAN device may include the term wireless, wireless LAN, WLAN...
Identifying a WLAN device To set up your wireless network, identify that is displayed. Right-click in the My Computer window. 3. NOTE If no WLAN device is listed, either your computer: 1. ENWW Identifying a WLAN device 7 Select Properties > Hardware tab > Device Manager > Network Adapters. 4. The listing for the WLAN device is installed on your computer does not have an integrated WLAN device, or the driver for a WLAN device may include the term wireless, wireless LAN, WLAN...
Troubleshooting
Page 10
... > Device options or Advanced and then press enter. 2. Use the arrow keys to a wireless network: 1. Be sure that the Windows Wireless Network Connection window can display the network. ● Click the Refresh button so that Windows will not appear in the window and select Properties > Hardware tab > Device Manager. An external device is within optimal range of the wireless router (access point). ● Be sure that the computer wireless antennae are free from obstructions. 6 Chapter 1 Quick checklist...
... > Device options or Advanced and then press enter. 2. Use the arrow keys to a wireless network: 1. Be sure that the Windows Wireless Network Connection window can display the network. ● Click the Refresh button so that Windows will not appear in the window and select Properties > Hardware tab > Device Manager. An external device is within optimal range of the wireless router (access point). ● Be sure that the computer wireless antennae are free from obstructions. 6 Chapter 1 Quick checklist...


