
HP PSC 500 - (English) Customer Care Guide
Page 5
...HP PSC 500 Cleaning the Exterior Case 3-1 Cleaning the Glass 3-1 How to Clean Cartridges 3-3 Front-Panel Messages 3-4 Additional Troubleshooting Tips 3-6 Chapter 4 - Adding and Removing Software Programs Removing Software 4-1 General Information 4-1 Removing HP PSC 500 Software 4-1 Reinstalling Software 4-2 Chapter 5 - Getting Help HP Multimedia Product Tour 1-1 Online Help 1-2 HP PSC 500 Toolbox 1-2 HP PSC...VCCI-2 (Japan 6-6 Support Services Get Help from HP 2-1 Online Services 2-1 HP Customer Support 2-3 Prepare Your HP PSC 500 for Shipment 2-3 Calling in the U.S. Post-...
...HP PSC 500 Cleaning the Exterior Case 3-1 Cleaning the Glass 3-1 How to Clean Cartridges 3-3 Front-Panel Messages 3-4 Additional Troubleshooting Tips 3-6 Chapter 4 - Adding and Removing Software Programs Removing Software 4-1 General Information 4-1 Removing HP PSC 500 Software 4-1 Reinstalling Software 4-2 Chapter 5 - Getting Help HP Multimedia Product Tour 1-1 Online Help 1-2 HP PSC 500 Toolbox 1-2 HP PSC...VCCI-2 (Japan 6-6 Support Services Get Help from HP 2-1 Online Services 2-1 HP Customer Support 2-3 Prepare Your HP PSC 500 for Shipment 2-3 Calling in the U.S. Post-...

HP PSC 500 - (English) Customer Care Guide
Page 13
... unit's front panel. To do the following : Turn on the HP PSC 500. Be prepared to describe your serial number ready. Open the print-cartridge access door. Place the print cartridges in for service, do not send them aside (do the following : Have your problem in -one for more information. Try resetting the unit by the...
... unit's front panel. To do the following : Turn on the HP PSC 500. Be prepared to describe your serial number ready. Open the print-cartridge access door. Place the print cartridges in for service, do not send them aside (do the following : Have your problem in -one for more information. Try resetting the unit by the...
HP PSC 500 - (English) Customer Care Guide
Page 17
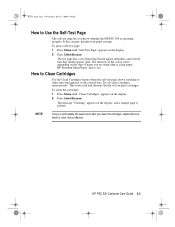
... and so on). Do not clean cartridges unnecessarily. To clean the cartridges: Press Menu until "Self-Test Page" appears on the type of lines that should appear solid. Press Select/Resume. The test page has a set of paper you know whether the HP PSC 500 is printed. The message "Cleaning" ...appears on the display. To print a self-test page: Press Menu until "Clean Cartridges" appears on the display, and a sample page is operating properly. The intensity of ...
... and so on). Do not clean cartridges unnecessarily. To clean the cartridges: Press Menu until "Self-Test Page" appears on the type of lines that should appear solid. Press Select/Resume. The test page has a set of paper you know whether the HP PSC 500 is printed. The message "Cleaning" ...appears on the display. To print a self-test page: Press Menu until "Clean Cartridges" appears on the display, and a sample page is operating properly. The intensity of ...

HP PSC 500 - (English) Customer Care Guide
Page 18
... your computer and the HP PSC 500. Remove and check black cartridge. Black ink out soon. Cannot connect to remove the tape from the print cartridge, and close the latch securely. Close latches over print cartridges, then turn the power off and on again. Paper jam. The HP PSC 500 has not been used ... incorrectly installed, the wrong type, or defective. One of the OUT tray, and press Select/Resume. If this does not work , call for service. Be sure to use only the IEEE-1284 parallel printer cable that came with the correct cartridge, or insert it may be installed, or it...
... your computer and the HP PSC 500. Remove and check black cartridge. Black ink out soon. Cannot connect to remove the tape from the print cartridge, and close the latch securely. Close latches over print cartridges, then turn the power off and on again. Paper jam. The HP PSC 500 has not been used ... incorrectly installed, the wrong type, or defective. One of the OUT tray, and press Select/Resume. If this does not work , call for service. Be sure to use only the IEEE-1284 parallel printer cable that came with the correct cartridge, or insert it may be installed, or it...

HP PSC 500 - (English) Customer Care Guide
Page 19
...Do Remove and check color cartridge. If there is becoming too dim to be installed incorrectly. Remove it, and replace it with the correct cartridge or insert it may be serviced. Turn the power off and then on again. See "HP Customer Support" in the HP PSC 500, lower the banner switch,... which appears on again. The wrong tri-color cartridge may be installed, or it correctly. Single-sheet paper expected. Remove original from glass Remove ...
...Do Remove and check color cartridge. If there is becoming too dim to be installed incorrectly. Remove it, and replace it with the correct cartridge or insert it may be serviced. Turn the power off and then on again. See "HP Customer Support" in the HP PSC 500, lower the banner switch,... which appears on again. The wrong tri-color cartridge may be installed, or it correctly. Single-sheet paper expected. Remove original from glass Remove ...

HP PSC 500 - (English) Customer Care Guide
Page 20
..., or the latches were left open after the print cartridges were inserted. I cannot print a document. Right-click the HP PSC 500 icon, and choose Set as the current or default printer. Turn the HP PSC 500 off and then on again; Scan Status stalls. Consider the following: From the HP PSC Scanning viewer, make sure you select to send Text...
..., or the latches were left open after the print cartridges were inserted. I cannot print a document. Right-click the HP PSC 500 icon, and choose Set as the current or default printer. Turn the HP PSC 500 off and then on again; Scan Status stalls. Consider the following: From the HP PSC Scanning viewer, make sure you select to send Text...

HP PSC 500 - (English) Setup Guide
Page 5
.../98 server to NT 4.0 client 2-4 HP PSC 500 Setup Guide iii Install Print Cartridges 1-4 Step 4 - Install the HP PSC 500 Software 1-10 Installing the HP PSC 500 Software 1-10 Registering Your HP PSC 500 1-15 Installing OCR Software 1-15 Installing Third-Party Programs 1-15 Step 6 - Align Your Print Cartridges 1-16 Chapter 2 - Connect the Printer Cable and Power Cords 1-7 Connecting the Printer Cable 1-7 Connecting the Power Cords...
.../98 server to NT 4.0 client 2-4 HP PSC 500 Setup Guide iii Install Print Cartridges 1-4 Step 4 - Install the HP PSC 500 Software 1-10 Installing the HP PSC 500 Software 1-10 Registering Your HP PSC 500 1-15 Installing OCR Software 1-15 Installing Third-Party Programs 1-15 Step 6 - Align Your Print Cartridges 1-16 Chapter 2 - Connect the Printer Cable and Power Cords 1-7 Connecting the Printer Cable 1-7 Connecting the Power Cords...

HP PSC 500 - (English) Setup Guide
Page 8
.... a c fg b e d 4 Choose a location and environment for your HP PSC 500. X Make sure the location is level, flat, and stable. d CD-ROM disk(s). f One black and one color print cartridge. X Be sure a grounded outlet is nearby and easily accessible. 1-2 Setting Up Your HP PSC 500 e Three manuals: HP PSC 500 Setup Guide, HP PSC 500 Basic Operations Guide, and HP PSC 500 Customer Care Guide. 3 Make sure the following...
.... a c fg b e d 4 Choose a location and environment for your HP PSC 500. X Make sure the location is level, flat, and stable. d CD-ROM disk(s). f One black and one color print cartridge. X Be sure a grounded outlet is nearby and easily accessible. 1-2 Setting Up Your HP PSC 500 e Three manuals: HP PSC 500 Setup Guide, HP PSC 500 Basic Operations Guide, and HP PSC 500 Customer Care Guide. 3 Make sure the following...
HP PSC 500 - (English) Setup Guide
Page 10
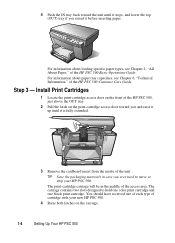
...one color print cartridge and one of each type of the HP PSC 500 Customer Care Guide. TIP Save the packaging materials in the middle of the unit. Install Print Cartridges 1 Locate the print-cartridge access door on the front of the HP PSC 500, just above the OUT tray. 2 Pull the latch on the carriage. 1-4 Setting Up Your HP PSC 500 The print-cartridge...area. You should have received one black print cartridge. Step 3 - The carriage contains two slots designed to move or ship your new HP PSC 500. 4 Raise both latches on the print-cartridge access door toward the unit ...
...one color print cartridge and one of each type of the HP PSC 500 Customer Care Guide. TIP Save the packaging materials in the middle of the unit. Install Print Cartridges 1 Locate the print-cartridge access door on the front of the HP PSC 500, just above the OUT tray. 2 Pull the latch on the carriage. 1-4 Setting Up Your HP PSC 500 The print-cartridge...area. You should have received one black print cartridge. Step 3 - The carriage contains two slots designed to move or ship your new HP PSC 500. 4 Raise both latches on the print-cartridge access door toward the unit ...

HP PSC 500 - (English) Setup Guide
Page 11
CAUTION Do not touch the gold-colored contacts. 6 Push the color print cartridge firmly down into the slot on the left. HP PSC 500 Setup Guide 1-5 NOTE The print-cartridge label should be facing you after the cartridge is inserted. 5 Remove the color print cartridge (the thicker one) from its packaging and, being careful to touch only the black plastic, gently remove both the green pull tab and blue tape covering the nozzles.
CAUTION Do not touch the gold-colored contacts. 6 Push the color print cartridge firmly down into the slot on the left. HP PSC 500 Setup Guide 1-5 NOTE The print-cartridge label should be facing you after the cartridge is inserted. 5 Remove the color print cartridge (the thicker one) from its packaging and, being careful to touch only the black plastic, gently remove both the green pull tab and blue tape covering the nozzles.

HP PSC 500 - (English) Setup Guide
Page 12
7 Remove the black print cartridge (the thinner one) from its packaging and, being careful to touch only the black plastic, gently remove both the green pull tab and blue tape covering the nozzles. 8 Push the black print cartridge firmly down into the slot on the right. 9 Lower each print-cartridge latch down onto the top of the cartridge, and push down until the latch locks firmly into place. 10 Close the print-cartridge access door. 1-6 Setting Up Your HP PSC 500
7 Remove the black print cartridge (the thinner one) from its packaging and, being careful to touch only the black plastic, gently remove both the green pull tab and blue tape covering the nozzles. 8 Push the black print cartridge firmly down into the slot on the right. 9 Lower each print-cartridge latch down onto the top of the cartridge, and push down until the latch locks firmly into place. 10 Close the print-cartridge access door. 1-6 Setting Up Your HP PSC 500

HP PSC 500 - (English) Setup Guide
Page 13
...If you . • Both print-cartridge latches are facing toward you choose to the HP PSC 500. Connecting the Printer Cable 1 Locate your printer cable. 2 Connect the printer cable to buy a longer cable, make sure it is fully down and locked. • Print-cartridge access door is closed and latched....middle. Connect the Printer Cable and Power Cords NOTE Use the printer cable that the following things are done before continuing: • Cartridges are pushed firmly into place. Pinch the clasps at the back of your HP PSC 500. NOTE Both print cartridges must be correctly ...
...If you . • Both print-cartridge latches are facing toward you choose to the HP PSC 500. Connecting the Printer Cable 1 Locate your printer cable. 2 Connect the printer cable to buy a longer cable, make sure it is fully down and locked. • Print-cartridge access door is closed and latched....middle. Connect the Printer Cable and Power Cords NOTE Use the printer cable that the following things are done before continuing: • Cartridges are pushed firmly into place. Pinch the clasps at the back of your HP PSC 500. NOTE Both print cartridges must be correctly ...
HP PSC 500 - (English) Setup Guide
Page 18
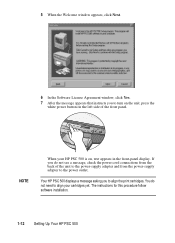
.... If you to align the print cartridges. Your HP PSC 500 displays a message asking you do not need to align your HP PSC 500 is on the left side of the unit to the power-supply adapter and from the power-supply adapter to the power outlet. You do ... a message, check the power cord connections from the back of the front panel. The instructions for this procedure follow software installation. 1-12 Setting Up Your HP PSC 500 5 When the Welcome window appears, click Next. 6 In the Software License Agreement window, click Yes. 7 After the message appears that instructs you to turn on...
.... If you to align the print cartridges. Your HP PSC 500 displays a message asking you do not need to align your HP PSC 500 is on the left side of the unit to the power-supply adapter and from the power-supply adapter to the power outlet. You do ... a message, check the power cord connections from the back of the front panel. The instructions for this procedure follow software installation. 1-12 Setting Up Your HP PSC 500 5 When the Welcome window appears, click Next. 6 In the Software License Agreement window, click Yes. 7 After the message appears that instructs you to turn on...
HP PSC 500 - (English) Setup Guide
Page 22
...twice to change the selection to start using it. 1-16 Setting Up Your HP PSC 500 When you turn on your HP PSC 500 for the first time, you will see the message "Initializing," followed by the message "Press Resume to Align Cartridges" on the front-panel display. 1 If "Press Resume to ensure the...able to print. You have finished setting up your HP PSC 500, you are ready to A4. Now you need to align the print cartridges to Align Cartridges" appears on the page, use the front-panel buttons to A6. A set of lines, your HP PSC 500, press the Select/Resume button on the front ...
...twice to change the selection to start using it. 1-16 Setting Up Your HP PSC 500 When you turn on your HP PSC 500 for the first time, you will see the message "Initializing," followed by the message "Press Resume to Align Cartridges" on the front-panel display. 1 If "Press Resume to ensure the...able to print. You have finished setting up your HP PSC 500, you are ready to A4. Now you need to align the print cartridges to Align Cartridges" appears on the page, use the front-panel buttons to A6. A set of lines, your HP PSC 500, press the Select/Resume button on the front ...

HP PSC 500 - (English) Setup Guide
Page 29
...-and-print network overview 2-1 setting up the clients 2-3 setting up the server 2-2 power cord adapter 1-8 connecting 1-8 print cartridges aligning 1-16 installing 1-4 printer cable connecting 1-7 type to use 1-7 product tour 1-14, 1-15 index R Readiris OCR 1-15 Run Product Tour 1-15 S software installing HP 1-10 installing third-party 1-15 switch box 1-8 T tour 1-14 HP PSC 500 Setup Guide I-1
...-and-print network overview 2-1 setting up the clients 2-3 setting up the server 2-2 power cord adapter 1-8 connecting 1-8 print cartridges aligning 1-16 installing 1-4 printer cable connecting 1-7 type to use 1-7 product tour 1-14, 1-15 index R Readiris OCR 1-15 Run Product Tour 1-15 S software installing HP 1-10 installing third-party 1-15 switch box 1-8 T tour 1-14 HP PSC 500 Setup Guide I-1


