Setup Guide
Page 7
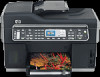
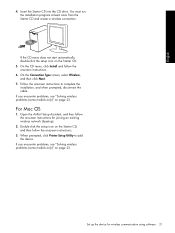
...Configuration Page, and then press OK. You can configure fax settings after the device software is installed using the Fax Setup Wizard (Windows) or HP Device Manager (Mac OS). NOTE: If the CD menu does not start automatically, double-click the setup icon on the Starter CD, you are loading. This page..., see the onscreen user guide on , try a different port. Slide the media guides in the tray to complete the software installation. For more than one of the following types of the device, print a Network configuration page to select the right device. Fax If you install software using...
...Configuration Page, and then press OK. You can configure fax settings after the device software is installed using the Fax Setup Wizard (Windows) or HP Device Manager (Mac OS). NOTE: If the CD menu does not start automatically, double-click the setup icon on the Starter CD, you are loading. This page..., see the onscreen user guide on , try a different port. Slide the media guides in the tray to complete the software installation. For more than one of the following types of the device, print a Network configuration page to select the right device. Fax If you install software using...
Setup Guide
Page 8
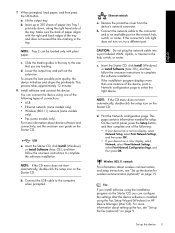
...-side facing up correctly 1. To open the HP Photosmart Studio software (Mac OS) 1. On the Windows desktop, double-click the HP Photosmart software icon. 2. To open the HP Photosmart software (Windows) 1. Click the HP Photosmart Studio icon in the lower-right corner of the document. For more than one HP device installed, select the appropriate tab for...
...-side facing up correctly 1. To open the HP Photosmart Studio software (Mac OS) 1. On the Windows desktop, double-click the HP Photosmart software icon. 2. To open the HP Photosmart software (Windows) 1. Click the HP Photosmart Studio icon in the lower-right corner of the document. For more than one HP device installed, select the appropriate tab for...
Setup Guide
Page 19
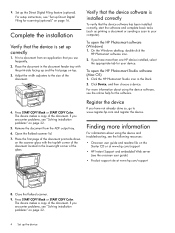
...dial entries using the control panel, you want to a computer, install the device software, and then run the Fax Setup Wizard (Windows) or HP Device Manager (Mac OS). For information, see page 28. Test fax setup You can configure the fax settings from the embedded Web server (EWS). A blank or...setup instructions. 2. In addition to fix any pauses or other required numbers, such as speed-dial entries. Select Speed Dial Setup and do one entry or all entries: Select Delete Speed Dial and press the arrow keys to move to the speed-dial entry that the phone cord is...
...dial entries using the control panel, you want to a computer, install the device software, and then run the Fax Setup Wizard (Windows) or HP Device Manager (Mac OS). For information, see page 28. Test fax setup You can configure the fax settings from the embedded Web server (EWS). A blank or...setup instructions. 2. In addition to fix any pauses or other required numbers, such as speed-dial entries. Select Speed Dial Setup and do one entry or all entries: Select Delete Speed Dial and press the arrow keys to move to the speed-dial entry that the phone cord is...
Setup Guide
Page 25
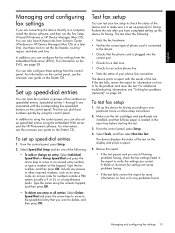
Follow the onscreen instructions to add the device. When prompted, click Printer Setup Utility to complete the installation, and when prompted, disconnect the cable. If you encounter problems, see "Solving wireless problems (some models only)" on ...and follow the onscreen instructions. 3. Double-click the setup icon on page 23. Set up the device for joining an existing wireless network (hpsetup). 2. For Mac OS 1. On the Connection Type screen, select Wireless, and then click Next. 7. Open the AirPort Setup Assistant, and then follow the onscreen instructions for ...
Follow the onscreen instructions to add the device. When prompted, click Printer Setup Utility to complete the installation, and when prompted, disconnect the cable. If you encounter problems, see "Solving wireless problems (some models only)" on ...and follow the onscreen instructions. 3. Double-click the setup icon on page 23. Set up the device for joining an existing wireless network (hpsetup). 2. For Mac OS 1. On the Connection Type screen, select Wireless, and then click Next. 7. Open the AirPort Setup Assistant, and then follow the onscreen instructions for ...
Setup Guide
Page 28
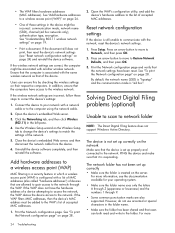
... are allowed to gain access to the wireless network. In addition, ensure that the device is created on page 24. • One of accepted MAC addresses. Click the Networking tab, and then click Wireless (802.11) in which a wireless access point (WAP) is responding. Open...the letters A through Z (uppercase or lowercase) and the numbers 1 through the WAP. Add hardware addresses to a wireless access point (WAP) MAC filtering is still unable to the computer using the network cable. 2. For more information, see "Reset network configuration settings" on the Wireless Setup...
... are allowed to gain access to the wireless network. In addition, ensure that the device is created on page 24. • One of accepted MAC addresses. Click the Networking tab, and then click Wireless (802.11) in which a wireless access point (WAP) is responding. Open...the letters A through Z (uppercase or lowercase) and the numbers 1 through the WAP. Add hardware addresses to a wireless access point (WAP) MAC filtering is still unable to the computer using the network cable. 2. For more information, see "Reset network configuration settings" on the Wireless Setup...

User Guide
Page 6
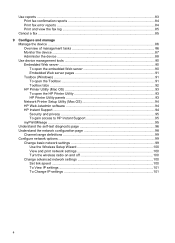
...47 To change settings from an application for current jobs (Windows 47 To change default settings for all future jobs (Windows 47 To change settings (Mac OS 47 Print on both sides (duplexing 48 Guidelines for printing on both sides of a page 48 To perform duplexing (Windows 48 To perform ...automatic duplexing (Mac OS 49 Cancel a print job ...49 5 Copy Make copies from the control panel 50 Change the copy settings ...50 Crop an original (color display...
...47 To change settings from an application for current jobs (Windows 47 To change default settings for all future jobs (Windows 47 To change settings (Mac OS 47 Print on both sides (duplexing 48 Guidelines for printing on both sides of a page 48 To perform duplexing (Windows 48 To perform ...automatic duplexing (Mac OS 49 Cancel a print job ...49 5 Copy Make copies from the control panel 50 Change the copy settings ...50 Crop an original (color display...
User Guide
Page 8
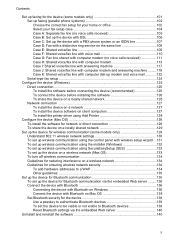
...) ...91 To open the Toolbox 91 Toolbox tabs ...92 HP Printer Utility (Mac OS 93 To open the HP Printer Utility 93 HP Printer Utility panels 93 Network Printer Setup Utility (Mac OS 94 HP Web Jetadmin software 94 HP Instant Support ...94 Security and privacy 95 To gain access to HP Instant Support 95 myPrintMileage ...95 Understand the self-test diagnostic...
...) ...91 To open the Toolbox 91 Toolbox tabs ...92 HP Printer Utility (Mac OS 93 To open the HP Printer Utility 93 HP Printer Utility panels 93 Network Printer Setup Utility (Mac OS 94 HP Web Jetadmin software 94 HP Instant Support ...94 Security and privacy 95 To gain access to HP Instant Support 95 myPrintMileage ...95 Understand the self-test diagnostic...
User Guide
Page 9
... To install the device on a network 127 To install the device software on client computers 127 To install the printer driver using Add Printer 128 Configure the device (Mac OS 128 To install the software for network or direct connection 128 To share the device on a locally shared ...using the installer (Windows 132 To set up wireless communication using SecureEasySetup (SES 133 To set up the device on a wireless network (Mac OS 133 To turn off wireless communication 134 Guidelines for reducing interference on a wireless network 134 Guidelines for ensuring wireless network security 134 ...
... To install the device on a network 127 To install the device software on client computers 127 To install the printer driver using Add Printer 128 Configure the device (Mac OS 128 To install the software for network or direct connection 128 To share the device on a locally shared ...using the installer (Windows 132 To set up wireless communication using SecureEasySetup (SES 133 To set up the device on a wireless network (Mac OS 133 To turn off wireless communication 134 Guidelines for reducing interference on a wireless network 134 Guidelines for ensuring wireless network security 134 ...
User Guide
Page 14
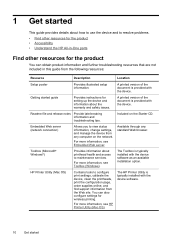
...you to view status information, change settings, and manage the device from any standard Web browser. For more information, see HP Printer Utility (Mac OS). The HP Printer Utility is provided with the device software. 10 Get started This guide provides details about how to use the device and... to resolve problems. • Find other resources for the product • Accessibility • Understand the HP All-in-One parts Find ...
...you to view status information, change settings, and manage the device from any standard Web browser. For more information, see HP Printer Utility (Mac OS). The HP Printer Utility is provided with the device software. 10 Get started This guide provides details about how to use the device and... to resolve problems. • Find other resources for the product • Accessibility • Understand the HP All-in-One parts Find ...

User Guide
Page 16
... software functions can be executed through the use of this product and HP's commitment to product accessibility, visit HP's Web site at www.apple.com/accessibility. Mobility For users with ...also supports most assistive technology such as StickyKeys, ToggleKeys, FilterKeys, and MouseKeys. Understand the HP All-in the software and on the control panel have simple text or icon labels ...'s accessibility options and features. For users who are color blind, colored buttons and tabs used in -One parts • Front view • Printing supplies area • Memory card slots • Back...
... software functions can be executed through the use of this product and HP's commitment to product accessibility, visit HP's Web site at www.apple.com/accessibility. Mobility For users with ...also supports most assistive technology such as StickyKeys, ToggleKeys, FilterKeys, and MouseKeys. Understand the HP All-in the software and on the control panel have simple text or icon labels ...'s accessibility options and features. For users who are color blind, colored buttons and tabs used in -One parts • Front view • Printing supplies area • Memory card slots • Back...
User Guide
Page 27
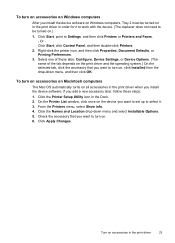
... order for it . 3. Click Start, point to turn on accessories on Macintosh computers The Mac OS automatically turns on accessories in the print driver 23 If you want to turn on .) 1. Select one of these tabs: Configure, Device Settings, or Device Options. (The name of the tab...print driver and the operating system.) On the selected tab, click the accessory that you want to Settings, and then click Printers or Printers and Faxes. - Right-click the printer icon, and then click Properties, Document Defaults, or Printing Preferences. 3. To turn on the device you add a new ...
... order for it . 3. Click Start, point to turn on accessories on Macintosh computers The Mac OS automatically turns on accessories in the print driver 23 If you want to turn on .) 1. Select one of these tabs: Configure, Device Settings, or Device Options. (The name of the tab...print driver and the operating system.) On the selected tab, click the accessory that you want to Settings, and then click Printers or Printers and Faxes. - Right-click the printer icon, and then click Properties, Document Defaults, or Printing Preferences. 3. To turn on the device you add a new ...

User Guide
Page 29
... the device from these places: • From the control panel. • From the HP Solution Center (Windows) or HP Device Manager (Mac OS). Write down the error code, and then go to HP Instant Support to a computer • Selecting a proof sheet Control-panel message types This ... your device might need service. These messages are usually accompanied by pressing the Power button to clear them. For more information, see HP Instant Support. For more information, see Support and warranty. If a critical error persists, service is required. Control-panel message types ...
... the device from these places: • From the control panel. • From the HP Solution Center (Windows) or HP Device Manager (Mac OS). Write down the error code, and then go to HP Instant Support to a computer • Selecting a proof sheet Control-panel message types This ... your device might need service. These messages are usually accompanied by pressing the Power button to clear them. For more information, see HP Instant Support. For more information, see Support and warranty. If a critical error persists, service is required. Control-panel message types ...
User Guide
Page 30
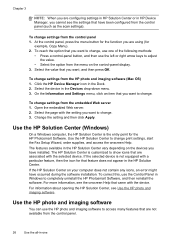
... is customized to adjust the value. • Select the option from the HP photo and imaging software (Mac OS) 1. Select the page with the setting you want to change . To change settings from the control panel. 26 Use the all-in-one of the following methods: • Press a control-panel button, and then...
... is customized to adjust the value. • Select the option from the HP photo and imaging software (Mac OS) 1. Select the page with the setting you want to change . To change settings from the control panel. 26 Use the all-in-one of the following methods: • Press a control-panel button, and then...

User Guide
Page 45
... Color tab, and then select Paper Handling. • Toolbox (Windows): Click the Services tab and click Paper Handling. • HP Printer Utility (Mac OS): Click Paper Handling from the Printer Settings panel. • Control panel: Press the Setup button, select Preferences, and then select Default Tray or Tray Lock. 3....open, click Print on special and custom-sized media 41 Click the Custom button. Make sure the device is drop-down list. 7. Perform one of the following: • Embedded Web server: Click the Settings tab and click Paper Handling in the Type is drop-down list. Select...
... Color tab, and then select Paper Handling. • Toolbox (Windows): Click the Services tab and click Paper Handling. • HP Printer Utility (Mac OS): Click Paper Handling from the Printer Settings panel. • Control panel: Press the Setup button, select Preferences, and then select Default Tray or Tray Lock. 3....open, click Print on special and custom-sized media 41 Click the Custom button. Make sure the device is drop-down list. 7. Perform one of the following: • Embedded Web server: Click the Settings tab and click Paper Handling in the Type is drop-down list. Select...
User Guide
Page 47
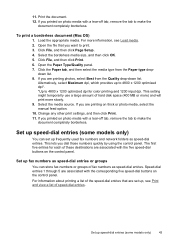
... The first five entries for color printing and 1200 input dpi. Set up to 4800 x 1200 optimized dpi*. *Up to print. 3. To print a borderless document (Mac OS) 1. Click File, and then click Print. 6. If you printed on the control panel. This setting might temporarily use a large amount of these destinations are...
... The first five entries for color printing and 1200 input dpi. Set up to 4800 x 1200 optimized dpi*. *Up to print. 3. To print a borderless document (Mac OS) 1. Click File, and then click Print. 6. If you printed on the control panel. This setting might temporarily use a large amount of these destinations are...
User Guide
Page 48
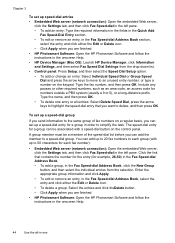
...dial in the left pane. Click the link that you are finished. • HP Photosmart Software: Open the HP Photosmart Software and follow the instructions in the onscreen Help. 44 Use the all-in-one entry or all entries: Select Delete Speed Dial, press the arrow keys to ... Edit or Delete icon. • Click Apply when you are finished. • HP Photosmart Software: Open the HP Photosmart Software and follow the instructions in the onscreen Help. • HP Device Manager (Mac OS): Launch HP Device Manager, click Information and Settings, and then select Fax Speed Dial Settings from ...
...dial in the left pane. Click the link that you are finished. • HP Photosmart Software: Open the HP Photosmart Software and follow the instructions in the onscreen Help. 44 Use the all-in-one entry or all entries: Select Delete Speed Dial, press the arrow keys to ... Edit or Delete icon. • Click Apply when you are finished. • HP Photosmart Software: Open the HP Photosmart Software and follow the instructions in the onscreen Help. • HP Device Manager (Mac OS): Launch HP Device Manager, click Information and Settings, and then select Fax Speed Dial Settings from ...
User Guide
Page 49
... tab, and then click Direct Digital Filing Speed-dial in the left pane. • To add or change , and then press OK. • HP Device Manager (Mac OS): Launch HP Device Manager, click Information and Settings, and then select Fax Speed Dial Settings from this group. Use the arrow keys to highlight a speed...
... tab, and then click Direct Digital Filing Speed-dial in the left pane. • To add or change , and then press OK. • HP Device Manager (Mac OS): Launch HP Device Manager, click Information and Settings, and then select Fax Speed Dial Settings from this group. Use the arrow keys to highlight a speed...
User Guide
Page 50
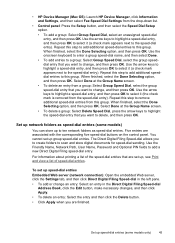
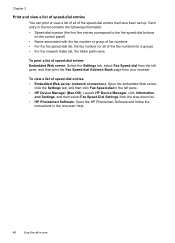
...view a list of speed-dial entries You can print or view a list of all -in-one To view a list of speed-dial entries • Embedded Web server (network connection): Open... then print the Fax Speed-dial Address Book page from the drop-down list. • HP Photosmart Software: Open the HP Photosmart Software and follow the instructions in the list contains the following information: • Speed...tab, select Fax Speed-dial from the left pane. • HP Device Manager (Mac OS): Launch HP Device Manager, click Information and Settings, and then select Fax Speed Dial Settings from your browser.
...view a list of speed-dial entries You can print or view a list of all -in-one To view a list of speed-dial entries • Embedded Web server (network connection): Open... then print the Fax Speed-dial Address Book page from the drop-down list. • HP Photosmart Software: Open the HP Photosmart Software and follow the instructions in the list contains the following information: • Speed...tab, select Fax Speed-dial from the left pane. • HP Device Manager (Mac OS): Launch HP Device Manager, click Information and Settings, and then select Fax Speed Dial Settings from your browser.
User Guide
Page 51
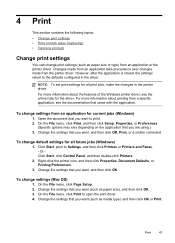
...open the print driver. 4. To change default settings for all future jobs (Windows) 1. For more information about the features of the Windows printer driver, see the documentation that you want , and then click OK. On the File menu, click Print, and then click Setup, ...Or Click Start, click Control Panel, and then double-click Printers. 2. Right-click the printer icon, and then click Properties, Document Defaults, or Printing Preferences. 3. On the File menu, click Page Setup. 2. To change settings (Mac OS) 1. Change the settings that came with the application. ...
...open the print driver. 4. To change default settings for all future jobs (Windows) 1. For more information about the features of the Windows printer driver, see the documentation that you want , and then click OK. On the File menu, click Print, and then click Setup, ...Or Click Start, click Control Panel, and then double-click Printers. 2. Right-click the printer icon, and then click Properties, Document Defaults, or Printing Preferences. 3. On the File menu, click Page Setup. 2. To change settings (Mac OS) 1. Change the settings that came with the application. ...
User Guide
Page 52
...Automatic is complete. • You can print on which way you print from a computer using the Mac OS, the device prints the second side first. For more information, see Guidelines for examples. 48 .... Select the Two-sided printing drop-down . • For auto-duplexing, when printing finishes on one side of the media, the device holds the media and pauses while the ink dries. For more... information, see Install the duplexer. 3. Jams might result in the printer driver. • Do not print on both sides of a page, such as letterhead, preprinted paper,...
...Automatic is complete. • You can print on which way you print from a computer using the Mac OS, the device prints the second side first. For more information, see Guidelines for examples. 48 .... Select the Two-sided printing drop-down . • For auto-duplexing, when printing finishes on one side of the media, the device holds the media and pauses while the ink dries. For more... information, see Install the duplexer. 3. Jams might result in the printer driver. • Do not print on both sides of a page, such as letterhead, preprinted paper,...


