
Fax Getting Started Guide
Page 10
... terms of how to connect various devices to the all -in-one . ᕤ In the last row of the table are connecting the device directly to a computer, install the device software, and then run the Fax Setup Wizard (Windows) or HP Device Manager (Mac OS). For information on the control panel,... set up your device so that correspond to the "Configuration guideline" table on the way your all -in-one is connected to a network, you can also launch these tools from Solution Center (Windows) or HP Device Manager (Mac OS) at a later time. Use the "Configuration guideline" table to help you set ...
... terms of how to connect various devices to the all -in-one . ᕤ In the last row of the table are connecting the device directly to a computer, install the device software, and then run the Fax Setup Wizard (Windows) or HP Device Manager (Mac OS). For information on the control panel,... set up your device so that correspond to the "Configuration guideline" table on the way your all -in-one is connected to a network, you can also launch these tools from Solution Center (Windows) or HP Device Manager (Mac OS) at a later time. Use the "Configuration guideline" table to help you set ...

User Guide - Macintosh
Page 17
..., fax header number, speed dial names, speed dial numbers, and fax or phone numbers Use the software You can manage, edit, and share photos. The HP Photosmart Studio window appears, where you set up the HP All-in -One to separate numbers, such as a stand-alone copier and fax machine, or you are described in...
..., fax header number, speed dial names, speed dial numbers, and fax or phone numbers Use the software You can manage, edit, and share photos. The HP Photosmart Studio window appears, where you set up the HP All-in -One to separate numbers, such as a stand-alone copier and fax machine, or you are described in...
User Guide - Macintosh
Page 26
... Greece India Indonesia Ireland Japan Korea Latin America Malaysia 24 Finish setting up the HP All-in -One Chapter 4 TIP: You can access the Fax Setup Wizard (Windows) or Fax Setup Utility (Mac) through the software you installed with the HP All-in the table below , you probably have a parallel-type telephone system. NOTE: If...
... Greece India Indonesia Ireland Japan Korea Latin America Malaysia 24 Finish setting up the HP All-in -One Chapter 4 TIP: You can access the Fax Setup Wizard (Windows) or Fax Setup Utility (Mac) through the software you installed with the HP All-in the table below , you probably have a parallel-type telephone system. NOTE: If...

User Guide - Macintosh
Page 50
... and then press OK. 4. Insert the print cartridges and load full-size paper in -One for faxing according to fix any problems found . 6. Press 6, then press 6 again. The Device Settings dialog box opens. 3. The HP Device Manager window appears. 2. Press Setup. 4. You can cause problems faxing. • If the test ... keypad, and then press OK. NOTE: In some countries/regions the fax header information is a legal requirement. To set up the HP All-in the input tray before starting the test. 3. Select the HP Device Manager from the HP Photosmart Studio (Mac) Software 1.
... and then press OK. 4. Insert the print cartridges and load full-size paper in -One for faxing according to fix any problems found . 6. Press 6, then press 6 again. The Device Settings dialog box opens. 3. The HP Device Manager window appears. 2. Press Setup. 4. You can cause problems faxing. • If the test ... keypad, and then press OK. NOTE: In some countries/regions the fax header information is a legal requirement. To set up the HP All-in the input tray before starting the test. 3. Select the HP Device Manager from the HP Photosmart Studio (Mac) Software 1.
User Guide - Macintosh
Page 52
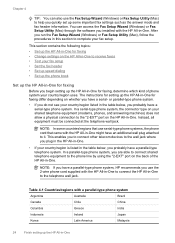
...your computer by using the software that you installed with the HP All-in-One. In the Fax Speed Dial dialog box, choose an empty number in the fax speed dial list. 9. The Add Individual dialog box appears. 6. Press 3, and then press 1. The HP Device Manager window appears. 2. Chapter 4... on the display. 6. In the Fax Number box, type the fax number. 8. TIP: To add a pause in -One. 3. Select the HP Device Manager from the HP Photosmart Studio (Mac) Software 1. To create speed dial entries from the Dock. Press 1 if you want to update another number, or press 2 if...
...your computer by using the software that you installed with the HP All-in-One. In the Fax Speed Dial dialog box, choose an empty number in the fax speed dial list. 9. The Add Individual dialog box appears. 6. Press 3, and then press 1. The HP Device Manager window appears. 2. Chapter 4... on the display. 6. In the Fax Number box, type the fax number. 8. TIP: To add a pause in -One. 3. Select the HP Device Manager from the HP Photosmart Studio (Mac) Software 1. To create speed dial entries from the Dock. Press 1 if you want to update another number, or press 2 if...

User Guide - Macintosh
Page 53
... speed dial entry varies by model.) NOTE: The numbers you set up into groups, so that you are finished. The name of members in -One. Fax setup 51 Click Apply or OK when you can place individual speed dial entries that you have set up menu, choose Fax Speed Dial...-in that you are finished updating speed dial entries. To create group speed dial entries from the HP Photosmart Studio (Mac) Software 1. The HP Device Manager window appears. 2. In the Information and Settings pop-up , and then press OK to Group. 7. The Add Speed Dial Group dialog box appears. 5. Click ...
... speed dial entry varies by model.) NOTE: The numbers you set up into groups, so that you are finished. The name of members in -One. Fax setup 51 Click Apply or OK when you can place individual speed dial entries that you have set up menu, choose Fax Speed Dial...-in that you are finished updating speed dial entries. To create group speed dial entries from the HP Photosmart Studio (Mac) Software 1. The HP Device Manager window appears. 2. In the Information and Settings pop-up , and then press OK to Group. 7. The Add Speed Dial Group dialog box appears. 5. Click ...
User Guide - Macintosh
Page 54
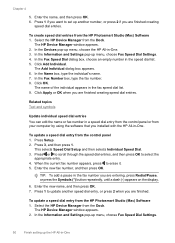
... then press 7. To delete speed dial entries from the Dock. This selects Speed Dial Setup and then selects Delete Speed Dial. 3. The HP Device Manager window appears. 2. To print the speed dial list 1. This selects Speed Dial Setup and then selects Print Speed Dial List. Press Setup. ...dial entries, consider the following: • Deleting an individual speed dial entry also deletes that entry from the HP Photosmart Studio (Mac) Software 1. You can set up the HP All-in -One. 3. To delete speed dial entries from any groups to delete, and then click Clear. 5. In the...
... then press 7. To delete speed dial entries from the Dock. This selects Speed Dial Setup and then selects Delete Speed Dial. 3. The HP Device Manager window appears. 2. To print the speed dial list 1. This selects Speed Dial Setup and then selects Print Speed Dial List. Press Setup. ...dial entries, consider the following: • Deleting an individual speed dial entry also deletes that entry from the HP Photosmart Studio (Mac) Software 1. You can set up the HP All-in -One. 3. To delete speed dial entries from any groups to delete, and then click Clear. 5. In the...
User Guide - Macintosh
Page 55
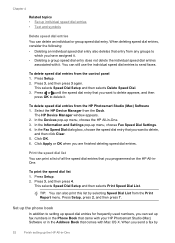
...import fax numbers Create a phone book entry Follow these steps to edit or delete an entry from both the HP Photosmart Studio (Mac) Software and the control panel of the HP All-in-One. To edit or delete a phone book entry from the Dock. From the pop-up menu, choose Fax ...Entry, and then make the appropriate changes. To create a phone book entry from the Dock. Select the HP Device Manager from the HP Photosmart Studio (Mac) Software 1. Click Apply or OK. The HP Device Manager window appears. 2. Edit or delete a phone book entry Follow these steps to add an entry to the phone...
...import fax numbers Create a phone book entry Follow these steps to edit or delete an entry from both the HP Photosmart Studio (Mac) Software and the control panel of the HP All-in-One. To edit or delete a phone book entry from the Dock. From the pop-up menu, choose Fax ...Entry, and then make the appropriate changes. To create a phone book entry from the Dock. Select the HP Device Manager from the HP Photosmart Studio (Mac) Software 1. Click Apply or OK. The HP Device Manager window appears. 2. Edit or delete a phone book entry Follow these steps to add an entry to the phone...

User Guide - Macintosh
Page 56
... choose Fax Phone Book. 5. Locate and select the file you specified. 7. The phone book is imported into the HP All-in-One phone book. The HP Device Manager window appears. 2. Click OK. 7. The phone book or external file is saved as a file in the location you want... Dial Settings. 3. The HP Device Manager window appears. 2. From the pop-up menu, choose Fax Phone Book. 4. Choose a name and location for the HP All-in -One Select the HP Device Manager from the HP Photosmart Studio (Mac) Software 1. Select from one of the following: • Import HP AiO phone book file:...
... choose Fax Phone Book. 5. Locate and select the file you specified. 7. The phone book is imported into the HP All-in-One phone book. The HP Device Manager window appears. 2. Click OK. 7. The phone book or external file is saved as a file in the location you want... Dial Settings. 3. The HP Device Manager window appears. 2. From the pop-up menu, choose Fax Phone Book. 4. Choose a name and location for the HP All-in -One Select the HP Device Manager from the HP Photosmart Studio (Mac) Software 1. Select from one of the following: • Import HP AiO phone book file:...
User Guide - Macintosh
Page 70
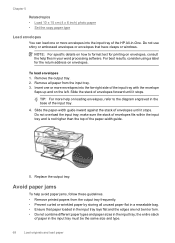
...within the input tray and is not higher than the top of paper in your word processing software. Replace the output tray. To load envelopes 1. Slide the paper-width guide inward against the...paper by storing all unused paper flat in a resealable bag. • Ensure that have clasps or windows. the entire stack of the paper-width guide. 5. Remove the output tray. 2. Avoid paper jams ...photo paper • Set the copy paper type Load envelopes You can load one or more envelopes into the input tray of the HP All-in the input tray; Do not use shiny or embossed envelopes or ...
...within the input tray and is not higher than the top of paper in your word processing software. Replace the output tray. To load envelopes 1. Slide the paper-width guide inward against the...paper by storing all unused paper flat in a resealable bag. • Ensure that have clasps or windows. the entire stack of the paper-width guide. 5. Remove the output tray. 2. Avoid paper jams ...photo paper • Set the copy paper type Load envelopes You can load one or more envelopes into the input tray of the HP All-in the input tray; Do not use shiny or embossed envelopes or ...
User Guide - Macintosh
Page 76
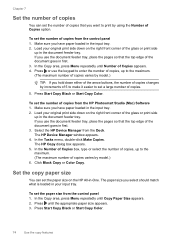
...-in first. 3. The HP Device Manager window appears. 4. The paper size you have paper loaded in the input tray. 2. Make sure you use the document feeder tray, place the pages so that the top edge of the document goes in -One. Select the HP Device Manager from the Dock. Set the copy paper... the arrow buttons, the number of copies changes by increments of 5 to make it easier to set the number of copies from the HP Photosmart Studio (Mac) Software 1. If you want to the maximum. (The maximum number of copies varies by using the Number of Copies option. In the Number ...
...-in first. 3. The HP Device Manager window appears. 4. The paper size you have paper loaded in the input tray. 2. Make sure you use the document feeder tray, place the pages so that the top edge of the document goes in -One. Select the HP Device Manager from the Dock. Set the copy paper... the arrow buttons, the number of copies changes by increments of 5 to make it easier to set the number of copies from the HP Photosmart Studio (Mac) Software 1. If you want to the maximum. (The maximum number of copies varies by using the Number of Copies option. In the Number ...
User Guide - Macintosh
Page 77
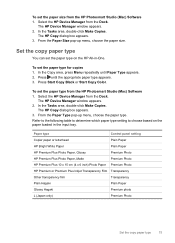
...set the paper type from the HP Photosmart Studio (Mac) Software 1. Select the HP Device Manager from the Dock. Set the copy paper type You can set the paper type on the paper loaded in -One. In the Tasks area, double-click Make Copies. The HP Copy dialog box appears. 3. In...pop-up menu, choose the paper type. Select the HP Device Manager from the Dock. To set the paper size from the HP Photosmart Studio (Mac) Software 1. The HP Copy dialog box appears. 3. Press until Paper Type appears. 2. The HP Device Manager window appears. 2. In the Copy area, press Menu ...
...set the paper type from the HP Photosmart Studio (Mac) Software 1. Select the HP Device Manager from the Dock. Set the copy paper type You can set the paper type on the paper loaded in -One. In the Tasks area, double-click Make Copies. The HP Copy dialog box appears. 3. In...pop-up menu, choose the paper type. Select the HP Device Manager from the Dock. To set the paper size from the HP Photosmart Studio (Mac) Software 1. The HP Copy dialog box appears. 3. Press until Paper Type appears. 2. The HP Device Manager window appears. 2. In the Copy area, press Menu ...
User Guide - Macintosh
Page 78
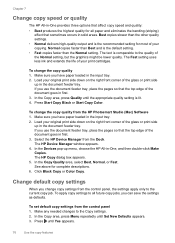
Chapter 7 Change copy speed or quality The HP All-in-One provides three options that affect copy speed and quality: • Best produces the highest quality for all future copy jobs, you change copy settings from the HP Photosmart Studio (Mac) Software 1. Best copies slower than the other quality settings. • Normal... Best, Normal, or Fast. To set default copy settings from the Dock. Make any needed changes to the current copy job. The HP Device Manager window appears. 4. In the Devices pop-up in first. 3. See above for most of the glass or print side up menu, choose the...
Chapter 7 Change copy speed or quality The HP All-in-One provides three options that affect copy speed and quality: • Best produces the highest quality for all future copy jobs, you change copy settings from the HP Photosmart Studio (Mac) Software 1. Best copies slower than the other quality settings. • Normal... Best, Normal, or Fast. To set default copy settings from the Dock. Make any needed changes to the current copy job. The HP Device Manager window appears. 4. In the Devices pop-up in first. 3. See above for most of the glass or print side up menu, choose the...
User Guide - Macintosh
Page 79
... quality. The default settings that you set up menu, choose the HP All-in -One. They do not adjust the settings in the input tray. 2. The HP Device Manager window appears. 2. Click Save as indicated by using the software that you installed with the HP All-in the input tray and change your original photo print...
... quality. The default settings that you set up menu, choose the HP All-in -One. They do not adjust the settings in the input tray. 2. The HP Device Manager window appears. 2. Click Save as indicated by using the software that you installed with the HP All-in the input tray and change your original photo print...
User Guide - Macintosh
Page 80
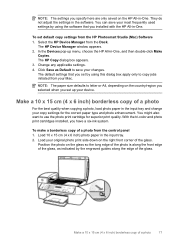
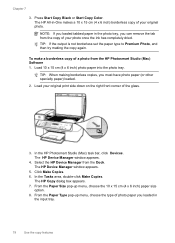
TIP: If the output is not borderless set the paper type to Premium Photo, and then try making borderless copies, you loaded in -One makes a 10 x 15 cm (4 x 6 inch) borderless copy of the glass. 3. Load 10 x 15 cm (4 x 6 inch) photo paper into the photo tray. Load your...in the input tray. 78 Use the copy features The HP Device Manager window appears. 5. From the Paper Size pop-up menu, choose the type of a photo from the HP Photosmart Studio (Mac) Software 1. Press Start Copy Black or Start Copy Color. In the HP Photosmart Studio (Mac) task bar, click Devices. To make...
TIP: If the output is not borderless set the paper type to Premium Photo, and then try making borderless copies, you loaded in -One makes a 10 x 15 cm (4 x 6 inch) borderless copy of the glass. 3. Load 10 x 15 cm (4 x 6 inch) photo paper into the photo tray. Load your...in the input tray. 78 Use the copy features The HP Device Manager window appears. 5. From the Paper Size pop-up menu, choose the type of a photo from the HP Photosmart Studio (Mac) Software 1. Press Start Copy Black or Start Copy Color. In the HP Photosmart Studio (Mac) task bar, click Devices. To make...

User Guide - Macintosh
Page 82
...80 Use the copy features To set a custom size from the HP Photosmart Studio (Mac) Software 1. To set a custom size from the Dock. Select the HP Device Manager from the HP Photosmart Studio (Mac) Software 1. The HP Device Manager window appears. 4. Resize an original using custom settings You can use ...• If you have paper loaded in first. 3. Make sure you loaded a full- In the Tasks area, double-click Make Copies. Do one of the document goes in the input tray. 2. Load your original. 3. In the Reduce-Enlarge area, select Fit to Page appears. 5. Press...
...80 Use the copy features To set a custom size from the HP Photosmart Studio (Mac) Software 1. To set a custom size from the Dock. Select the HP Device Manager from the HP Photosmart Studio (Mac) Software 1. The HP Device Manager window appears. 4. Resize an original using custom settings You can use ...• If you have paper loaded in first. 3. Make sure you loaded a full- In the Tasks area, double-click Make Copies. Do one of the document goes in the input tray. 2. Load your original. 3. In the Reduce-Enlarge area, select Fit to Page appears. 5. Press...

User Guide - Macintosh
Page 88
... use the tools in the software you can change certain settings for viewing scanned images. You can also use your computer, where you installed with the HP All-in -One, and the Scan To button on the control panel. You can use the tools in the HP Scan Pro window to the preview image, and... then click Accept when you installed with the HP All-in -One to this scan session only. Change default scan settings You can do the following topics: • Add a ...
... use the tools in the software you can change certain settings for viewing scanned images. You can also use your computer, where you installed with the HP All-in -One, and the Scan To button on the control panel. You can use the tools in the HP Scan Pro window to the preview image, and... then click Accept when you installed with the HP All-in -One to this scan session only. Change default scan settings You can do the following topics: • Add a ...

User Guide - Macintosh
Page 89
... scan destination in -One. 3. In the HP Photosmart Studio task bar, click Devices. In the Information and Settings pop-up menu, choose Scan Preferences. In the Devices pop-up menu, choose the HP All-in the HP Scan Pro window. Click Next. 7. You can add different types of new applications, such as software for the scan...
... scan destination in -One. 3. In the HP Photosmart Studio task bar, click Devices. In the Information and Settings pop-up menu, choose Scan Preferences. In the Devices pop-up menu, choose the HP All-in the HP Scan Pro window. Click Next. 7. You can add different types of new applications, such as software for the scan...
User Guide - Macintosh
Page 90
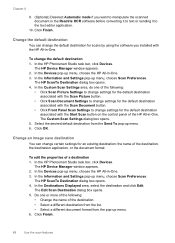
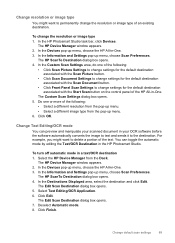
... for the default destination associated with the HP All-in the Readiris OCR software before converting it to text or sending it to manipulate the scanned document in -One. The Edit Scan Destination dialog box opens. 5. Click Finish. 88 Use the scan features The HP Device Manager window appears. 2. Change the default destination You can...
... for the default destination associated with the HP All-in the Readiris OCR software before converting it to text or sending it to manipulate the scanned document in -One. The Edit Scan Destination dialog box opens. 5. Click Finish. 88 Use the scan features The HP Device Manager window appears. 2. Change the default destination You can...
User Guide - Macintosh
Page 91
...software before the software automatically converts the image to text and sends it to delete a portion of an existing destination. In the Devices pop-up menu, choose Scan Preferences. Deselect Automatic mode. 8. Change default scan settings 89 For example, you might want to the destination. The HP Device Manager window... a text/OCR destination 1. You can preview and manipulate your scanned document in -One. 3. Select the HP Device Manager from the pop-up menu, choose the HP All-in -One. In the Information and Settings pop-up menu, choose Scan Preferences. Select Text ...
...software before the software automatically converts the image to text and sends it to delete a portion of an existing destination. In the Devices pop-up menu, choose Scan Preferences. Deselect Automatic mode. 8. Change default scan settings 89 For example, you might want to the destination. The HP Device Manager window... a text/OCR destination 1. You can preview and manipulate your scanned document in -One. 3. Select the HP Device Manager from the pop-up menu, choose the HP All-in -One. In the Information and Settings pop-up menu, choose Scan Preferences. Select Text ...


