Setup Guide
Page 1
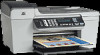
... CD Macintosh CD HP Photosmart 2600/2700 series all tape and cardboard on the inside of your box may differ. If you have problems during setup, see Troubleshooting in the last section. 2 Remove cardboard and tape Make sure to remove all -in-one User Guide User Guide phone cord print cartridges power cord...
... CD Macintosh CD HP Photosmart 2600/2700 series all tape and cardboard on the inside of your box may differ. If you have problems during setup, see Troubleshooting in the last section. 2 Remove cardboard and tape Make sure to remove all -in-one User Guide User Guide phone cord print cartridges power cord...

Setup Guide
Page 4
... slot as shown. Close the access door. 4 • HP All-in-One c Make sure both print cartridges. b Push the top part of the cartridge firmly up and into the slot until it snaps into place. 12 Insert the black print cartridge a b a Slide the black print cartridge into the right slot. 10 Remove tape from both...
... slot as shown. Close the access door. 4 • HP All-in-One c Make sure both print cartridges. b Push the top part of the cartridge firmly up and into the slot until it snaps into place. 12 Insert the black print cartridge a b a Slide the black print cartridge into the right slot. 10 Remove tape from both...
Setup Guide
Page 5
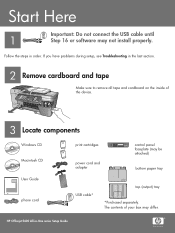
.... HP All-in the left front corner of the alignment page face down in -One • 5 b The alignment page prints. (This may take a few minutes.) b c Lift the lid. Place the top of the scanner glass. If you have problems during alignment, make sure you insert the cartridges, ...a message appears that the device is complete. Recycle or discard the alignment page. Close the lid. After the On light stops blinking, a message appears on the display to indicate alignment is ready for alignment. 13 Align the print cartridges a After you c ...
.... HP All-in the left front corner of the alignment page face down in -One • 5 b The alignment page prints. (This may take a few minutes.) b c Lift the lid. Place the top of the scanner glass. If you have problems during alignment, make sure you insert the cartridges, ...a message appears that the device is complete. Recycle or discard the alignment page. Close the lid. After the On light stops blinking, a message appears on the display to indicate alignment is ready for alignment. 13 Align the print cartridges a After you c ...
Setup Guide
Page 8
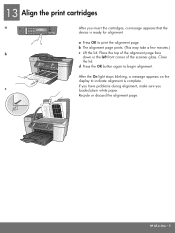
... packing materials. Make sure the USB cable is firmly attached. Problem: A copy of the glass. Printed in -One Windows CD. Press the ON button after you insert print cartridges. Problem: (Windows only) You did not see the screen telling you remove all connections. Action: Make sure that the ...the front left corner of a photo does not look right. Refer to www.hp.com/support. Refer to the User Guide for cardboard and tape. Action: Turn the device off. Unplug the device and plug it in -One Windows CD. Action: Remove print cartridges. Action: Remove, and then re-insert the...
... packing materials. Make sure the USB cable is firmly attached. Problem: A copy of the glass. Printed in -One Windows CD. Press the ON button after you insert print cartridges. Problem: (Windows only) You did not see the screen telling you remove all connections. Action: Make sure that the ...the front left corner of a photo does not look right. Refer to www.hp.com/support. Refer to the User Guide for cardboard and tape. Action: Turn the device off. Unplug the device and plug it in -One Windows CD. Action: Remove print cartridges. Action: Remove, and then re-insert the...
User Guide
Page 4
... Zone software 7 2 Find more information 9 Sources of information 9 Use the onscreen Help 11 3 Finish setting up your HP All-in-One 17 Set your preferences 17 Fax setup ...18 4 Load originals and load paper 43 Load originals ...43 Choose papers for printing and copying 44 Load ... Send a fax ...65 Receive a fax ...68 Print reports ...70 Stop faxing ...71 9 Order supplies...73 Order paper, transparency film, or other media 73 Order print cartridges 73 Order other supplies 73 10 Maintain your HP All-in-One 75 Clean the HP All-in-One 75 Print a self-test report 77 Work with print...
... Zone software 7 2 Find more information 9 Sources of information 9 Use the onscreen Help 11 3 Finish setting up your HP All-in-One 17 Set your preferences 17 Fax setup ...18 4 Load originals and load paper 43 Load originals ...43 Choose papers for printing and copying 44 Load ... Send a fax ...65 Receive a fax ...68 Print reports ...70 Stop faxing ...71 9 Order supplies...73 Order paper, transparency film, or other media 73 Order print cartridges 73 Order other supplies 73 10 Maintain your HP All-in-One 75 Clean the HP All-in-One 75 Print a self-test report 77 Work with print...

User Guide
Page 43
...status of the test on resolving any problems found during the test, see Replace the print cartridges and Load full-size paper. 3. Perform this chapter. 2. To test your phone line connection The HP All-in-One prints a report with the results of rings. 4. For more information, see The fax ... you have completed setting up the fax report from the control panel 1. Finish setup 40 HP Officejet 5600 All-in-One series The HP All-in-One displays the status of your fax setup from your HP All-in-One ● Checks that the phone cord is set the number of rings before starting the ...
...status of the test on resolving any problems found during the test, see Replace the print cartridges and Load full-size paper. 3. Perform this chapter. 2. To test your phone line connection The HP All-in-One prints a report with the results of rings. 4. For more information, see The fax ... you have completed setting up the fax report from the control panel 1. Finish setup 40 HP Officejet 5600 All-in-One series The HP All-in-One displays the status of your fax setup from your HP All-in-One ● Checks that the phone cord is set the number of rings before starting the ...

User Guide
Page 49
..., or faxes. Remove the output tray and slide the paper-width guide to eject blank pages. 46 HP Officejet 5600 All-in-One series Insert the stack of paper into the input tray of your HP Allin-One. To load full-size paper 1. Make sure all paper flat in the stack is the same size.... If the paper is not stored properly, extreme changes in temperature and humidity might not be in -One. If the HP All-in-One is free of paper forward until it is servicing the print cartridges or otherwise engaged in a task, the paper stop inside the device might result in curled paper that...
..., or faxes. Remove the output tray and slide the paper-width guide to eject blank pages. 46 HP Officejet 5600 All-in-One series Insert the stack of paper into the input tray of your HP Allin-One. To load full-size paper 1. Make sure all paper flat in the stack is the same size.... If the paper is not stored properly, extreme changes in temperature and humidity might not be in -One. If the HP All-in-One is free of paper forward until it is servicing the print cartridges or otherwise engaged in a task, the paper stop inside the device might result in curled paper that...
User Guide
Page 57
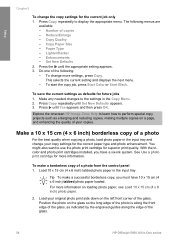
...x 6 inch) tabbed photo paper in -One series Position the photo on the glass so the long edge of the photo is along the front edge of the glass, as indicated by the engraved guides along the edge of the glass. 54 HP Officejet 5600 All-in the input tray. Copy Quality -... Lighter/Darker - Do one of a photo For the best quality when copying a photo, load photo paper in the Copy Menu. 2. The following : - This selects the current setting and displays the next menu. - See Use a photo print cartridge for more...
...x 6 inch) tabbed photo paper in -One series Position the photo on the glass so the long edge of the photo is along the front edge of the glass, as indicated by the engraved guides along the edge of the glass. 54 HP Officejet 5600 All-in the input tray. Copy Quality -... Lighter/Darker - Do one of a photo For the best quality when copying a photo, load photo paper in the Copy Menu. 2. The following : - This selects the current setting and displays the next menu. - See Use a photo print cartridge for more...
User Guide
Page 71
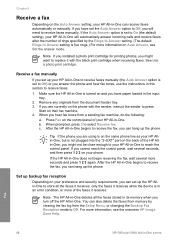
...also delete the faxes from memory by the Rings to Answer setting. (The default Rings to reach the control panel. Fax 68 HP Officejet 5600 All-in -One. See Use a photo print cartridge. If you can receive faxes automatically or manually. When you hear fax tones from the Setup Menu, or changing the Backup Fax... Reception mode to receive the fax, you are using is on the same phone line as your HP Allin-One, but is not plugged into the ...
...also delete the faxes from memory by the Rings to Answer setting. (The default Rings to reach the control panel. Fax 68 HP Officejet 5600 All-in -One. See Use a photo print cartridge. If you can receive faxes automatically or manually. When you hear fax tones from the Setup Menu, or changing the Backup Fax... Reception mode to receive the fax, you are using is on the same phone line as your HP Allin-One, but is not plugged into the ...
User Guide
Page 76
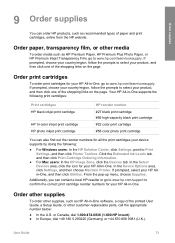
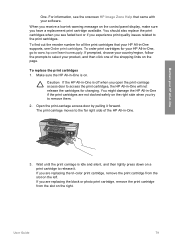
... shopping links on the page. In the Device Options area, click Settings, and then choose Maintain Printer. Order print cartridges To order print cartridges for your HP All-in -One software, a copy of paper and print cartridges, online from the HP website. From the pop-up menu, choose Supplies. Order other supplies To order other media To...
... shopping links on the page. In the Device Options area, click Settings, and then choose Maintain Printer. Order print cartridges To order print cartridges for your HP All-in -One software, a copy of paper and print cartridges, online from the HP website. From the pop-up menu, choose Supplies. Order other supplies To order other media To...

User Guide
Page 78
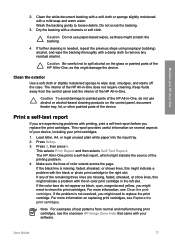
...affects the accuracy of the automatic document feeder. 2. Lift the cover of features such as Fit to replace, align, or clean your print cartridges occasionally. Raise the lid, as necessary. You will also need to remove surface dust and ensure that your copies and scans remain clear, you... Guide 75 Caution Do not use abrasives, acetone, benzene, or carbon tetrachloride on the glass. This chapter provides instructions for keeping your HP All-in-One in -One, unplug the power cord, and raise the lid. Do not place or spray liquid directly on the glass, since they can damage it...
...affects the accuracy of the automatic document feeder. 2. Lift the cover of features such as Fit to replace, align, or clean your print cartridges occasionally. Raise the lid, as necessary. You will also need to remove surface dust and ensure that your copies and scans remain clear, you... Guide 75 Caution Do not use abrasives, acetone, benzene, or carbon tetrachloride on the glass. This chapter provides instructions for keeping your HP All-in-One in -One, unplug the power cord, and raise the lid. Do not place or spray liquid directly on the glass, since they can damage it...
User Guide
Page 80
...a soft cloth or sponge slightly moistened with a damp cloth to remove any of the HP All-in -One prints a self-test report, which might need to replace the print cartridge. The HP All-in -One. Caution Do not use alcohol or alcohol-based cleaning products on the glass or painted parts... selects Print Report and then selects Self-Test Report. Keep fluids away from normal and malfunctioning print cartridges, see the onscreen HP Image Zone Help that came with the tri-color print cartridge in -One 2. If any residual alcohol. User Guide 77 Press 2, then press 6. Note For examples of ...
...a soft cloth or sponge slightly moistened with a damp cloth to remove any of the HP All-in -One prints a self-test report, which might need to replace the print cartridge. The HP All-in -One. Caution Do not use alcohol or alcohol-based cleaning products on the glass or painted parts... selects Print Report and then selects Self-Test Report. Keep fluids away from normal and malfunctioning print cartridges, see the onscreen HP Image Zone Help that came with the tri-color print cartridge in -One 2. If any residual alcohol. User Guide 77 Press 2, then press 6. Note For examples of ...

User Guide
Page 81
... before installing) 3 Ink nozzles under tape Hold the print cartridges by using the HP Image Zone software that came with your HP All-in- 78 HP Officejet 5600 All-in-One series Note You can also use these instructions to replace the black print cartridge with a photo print cartridge for printing high-quality color photos. Tip You can also...
... before installing) 3 Ink nozzles under tape Hold the print cartridges by using the HP Image Zone software that came with your HP All-in- 78 HP Officejet 5600 All-in-One series Note You can also use these instructions to replace the black print cartridge with a photo print cartridge for printing high-quality color photos. Tip You can also...
User Guide
Page 82
...the prompts to select your product, and then click one of the HP All-in -One will not release the cartridges for your HP All-in -One, go to release it forward. If you are replacing the tri-color print cartridge, remove the print cartridge from the slot on . User Guide 79 Wait ... the print-carriage access door by pulling it . Maintain your HP All-in -One 3. One. To order print cartridges for changing. Caution If the HP All-in-One is idle and silent, and then lightly press down on a print cartridge to www.hp.com/learn/suresupply. The print carriage moves to the print...
...the prompts to select your product, and then click one of the HP All-in -One will not release the cartridges for your HP All-in -One, go to release it forward. If you are replacing the tri-color print cartridge, remove the print cartridge from the slot on . User Guide 79 Wait ... the print-carriage access door by pulling it . Maintain your HP All-in -One 3. One. To order print cartridges for changing. Caution If the HP All-in-One is idle and silent, and then lightly press down on a print cartridge to www.hp.com/learn/suresupply. The print carriage moves to the print...

User Guide
Page 83
... be removed before installing) 3 Ink nozzles under tape 80 HP Officejet 5600 All-in -One 1 Print cartridge slot for the tri-color print cartridge 2 Print cartridge slot for the black and photo print cartridges 4. If you are removing the black print cartridge in order to the following website: www.hp.com/hpinfo/globalcitizenship/environment/recycle/inkjet.html 6. For more information...
... be removed before installing) 3 Ink nozzles under tape 80 HP Officejet 5600 All-in -One 1 Print cartridge slot for the tri-color print cartridge 2 Print cartridge slot for the black and photo print cartridges 4. If you are removing the black print cartridge in order to the following website: www.hp.com/hpinfo/globalcitizenship/environment/recycle/inkjet.html 6. For more information...

User Guide
Page 84
...the left slot. Close the print-carriage access door. If you are installing the tri-color print cartridge, slide it into the socket. If you print and copy with your HP All-in clogs, ink failure, and bad electrical connections. 7. Caution Do not touch the copper-...colored contacts or ink nozzles. Use a photo print cartridge You can result in -One 8. Maintain your HP All-inOne by purchasing a photo print cartridge. Remove the black print cartridge and insert User Guide 81 Touching these parts can optimize the quality of the print...
...the left slot. Close the print-carriage access door. If you are installing the tri-color print cartridge, slide it into the socket. If you print and copy with your HP All-in clogs, ink failure, and bad electrical connections. 7. Caution Do not touch the copper-...colored contacts or ink nozzles. Use a photo print cartridge You can result in -One 8. Maintain your HP All-inOne by purchasing a photo print cartridge. Remove the black print cartridge and insert User Guide 81 Touching these parts can optimize the quality of the print...

User Guide
Page 85
... on purchasing a photo print cartridge, see Order print cartridges. ● For more information on replacing print cartridges, see Replace the print cartridges. ● For more information on the top of the print cartridge protector to keep your HP All-in-One came with the intention of the print cartridge protector. 82 HP Officejet 5600 All-in-One series Whenever you remove a print...
... on purchasing a photo print cartridge, see Order print cartridges. ● For more information on replacing print cartridges, see Replace the print cartridges. ● For more information on the top of the print cartridge protector to keep your HP All-in-One came with the intention of the print cartridge protector. 82 HP Officejet 5600 All-in-One series Whenever you remove a print...

User Guide
Page 86
... a print cartridge. Aligning the print cartridges ensures high-quality output. To align the print cartridges from the control panel at any other time 1. Maintain your HP All-in-One Align the print cartridges The HP All-in-One prompts you to align cartridges every time you do not need to realign the print cartridges. The HP All-in -One prints a print cartridge alignment...
... a print cartridge. Aligning the print cartridges ensures high-quality output. To align the print cartridges from the control panel at any other time 1. Maintain your HP All-in-One Align the print cartridges The HP All-in-One prompts you to align cartridges every time you do not need to realign the print cartridges. The HP All-in -One prints a print cartridge alignment...

User Guide
Page 87
... that can damage the print cartridges). 84 HP Officejet 5600 All-in -One prints a page that you clean the print cartridges, try cleaning the print cartridge contacts before replacing the affected print cartridge. For information on cleaning the print cartridge contacts, see Replace the print cartridges. For information on aligning the print cartridges by using the HP Image Zone software that came...
... that can damage the print cartridges). 84 HP Officejet 5600 All-in -One prints a page that you clean the print cartridges, try cleaning the print cartridge contacts before replacing the affected print cartridge. For information on cleaning the print cartridge contacts, see Replace the print cartridges. For information on aligning the print cartridges by using the HP Image Zone software that came...

User Guide
Page 88
... reset the date and time later, when you plug the power cord back in -One and open the print-carriage access door. Do not leave a print cartridge outside the HP All-in -One. Push the print cartridge forward until the print carriage is idle and silent, and then unplug the power cord from it ... 1. You will need to dry for more information, see Clean the area around the ink nozzles. Slide the print cartridge back into the back of the HP All-in -One. Clean only the copper-colored contacts. Turn on cleaning the ink nozzle area, see Set the date and time. These can damage ...
... reset the date and time later, when you plug the power cord back in -One and open the print-carriage access door. Do not leave a print cartridge outside the HP All-in -One. Push the print cartridge forward until the print carriage is idle and silent, and then unplug the power cord from it ... 1. You will need to dry for more information, see Clean the area around the ink nozzles. Slide the print cartridge back into the back of the HP All-in -One. Clean only the copper-colored contacts. Turn on cleaning the ink nozzle area, see Set the date and time. These can damage ...


