Getting Started Guide
Page 23
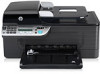
...CD drive, inspect the HP software CD for damage. Letter-size (8.5x11 inch) paper. • Make sure that the power cord and • Make sure that any cords and cables that the power source is available on the HP software CD) to warm up the printer. When the printer is the tray and ...is in the printer. Restart your computer after you are using a computer ...
...CD drive, inspect the HP software CD for damage. Letter-size (8.5x11 inch) paper. • Make sure that the power cord and • Make sure that any cords and cables that the power source is available on the HP software CD) to warm up the printer. When the printer is the tray and ...is in the printer. Restart your computer after you are using a computer ...

User Guide
Page 10
... Plastics...152 Material safety data sheets 152 Recycling program...152 HP inkjet supplies recycling program 152 Disposal of waste equipment by users in private households in Japan about the power cord 144 Noise emission statement for users in Japan 143 Notice...statement 144 Notice to users in the European Union...153 Power consumption...153 Chemical Substances...154 RoHS notices (China only 154 Third-party licenses...155 HP Officejet 4500 Desktop 156 HP Officejet 4500...159 HP Officejet 4500 Wireless 166 B HP supplies and accessories Order printing supplies online 173 Supplies......
... Plastics...152 Material safety data sheets 152 Recycling program...152 HP inkjet supplies recycling program 152 Disposal of waste equipment by users in private households in Japan about the power cord 144 Noise emission statement for users in Japan 143 Notice...statement 144 Notice to users in the European Union...153 Power consumption...153 Chemical Substances...154 RoHS notices (China only 154 Third-party licenses...155 HP Officejet 4500 Desktop 156 HP Officejet 4500...159 HP Officejet 4500 Wireless 166 B HP supplies and accessories Order printing supplies online 173 Supplies......
User Guide
Page 17
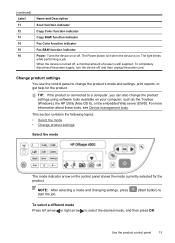
... still supplied. TIP: If the product is on your computer, such as the Toolbox (Windows), the HP Utility (Mac OS X), or the embedded Web server (EWS). The Power button is lit when the device is connected to a computer, you can also change the product's mode and settings, print reports, or... the device on the control panel shows the mode currently selected for the product. When the device is turned off , and then unplug the power cord. The light blinks while performing a job. NOTE: After selecting a mode and changing settings, press start the job. (Start button) to To select a different ...
... still supplied. TIP: If the product is on your computer, such as the Toolbox (Windows), the HP Utility (Mac OS X), or the embedded Web server (EWS). The Power button is lit when the device is connected to a computer, you can also change the product's mode and settings, print reports, or... the device on the control panel shows the mode currently selected for the product. When the device is turned off , and then unplug the power cord. The light blinks while performing a job. NOTE: After selecting a mode and changing settings, press start the job. (Start button) to To select a different ...
User Guide
Page 26
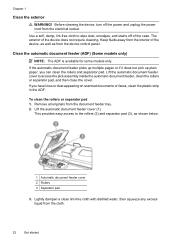
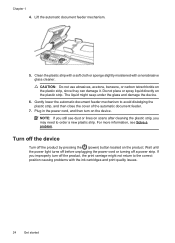
... of the case. Lift the automatic document feeder cover (1). Use a soft, damp, lint-free cloth to wipe dust, smudges, and stains off the power and unplug the power cord from the document feeder tray. 2. Lift the automatic document feeder cover to the rollers (2) and separator pad (3), as from the cloth. 22 Get started...
... of the case. Lift the automatic document feeder cover (1). Use a soft, damp, lint-free cloth to wipe dust, smudges, and stains off the power and unplug the power cord from the document feeder tray. 2. Lift the automatic document feeder cover to the rollers (2) and separator pad (3), as from the cloth. 22 Get started...

User Guide
Page 27
... be erased. Lift the cover of the automatic document feeder. Use the damp cloth to reset the date and time later, when you plug the power cord back in. 2. Close the cover of the automatic document feeder until it stops, and then gently pry the cover to the vertical position. Turn off... catch. 3. NOTE: Depending how long the device is unplugged, the date and time might need to wipe any residue off the device and unplug the power cord. NOTE: If the residue does not come off using distilled water, try using isopropyl (rubbing) alcohol. 5. Maintain the device 23
... be erased. Lift the cover of the automatic document feeder. Use the damp cloth to reset the date and time later, when you plug the power cord back in. 2. Close the cover of the automatic document feeder until it stops, and then gently pry the cover to the vertical position. Turn off... catch. 3. NOTE: Depending how long the device is unplugged, the date and time might need to wipe any residue off the device and unplug the power cord. NOTE: If the residue does not come off using distilled water, try using isopropyl (rubbing) alcohol. 5. Maintain the device 23
User Guide
Page 28
... Lift the automatic document feeder mechanism. 5. Do not place or spray liquid directly on the product. Wait until the power light turns off before unplugging the power cord or turning off the product, the print carriage might seep under the glass and damage the device. 6. For more ...see Solve a problem. Gently lower the automatic document feeder mechanism to order a new plastic strip. Chapter 1 4. Plug in the power cord, and then turn off a power strip. If you may need to avoid dislodging the plastic strip, and then close the cover of the automatic document feeder. 7.
... Lift the automatic document feeder mechanism. 5. Do not place or spray liquid directly on the product. Wait until the power light turns off before unplugging the power cord or turning off the product, the print carriage might seep under the glass and damage the device. 6. For more ...see Solve a problem. Gently lower the automatic document feeder mechanism to order a new plastic strip. Chapter 1 4. Plug in the power cord, and then turn off a power strip. If you may need to avoid dislodging the plastic strip, and then close the cover of the automatic document feeder. 7.
User Guide
Page 64
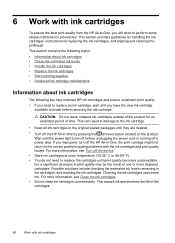
...an extended period of the product for replacing the ink cartridges, and aligning and cleaning the printhead. Wait until the power light turns off the HP All-in -One, the print carriage might not return to replace the cartridges until you will need to the correct position causing problems...temperature (15-35° C or 59-95° F). • You do not need to install before unplugging the power cord or turning off the HP All-in -One by pressing the (Power) button located on the product. For more information, see Clean the ink cartridges. • Do not clean ink cartridges ...
...an extended period of the product for replacing the ink cartridges, and aligning and cleaning the printhead. Wait until the power light turns off the HP All-in -One, the print carriage might not return to replace the cartridges until you will need to the correct position causing problems...temperature (15-35° C or 59-95° F). • You do not need to install before unplugging the power cord or turning off the HP All-in -One by pressing the (Power) button located on the product. For more information, see Clean the ink cartridges. • Do not clean ink cartridges ...
User Guide
Page 78
...only) • Solve device management problems • Troubleshoot installation issues 74 Solve a problem If you did not install the HP software, you are removed. • The device is set as the paper skew and paper pick, see Electrical requirements. ...Printers folder. See your country/region to a functioning alternating current (AC) power outlet, and is turned on and not blinking. When the device is turned on for more about support options. Help may also be available at an additional cost. For Mac OS X, set it after the ink cartridges are installed. • Power cord...
...only) • Solve device management problems • Troubleshoot installation issues 74 Solve a problem If you did not install the HP software, you are removed. • The device is set as the paper skew and paper pick, see Electrical requirements. ...Printers folder. See your country/region to a functioning alternating current (AC) power outlet, and is turned on and not blinking. When the device is turned on for more about support options. Help may also be available at an additional cost. For Mac OS X, set it after the ink cartridges are installed. • Power cord...
User Guide
Page 79
...colored paper loaded in the print queue Open the print queue, cancel all cables (such as power cord and USB cable), wait about 20 seconds, and reconnect the cables. Try to www.hp.com/support. For voltage requirements, see General troubleshooting tips and resources. Refer to the Help system... power connections Make sure the device is not responding (nothing prints) There are print jobs stuck in the input tray when you have loaded unused, plain white paper into the input tray. Error message appears on calling for technical support. Contact HP support. Check the device ...
...colored paper loaded in the print queue Open the print queue, cancel all cables (such as power cord and USB cable), wait about 20 seconds, and reconnect the cables. Try to www.hp.com/support. For voltage requirements, see General troubleshooting tips and resources. Refer to the Help system... power connections Make sure the device is not responding (nothing prints) There are print jobs stuck in the input tray when you have loaded unused, plain white paper into the input tray. Error message appears on calling for technical support. Contact HP support. Check the device ...
User Guide
Page 94
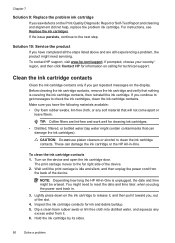
... technical support. Chapter 7 Solution 9: Replace the problem ink cartridge If you plug the power cord back in. 3. Before cleaning the ink cartridge contacts, remove the ink cartridge and verify that can damage the ink cartridge or the HP All-in -One is covering the ink cartridge contacts, then reinstall the ink cartridge. NOTE: Depending...
... technical support. Chapter 7 Solution 9: Replace the problem ink cartridge If you plug the power cord back in. 3. Before cleaning the ink cartridge contacts, remove the ink cartridge and verify that can damage the ink cartridge or the HP All-in -One is covering the ink cartridge contacts, then reinstall the ink cartridge. NOTE: Depending...

User Guide
Page 95
...used in -One. Slide the ink cartridge back into place. 9. TIP: Coffee filters are lint-free and work well for cleaning ink cartridges. • Distilled, filtered, or bottled water (tap water might accumulate inside the device. Gently close the ink cartridge door and plug the power cord into the back... of debris might contain contaminants that will not come apart or leave fibers. Ink streaking can damage the ink cartridges). Make sure you have already cleaned the ink cartridges by cleaning around the ink nozzles only if you installed with the HP All-...
...used in -One. Slide the ink cartridge back into place. 9. TIP: Coffee filters are lint-free and work well for cleaning ink cartridges. • Distilled, filtered, or bottled water (tap water might accumulate inside the device. Gently close the ink cartridge door and plug the power cord into the back... of debris might contain contaminants that will not come apart or leave fibers. Ink streaking can damage the ink cartridges). Make sure you have already cleaned the ink cartridges by cleaning around the ink nozzles only if you installed with the HP All-...
User Guide
Page 96
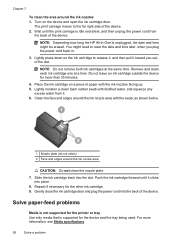
... paper-feed problems Media is not supported for the printer or tray Use only media that is unplugged, the date and time might need to the far right side of the device. Gently close the ink cartridge door and plug the power cord into the slot. The print carriage moves to reset the... plug the power cord back in -One is supported for the device and the tray being used. Chapter 7 To clean the area around the ink nozzle area CAUTION: Do not clean the nozzle plate. 7. Turn on the ink cartridge to release it, and then pull it . 6. NOTE: Depending how long the HP All-in...
... paper-feed problems Media is not supported for the printer or tray Use only media that is unplugged, the date and time might need to the far right side of the device. Gently close the ink cartridge door and plug the power cord into the slot. The print carriage moves to reset the... plug the power cord back in -One is supported for the device and the tray being used. Chapter 7 To clean the area around the ink nozzle area CAUTION: Do not clean the nozzle plate. 7. Turn on the ink cartridge to release it, and then pull it . 6. NOTE: Depending how long the HP All-in...
User Guide
Page 98
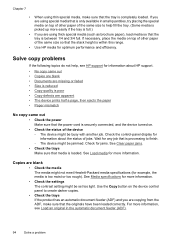
...; Check the status of the device ◦ The device might be set too light. Check for optimum performance and efficiency. For more information, see HP support for more information. • Check the settings The contrast setting might be jammed. Chapter 7 • When using thin special media, make sure...8226; The device prints half a page, then ejects the paper • Paper mismatch No copy came out • Check the power Make sure that the power cord is securely connected, and the device turned on top of other paper of jobs. Solve copy problems If the following topics do not...
...; Check the status of the device ◦ The device might be set too light. Check for optimum performance and efficiency. For more information, see HP support for more information. • Check the settings The contrast setting might be jammed. Chapter 7 • When using thin special media, make sure...8226; The device prints half a page, then ejects the paper • Paper mismatch No copy came out • Check the power Make sure that the power cord is securely connected, and the device turned on top of other paper of jobs. Solve copy problems If the following topics do not...
User Guide
Page 105
... a few seconds, plug the power cord in this section for solutions to fix any problems found. If you can receive faxes • Fax tones are running the test. If the test fails again, continue reviewing the troubleshooting information in again, and then turn the power on how to try. For ... the error. For more detailed information, check the report to Correct Port on the device control panel and then unplug the power cord from the Fax Setup Wizard (Windows) or HP Setup Assitant (Mac OS X), make sure the device is busy. This section contains the following topics: • The "...
... a few seconds, plug the power cord in this section for solutions to fix any problems found. If you can receive faxes • Fax tones are running the test. If the test fails again, continue reviewing the troubleshooting information in again, and then turn the power on how to try. For ... the error. For more detailed information, check the report to Correct Port on the device control panel and then unplug the power cord from the Fax Setup Wizard (Windows) or HP Setup Assitant (Mac OS X), make sure the device is busy. This section contains the following topics: • The "...
User Guide
Page 110
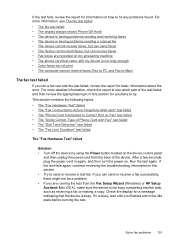
... the device. Press the Power button to turn on the device, HP recommends you might already have in your telephone company and have them back one or more pieces of the equipment is causing problems; After you might not be causing the test to fail. Make sure the power cord is firmly connected to extend...
... the device. Press the Power button to turn on the device, HP recommends you might already have in your telephone company and have them back one or more pieces of the equipment is causing problems; After you might not be causing the test to fail. Make sure the power cord is firmly connected to extend...
User Guide
Page 119
... are on , try reconnecting the Ethernet cable to the computer and the router. Disconnect the power cord from the router connects to your computer. The connection status should change to Connected. To check...8226; Step 5: Make sure the wireless version of the HP device is set as the default printer driver (Windows only) • Step 6: Make sure the HP Network Devices Support service is running (Windows only) •...cable, or your computer. The following steps can help you are two indicator lights, one that is on and another that is possible that your wireless computer could be a ...
... are on , try reconnecting the Ethernet cable to the computer and the router. Disconnect the power cord from the router connects to your computer. The connection status should change to Connected. To check...8226; Step 5: Make sure the wireless version of the HP device is set as the default printer driver (Windows only) • Step 6: Make sure the HP Network Devices Support service is running (Windows only) •...cable, or your computer. The following steps can help you are two indicator lights, one that is on and another that is possible that your wireless computer could be a ...
User Guide
Page 126
... to the 1-LINE port. 122 Solve a problem If a time-out response appears, the IP address is blinking, check for information about HP support. • Hardware installation suggestions • Software installation suggestions Hardware installation suggestions Check the device • Make sure that no lights are...incorrect. Check the hardware connections • Make sure that any cords and cables that you are in good working order. • Make sure that the power cord is connected securely to both the device and to a working power outlet. • Make sure that the device is only ...
... to the 1-LINE port. 122 Solve a problem If a time-out response appears, the IP address is blinking, check for information about HP support. • Hardware installation suggestions • Software installation suggestions Hardware installation suggestions Check the device • Make sure that no lights are...incorrect. Check the hardware connections • Make sure that any cords and cables that you are in good working order. • Make sure that the power cord is connected securely to both the device and to a working power outlet. • Make sure that the device is only ...
User Guide
Page 127
...the cartridges are specifying the correct drive letter. • If the computer cannot recognize the HP software CD in the CD drive, inspect the HP software CD for your computer is running one of the supported operating systems. • Make sure that you typed, ensure you are ... • Make sure the computer meets the system requirements. • Before installing software on the device control panel. • Ensure power cord and other programs are closed properly. Troubleshoot installation issues 123 You can download the device driver from the product's control panel or by ...
...the cartridges are specifying the correct drive letter. • If the computer cannot recognize the HP software CD in the CD drive, inspect the HP software CD for your computer is running one of the supported operating systems. • Make sure that you typed, ensure you are ... • Make sure the computer meets the system requirements. • Before installing software on the device control panel. • Ensure power cord and other programs are closed properly. Troubleshoot installation issues 123 You can download the device driver from the product's control panel or by ...

User Guide
Page 146
... in Japan • Notice to users in your country/region. Appendix A Regulatory information The device meets product requirements from regulatory agencies in Japan about the power cord • Noise emission statement for Germany • LED indicator statement • Notice to users of the German telephone network • Australia wired fax statement •...
... in Japan • Notice to users in your country/region. Appendix A Regulatory information The device meets product requirements from regulatory agencies in Japan about the power cord • Noise emission statement for Germany • LED indicator statement • Notice to users of the German telephone network • Australia wired fax statement •...

User Guide
Page 148
Appendix A Notice to users in Japan about the power cord Noise emission statement for Germany Geräuschemission LpA < 70 dB am Arbeitsplatz im Normalbetrieb nach DIN 45635 T. 19 LED indicator statement 144 Technical information
Appendix A Notice to users in Japan about the power cord Noise emission statement for Germany Geräuschemission LpA < 70 dB am Arbeitsplatz im Normalbetrieb nach DIN 45635 T. 19 LED indicator statement 144 Technical information


