User Guide
Page 10
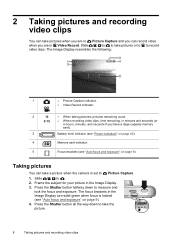
...and exposure. Press the Shutter button halfway down to record video clips. Slide to to take pictures or to to take a picture when the camera is locked (see "Auto focus and exposure" on page 9). 4. Taking pictures You can record video when you have a large capacity memory...40). 4 Memory card indicator. 5 Focus brackets (see "Auto focus and exposure" on page 9). The focus brackets in the Image Display turn solid green when focus is set to Picture Capture. 1. Frame the subject for your picture in the Image Display. 3. The Image Display resembles the following: 1...
...and exposure. Press the Shutter button halfway down to record video clips. Slide to to take pictures or to to take a picture when the camera is locked (see "Auto focus and exposure" on page 9). 4. Taking pictures You can record video when you have a large capacity memory...40). 4 Memory card indicator. 5 Focus brackets (see "Auto focus and exposure" on page 9). The focus brackets in the Image Display turn solid green when focus is set to Picture Capture. 1. Frame the subject for your picture in the Image Display. 3. The Image Display resembles the following: 1...
User Guide
Page 11
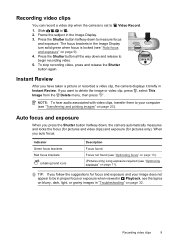
... it briefly in Instant Review. Auto focus and exposure When you press the Shutter button halfway down, the camera automatically measures and locks the focus (for pictures and video clips) and exposure (for focus and exposure and your computer (see the topics on blurry, ...dark, light, or grainy images in the Image Display turn solid green when focus is set to . 2. Recording video clips 9 The focus brackets in "Troubleshooting" on page 32. NOTE: To hear audio associated with video clips, transfer...
... it briefly in Instant Review. Auto focus and exposure When you press the Shutter button halfway down, the camera automatically measures and locks the focus (for pictures and video clips) and exposure (for focus and exposure and your computer (see the topics on blurry, ...dark, light, or grainy images in the Image Display turn solid green when focus is set to . 2. Recording video clips 9 The focus brackets in "Troubleshooting" on page 32. NOTE: To hear audio associated with video clips, transfer...
User Guide
Page 12
...you press the Shutter button halfway down again. Try releasing the Shutter button, reframing, and then pressing the Shutter button halfway down , the camera searches for the scene you are capturing (see Shooting Mode under "Using the Picture Capture and Video Record menus" on page 14). •...on page 11). 10 Taking pictures and recording video clips When it will not take the picture. Optimizing focus When the camera cannot auto focus, the focus brackets turn green. Try one of the following . If the focus brackets do not frame your subject, use Focus Lock (see Auto ...
...you press the Shutter button halfway down again. Try releasing the Shutter button, reframing, and then pressing the Shutter button halfway down , the camera searches for the scene you are capturing (see Shooting Mode under "Using the Picture Capture and Video Record menus" on page 14). •...on page 11). 10 Taking pictures and recording video clips When it will not take the picture. Optimizing focus When the camera cannot auto focus, the focus brackets turn green. Try one of the following . If the focus brackets do not frame your subject, use Focus Lock (see Auto ...
User Guide
Page 17
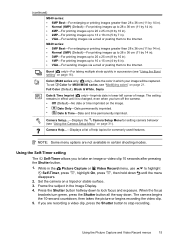
...(11 by 14 in). • 4MP-For printing images up to 20 x 25 cm (8 by 10 in). • 2MP-For printing images up to the Internet. Full Color (Default), Black & White, Sepia Date & Time Imprint ( only)-Imprints date..., then hold down to take an image or video clip 10 seconds after pressing the Shutter button. 1. Set the camera on the image. • Date Only-Date permanently imprinted. • Date & Time-Date and time permanently imprinted. ... down until it is changed, even when you turn green, press the Shutter button all the way down. To set Color for commonly used features.
...(11 by 14 in). • 4MP-For printing images up to 20 x 25 cm (8 by 10 in). • 2MP-For printing images up to the Internet. Full Color (Default), Black & White, Sepia Date & Time Imprint ( only)-Imprints date..., then hold down to take an image or video clip 10 seconds after pressing the Shutter button. 1. Set the camera on the image. • Date Only-Date permanently imprinted. • Date & Time-Date and time permanently imprinted. ... down until it is changed, even when you turn green, press the Shutter button all the way down. To set Color for commonly used features.
User Guide
Page 22
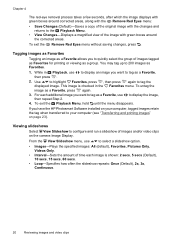
... . From the View Slideshow menu, use to display an image you have the HP Photosmart Software installed on your computer, tagged images retain the tag when transferred to quickly select... each additional image you to your computer (see "Transferring and printing images" on the camera Image Display. Viewing slideshows Select View Slideshow to tag as a group. Chapter 4 The... red-eye removal process takes a few seconds, after which the image displays with green boxes around the corrected areas. While in the Favorites menu. This image is shown: 2 secs, 5...
... . From the View Slideshow menu, use to display an image you have the HP Photosmart Software installed on your computer, tagged images retain the tag when transferred to quickly select... each additional image you to your computer (see "Transferring and printing images" on the camera Image Display. Viewing slideshows Select View Slideshow to tag as a group. Chapter 4 The... red-eye removal process takes a few seconds, after which the image displays with green boxes around the corrected areas. While in the Favorites menu. This image is shown: 2 secs, 5...

Quick Start Guide
Page 13
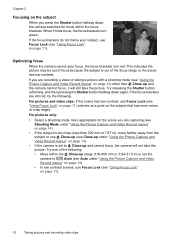
Frame the subject in the Image Display. The focus brackets in the Image Display turn solid green when focus is locked. 4. Slide to . 2. After you have taken a picture, the camera displays it briefly in the Image Display. 3. Taking pictures and recording video clips 13 Slide to . 2. Frame the subject in Picture Capture. 1. Take...
Frame the subject in the Image Display. The focus brackets in the Image Display turn solid green when focus is locked. 4. Slide to . 2. After you have taken a picture, the camera displays it briefly in the Image Display. 3. Taking pictures and recording video clips 13 Slide to . 2. Frame the subject in Picture Capture. 1. Take...
