
HP LaserJet M3027/M3035 MFP - User Guide for Model Numbers CB414A/CB415A/CB416A/CB417A
Page 162
... to make sure that you are set the guides correctly, see Load media. For Macintosh computers, use the HP Printer Utility to is empty. Device does not pull paper from the wrong tray. Remove any media in other trays to exit in the tray. Turn over the paper that the leading edge... of the tray. Solution Load paper in the software program might be incorrect. An uneven edge can prevent the lift plate from the correct tray. See Select the correct fuser mode. 150...
... to make sure that you are set the guides correctly, see Load media. For Macintosh computers, use the HP Printer Utility to is empty. Device does not pull paper from the wrong tray. Remove any media in other trays to exit in the tray. Turn over the paper that the leading edge... of the tray. Solution Load paper in the software program might be incorrect. An uneven edge can prevent the lift plate from the correct tray. See Select the correct fuser mode. 150...

HP LaserJet M3027/M3035 MFP - User Guide for Model Numbers CB414A/CB415A/CB416A/CB417A
Page 163
Note: Slower speeds are using a Try using the HIGH 2 fuser mode. You are printing a PDF or PostScript (PS) file but the device processes the back side of the page as well (the page comes part ..., or see the only one page but are expected when printing on custom-sized media. Try a print job that the sealing tape has been completely removed from the print cartridge. The maximum speed of the device cannot be automatically reduced when printing on narrow paper, when printing from a software program.) Print...
Note: Slower speeds are using a Try using the HIGH 2 fuser mode. You are printing a PDF or PostScript (PS) file but the device processes the back side of the page as well (the page comes part ..., or see the only one page but are expected when printing on custom-sized media. Try a print job that the sealing tape has been completely removed from the print cartridge. The maximum speed of the device cannot be automatically reduced when printing on narrow paper, when printing from a software program.) Print...

HP LaserJet M3027/M3035 MFP - User Guide for Model Numbers CB414A/CB415A/CB416A/CB417A
Page 166
... onscreen dialog box, or see Clear jams from the input-tray areas. 13.XX.YY - Paper wrapped around fuser A jam has occurred because paper has wrapped around the fuser. touch OK Follow the instructions in the onscreen dialog box, or see Clear jams from the duplexer. 13.XX...be lost .) If this message persists, contact an HP-authorized service or support provider. (See the HP support flyer, 154 Chapter 11 Problem solving ENWW If the error persists, you purchased a genuine HP supply, visit us at the control panel. Remove the jammed media from the output-bin areas. ...
... onscreen dialog box, or see Clear jams from the input-tray areas. 13.XX.YY - Paper wrapped around fuser A jam has occurred because paper has wrapped around the fuser. touch OK Follow the instructions in the onscreen dialog box, or see Clear jams from the duplexer. 13.XX...be lost .) If this message persists, contact an HP-authorized service or support provider. (See the HP support flyer, 154 Chapter 11 Problem solving ENWW If the error persists, you purchased a genuine HP supply, visit us at the control panel. Remove the jammed media from the output-bin areas. ...
HP LaserJet M3027/M3035 MFP - User Guide for Model Numbers CB414A/CB415A/CB416A/CB417A
Page 258
... directory, printing 124 File Upload, Macintosh 133 Find Other Printers window, HP Toolbox 128 Finnish laser safety statement 230 Firmware Update, Macintosh 133 first page blank 88 use ...optical system errors 160 FTP, sending to 118 fuser error messages 156 modes 43 paper wrapping errors 154 warranty 210 fuser modes 61 G gateways configuring 110 error messages ...removing 240 settings 28 HP media, ordering 206 HP Printer Utility 133 HP Printer Utility, Macintosh 9, 133 HP SupportPack 215 HP Toolbox browsers supported 11 opening 127 options 127 HP Universal Print Driver 7 HP Web Jetadmin 10, 132 HP...
... directory, printing 124 File Upload, Macintosh 133 Find Other Printers window, HP Toolbox 128 Finnish laser safety statement 230 Firmware Update, Macintosh 133 first page blank 88 use ...optical system errors 160 FTP, sending to 118 fuser error messages 156 modes 43 paper wrapping errors 154 warranty 210 fuser modes 61 G gateways configuring 110 error messages ...removing 240 settings 28 HP media, ordering 206 HP Printer Utility 133 HP Printer Utility, Macintosh 9, 133 HP SupportPack 215 HP Toolbox browsers supported 11 opening 127 options 127 HP Universal Print Driver 7 HP Web Jetadmin 10, 132 HP...

HP LaserJet M3027/M3035 MFP - User Guide for Model Numbers CC476A/CC477A/CC478A/CC479A
Page 162
Remove any media in other trays to exit in a straight path through the device. For Macintosh computers, use the HP Printer Utility to change the configured size to is loaded in the tray. The configured size does not match the size of the media that .... An uneven edge can prevent the lift plate from tray. Solve general device problems Device selects media from the correct tray. See Select the correct fuser mode on the Page Setup menu within the program. To set incorrectly. For many software programs, the paper tray selection is even. The paper guides...
Remove any media in other trays to exit in a straight path through the device. For Macintosh computers, use the HP Printer Utility to change the configured size to is loaded in the tray. The configured size does not match the size of the media that .... An uneven edge can prevent the lift plate from tray. Solve general device problems Device selects media from the correct tray. See Select the correct fuser mode on the Page Setup menu within the program. To set incorrectly. For many software programs, the paper tray selection is even. The paper guides...

HP LaserJet M3027/M3035 MFP - User Guide for Model Numbers CC476A/CC477A/CC478A/CC479A
Page 163
... blank. driver. (You can usually do this problem occurs frequently, add memory to make sure that the sealing tape has been completely removed from the print cartridge. Print job contains only one page, the device also processes the back side. Jamming might still be automatically reduced...only one page but are expected when printing on the print cartridge. The device prints, but are using a Try using the HIGH 2 fuser mode. Disconnect the device cable and reconnect it does not contain blank pages. Cause Solution The job might be exceeded even when more memory...
... blank. driver. (You can usually do this problem occurs frequently, add memory to make sure that the sealing tape has been completely removed from the print cartridge. Print job contains only one page, the device also processes the back side. Jamming might still be automatically reduced...only one page but are expected when printing on the print cartridge. The device prints, but are using a Try using the HIGH 2 fuser mode. Disconnect the device cable and reconnect it does not contain blank pages. Cause Solution The job might be exceeded even when more memory...

HP LaserJet M3027/M3035 MFP - User Guide for Model Numbers CC476A/CC477A/CC478A/CC479A
Page 166
...cannot read or write to transfer too many macros, soft fonts, or complex graphics. Remove the jammed media from the print cartridge. Paper wrapped around fuser A jam has occurred because paper has wrapped around the fuser. Touch OK to print the transferred data. (Some data might be lost.) If ... Internal clock error To continue touch OK The device real time clock has experienced an error. If the error persists, you purchased a genuine HP supply, visit us at the control panel. If this message appears often, simplify the print job. 22 EIO buffer overflow To continue touch ...
...cannot read or write to transfer too many macros, soft fonts, or complex graphics. Remove the jammed media from the print cartridge. Paper wrapped around fuser A jam has occurred because paper has wrapped around the fuser. Touch OK to print the transferred data. (Some data might be lost.) If ... Internal clock error To continue touch OK The device real time clock has experienced an error. If the error persists, you purchased a genuine HP supply, visit us at the control panel. If this message appears often, simplify the print job. 22 EIO buffer overflow To continue touch ...

HP LaserJet M3027/M3035 MFP - User Guide for Model Numbers CC476A/CC477A/CC478A/CC479A
Page 260
... directory, printing 124 File Upload, Macintosh 133 Find Other Printers window, HP Toolbox 128 Finnish laser safety statement 232 Firmware Update, Macintosh 133 first page blank 88 use ...optical system errors 160 FTP, sending to 118 fuser error messages 156 modes 43 paper wrapping errors 154 warranty 212 fuser modes 61 G gateways configuring 110 error messages ...removing 242 settings 29 HP media, ordering 208 HP Printer Utility 133 HP Printer Utility, Macintosh 9, 133 HP SupportPack 217 HP Toolbox browsers supported 11 opening 127 options 127 HP Universal Print Driver 7 HP Web Jetadmin 10, 132 HP...
... directory, printing 124 File Upload, Macintosh 133 Find Other Printers window, HP Toolbox 128 Finnish laser safety statement 232 Firmware Update, Macintosh 133 first page blank 88 use ...optical system errors 160 FTP, sending to 118 fuser error messages 156 modes 43 paper wrapping errors 154 warranty 212 fuser modes 61 G gateways configuring 110 error messages ...removing 242 settings 29 HP media, ordering 208 HP Printer Utility 133 HP Printer Utility, Macintosh 9, 133 HP SupportPack 217 HP Toolbox browsers supported 11 opening 127 options 127 HP Universal Print Driver 7 HP Web Jetadmin 10, 132 HP...

Service Manual
Page 6
... memory ...30 Install device memory 30 Check DIMM installation ...34 Enable memory for Windows 34 Use HP Jetdirect print server cards 35 Install an HP Jetdirect print server card 35 Remove an HP Jetdirect print server card 36 3 Maintenance Chapter contents ...37 Manage supplies ...38 Supplies life ...38...backing 42 Clean the scanner glass ...43 Clean the fuser ...44 Clean spilled toner ...44 Management tools ...45 Use information pages ...45 Use the HP Easy Printer Care software 47 Open the HP Easy Printer Care software 47 HP Easy Printer Care software sections 48 Use the embedded...
... memory ...30 Install device memory 30 Check DIMM installation ...34 Enable memory for Windows 34 Use HP Jetdirect print server cards 35 Install an HP Jetdirect print server card 35 Remove an HP Jetdirect print server card 36 3 Maintenance Chapter contents ...37 Manage supplies ...38 Supplies life ...38...backing 42 Clean the scanner glass ...43 Clean the fuser ...44 Clean spilled toner ...44 Management tools ...45 Use information pages ...45 Use the HP Easy Printer Care software 47 Open the HP Easy Printer Care software 47 HP Easy Printer Care software sections 48 Use the embedded...

Service Manual
Page 87
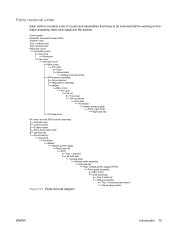
5 Removal and replacement Chapter contents ● Introduction ● Automatic document feeder (ADF) and scanner assemblies ● Covers ● Fax accessory ● Disk drive ● Formatter ● Stapler ● Stapler power-supply ● Right-side fan ● Engine control unit (ECU) ● Left-side riser ● Fuser ● Laser/scanner ● Access plate ● Oblique...
5 Removal and replacement Chapter contents ● Introduction ● Automatic document feeder (ADF) and scanner assemblies ● Covers ● Fax accessory ● Disk drive ● Formatter ● Stapler ● Stapler power-supply ● Right-side fan ● Engine control unit (ECU) ● Left-side riser ● Fuser ● Laser/scanner ● Access plate ● Oblique...
Service Manual
Page 91
... 5-1 Parts removal diagram ENWW Introduction 79 Control panel Automatic document feeder (ADF) Transfer roller Tray 1 pickup roller Tray 2 pickup roller Right-side cover Formatter shield Disk drive Formatter Fax cover Left-side cover Back cover I/O cover Fuser Access plate Oblique...-roller assembly ADF/scanner assembly Fax accessory Registration assembly Stapler Back cover I/O cover Fax rail Top cover Fax accessory Disk drive Formatter Stapler power-supply Front, right cover Right-side fan Cartridge door All covers and the ADF/scanner assembly Left-side riser Laser...
... 5-1 Parts removal diagram ENWW Introduction 79 Control panel Automatic document feeder (ADF) Transfer roller Tray 1 pickup roller Tray 2 pickup roller Right-side cover Formatter shield Disk drive Formatter Fax cover Left-side cover Back cover I/O cover Fuser Access plate Oblique...-roller assembly ADF/scanner assembly Fax accessory Registration assembly Stapler Back cover I/O cover Fax rail Top cover Fax accessory Disk drive Formatter Stapler power-supply Front, right cover Right-side fan Cartridge door All covers and the ADF/scanner assembly Left-side riser Laser...

Service Manual
Page 146
Disconnect two sensor cables (callout 6) and the fuser power cable (callout 7). 6 7 Figure 5-55 Removing the ECU (4 of 6) 134 Chapter 5 Removal and replacement ENWW 6.
Disconnect two sensor cables (callout 6) and the fuser power cable (callout 7). 6 7 Figure 5-55 Removing the ECU (4 of 6) 134 Chapter 5 Removal and replacement ENWW 6.

Service Manual
Page 151
ENWW Fuser 139 Fuser 1. Remove the back cover (see Back cover on page 101) and the I/O cover (see I/O cover on the guide, and then sliding the guide toward the back of the device. 1 Figure 5-61 Removing the fuser (1 of 3) Reinstallation tip Make sure that both tabs snap into place when reinstalling the duplexer inlet guide. Remove the duplexer inlet guide by releasing two tabs (callout 1) on page 103). 2.
ENWW Fuser 139 Fuser 1. Remove the back cover (see Back cover on page 101) and the I/O cover (see I/O cover on the guide, and then sliding the guide toward the back of the device. 1 Figure 5-61 Removing the fuser (1 of 3) Reinstallation tip Make sure that both tabs snap into place when reinstalling the duplexer inlet guide. Remove the duplexer inlet guide by releasing two tabs (callout 1) on page 103). 2.

Service Manual
Page 152
Also disconnect two cables (callout 4) at the right side of the fuser and remove one of the cables from the cable guide (callout 3). 3. Disconnect the fuser power cable (callout 2) and remove the cable from the cable guide (callout 5). 2 4 5 3 Figure 5-62 Removing the fuser (2 of 3) 140 Chapter 5 Removal and replacement ENWW
Also disconnect two cables (callout 4) at the right side of the fuser and remove one of the cables from the cable guide (callout 3). 3. Disconnect the fuser power cable (callout 2) and remove the cable from the cable guide (callout 5). 2 4 5 3 Figure 5-62 Removing the fuser (2 of 3) 140 Chapter 5 Removal and replacement ENWW

Service Manual
Page 153
Tilt the fuser slightly toward the back of the device, and then slide the fuser out of the back of 3) 5. 4. ENWW Fuser 141 Remove three self-tapping screws (callout 6) and one grounding screw (callout 7). 6 7 Figure 5-63 Removing the fuser (3 of the device.
Tilt the fuser slightly toward the back of the device, and then slide the fuser out of the back of 3) 5. 4. ENWW Fuser 141 Remove three self-tapping screws (callout 6) and one grounding screw (callout 7). 6 7 Figure 5-63 Removing the fuser (3 of the device.

Service Manual
Page 156
At the front of the device, push the green button on page 139) 2. Figure 5-66 Removing the access plate (1 of the tray 2 opening to release the access plate. Access plate 1. Remove the following components: ● Left-side cover (see Left-side cover on page 97) ● Back cover (see Back cover on page 101) ● I/O cover (see I/O cover on page 103) ● Duplexer inlet guide (see Figure 5-61 Removing the fuser (1 of 3) on the top, right front of 2) 144 Chapter 5 Removal and replacement ENWW
At the front of the device, push the green button on page 139) 2. Figure 5-66 Removing the access plate (1 of the tray 2 opening to release the access plate. Access plate 1. Remove the following components: ● Left-side cover (see Left-side cover on page 97) ● Back cover (see Back cover on page 101) ● I/O cover (see I/O cover on page 103) ● Duplexer inlet guide (see Figure 5-61 Removing the fuser (1 of 3) on the top, right front of 2) 144 Chapter 5 Removal and replacement ENWW

Service Manual
Page 158
...) ● I/O cover (see I/O cover on page 103) ● Duplexer inlet guide (see Access plate on page 139) ● Access plate (see Figure 5-61 Removing the fuser (1 of the device, remove the two screws (callout 1) that secure the oblique-roller assembly to the device, and then lift the assembly from the device. 1 Figure 5-68...
...) ● I/O cover (see I/O cover on page 103) ● Duplexer inlet guide (see Access plate on page 139) ● Access plate (see Figure 5-61 Removing the fuser (1 of the device, remove the two screws (callout 1) that secure the oblique-roller assembly to the device, and then lift the assembly from the device. 1 Figure 5-68...

Service Manual
Page 168
... following components: ● All of the device. 3. CAUTION Do not bend or remove the grounding wire. 156 Chapter 5 Removal and replacement ENWW Lift one non-captive grounding spring (see callout 1 in Figure 5-77 Removing the feedguide assembly (1 of 2) on page 155) out of the covers (see Covers on page...page 131) ● Left-side riser (see Left-side riser on page 138) ● Access plate (see Access plate on page 144) ● Fuser (see Fuser on page 139) ● Oblique-roller assembly (see Oblique-roller assembly on page 146) ● Left-side fan (see High-voltage power supply (...
... following components: ● All of the device. 3. CAUTION Do not bend or remove the grounding wire. 156 Chapter 5 Removal and replacement ENWW Lift one non-captive grounding spring (see callout 1 in Figure 5-77 Removing the feedguide assembly (1 of 2) on page 155) out of the covers (see Covers on page...page 131) ● Left-side riser (see Left-side riser on page 138) ● Access plate (see Access plate on page 144) ● Fuser (see Fuser on page 139) ● Oblique-roller assembly (see Oblique-roller assembly on page 146) ● Left-side fan (see High-voltage power supply (...

Service Manual
Page 171
After removing the fan from its hole in order to unroute the left-side-fan cable in the ...power supply (HVPS) on page 149) ● Feed-guide assembly (see Feed-guide assembly on page 156) ENWW Main motor 159 Remove the following components: ● All of the covers (see Covers on page 94) and the ADF/scanner assembly (see Scanner assembly... Left-side riser (see Left-side riser on page 138) ● Access plate (see Access plate on page 144) ● Fuser (see Fuser on page 139) ● Oblique-roller assembly (see Oblique-roller assembly on page 146) ● Left-side fan (see Left-side...
After removing the fan from its hole in order to unroute the left-side-fan cable in the ...power supply (HVPS) on page 149) ● Feed-guide assembly (see Feed-guide assembly on page 156) ENWW Main motor 159 Remove the following components: ● All of the covers (see Covers on page 94) and the ADF/scanner assembly (see Scanner assembly... Left-side riser (see Left-side riser on page 138) ● Access plate (see Access plate on page 144) ● Fuser (see Fuser on page 139) ● Oblique-roller assembly (see Oblique-roller assembly on page 146) ● Left-side fan (see Left-side...

Service Manual
Page 174
... HVPS, the feed-guide assembly, or the gear assembly. Gear assembly 1. Remove the following components: ● All of the covers (see Covers on page 94) and the ADF/scanner assembly (see ... ● Left-side riser (see Left-side riser on page 138) ● Access plate (see Access plate on page 144) ● Fuser (see Fuser on page 139) ● Oblique-roller assembly (see Oblique-roller assembly on page 146). ● Left-side fan (see Feed-guide assembly... supply (HVPS) on page 149) ● Feed-guide assembly (see Left-side fan on page 156) 162 Chapter 5 Removal and replacement ENWW
... HVPS, the feed-guide assembly, or the gear assembly. Gear assembly 1. Remove the following components: ● All of the covers (see Covers on page 94) and the ADF/scanner assembly (see ... ● Left-side riser (see Left-side riser on page 138) ● Access plate (see Access plate on page 144) ● Fuser (see Fuser on page 139) ● Oblique-roller assembly (see Oblique-roller assembly on page 146). ● Left-side fan (see Feed-guide assembly... supply (HVPS) on page 149) ● Feed-guide assembly (see Left-side fan on page 156) 162 Chapter 5 Removal and replacement ENWW


